by successfulbob | black & white, landscape photography, photography, photography gear
Long Exposure Photography
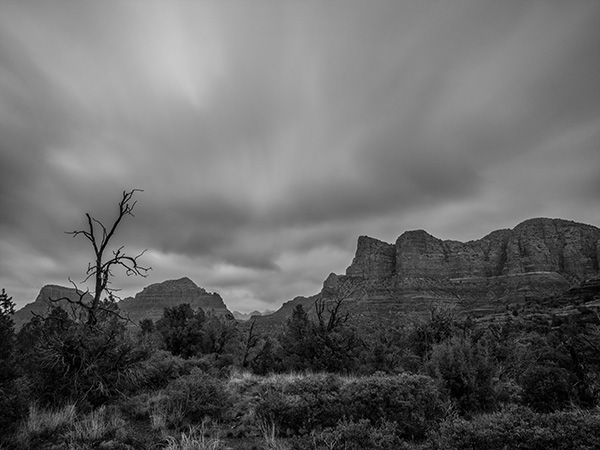
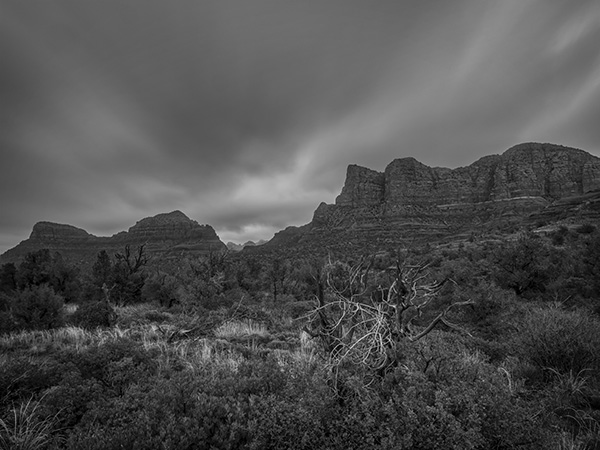
Photographing for extended periods of time can add a whole different dimension to your photography. I consider any exposure over ten seconds to be in the long exposure category. When you have the shutter open for an extended time you begin to record movement which can lead to unique captures of time. Clouds blur through a scene. Light also renders a slightly different dimension on still objects. We all have seen the results of water captured over time.
There are occasions when even with a small aperture and low ISO we can’t get the time we would like to try these creative looks. Enter the neutral density filter. With one or more neutral density filters the creative possibilities are extended. I’m working with Tiffen ND filters (landscape/seascape kit) ** and trying the extremely dark filters. I have a three stop and a ten stop filter. These can be stacked for even more density if necessary.
Here are a couple images made with the ten stop filter in place. It is almost impossible to see through a filter this dark so my process is to pull focus and take note of the exposure reading without the filter attached. Then place the filter on the camera. In this case, the exposure was between two and four minutes. My camera will only go to sixty seconds. It also has a bulb setting but that would mean touching the camera to activate and deactivate the shutter. There’s a better way.
 I haven’t achieved the exact look I’d like but I’m looking forward to the experimentation.
Clouds go soft with movement over the time exposure.
If you haven’t heard of the Pluto Trigger *** and its app you are missing out on many possible controls that can be added to your camera. As long as you have a remote port on your camera it can work for you. For this example, there is a conversion table for the extended time needed for long exposure ND photography. The trigger asks what the shutter speed is for an exposure without the ND filter in place. You input the shutter speed and let the app know what ND filter(s) you add and it calculates the proper exposure. Push the button on the app and the camera shutter is opened for the needed duration and then closed. Very cool!
** The Tiffen Long Exposure Kit
Tiffen Pro100 Series Camera Filter Holder
77mm & 82mm Adapting Rings
Tiffen ND 1.2 (4 Stop)
Tiffen IRND 3.0 (10 Stop)
Tiffen’s Pro 100 Series Filter System
The sleek and innovative design of our camera filter holder enables you to use up to two Tiffen Award Winning 4mm thick glass Motion Picture/Television filters at once, giving you the opportunity to create images like never before.
- Extremely durable Aluminum Frame equipped with rubberized grips, allowing for a secure fit for 4X4 and 4X5.650 filters
- Holds up to two, 4mm thick filters
- Fully rotatable adapting ring
- Edge sealed to prevent light leaks*
- Works with adapting rings from 49mm-82mm
* Felt lining included to prevent light leaks (for long exposure photography
*** There are about 24 extra things you can do with your camera when using the
Pluto Trigger including lightning, sound, infrared, water droplet (with optional valve), extended HDR, time-lapse and much more!
I’m looking forward to exploring this long exposure photography more in the future!!
Yours in Creative Photography, Bob
Save
by successfulbob | architectural photography, black & white, infrared photography, Lumix G6, photo walkabout, photography, photography creativity, photography gear
Wandering – Scottsdale, Arizona
Today is the start of a new feature here on the Successful-Photographer blog. Wandering will have images from a walk around a place with no other objective than to see what images might be gathered. Wandering is a way to keep your eye sharp and experiment with new ideas or test out new gear.
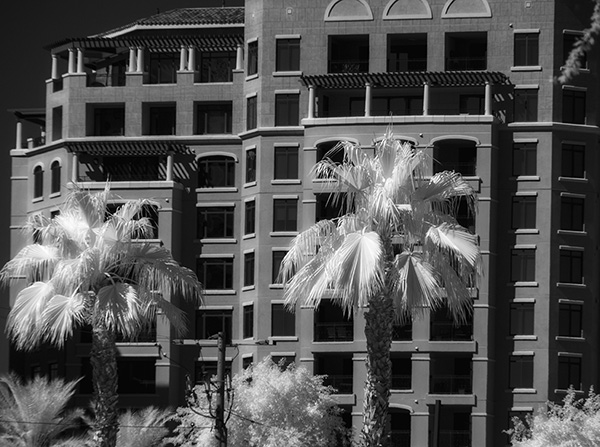
The first stop on the SP wandering tour is Downtown Scottsdale, Arizona. Scottsdale is a high-end community with lots of art galleries and interesting new architecture mixed with buildings built in the ’20’s. I was down in the Valley of the Sun for meetings that started in early morning and stretched into the night with some downtime in the middle of the day. With full sun basting the town I thought it would be fun to put the infrared camera through some paces. For convenience, I mounted the 14-140mm (28-280mm full frame equivalent) on the LifePixel converted IR and set off to see what I could capture.
 Fountain on the central circle.
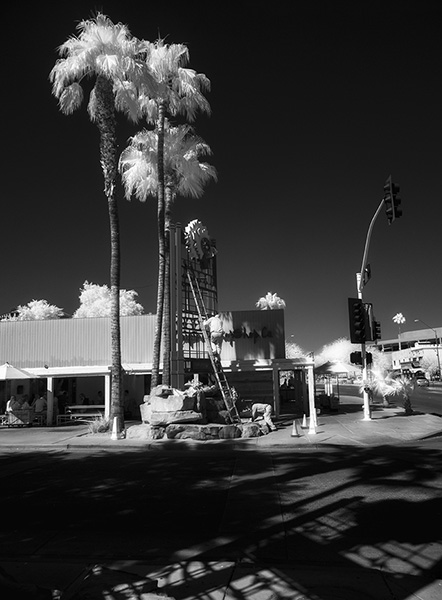 Working on the sign under the palms.
Glowing palms against the modern architecture.
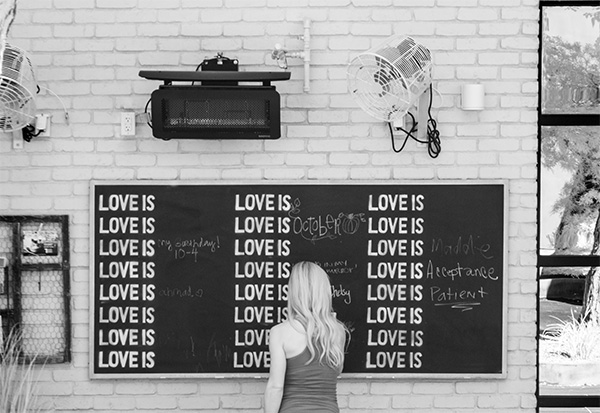 ‘Love is…’ bulletin-blackboard outside a restaurant. Even though there was no full sun the infrared capture renders this scene with lots of contrast.
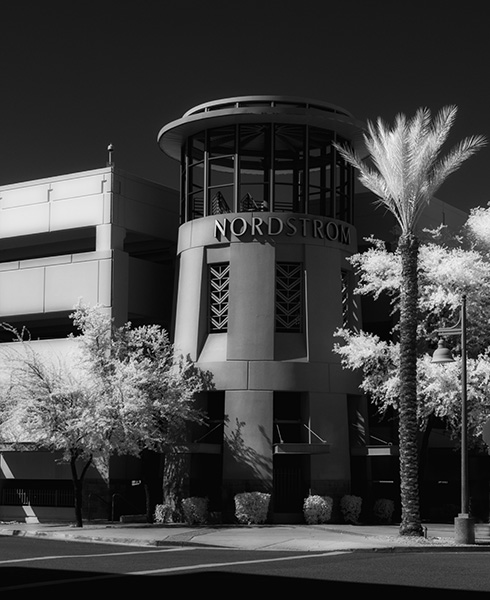 Nordstroms tower architectural detail.
Always having a camera with you allows you to take downtime and turn it into a learning experience. With the light weight and quality of the micro four thirds cameras, it’s easier than ever to always have a reliable capture device with you.
It’s a great time to be a photographic artist.
Yours in creative Photography, Bob
by successfulbob | black & white, cloud photography, infrared photography, Lumix G6, Lumix Lounge
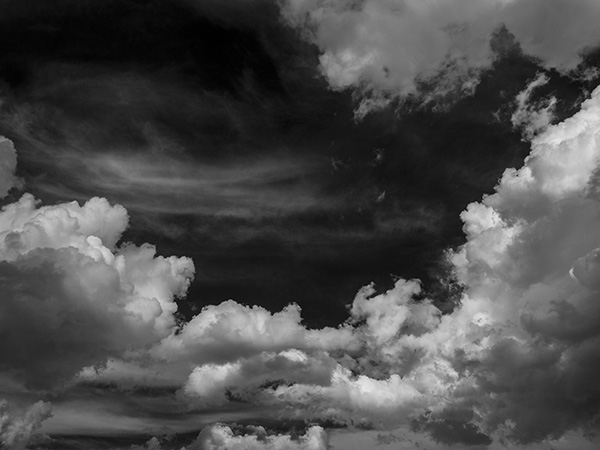
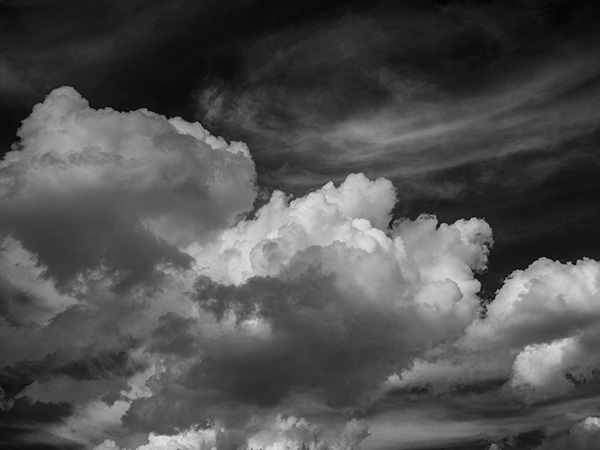
Infrared Cloud Images
I enjoy the high-contrast look of clouds when photographed in infrared. I use a Lumix G6 with the filter changed out to infrared by LifePixel.
Processed in Adobe Camera RAW
Clouds can have lots of personality when paired with an infrared capture. The high contrast can be a lot of fun. I’m starting to collect IR cloud images just as I have for my regular work. Having a library of clouds can help add interest to art photo composites.
 These were taken in Sedona.
I was cooking dinner and looked out of the window and saw the clouds starting to march through the area. They only showed this kind of depth for a few minutes. If you see cloud formations happening, take it ASAP. Usually, if you wait a little bit, or drive down the road a little ways you won’t get what you were looking for as clouds are an ever changing kaleidoscope of shape and form.
Yours in creative Photography, Bob
Save
Save
by successfulbob | black & white, cloud photography, infrared photography, landscape photography, Lumix G6, Lumix Lounge
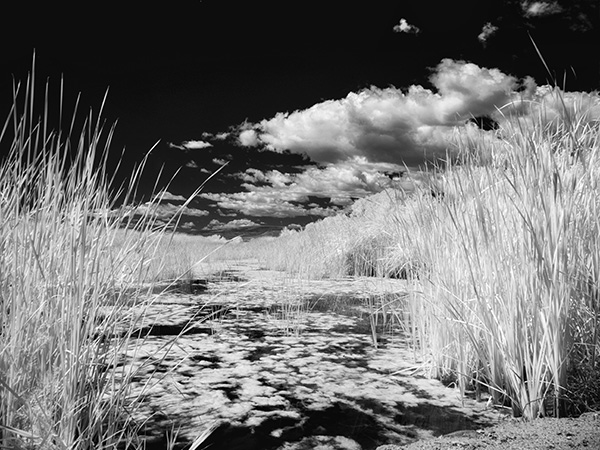
Infrared Image Wetlands Near Sedona, Arizona
The Lumix G6 is coming in very handy now that it is converted over to infrared capture by LifePixel. Midday is not the best time in the world for catching beautiful photos with standard color capture. But move to infrared and the middle of the day is a whole new world.
I was out scouting some new areas to photograph with wildlife and really didn’t think I would be capturing any images but I had the new Lumix GX85 and the 100-300mm lens and had some fun there in spite of the time of day. (check the post here) And I also had the G6 in IR. This is one of the advantages to shooting with micro 4/3rds gear. I was able to have all these options with me with no strain when hiking around and scouting. Used to be I would leave gear behind until I was absolutely certain I wanted to make images. Now opportunity abounds and I’m having more fun and getting more images.
Sedona Wetlands (learn more about them here). Designed land to help with the processing of wastewater while creating habitat for wildlife. There are quite a number of species taking advantage of the new ‘watering holes’!
I’ve started to narrow down my processing of infrared images. I have bee taking the RAW file and lowering the color and tint sliders to 0. Dialing in highlight and shadow to taste. A pinch of Clarity. Add some black. Add some white. Then tweak the contrast. Open the image and take it to NIK Color FX Pro 4 for a little Glamour Glow and we are looking pretty good. Once I am pretty certain this is the processing path I want to take I’ll set up a preset in ACR which will dial in all the goodies to get me close then tweak. When I set that up I’ll share it here on the Successful-Photographer blog. You can see a bit more in-depth info on this IR conversion in this post on LifePixel.
Yours in Creative Photography, Bob

by successfulbob | bird photography, black & white, fine art photography, imaging competition, photography, photography competition, photography creativity, wildlife photography
International Photographic Competition – Part 4
Change is in the air!
Due to a change in this year’s judging procedure, I can share my Loan Collection images from the International Photographic Competition (IPC) put on by Professional Photographers of America (PPA). The PPA Loan Collection is judged after a picture has earned a Merit, which is defined as an above average image by an above average photographer. Loan Collection images are considered among the ‘Best of the Best.’
And here we go. I’ll comment under each image for what I was trying to accomplish.
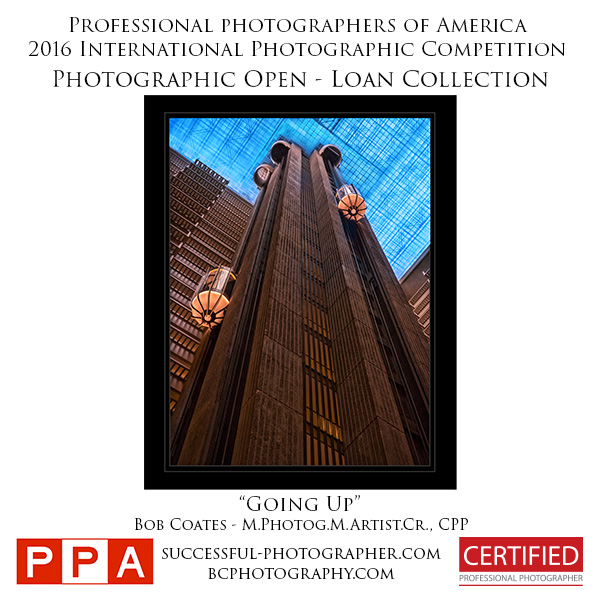 “Going Up” – A study in perspective. Trying to make an everyday object into an art piece. I do this in practice for my commercial and architectural clients.
“Dance of the Snowy Egret” – This was me on vacation. I was studying this snowy egret tracking down its meals in the marsh. I noticed some patterns as I watched its behavior. This image began to form in my head. The Master Artist category is judged on the final output. Also, the difficulty and expertise in applying the techniques is a major part of whether an image is accepted.
 “Shape Form Tone” – Made in Atlanta while I was a PPA headquarters for a meeting. We were on break, and I had brought a camera with me and saw this view out the window. Again, working on perfecting my craft by creating depth and dimension in my work.
 “Iris” – This was a design I created for a silk scarf. (my clothing designs are available at SHOP VIDA) Depth and dimension are critical to adding life to a two-dimensional surface. Shadows are essential in making that happen.
There you have it. My photographic and design work in the 2016 PPA Loan Collection as judged by Professional Photographers of America.
Yours in Creative Photography, Bob
by successfulbob | black & white, infrared photography, landscape photography, people photography, photography education
Infrared Photography – Some Members
of Infamous Mopar AZ Chapter Car Club in Sedona
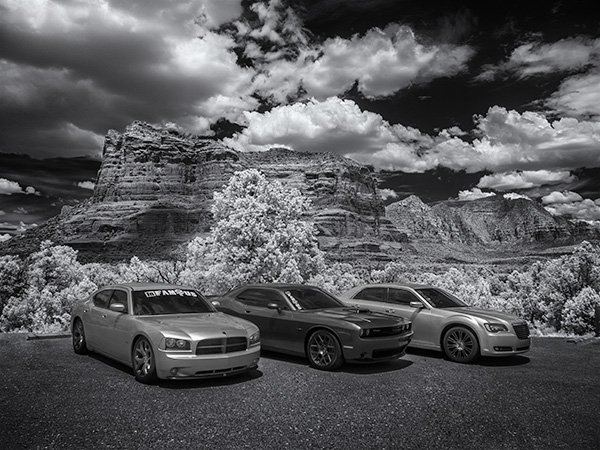
You never know who you might run into when you are out photographing clouds. While I was catching some infrared photos at Bell Rock Vista in the Village of Oak Creek in Sedona, three pretty cool cars started backing into spaces right behind me. When I realized they were lining up to take photos of their cars I moved out of their frame.
We started to chat, and it turns out we have a lot in common. They are members of the Infamous AZ Chapter Mopar Car Club, and I once had a cat I named Mopar because of the way she purred. OK, I have a weird sense of humor, but you get used to it I think. I believe all people are connected in one way or another.
Since the cars were lined up, I captured some photos with my infrared set-up. (see this post on processing infrared files from this session)
Here are a couple of captures.
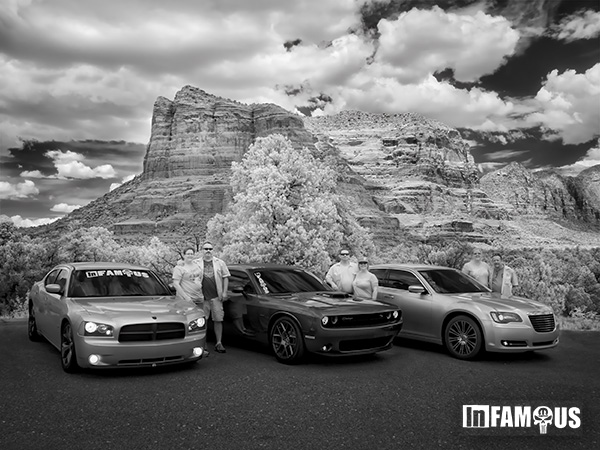 Three couples from the INfamous Mopar AZ Chapter
The three couples I met while photographing with my infrared Lumix G6 camera at Bell Rock Vista. This image was processed in the same way as was described in the other post.
Cars from the Infamous Mopar Car Club AZ Chapter in front of Courthouse Butte in the VOC, Sedona
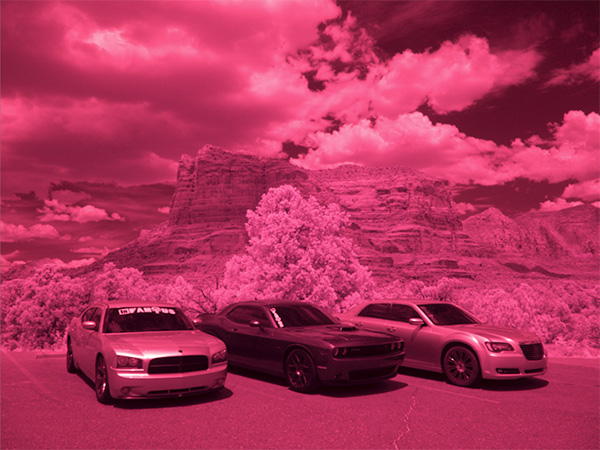 Straight out of Camera (SOOC)
This image was processed in a different manner from the on above. I started with the RAW file. In infrared converted cameras, the RAW image will have a severe magenta cast.
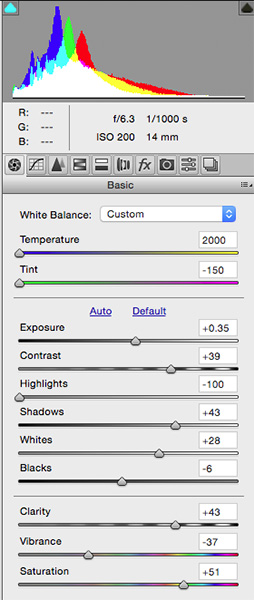 ACR Palette with settings
First stop was into Adobe Camera RAW for initial processing. Settings were to move the Temperature Slider all the way to Blue. The Tint Slider all the way to Green. Exposure boosted 1/3 stop. Contrast increased. Highlights were lowered, and Shadows raised. Whites bumped up a bit, and Blacks brought down. A small amount of Clarity was added, and Vibrance was lowered. 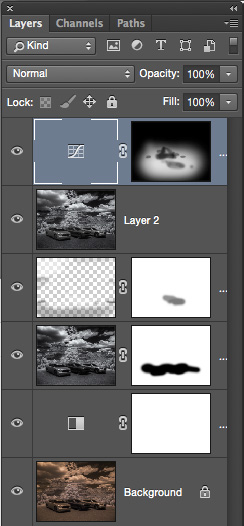
Adobe Photoshop Layers Palette
The Background Layer shows how the image comes out of Adobe Camera RAW with the processing shown. It is quite a Sepia tone which cold be OK but not the look for which I was going Above that is a Black & White Adjustment Layer. Next up, is the Layer generated by a trip to NIK Silver FX Pro 2. (available free of charge from Google) It created the full black & white conversion. I added some structure, grain, and controlled the intensity of the black and white. There’s a Layer Mask to allow some of the original image to show through without the processing from NIK. Above that is a Layer in Soft Light Mode for dodging and burning. The top Layer is a Curves Layer to allow some selective lightening of the image to bring some extra attention to the cars.
I think these infrared images would look great printed on metal.
Yours in Creative Photography, Bob
Save
Save

