by successfulbob | bird photography, Lumix G9, LumixGH5, photography, photography gear, travel photography, wildlife photography
Festival of the Cranes
Bosque Del Apache National Wildlife Refuge
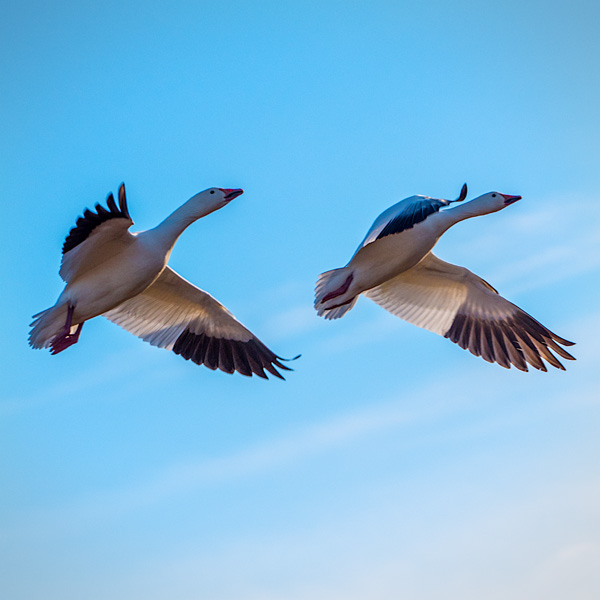
White Snow Geese must have gotten the invitation too.
I was in Socorro, New Mexico at the Festival of the Cranes hanging with the massive flocks of birds and a mass of photographers. Gotta tell you I felt like the Snow Goose whisperer during my workshop. The 10,000-plus Snow geese seemed to be following me around the refuge. Seeing them move as a group and fly mass ascensions from place to place was magical! Here are a few photos to help visually tell the story.
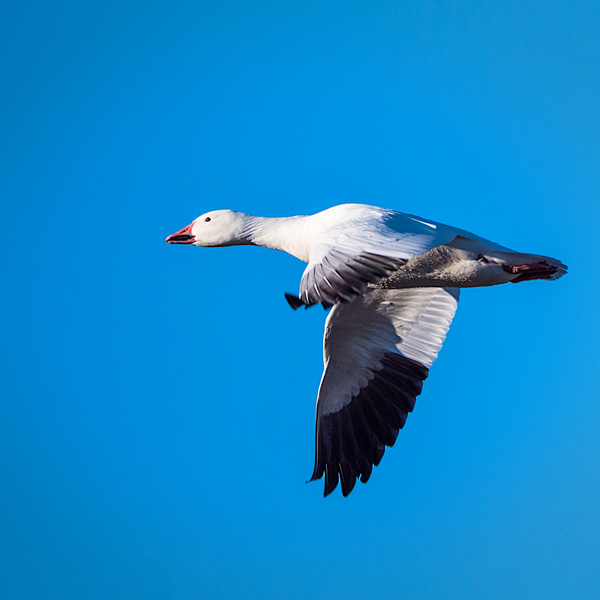 If you look closely, you can see the water droplets on the goose’s body
 A sandhill crane works to land over a pile of snow geese. The guides at the Festival of the Cranes consider the geese interlopers. (And there were about 20,000 plus!)
A pair of snow geese in flight
This trip is my second time at the Bosque Del Apache National Wildlife Preserve, and I certainly hope it won’t be my last. It is a well-managed area with wildlife throughout the year. Each year the cranes and geese return on their annual migration just before Thanksgiving. It is a sight to behold when 20,000 geese take to the air. I’ll share some photos of that spectacle in a day or so. To tell the truth, I stopped making images for a while to experience the display of so many birds in flight, or as my friend, Skip Cohen says, “Take ‘Neurochromes’ and burn the images into your brain.”
Images were made with Panasonic cameras. Most often the LUMIX G Leica DG Vario-Elmar Professional Lens, 100-400MM, F4.0-6.3 ASPH mounted on the Lumix G9 and the Lumix GH5 for a second body. I had the chance to try out the Leica DG Vario-Elamarit 50-200mm 2.8-40 lens I am now lusting after this… A sweet piece of glass!
Have a happy Thanksgiving!
Yours in Creative Photography, Bob
by successfulbob | infrared photography, landscape photography, Lumix G6
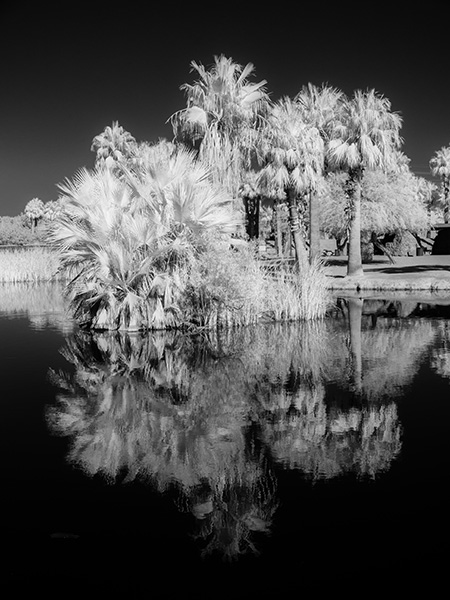
Papago Park, Phoenix Arizona
Infrared Imagery
When the sun is high in the sky, and the contrast makes for images that would be too ‘eh’ for making regular color photos it’s time to break out the infrared camera. Infrared is soooo much more natural to capture with a digitally converted camera with Live View. The Live View allows you to see in real time how the image will look in black and white. This is a massive thing as even to try to focus when we were capturing Infrared photos in the film days your filter had to be so dark that you would need to remove it to focus. AND, there would be an adjustment that you had to apply because IR capture focused on a slightly different plane from your regular focusing.
Enough about the past hassles of IR capture here are a couple of images I made yesterday at Papago Park.
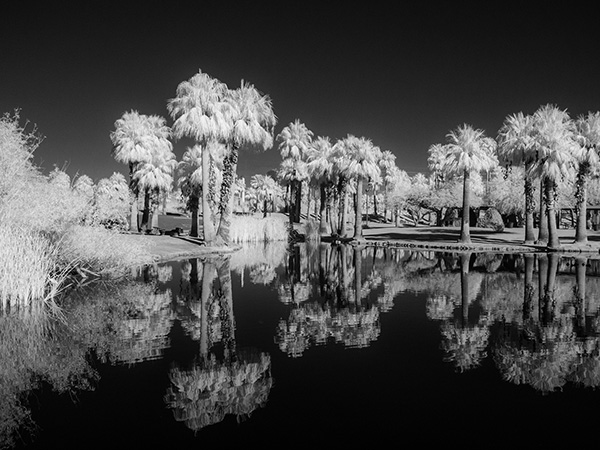 I quite enjoy the high contrast of the water and sky with the light palms
The IR converted camera file initially comes out a magenta file, so it needs some massaging in Adobe Photoshop to be the BW we’ve come to know and love.
Some Notes on How I processed these images
There are lots of convoluted processing possibilities to getting the IR look. In this case, I’m coming up just a wee bit short on the full IR feeling, but I like the results. In Photoshop I remove the color by decreasing the saturation, adding Clarity, opening shadows or highlights. I also adjust the Temperature slider making the blue sky and the water reflecting the blue sky darker.
As a final touch, I use Luminar 2018 as a Plug-in and add an Orton Effect or possibly a Glow depending upon the image feel for which I am going.
Camera is the Lumix G6 (using an older camera collecting dust on your shelf for conversion is fine as long as it has Live View) Conversion done by LifePixel. There are varieties of IR filters you can choose to check out the info here. I have gone with the old standard.
If you have any questions, give me a shout.
Yours in Creative Photography, Bob
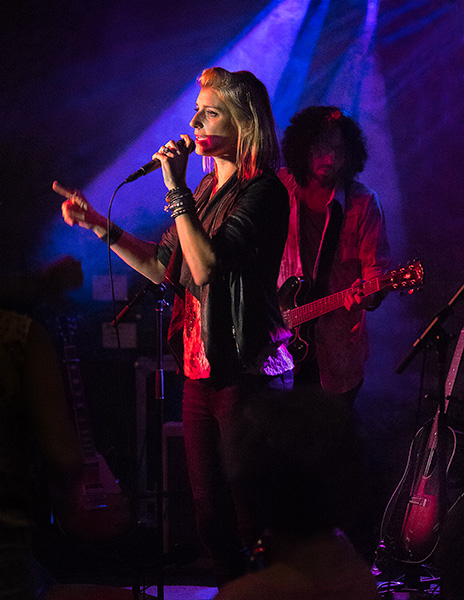
by successfulbob | Lumix G9, musician photography, people photography, photography
Sound Bites Grill Entertainer
Gaelle Buswell
Great Show
First I want to say what a great show it was at Sound Bites Grill in Sedona, AZ. I photograph musicians at this venue on a regular basis, and it’s a great space. Gaelle is from France, and she brought her A game with her for the performance. I look forward to a return engagement should it happen to come this way.
Gaelle Buswell Live on stage at Sound Bites
Photographing a Live Performance
I want to talk to you about capturing images from a live performance. In the studio, you have control of the lighting, posing, and expression of your subject. Not so much when the performers are live on stage. The lighting is what the lighting is, and while it was set for a specific place on stage, the entertainers often are moving in and out of the preset light pattern. Expressions can be all over the place with closed eyes, weird mouth positions, and strange body positions. To get the best captures that are flattering to the subject you need to study the movements of the performer before beginning to photograph. If you do this, you will start to notice what type of body language will happen with certain kinds of songs. When does the performer close their eyes? And better yet when will they be open? Where is the light best? The study will get you more and better images than if you just start firing away.
Processing the Files
Once you have the capture, it’s time to finesse it in post-processing. There are always improvements to be made. Control of the highlight and shadows. Getting the best color for the situation can be a bit of work because of the LED lighting not having a full spectrum. This can give some bizarre color tones on the skin, and even if everything else is excellent, an unflattering skin tone can kill a shot. Many times I will double process an image and combine. One copy is prepared for the background and the other for the skin tones. Using Layer in Photoshop and adding Masks allow complete control.
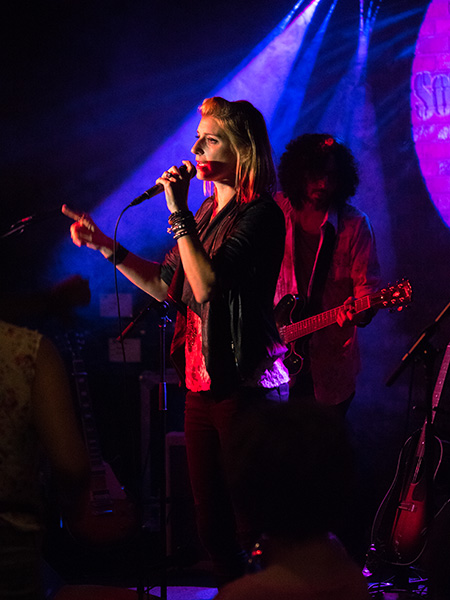 Original image of Gaelle after ACR Process and before tweaks
You can compare the image above with the photo on the top of this post. You will see with a little dodging and burning along with a tiny bit of cloning there are fewer distractions from the performer. Let me know if you can see what the differences are. There are five.
Black and White
I always process out my images to black and white. One is for my clients use in PR situations. Providing BW images will lead to better quality in print, especially newspapers rather than letting the Paper just do a desaturation. The other reason is viewing a black and white image tells you if your tonal values are on because you are not distracted by the color.
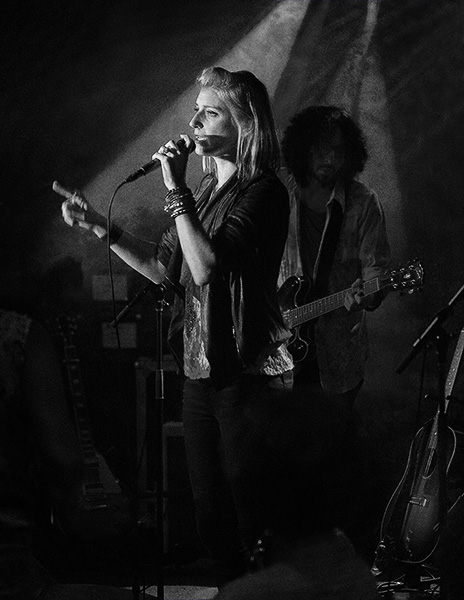 Gaelle in black and white
Camera Gear
As always I am using Lumix Micro 4/3rds camera gear. The camera is Lumix G9 with the LUMIX G X VARIO LENS, 35-100MM, F2.8 ASPH Instead of using the Leica f2.8-4.0 12-60mm when I am shooting in scenes with this much contrast and moving performers I want the speed and control f2.8 of the fixed aperture lens.
Yours in Creative Photography, Bob
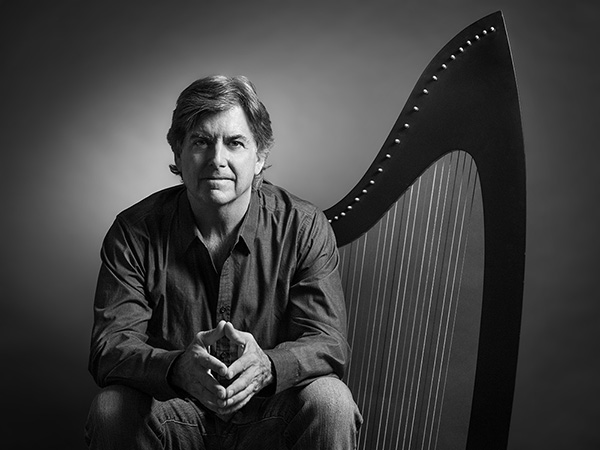
by successfulbob | fine art musician portrait, fine art portrait, lighting, Lumix G9, musician photography, people photography, photographer of musicians, photography, photography gear, photography lighting resources
Studio Photography of a Harp Musician
I enjoy working with creative people. It’s a blast. Creative folks tend to bring an extra little something to the photo session. I was working with Sedona musician Peter Sterling the other day. He had some specific thoughts on the session we were photographing for some headshots and CD cover art.
Once an idea is put forward, then it’s time to tweak the lighting to create the mood and feeling needed. We started with a high key background then went to a low key background with more dramatic lighting.
One of the first images from the session. * setup described below  Harpist Peter Sterling
Above and below are unretouched photos on a high key background. Peter was an excellent subject as he made excellent eye contact with the camera and was easy to get relaxed. He made my job pretty easy!
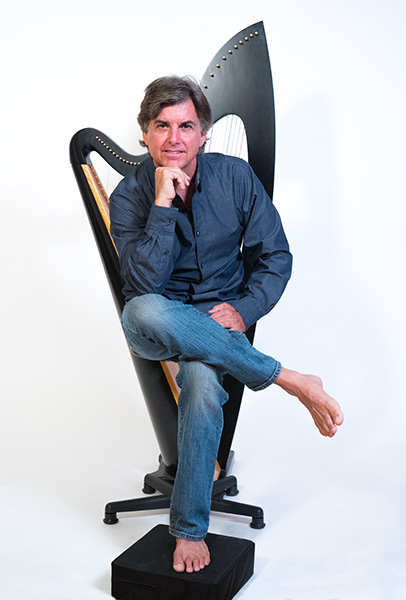 I liked this one as a different look but wasn’t thrilled with the foot pad and stool. I wanted to crop in but it has a very casual feel, and it keeps growing on me.
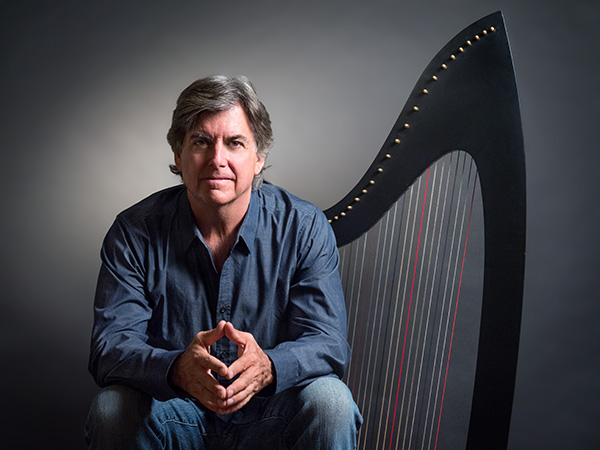 Moved to a black background and worked on a more moody look. Peter asked me to retouch this one, and I like it a lot! ** the setup described below
When I do final retouching for artists, I always include a black and white version. This is often way better than sending off a color image and letting the newspaper or magazine do the conversion.
* White seamless backdrop with a Fiilex 360ex Variable LED light with 24×36 inch softbox as main light (camera right) Camera left another light with a smaller softbox used as fill.
** Black seamless backdrop and lights as above but adjusted for more drama. A 5-inch Fiilex Fresnel attachment was added to another light for the background
Images were captured with the Panasonic Lumix G9 and the Leica DG Vario-Elmarit 12-60mm f2.8-4.0 lens and processed in Adobe Photoshop
Yours in Creative Photography, Bob
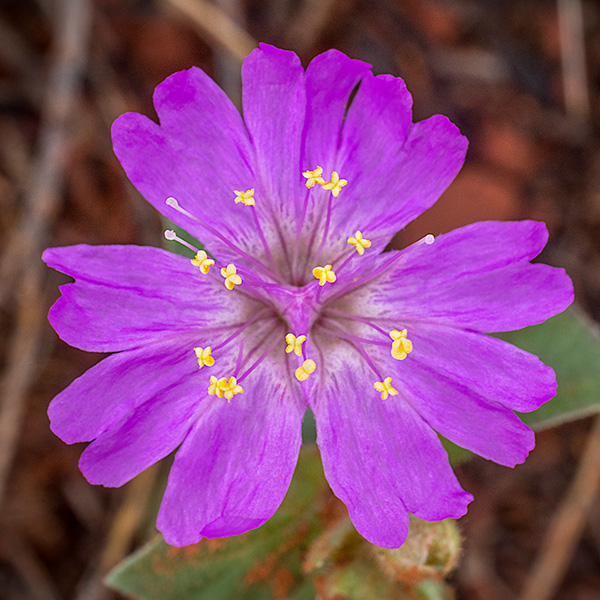
by successfulbob | flower photography, Lumix G9, macro, photography
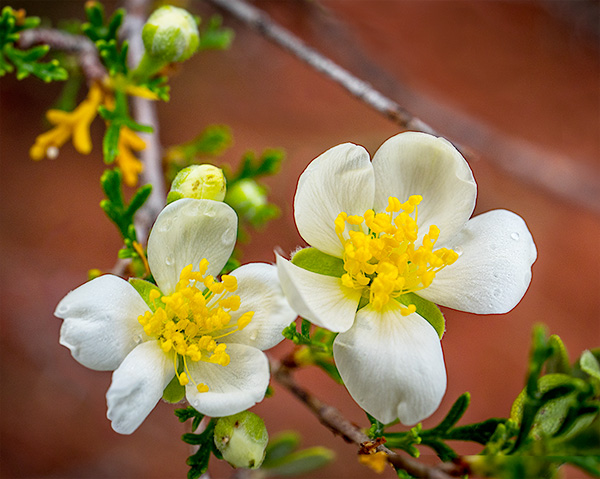
Extension Tube Macro Photography
OK. Extension tubes don’t necessarily equate to macro photography. But, they can let you focus very close, and in some cases, you can replicate macro photography. Getting in close and showing people things that won’t be noticed by the naked eye can get you some excellent images. If you are not officially into macro photography but want to play, extension tubes are the way to go. Let’s call this close-up photography!
A true macro lens can be anywhere from $700 and up new. A set of extension tubes goes from $7 to $229. I don’t recommend going with the absolute cheapest as the builds seem to be a little rough. (I’ve tried) I’ve found a great set of tubes for about fifty bucks. Vello extension tubes are a great cross in build quality to performance. You can see them here. Vello Micro 4/3rds Extension Tubes
Some examples from a recent hike below
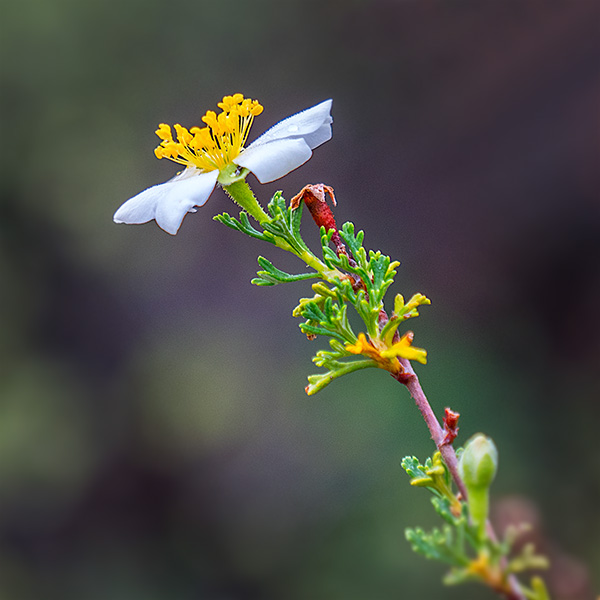 All flowers in this post are smaller than the size of my fingernails. All Images Photographed with the ** Lumix G9 and the 12-60mm Leica DG Vario-Elmarit f2.8-4.0 lens w/ Extension Tubes
Two images blended together to extend the depth of field.
If I were working the flowers, I would be on a tripod and automatically bracket my focus for subsequent stacking in post-production. In this case, I focused on the front flower and then on the back flower bloom and used Photoshop Layers to blend the two by hand with a mask.
 An example of the camera settings. For this image – 1/100th sec F11 ISO 800
If you want to go full macro and you are in the micro four-thirds camera systems, I find some beautiful results with the 45mm Leica DG Macro-Elmarit f2.8 lens. BTW, as this lens is a 90mm (35mm equivalent view), it also makes for a nice head and shoulders portrait lens. Dual use is always a winner in my book!
Yours in Creative Photography, Bob
** Lumix G9 Camera is on special for $200 off regular MSRP (not sure how long this will last)

