I enjoy my long lens for outdoor photography. It’s a beautiful piece of equipment for isolating subjects against a background with nice bokeh. The longer the lens, the easier it is to have an out-of-focus background. The PANASONIC LUMIX G Leica DG Vario-Elmar Professional Lens, 100-400MM, F4.0-6.3 ASPH is a magical lens IMHO.
Here are some images from a walkabout at the Sedona Wetlands. I didn’t find many waterfowl as it was midday and possibly the wrong time of year. In any case, I always try to make the best of any photography situation and started looking for details. There are still some wildflowers scattered throughout. This attracts butterflies, birds, and bees.
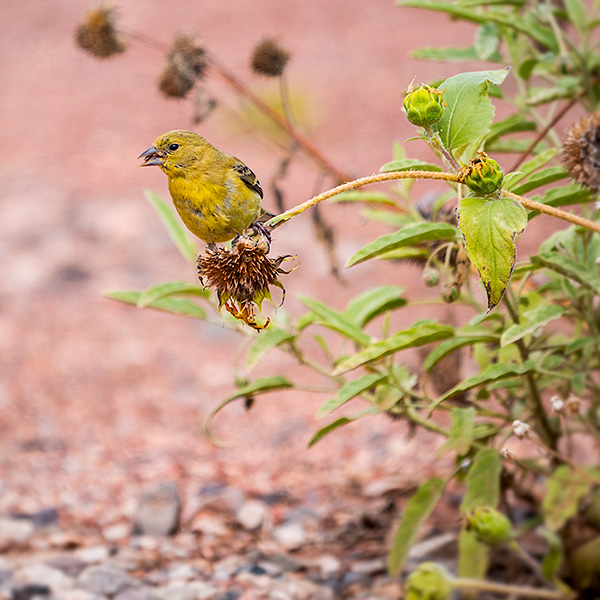
Adult female Lesser Goldfinch snacking on some wildflowers that have gone to seed
I always look to capture ‘behavior’ photos as well as straight portraits of my feathered friends. Here the Lesser Goldfinch is working to get the seeds free from the plant.
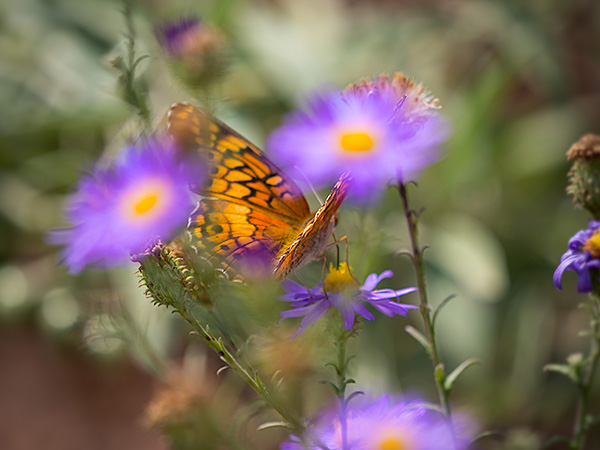
Butterfly caught with shallow depth of field between the plants.
The butterfly photo was my favorite photo of the day. If you’ve chased butterflies in the wild, you know how difficult it can be to get an interesting image. I tracked this one for a while and looked to ‘sandwich’ the butterfly with DOF. I wanted a sharp subject surrounded by the in and out of focus flowers. This was made more difficult as there were not a ton of flowers in bloom and the wind was making the flowers dance as well. Now that I see the image here I’ll crop in a little tighter and loose the past prime flowers on the right-hand side of the photo.
Wasps one of our other pollinators were flitting between the blooms as well as the butterflies.
I choose this one to share as it has a different color with black and white stripes.
Back to the lens. One complaint I hear about the lens is that it is very stiff to zoom. It was designed that way not to suffer ‘lens creep’ when you hang it from your shoulder. I’ve found a perfect way to change the zoom. Instead of trying to turn the lens, hold the lens and turn the camera. It’s like opening a bottle of champagne where you hold the cork and twist the bottle. Makes it easy and you don’t end up with the lens creep!
When paired with the Lumix G9 you get 6 and a half stops of handholdability. All images were handheld in this post.
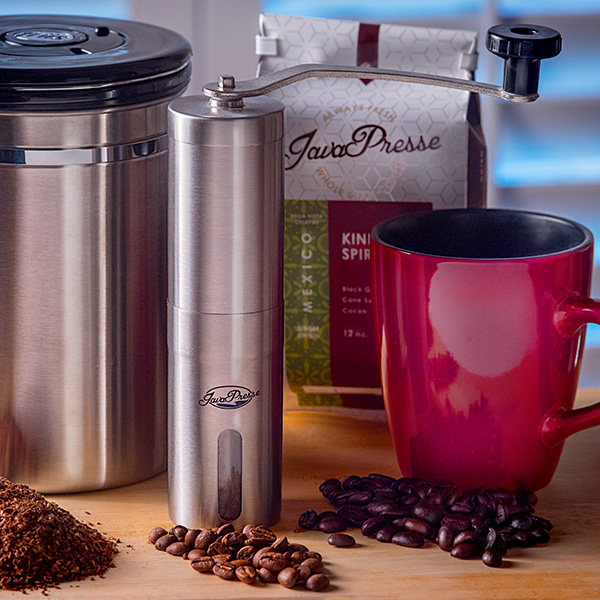
Not quite ‘nectar of the gods’ but I’ve found some serious joy in my morning coffee. It was a gradual process to see the pleasure I now have in the morning ritual and enjoyment of grinding beans, brewing and enjoying coffee.
Java Presse Coffee image square format final crop
It started with some friends showing the benefits of grinding beans for French Press coffee. Good stuff.
I found myself getting frustrated with the ‘static cling’ that was generated by using an electric grinder that had a plastic bin for catching the grounds and left little trails of tiny grounds scattered along the counter. This led to looking for a mill that had a stainless steel basket. Research showed that prices were more than I wanted to pay. Which turned out to be a good thing! Because that led me to the stainless steel coffee grinder from Java Presse.
The grinder led me to lots more information about the whole process of roasting coffee, the freshness of the beans and proper preparation for the French Press that I use. Thanks to Java Presse the entire experience has turned my morning coffee into an enjoyable ritual. And who knew that freshly roasted beans, ground fresh just before brewing could make such a difference.
I’m a coffee convert.
Photography Process
And, now on the photography section of the making of a commercial image of the product. You can see the final photo at the top of the post above. Below is how the photo was built.
Good, solid commercial images should look effortless and clean. It takes a bit more to achieve the look. I make this happen by creating several images with different lighting patterns which are later combined in Adobe Photoshop. This comes in handy for items that have different levels of reflectance such as the stainless steel of the grinder and coffee storage container as well as making sure logos are readable.
Note the harsh light patterns in the metal especially the one crossing through the logo on the grinder
Using a reflector I reshot the scene to give more pleasing light on the stainless steel, but now the reflections that give the image life are gone
See the difference between the two blended images. Logos are a much easier read, and there are highlights right where they are needed without distraction
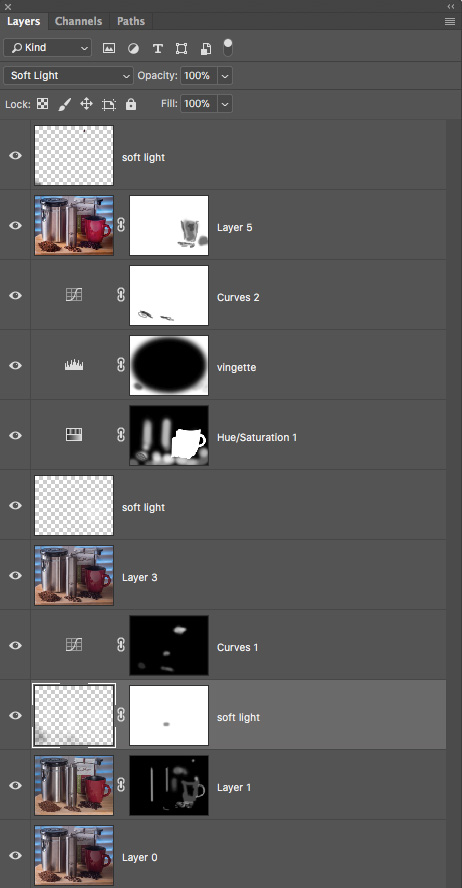
Photoshop Layers Palette is showing some of the work with Masks used to help create the final image.
I also used Skylum software (formerly MacPhun) software called Focus CK. CK stands for Creative Kit. It is a very handy sharpening and blurring tool for directing attention where you want. I often use the ‘Macro’ setting on its layer and mask in what I need.
I have a preference for ocean sounds after having lived in the Caribbean for 20 years but any water sounds are helpful with calming my mind. I spent about an hour on Oak Creek at Cathedral Rock capturing small moments of the creek experience. I took some time this morning editing the footage so that you can enjoy the experience as well.
The video is two minutes long and shows some of the different water patterns along this section of the creek.
I didn’t have myfull video kit with tripod and fluid head for proper zooming and panning. Did the best I could with a tiny little five-inch tripod that I keep with me in my shooting bag for just such an occasion. The occasion being I didn’t want to hike with the full tripod kit. With the light weight of Lumix gear, a small tripod can come in quite handy! The camera was Lumix G9 with the Leica DG Vario-ELMARIT Professional Lens, 12-60MM, F2.8-4.0 Lens. Sound was also recorded from the mic that is built in to the camera. Shot in 4K 24p mode.
I edited the footage with a screen capture program that is for MAC computers called ScreenFlow from TeleStream.
The video was captured in the middle of September when there is some monsoon water flow.
The Making of
Sound Bites Grill Hall of Fame Image
I’ve often been asked how I create the art images for the Sound Bites Grill Hall of Fame. Thought I might share the process here from start to finish.
Finished Hall of Fame image with Gaelle Buswell and her band members
First, I make photos from the show during the live performance. This is a bit easier said than done as performers are moving in and out of the light, have strange expressions when they reach for THAT note, etc. I need to watch and learn as each performer works and then make sure I’ve gotten enough source material on all the band members.
Then it’s time to download all the images and begin the culling process. Lots of images get thrown away on the first pass. Then I’ll go back through to look for the selects. Those are the photos that have the body position, expression and look I am going for in the final art piece.
The individuals are extracted from their photo and placed upon their own layer so effects such as drop shadows and lighting can be applied individually. Then it’s time to start working on combining all the elements of people, texture, drop shadows, color adjustments and more.
Animated Gif of the various Layers
Above is a Gif showing most of the Layers made in Photoshop to give you an idea of how the pieces work together during the build. Below is a screen capture of the Layers Palette in Photoshop.
Layers Palette of the Gaelle Hall of Fame image
I’m thrilled with the dynamic range of the Lumix Micro 4/3rds camera gear. The camera is Lumix G9 Panasonic’s stills flagship model with the LUMIX G X VARIO LENS, 35-100MM, F2.8 ASPH
Ken is a traveling man and uses Lumix gear during his travels. Ken will share some of his travel photography and stories here on Successful-Photographer as he has in the past. Ken’s camera of choice is Panasonic’s flagship stills camera the Lumix G9 with the Leica DG Vario-ELMARIT Professional Lens, 12-60MM, F2.8-4.0
Heeeeere’s Ken!
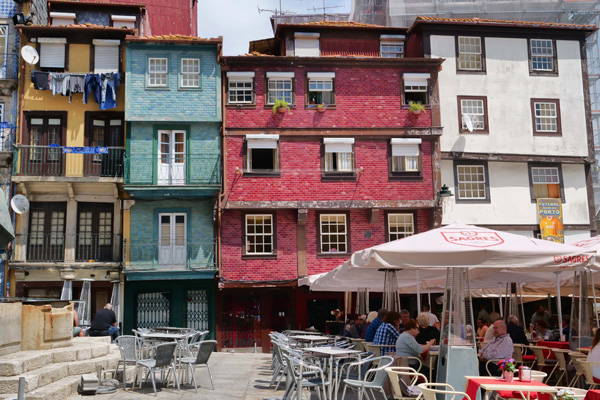
Porto is a coastal city in northwest Portugal known for its port wine and stately bridges. In the medieval riverside Ribeira district, narrow, hilly cobbled streets wind past merchants’ cafes and houses. Close by is the Dom Luis I Bridge, a double deck metal arch bridge that was designed by Gustav Eiffel, the same man who designed Paris’ famous Eiffel Tower. Spanning the River Douro between the cities of Porto and Vila Nova de Gaia, this unique bridge offers great views of the river and city. You can walk across either level of the bridge, but most of the activity takes place on the streets adjoining the lower level, or riverside.
While on the Vila Nova de Gaia city side, or south side of the river, we turned down Avenida Diogo Leite, a street paralleling the River Douro. This street is lined with a multitude of sidewalk cafes, and numerous wine tasting establishments. Settling in at one of the sidewalk cafes, we enjoyed the views of watercraft plying the River Douro, with the hillside city of Porto in the background.
Cafes and housing in the old Riberia district, Porto.
While history tells us it was the Romans – early conquerors of this land – that introduced the first grapevines to this area, it was the Brits who championed port. The significance of the wine producing Douro area dates back hundreds of years. When England was at war with France in the early 1700’s, English merchants began importing wine from this region, for the deprived English wine drinkers of French wines. British importers realized the need for a smooth fortified wine that would not only appeal to English palates but would also survive the trip to London.
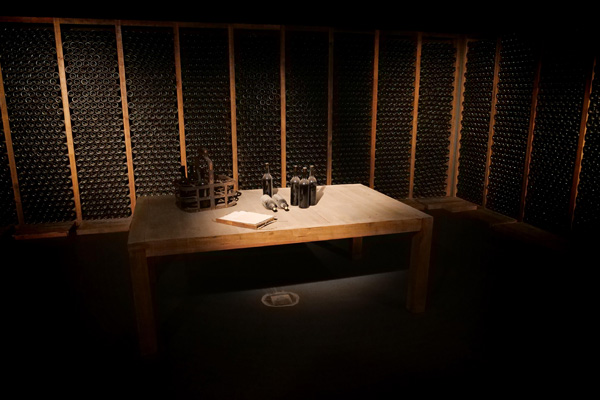
Wine Cellar
Port wine is typically richer, sweeter, and higher in alcohol content than unfortified wines. This is caused by the addition of distilled grape spirits to fortify the wine and halt fermentation before all the sugar is converted to alcohol, and results in a wine that is usually 19% to 20% alcohol. The grapes aren’t grown in Porto itself, but in the region extending inland up the Douro River Valley.
To be continued next Friday. Porto, Portugal – Part Two
Ken MacAdams – “I grew up with a darkroom in my basement…so all the old film skills were my friend when digital came on the scene. Funny thing happened…photography just got more interesting as digital posed new challenges! While I loved the characteristic sounds and smells of the old wet-process darkroom days, I wouldn’t go back!”
Ken has always loved to travel, so when he made a common connection with the fact that either a long day pounding the streets of some foreign city, or shooting the last dance at a wedding, a good part of his physical weariness came from lugging around my big heavy DSLR. That’s when he started looking at alternatives – and ended up selecting Panasonic Lumix Micro Four Thirds gear.
Ken is rarely without a camera, and the next great photo travel experience – whether local or abroad – is always in the back of his mind! A longtime resident of the Four Corners, and when he’s not out on the road, he enjoys some of the great outdoor opportunities found here – mountain biking, hiking, and Jeeping.
For infrared conversion of my cameras I use LifePixel. Infrared allows you to put an older camera to use and opens up a new time time of day for productive image creation.
Fotopro tripods are well worth checking out. You can learn about the ones I use and recommend by clicking on the Fotopro Tripods link at the top of this page. If you want to see what other tripods might fit your needs check out the Fotopro.com website. Check back with me before you buy as a Fotopro Ambassador I’m able to get you discounted pricing including complementary continental USA shipping for my followers that you won’t find through retail outlets.
Learn Photoshop in a fun environment. Aaron Nace applies the right amount of fun with easy to understand and follow tutorials. Actions and brushes are included with lessons!
Lightning, waterdroplets, sound, time-lapse, HDR sequences, smiles and much more control for your camera!
Cameras Get Smarter -
A High Speed Smart Camera Remote
Best embroidery ever. Give Queensboro a try, get a $20 instant credit to get started by clicking on the logo! They specialize in great quality custom logo apparel and promotional products with the best customer service.
Platypod has become a great resource for being creative in getting your camera gear easily into unusual places. As an Platypod Pro I get to work/play with the gear even before it comes out. Head over to Platypod, subscribe to the newsletter and you will get special discounts reserved only for subscribers.
 Adult female Lesser Goldfinch snacking on some wildflowers that have gone to seed
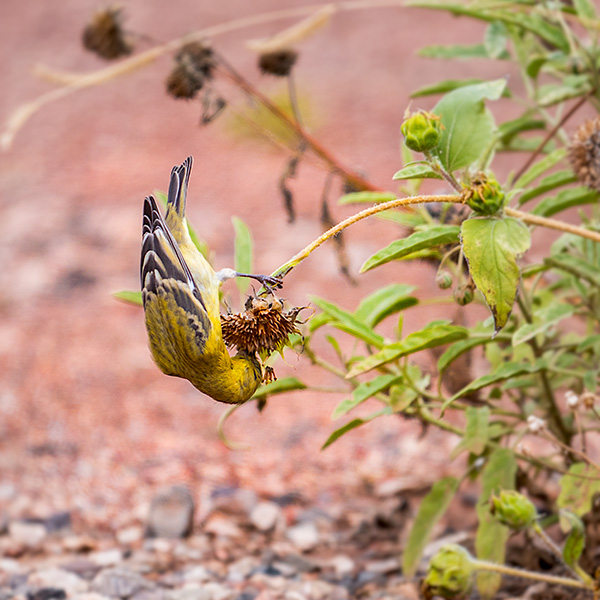 I always look to capture ‘behavior’ photos as well as straight portraits of my feathered friends. Here the Lesser Goldfinch is working to get the seeds free from the plant.
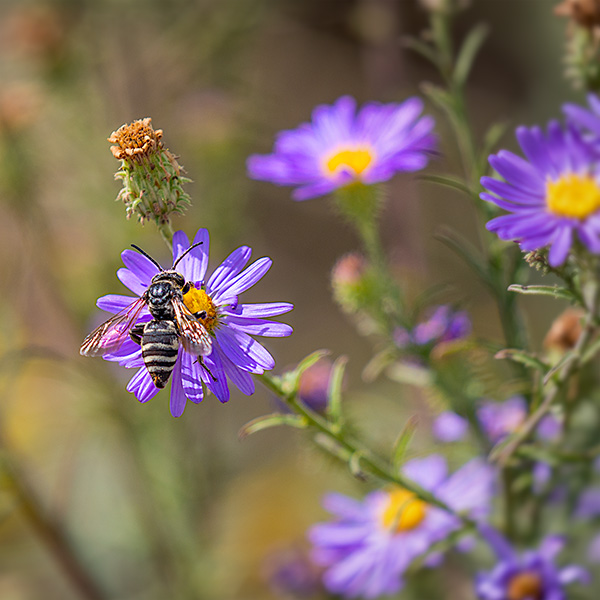 Wasps one of our other pollinators were flitting between the blooms as well as the butterflies.