by successfulbob | infrared photography, landscape photography, Lumix G6
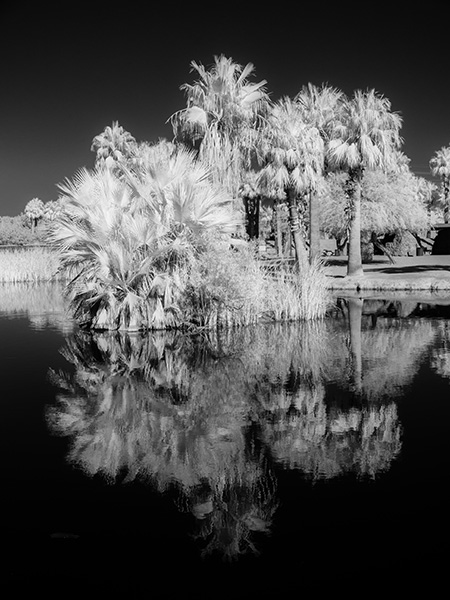
Papago Park, Phoenix Arizona
Infrared Imagery
When the sun is high in the sky, and the contrast makes for images that would be too ‘eh’ for making regular color photos it’s time to break out the infrared camera. Infrared is soooo much more natural to capture with a digitally converted camera with Live View. The Live View allows you to see in real time how the image will look in black and white. This is a massive thing as even to try to focus when we were capturing Infrared photos in the film days your filter had to be so dark that you would need to remove it to focus. AND, there would be an adjustment that you had to apply because IR capture focused on a slightly different plane from your regular focusing.
Enough about the past hassles of IR capture here are a couple of images I made yesterday at Papago Park.
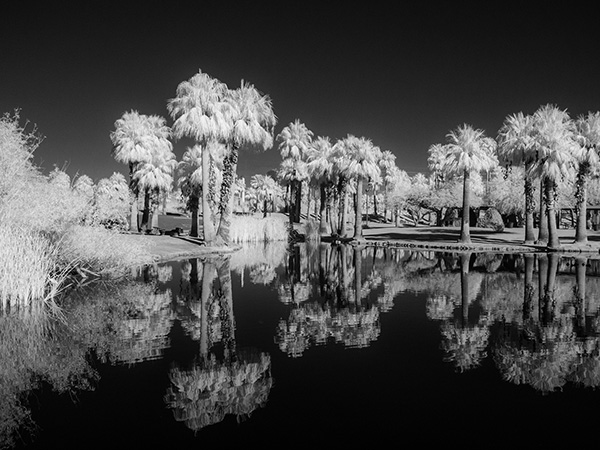 I quite enjoy the high contrast of the water and sky with the light palms
The IR converted camera file initially comes out a magenta file, so it needs some massaging in Adobe Photoshop to be the BW we’ve come to know and love.
Some Notes on How I processed these images
There are lots of convoluted processing possibilities to getting the IR look. In this case, I’m coming up just a wee bit short on the full IR feeling, but I like the results. In Photoshop I remove the color by decreasing the saturation, adding Clarity, opening shadows or highlights. I also adjust the Temperature slider making the blue sky and the water reflecting the blue sky darker.
As a final touch, I use Luminar 2018 as a Plug-in and add an Orton Effect or possibly a Glow depending upon the image feel for which I am going.
Camera is the Lumix G6 (using an older camera collecting dust on your shelf for conversion is fine as long as it has Live View) Conversion done by LifePixel. There are varieties of IR filters you can choose to check out the info here. I have gone with the old standard.
If you have any questions, give me a shout.
Yours in Creative Photography, Bob
by successfulbob | cityscape photography, Guest Post, Lumix G9, travel photography
Sintra, Portugal – Guest Post Part Two
by Ken MacAdams
Ken shares his travel photography and stories here on Successful-Photographer as he has in the past. Ken’s camera of choice is Panasonic’s flagship stills camera the Lumix G9 with the Leica DG Vario-ELMARIT Professional Lens, 12-60MM, F2.8-4.0
Take it away Ken. Start with part one of this story here.
A five minute walk downhill brought me to my second stop, the Moorish Castle. The castle was constructed during the 8th and 9th centuries, during the period of Muslim Iberia. The castle was centrally located in an area that was primarily agricultural, and was necessary for protection of the residents. It was a strategic point during the Reconquista, but was taken by Christian forces after the fall of Lisbon in 1147. Settlers occupied the castle during the 12th and 13th centuries, but its military importance was progressively diminishing, and inhabitants were abandoning the castle for the old village of Sintra. In the beginning of the 15th century a small group of Jews occupied the castle until being expelled from the country by Manuel I of Portugal.
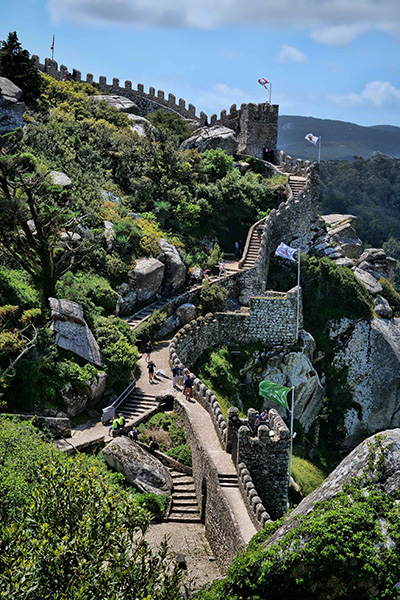
Inside the Moorish Castle. These walls match the terrains ups and downs with lots of archery vantage points. In ancient days, they would have cleared the trees around the outside of the compound so attackers had no shelter. Images in this post © Ken MacAdams
The 1755 Lisbon earthquake caused considerable damage to the chapel and castle. It wasn’t until King Ferdinand II began work on the Pena Palace around 1840, that he took up the task of improving the condition of the old Moorish Castle and walls. The castle is built on very rugged terrain with slopes reaching 40% gradients. The hike around the castle walls is bound to elevate your pulse! A stop at each watchtower allows you to catch your breath and enjoy the magnificent views.
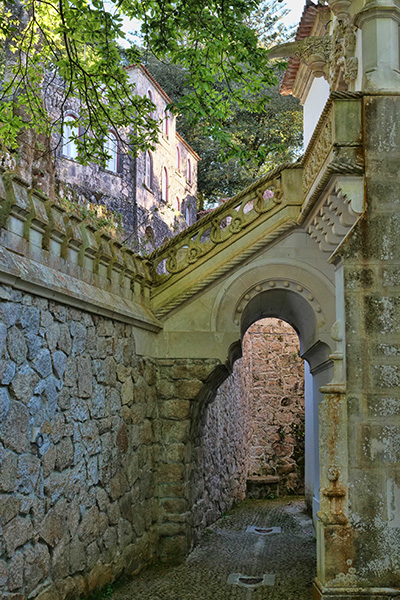
Secluded archway leading to the palace. Examine the rope detail on the sides of the stairs.
Having navigated the castle walls, I retraced my steps – also uphill – to where I’d parked the car. Returning to back to Sintra, I visited the Quinta da Regaleria. This highly decorated, ornate Gothic styled, multi-story 20th century residence is situated in Old Town. The original house dates back to the 1800’s. Over the years, subsequent owners have made renovation, the most recent being about 1904, when carved gargoyles, Gothic turrets, exotic woodwork and other ornate features were added. Additions by an Italian architect evoked Roman, Gothic, Renaissance, and Manueline styles. Located within the park is the palace and chapel, and a luxurious park with walkways, lakes, grottoes, wells, benches, statues, and fountains.
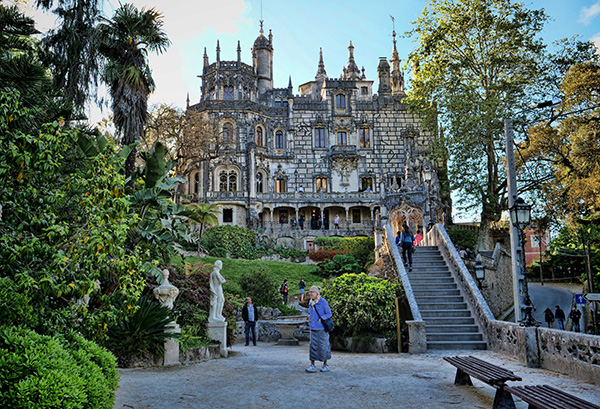
The Quinta da Regaleria palace and stature gardens.
The true wonder of the Quinta da Regaleria are the grounds, which were inspired by the owner’s mystic ideologies. Hidden within the grounds are references to the Knights Templar, the Masons, and dark alchemy. The well, one of the strangest features, has a concealed circular passageway that descends 88 ft. downward, then connects to a series of tunnels that run the length of the garden. The well symbolizes the initiation ceremony for the Knights Templar. As you walk through the gardens, you’re also awarded occasional glimpses of the Moorish Castle and Pena Palace high up on the mountain above you.
I’d packed all three sights into one day, so my feet were happy to settle into a comfy booth at one of downtown Sintra’s cafes! Shortly thereafter, I returned to the villa, and enjoyed a quiet nights’ sleep.
Ken has always loved to travel, so when he made a common connection with the fact that either a long day pounding the streets of some foreign city, or shooting the last dance at a wedding, a good part of his physical

weariness came from lugging around his big heavy DSLR. That’s when he started looking at alternatives – and ended up selecting Panasonic Lumix Micro Four Thirds gear.
Ken is rarely without a camera, and the next great photo travel experience – whether local or abroad – is always in the back of his mind! A longtime resident of the Four Corners, and when he’s not out on the road, he enjoys some of the great outdoor opportunities found there – mountain biking, hiking, and Jeeping.
by successfulbob | landscape photography, Lumix G9, photography creativity, photography gear
Interpreting the Red Rocks – Juuuust a Little Different
If you have followed this blog and my work for any length of time you know that I often like to take my images further than a ‘straight’ photograph. I have found a weird thing while working on this process. There are times to get a certain look you need to make what I would normally consider a ‘bad’ photograph. One that is either under or overexposed to create the vision in your using certain textures.
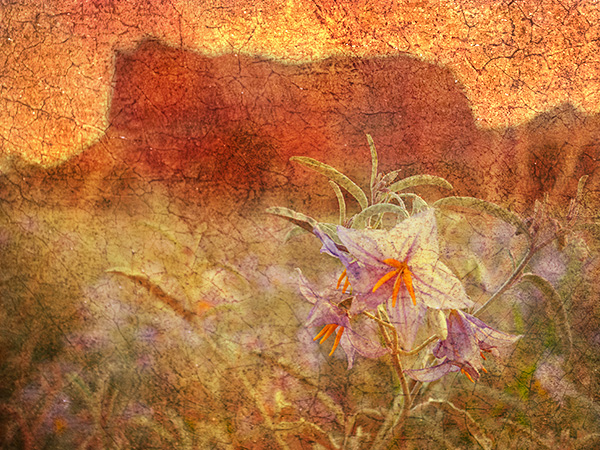
Here’s a case in point. The density range for this image was huge in that I was shooting the flower in the shade and the background was in full sun. I originally bracketed this scene to get a ‘correct’ exposure. I processed that, but when I went to work, I found that I had better results with the image that was a single exposure rather than having all the detail that Aurora HDR 2018 software would provide.
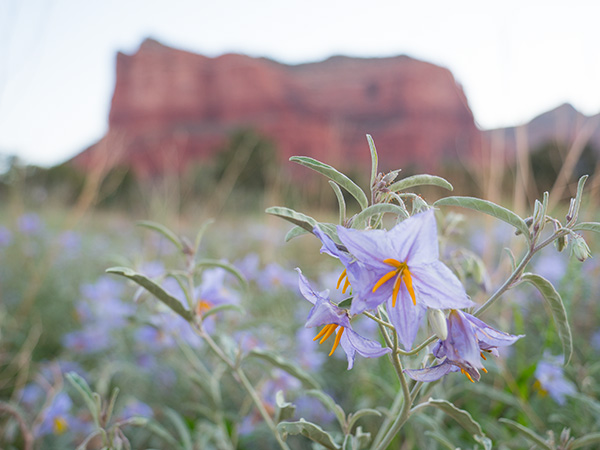 Here is one of the bracketed images slightly over-exposed. Little to no detail in the sky.
The little to no detail in the sky gives the texture a chance to shine. I used texture from a small section of an old painting in various blend modes to achieve the image below.
Here is my artistic rendition of the image.
I think the plain image needed some help other than making a full range of tones visible. I work photos in many different ways before I find the vision for which I was looking.
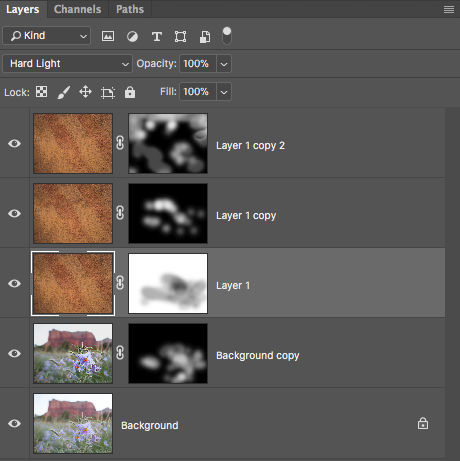 Here is the Photoshop Layers Palette from the image above. Note: all Layers had a different blend mode applied and Masks were used to extract or cover the information I did or didn’t want.
Lumix G9 with the Leica DG Vario-ELMARIT Professional Lens, 12-60MM, F2.8-4.0 was used for this capture. The fully articulating screen is helpful when framing an image where the camera is low to the ground. Saves getting down to try and look through the viewfinder and also save work in the laundry for clothes that have been doused in dirt!
Yours in Creative Photography, Bob
by successfulbob | Guest Post, Lumix G9, travel photography
Porto, Portugal – Guest Post Part Two
by Ken MacAdams
Ken is a traveling man and uses Lumix gear during his travels. Ken will share some of his travel photography and stories here on Successful-Photographer as he has in the past. Ken’s camera of choice is Panasonic’s flagship stills camera the Lumix G9 with the Leica DG Vario-ELMARIT Professional Lens, 12-60MM, F2.8-4.0
If you want to start at the beginning here’s part one.
Heeeeere’s Ken again!
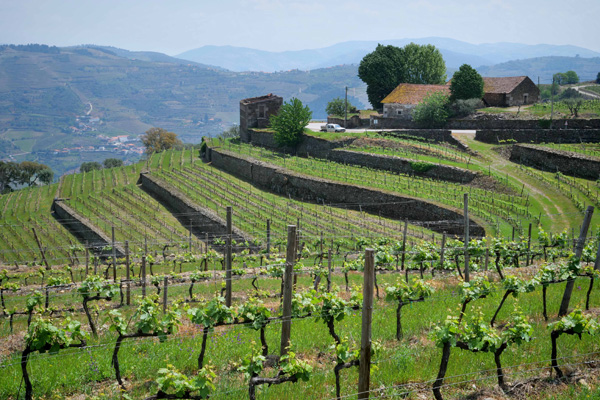
We made a day trip out into the beautiful, hilly, wine region to the east of Porto. Vineyards cling to the sometimes steep hillsides bordering the meandering Douro River. Old World cities cling to these hillsides also, as the narrow road snakes its way inland. We stopped at one of the vineyards along the way for a tour and wine tasting experience. A narrow road switch-backed us from the river side to the establishment set high up on the hillside. Views up and down the river valley revealed terraced vines as far as the eye could see. Inside, the guide explained the different types of port wines – white, red, tawny, and rose. For the different varieties of grapes there is a different aging processes for the wines, with some aged in wooden casks, others in bottles. We were led deep underground, into their wine cellar, and allowed to walk between rows of neatly stacked wooden casks. Another area housed thousands of bottles of port wine, all quietly aging away! Climbing back up from the cellar, we entered a tasting room, where several different varieties were uncorked for our sampling.
Rural vineyards as far as the eye can see
All Images in this post © Ken MacAdams
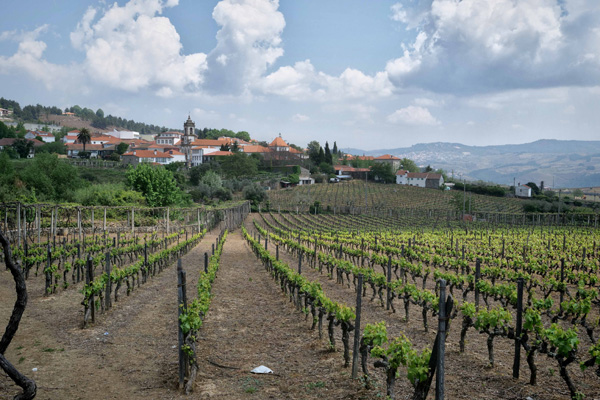 Douro Valley vineyards with the town of Sabrosa in the background
Back in the 1700’s, the wines processed inland by the different vintners was transported downriver to Porto in large casks on Rabelo boats, small river-going boats. The casks were stored in warehouses along the river in Porto, called “lodges”. The port wine often aged here for years before being loaded onto ocean going ships which transported them primarily to England, or to final markets in Europe. Modern dams on the river make this shipping process impossible today. Many of the original “lodges” in Porto along the river have been converted into wine tasting establishments. You can still see replicas of the historic boats, complete with wine casks, in many of the old riverside cities that dot the banks of the Douro River, as well as in the Ribeira district in Porto.
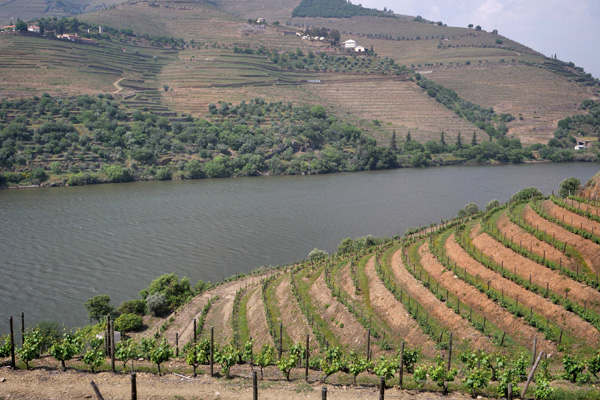
The River Douro with vineyards clinging to the hillsides
It was late in the night when we returned to Porto, but our travel experiences up through the Douro Valley were priceless. We’d seen history, tasted the famous Port wines, and walked among the vineyards. We could have easily stayed in a villa back in the valley, but other destinations in Portugal beckoned.
Ken MacAdams – “I grew up with a darkroom in my basement…so all the old film skills were my friend when  digital came on the scene. Funny thing happened…photography just got more interesting as digital posed new challenges! While I loved the characteristic sounds and smells of the old wet-process darkroom days, I wouldn’t go back!”
Ken has always loved to travel, so when he made a common connection with the fact that either a long day pounding the streets of some foreign city, or shooting the last dance at a wedding, a good part of his physical weariness came from lugging around my big heavy DSLR. That’s when he started looking at alternatives – and ended up selecting Panasonic Lumix Micro Four Thirds gear.
Ken is rarely without a camera, and the next great photo travel experience – whether local or abroad – is always in the back of his mind! A longtime resident of the Four Corners, and when he’s not out on the road, he enjoys some of the great outdoor opportunities found there – mountain biking, hiking, and Jeeping.
by successfulbob | landscape photography, Lumix G9, photography, photography gear
Red Rocks of Sedona – Part Two
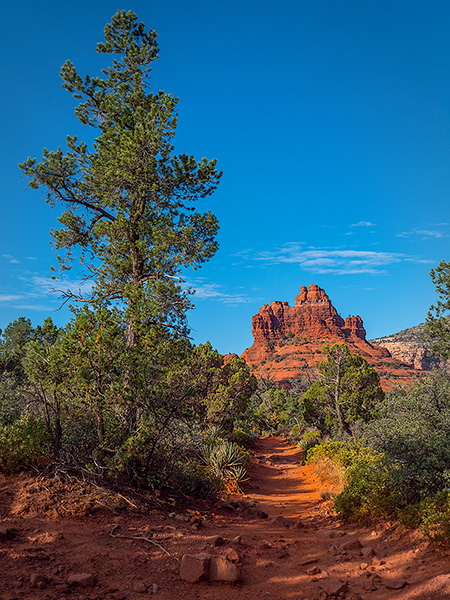
Since I have started back to hiking through the red rocks in Sedona once again, I’ve had a great time making images that show the best part of hiking. For these images, I was using the Lumix G9 and the 12-60mm Leica DG VARIO-ELMARIT f2.8-4.0 lens. This combo has a substantial reach and weighs in about three pounds which is hugely manageable on trails that are considered wilderness by the forest service. Wilderness trails mean clambering over, up and down medium size rocks, so the weight is a factor.
Wilderness area trail photo of the back side of Courthouse Butte – Sedona, AZ
As the trail moves toward another iconic feature called Bell Rock
Meet my twisted friend the juniper.
Lots of interesting junipers litter the sometimes otherworldly landscape of Sedona. Fun fact – the seeds need to pass through a bird to germinate.
This from an article on Lubbock Online by ELLEN PEFFLEY who taught horticulture at the college level for 28 years, 25 of those at Texas Tech, during which time she developed two onion varieties. She is now the sole proprietor of From the Garden, a market garden farmette. You can email her at [email protected].
“The fruit botanically are cones but, unlike pinecones that are dry and open, the fleshy and fused closed scales of juniper resemble berries, thus the reason fruit of juniper is usually referred to as a berry. Berries mature over 18 months, at first green and turn a dark-blue purple or bluish color as they mature. Berries are visible during the winter months. Each berry develops six triangular, hard black seeds, which are eaten and scattered by frugivorous birds.
“A word for the word jar: frugivorous, defined by Merriam Webster as fruit-eating. Fruit is the preferred food for frugivorous birds, which swallow the fruit whole, digest the fleshy scales, pass the hard-shelled seeds through the gut and disperse the seeds. This is why seedling junipers pop up in unusual surroundings.” http://www.lubbockonline.com/life/2017-01-09/peffley-juniper-berries-sought-birds-food-flavor-base-gin
Yours in Creative Photography, Bob


