by successfulbob | landscape photography, Lumix GX8, panorama, photography education, photography gear
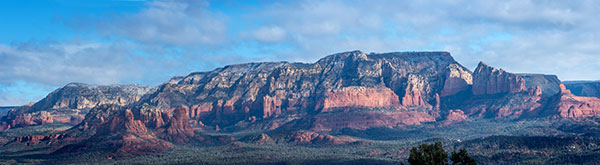
I really enjoy the field of view you can achieve with a panoramic photo. The Lumix GX8 is pretty solid with the in-camera stitching when you need a quick capture of the scene for sharing… And with this version going to print. There are still some occasional stitching errors in areas with lots of confusing crossing details or areas with hardly any detail but I had to look really, really hard to find a small error in one of the tree clumps… Sweet!
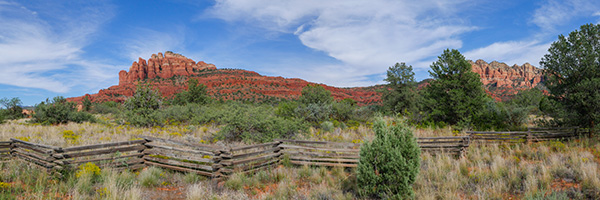
This is the view on the way to Cathedral Rock in Sedona, Arizona. Heading down Verde Valley School Road in the Village of Oak Creek (view of the right side of Cathedral Rock)
Here’s a tip that some people don’t think of when creating Panos. Turn the camera to the vertical position as you make your capture. This will give you some more vertical room. You can also capture a next ‘row’ of image and stitch them together in Photoshop or your favorite Pano program.
One more thought to help get smoother stitching… Point your feet toward or slightly past where you would like the pano to end. Then pivot your stomach muscles to the beginning of the captures and use your stomach muscles to move the camera with your elbows tucked in and the camera touching your forehead.
Yours in Creative Photography, Bob
by successfulbob | cloud photography, landscape photography, Lumix GX8, Lumix Lounge, panorama, photography education, photography gear
Playing some more with the in-camera panorama stitching on the Lumix GX8 again… This time in the Village of Oak Creek with Bell Rock and Courthouse Butte as the stars of the show. I used the 20mm f1.7. This combo worked very well when keeping the lens pointed straight ahead. If you tilt the camera up there will be a bit of bending of the horizon.
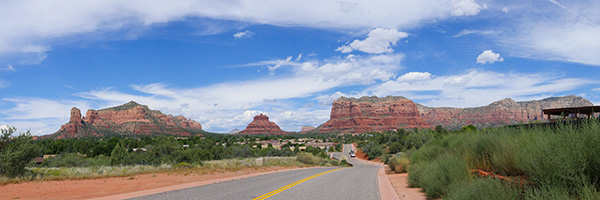
Here’s the original capture SOOC with a minus 2/3rds of a stop exposure adjustment to bring down the sky to a deeper blue. One of the benefits of being able to see what you camera is capturing I could tell that it was going to be a bit overexposed before shooting.
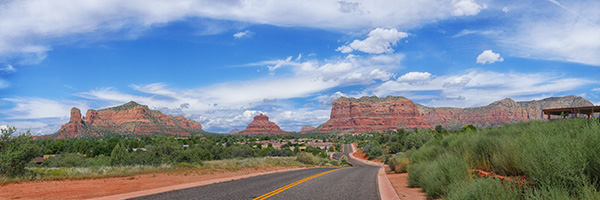
Here’s the finished image with a bit of post production. Darkened the road. Removed a couple vehicles. Increased saturation a little. Added some contrast with Google’s NIK Detail Enhancer. The only place I ran into a stitching evidence was after applying the Detail Enhancer the blue portions of the sky showed the beginnings of unwanted lines. Using a Layer Mask took care of that problem.
This image could easily print to 14 X 42 inches and probably larger if I wanted to work at it a bit and depending on what material I was printing on.
Yours in Creative Photography, Bob
by successfulbob | landscape photography, Lumix GX8, panorama, photography
Panorama Photos
I’ll put on my ‘Old Man’ hat here and say, “Back in the day (can you hear the creaky voice??) we had to make notes with a pencil and paper to record what lens was used, and the settings on the camera like Aperture and shutter speed. We knew the ISO ’cause that was on the film.”
OK. you probably already know I’m a fan of the in-camera panoramic format with the Lumix line of cameras. Well I gotta tell ya’ they’ve made it even better. Must be some new math working but you can make your panoramas longer and the stitching is even better than before in the G7 and the GX8.
I’m stoked!
My wife and I went out to dinner tonight and I slipped out for a couple minutes as the scene was unfolding with some nice light. I dialed the GX8 to the pano setting and opened up one stop of exposure compensation to keep the shadows from blocking up since there was so much sky in the image. In Adobe Photoshop I added a Soft Light Layer to gently burn the top ot the sky back in just a bit. Here’s the result.
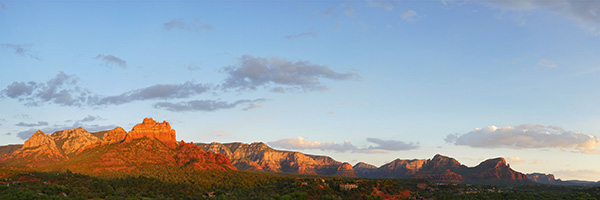
Red rock view from Sound Bites Grill in Sedona, Arizona at sunset. Camera and lens information below.
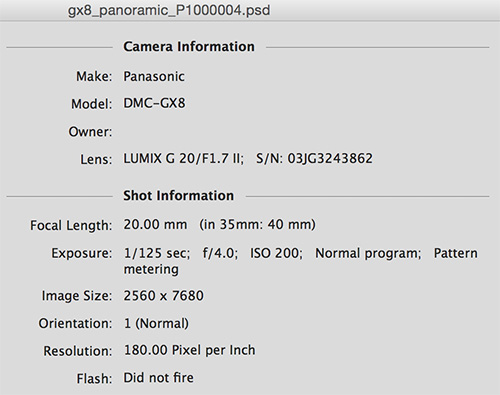
One of the best pieces of information we have as photographers today is the metadata secured in the file for all of our images.
This information is accessed in Photoshop by going to File > File Info >Camera Data. This info makes it possible to understand settings and study how to make our images more consistent and to make situations repeatable as we understand more how our camera’s work.
Yours in Creative Photography, Bob
by successfulbob | cloud photography, Lumix G7, Lumix Lounge, panorama, photography
I dig clouds!
This time of year Arizona can lay out a pretty nice palette for us to enjoy. It’s called monsoon season and thunderheads will pop up in the afternoon and put on a show. I gather all kinds of cloud formations for use in my artwork. I decided to challenge the Lumix G7 (new baby brother to the GH4) to see how well it could do in capturing some panoramic photos of the sky in camera. In the past I’ve found that sometimes the lack of definition in sky scenes made it difficult and I would find stitching errors there occasionally. So I shot some soft cloud formations and some harder edged formations and here’s what happened…

I really thought that the camera might have problems with the lack of definition with this panoramic cloud capture. No problem at all!
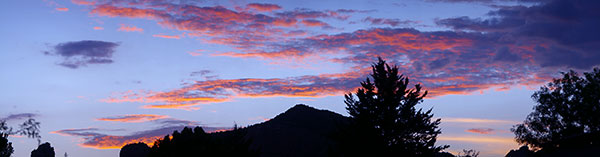
Overall did a great job on this one. There was one small area on the left that I had to look hard to find a small stitching error that was easily rectified with the Patch Tool from Adobe Photoshop

Here was another that had an error. It was off to the right and was in the transition area from bright clouds to very dark clouds. After a quick crop this is what’s left.
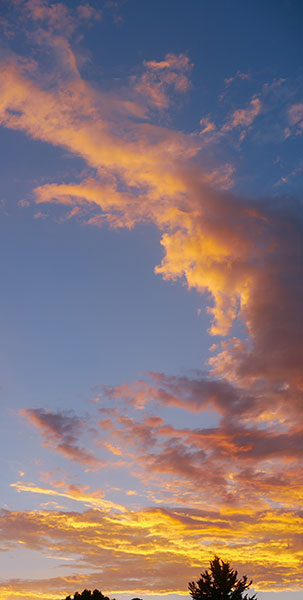
And, not to forget that the camera can create panoramas in different directions. No stitch errors on this or about 10 other files I let the G7 create.
My overall thoughts on the new panorama stitching in the G7 gets high marks. I always recommend using good camera technique. I point my body to the direction where I want to end up. Then using stomach muscles turn back to the start of the panorama and slowly pivot using the stomach to make the movement to capture the image. If it is a very important pano I will always shoot it several times just in case. Many times an in camera stitching error can be traced to operator error of not capturing the scene smoothly. Even though you can play back the panoramic image at a larger size on the camera you might miss small errors that wouldn’t show up in another pass with the camera.
Yours in Creative Photography, Bob
by successfulbob | landscape photography, Lumix GH4, Lumix Lounge, photography, photography education
The clouds led to some interesting lighting conditions when I drove up the hill overlooking West Sedona so I popped out to see if it would translate into a cool photograph. What I saw in my mind was not what I was able to capture in my camera but it wasn’t terrible.
This is the color ‘straight version. I liked the play of light and shadow but thought there was more there with a little artwork.
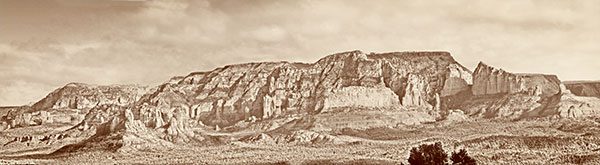
Using a couple NIK Color FX filters (Glamour Glow & Old Time Photo) I feel like this image was made many years ago and
could work as a decor piece for a business that caters to a more timeless vision of Sedona.
The panorama was made from 7 photos with the camera held in the vertical position and stitched in Adobe Photoshop. Manual settings including focus and exposure on the Lumix GH4 made it easier to stitch the pano. The lens was the Lumix 35-100mm f2.8. With the stitching I ended up with a 150MB file which can be printed pretty darn large.
What ‘Cha think?
YOurs in Creative Photography, Bob

