
by successfulbob | inspiration, photography, photography software
 MacPhun Software – Luminar & Aurora
What are we going to do when our software updates stop allowing us to use Google’s NIK Software? Right now it’s free for download if you want to use it! I highly recommend if you haven’t already taken advantage of this deal get to it. It’s good stuff! I even paid for it originally and was happy to do so.
But it won’t be around forever.
It may be Adobe or it may be our computer operating systems that will make the software no longer usable. For Apple computer users one answer lies with MacPhun Software. Some of the folks who were at NIK Software before Google bought them out have been working on some solutions at MacPhun.
At first, they came out with some stand-alone solutions for handling noise and adding creativity. They bundled them into a nice package called Creative Kit which had six different software solutions usable as plug-ins for Photoshop and Lightroom. Next came Aurora HDR software.
Here are a few images I dressed up using the software and since it’s a holiday promotion here you go.


 Next came Aurora HDR software followed by Aurora 2017* (see the deal below!). I like Aurora 2017 because it allows me to get the HDR process to increase the density range of an image but without the images screaming ‘HDRRRR!!!.’ And I still have the creative possibilities available. It is also a stand alone program. I have been fortunate to be able to work with MacPhun’s new software as it becomes available and I’m having a great time playing with the possibilities. I think you’ll like it too.
There’s a new stand-alone product that has just hit the market combining the software that is called Luminar**. Learn more about it below with a special deal until the New Year.
* Check out the Aurora 2017 Deal DetailsAurora HDR 2017 + Bonuses for only $89. Total value $175. Savings of 49%Give your holiday photos a truly unique look this year with Aurora HDR 2017 and our new Winter Preset Pack. Plus, improve your photography with training from Nature Photography Guides and Trey Ratcliff!
You get:
Aurora HDR 2017, the world’s #1 HDR software for Mac photographers
2 eBooks by Nature Photography Guides: “Forever Light: the Landscape Photographer’s Guide to Iceland” & “Iceland: Black & White Photography Portfolio by Sarah Marino” will inspire your photography to new heights.
Creative HDR Presets Pack: Use these exciting new presets to stylize and experiment with your photos.
20-minute Deep Dive video from Trey Ratcliff: Learn from the most influential HDR shooter of our generation, and co-developer of Aurora HDR 2017!
** Check out the Luminar Deal DetailsLuminar + Bonuses for only $59. Total value $319 Savings of 80%Celebrate the holidays with an incredible deal on our most popular photo editor to date and a host of bonuses sure to put a smile on your face!
You get:
Luminar, super-charged photo software for any Mac photographer
3 eBooks from Andrew S. Gibson: Mastering Photography, Mastering Composition & Mastering Lenses. The “Mastering” series is designed to help improve the creative aspects of your photography. They are aimed at intelligent and creative photographers who understand that light and composition are just as important as knowing which buttons to press on the camera.
Over 300 high resolution sky overlays: Use Luminar and this set of warm, blue or dramatic skies to enhance any image. Perfect for any photographer who has photos with dull or lifeless skies – bring them to life with this exciting collection!
Creative Portraits Preset Pack for Luminar: Make even more amazing photos with this speciality pack of presets ideal for improving any portrait.
How to Shoot Sandscapes by Baber Afzal: In this video, you’ll learn pro techniques for capturing the best sandscape photos possible.
Lots of good things for you. Happy Holidays!
Yours in Creative Photography, Bob
Save
Save
by successfulbob | photography software
New Photo Processing Software for MAC
Some very interesting software for photo editing has been released by the folks at MacPhun. Basically, you can set up this software very simply or you can build workspaces to create intricate working areas for complex projects. This is new stand-alone software and the price? Only $69. You can try it for free to see if it something that will work for you. Here are the details below.
 LUMINAR NOW AVAILABLE
Offer Available: November 17, 2017
Short Description of Luminar:
Luminar is a new all-in-one photo editor designed to ensure the ultimate in creativity and convenience. The Luminar user interface is built around the idea that every photographer is different, and therefore their photo editing needs are different too. Users can choose from pre-built user interface configurations that match their editing style and needs or create their own.
Pricing:
Retail Price: $69
Launch Price for Macphun Users: $49
Launch Price for New User Price: $59
Luminar Key Features:
• Adaptive User Interface
• Multiple Modes: From basic to advanced
• One-click switch between modes
• Change modes anytime
• All-in-one photo editing tool set
• Includes essential editing tools for different photography styles
• Live editing, live processing, live previews
• Non-destructive editing
• Works as a standalone app or plug-in
• RAW converter & processor
•History Panel
Take a look & try it for free.
Yours in Creative Photography, Bob

by successfulbob | Lumix Lounge, macro, photography, photography software
In-Camera Focus Bracketing
Yesterday I shared info on in-camera focus stacking of images captured with the Post Focus Photo Mode in the Lumix GX85. The PFPM is a great feature for getting images from moving objects, quick captures and times where you won’t need to crop into the image very much because the still frames pulled from the video are eight megapixels. Eight megapixels can get you to a twenty-inch print with no problem but when you want to go big it’s time for a new feature built into the camera.
Focus Bracketing is different than the Post Focus Photo Mode in that the camera will be making image captures using the full-size files and changing the focus between each shot automatically. Here’s the screen you will see to set up the capture of multiple images with one push of the button.
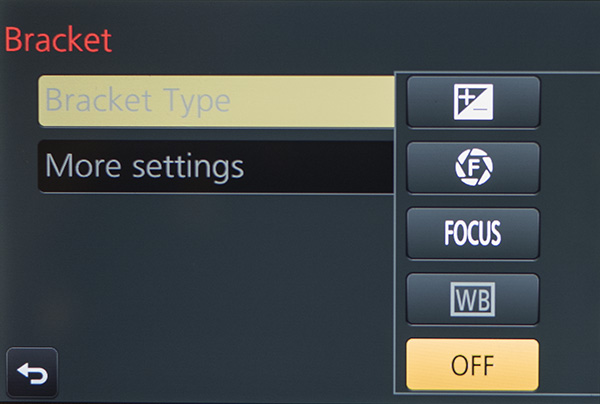 The new Bracket Menu. Options include Exposure Bracketing, Aperture Bracketing, Focus Bracketing and White Balance Bracketing.
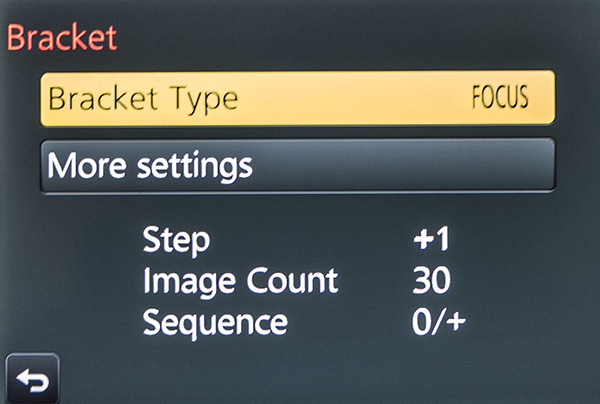 Menu with the Focus Bracket Chosen.
 Each one of the menus adds choices. You’ll need to experiment and ‘bracket’ your choices as you learn the results. Step – is the distance that the focus will move on each exposure. Image Count – will be the number of frames made with a single push of the shutter button. You’ll want to ensure there’s enough to cover the scene. Sequence – is the order the images are taken in. Choices are 0/+ to start close and go far (I recommend) or 0/-/+ which will alternate how the bracket is accomplished. I found that Photoshop tends to choke when creating the focus stack using this setting.
Here’s an example of a completed capture and focus stack using Adobe Photoshop taken at Horseshoe Bend just outside Page, Arizona. The Focus Bracketing allowed for a much deeper depth of field in the final image.
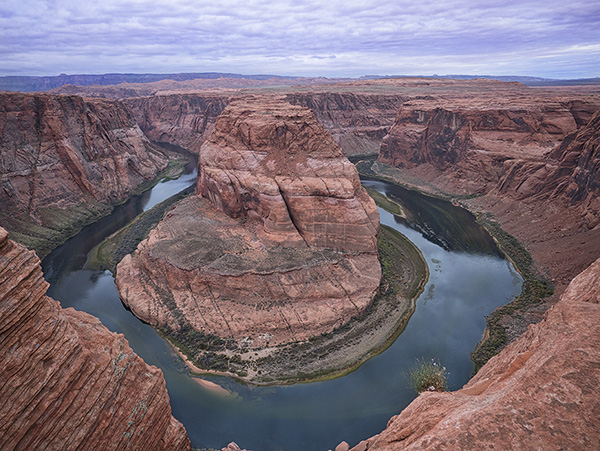 Horseshoe Bend, Page Arizona. The depth of field extends from the near foreground to the far distance.
People ask why do you want to go to all this work? I just set my camera to a smaller aperture like f16 or f22 for deeper depth of field. There is some science that will come into play here. When you use smaller apertures, you will introduce diffraction into your image which will soften the image. There is a sweet spot in lenses between f5.6 and f10, depending upon the lens, that is the absolute best quality the lens can produce. That is the f stop to use when focus stacking. All the sharp areas will be the sharpest and highest quality when combined.
I’ll look at the actual focus stacking technique in a future post using Adobe Photoshop. There are also automatic software solutions like Helicon Focus, Zyrene Stacker, and possibly others for you to check out if you plan to do a lot of stacking.
Til then.
Yours in Creative Photography, Bob
Save
Save

by successfulbob | landscape photography, Lumix GX8, Lumix Lounge, panorama, photography, photography software
Panorama Photography – In Camera
Playing with my Lumix GX8 in panorama mode is a fun time. Being able to have a panoramic image of the scene in front of you stitched in-camera can be a great help. Sometimes these are all I need. Sometimes there can be a bit of a ‘hitch-in-the-giddyup’. Let’s look at the good, the bad, and the sometimes ugly and how to make the best use of all of them.
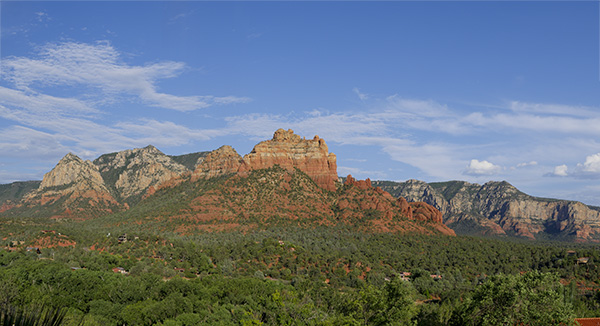
 Sedona, Arizona red rocks – All panoramas were captured with Lumix GX8 in panorama mode
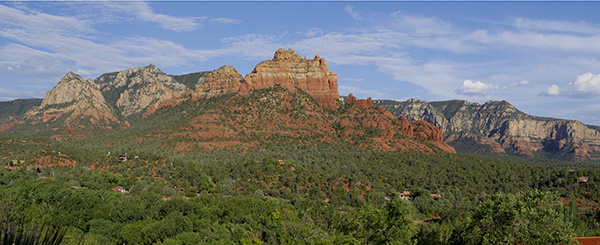 Here’s the same view with a different amount of foreground
Sometimes a panorama gives you the field of view you are looking for, but its height is just not quite right. Then it’s time to do another row and stitch them together in post-production.
 The two panorama images above combined in Adobe Photoshop
When making in-camera panoramics proper technique is imperative. I learned an old videographer’s trick that makes for better captures. Point your feet where you would like the panorama to end. Place the camera against your forehead and lock elbows down to the side. Use your stomach muscles to rotate the lens to the start of the pano. Press the shutter and use the stomach muscles to turn to the end of the image. With in-camera images, I recommend going past where you wold like the final part of the picture to finish because the image will cut off a little before it appears to in the viewfinder. There’s a ‘Goldilocks’ speed for the rotation. You don’t want to go too fast or too slow. You want to move ‘just right’ to help the camera give you a good image. If it is radically wrong, the camera will notify you that it can’t process the image because of processing errors.
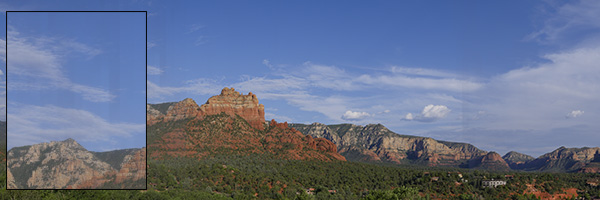 Poor technique led to lines captured in the image. It’s important to play your panorama back to ensure you’ve achieved a good result. It can sometimes show OK with a quick glance. I will often shoot the scene a couple of times to make sure I’ve got a good clean result.
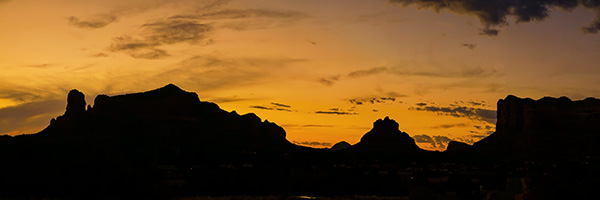 Panorama in silhouette. I saw this scene developing in the distance and stopped the car the first chance I could. I used MacPhun’s Intensify plugin* for Mac to help bring the scene back to what had attracted me to make the image. By the time I was able to pull over the sky had started to lose its color. The software brought back the sky as it was moments before.
We have incredible tools at our disposal in the photographic world. I enjoy learning how to push them to the next level.
How about you?
Yours in creative Photography, Bob
* Special deal on MacPhun’s Intensify and Uplet (a software for uploading images to Instagram from your computer)
by successfulbob | HDR photography, landscape photography, Lumix FZ 1000, Lumix Lounge, photography, photography software
Earth Day Photography – Landscape Photography Magazine
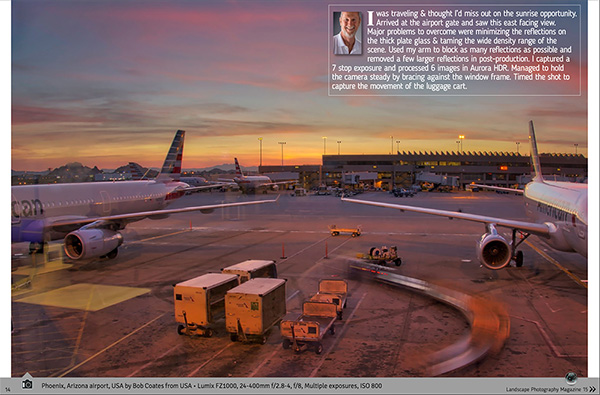
Landscape Photography Magazine put out a call to photography artists to create an image of sunrise on Earth Day of this year. The image I created was accepted into the curated collection gathered from that day. Here is my entry as it appears in the Landscape Photography Magazine Earth day PDF. Download your copy for free & get a 60% off deal on a new subscription. If you are a landscape photographer I know you’ll love this. (disclosure: I am not an affiliate of LPM magazine. Just think they do a great job!)
 Earth Day Photo – Capture Lumix FZ1000 25-400mm f2.8-4.0 @f8 Multiple Exposures ISO 800
Text from image follows below
“I was traveling and thought I’d miss out on the sunrise opportunity. Arrived at the airport gate and saw this east facing view. Major problems to overcome were minimizing the reflections on the thick plate glass & taming the wide density range of the scene. Used my arm to block as many of the reflections as possible and removed a few of the larger reflections in post-production. I captured a 7 stop exposure and processed 6 images in Aurora HDR *. Managed to hold the camera steady by bracing against the window frame. Timed the shot to capture the movement of the luggage cart.”
Yours in Creative Photography, Bob
*Until July 5th there is a Fireworks Bundle available from MacPhun
Special Bundle price: $99 – Over $300 in Savings
Creative Kit 2016 – 6 Powerful photography apps
Creating Powerful Photos of Fireworks – Video Training from PhotoFocus
8 Intensify presets and 3 Noiseless Presets created especially for fireworks images
PhotoBulk app by Eltima Software – Resize photos and add watermarks
Uplet app by Eltima Software – Upload photos from your Mac to Instagram
Save
Save

by successfulbob | photography software
MacPhun Software Bundle – Fireworks!
Fireworks indeed.
Who doesn’t like photographing fireworks? It’s a blast if you’ll excuse the expression.
Ever been disappointed when you returned from session photographing the incendiary display? (I have in the past) Part of the problem is fireworks contains lots of challenges for the photographer and if you don’t study up previous to your shoot on proper techniques you set yourself up for failure.
Even if you’ve had success in the past it’s wise to review because we don’t get very many opportunities to practice.
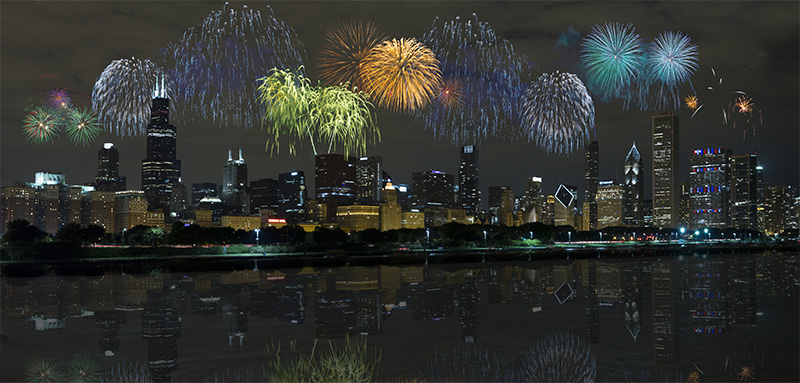 This is a composite I put together for fun. (first fireworks image I could put my hands on to illustrate this post)
This was imaged during a trip to Chicago. The skyline was to the left and the fireworks were to the right from my vantage point. I took a bit of creative license with this.
SHOOTING FIREWORKS – CREATIVE KIT PROMOTION
Available: Now through July 5
Key Features:
Special Bundle price: $99 – Over $300 in Savings
Creative Kit 2016 – 6 Powerful photography apps
Creating Powerful Photos of Fireworks – Video Training from PhotoFocus
8 Intensify presets and 3 Noiseless Presets created especially for fireworks images
PhotoBulk app by Eltima Software – Resize photos and add watermarks
Uplet app by Eltima Software – Post photos from your Mac to Instagram
Yours in Creative Photography, Bob