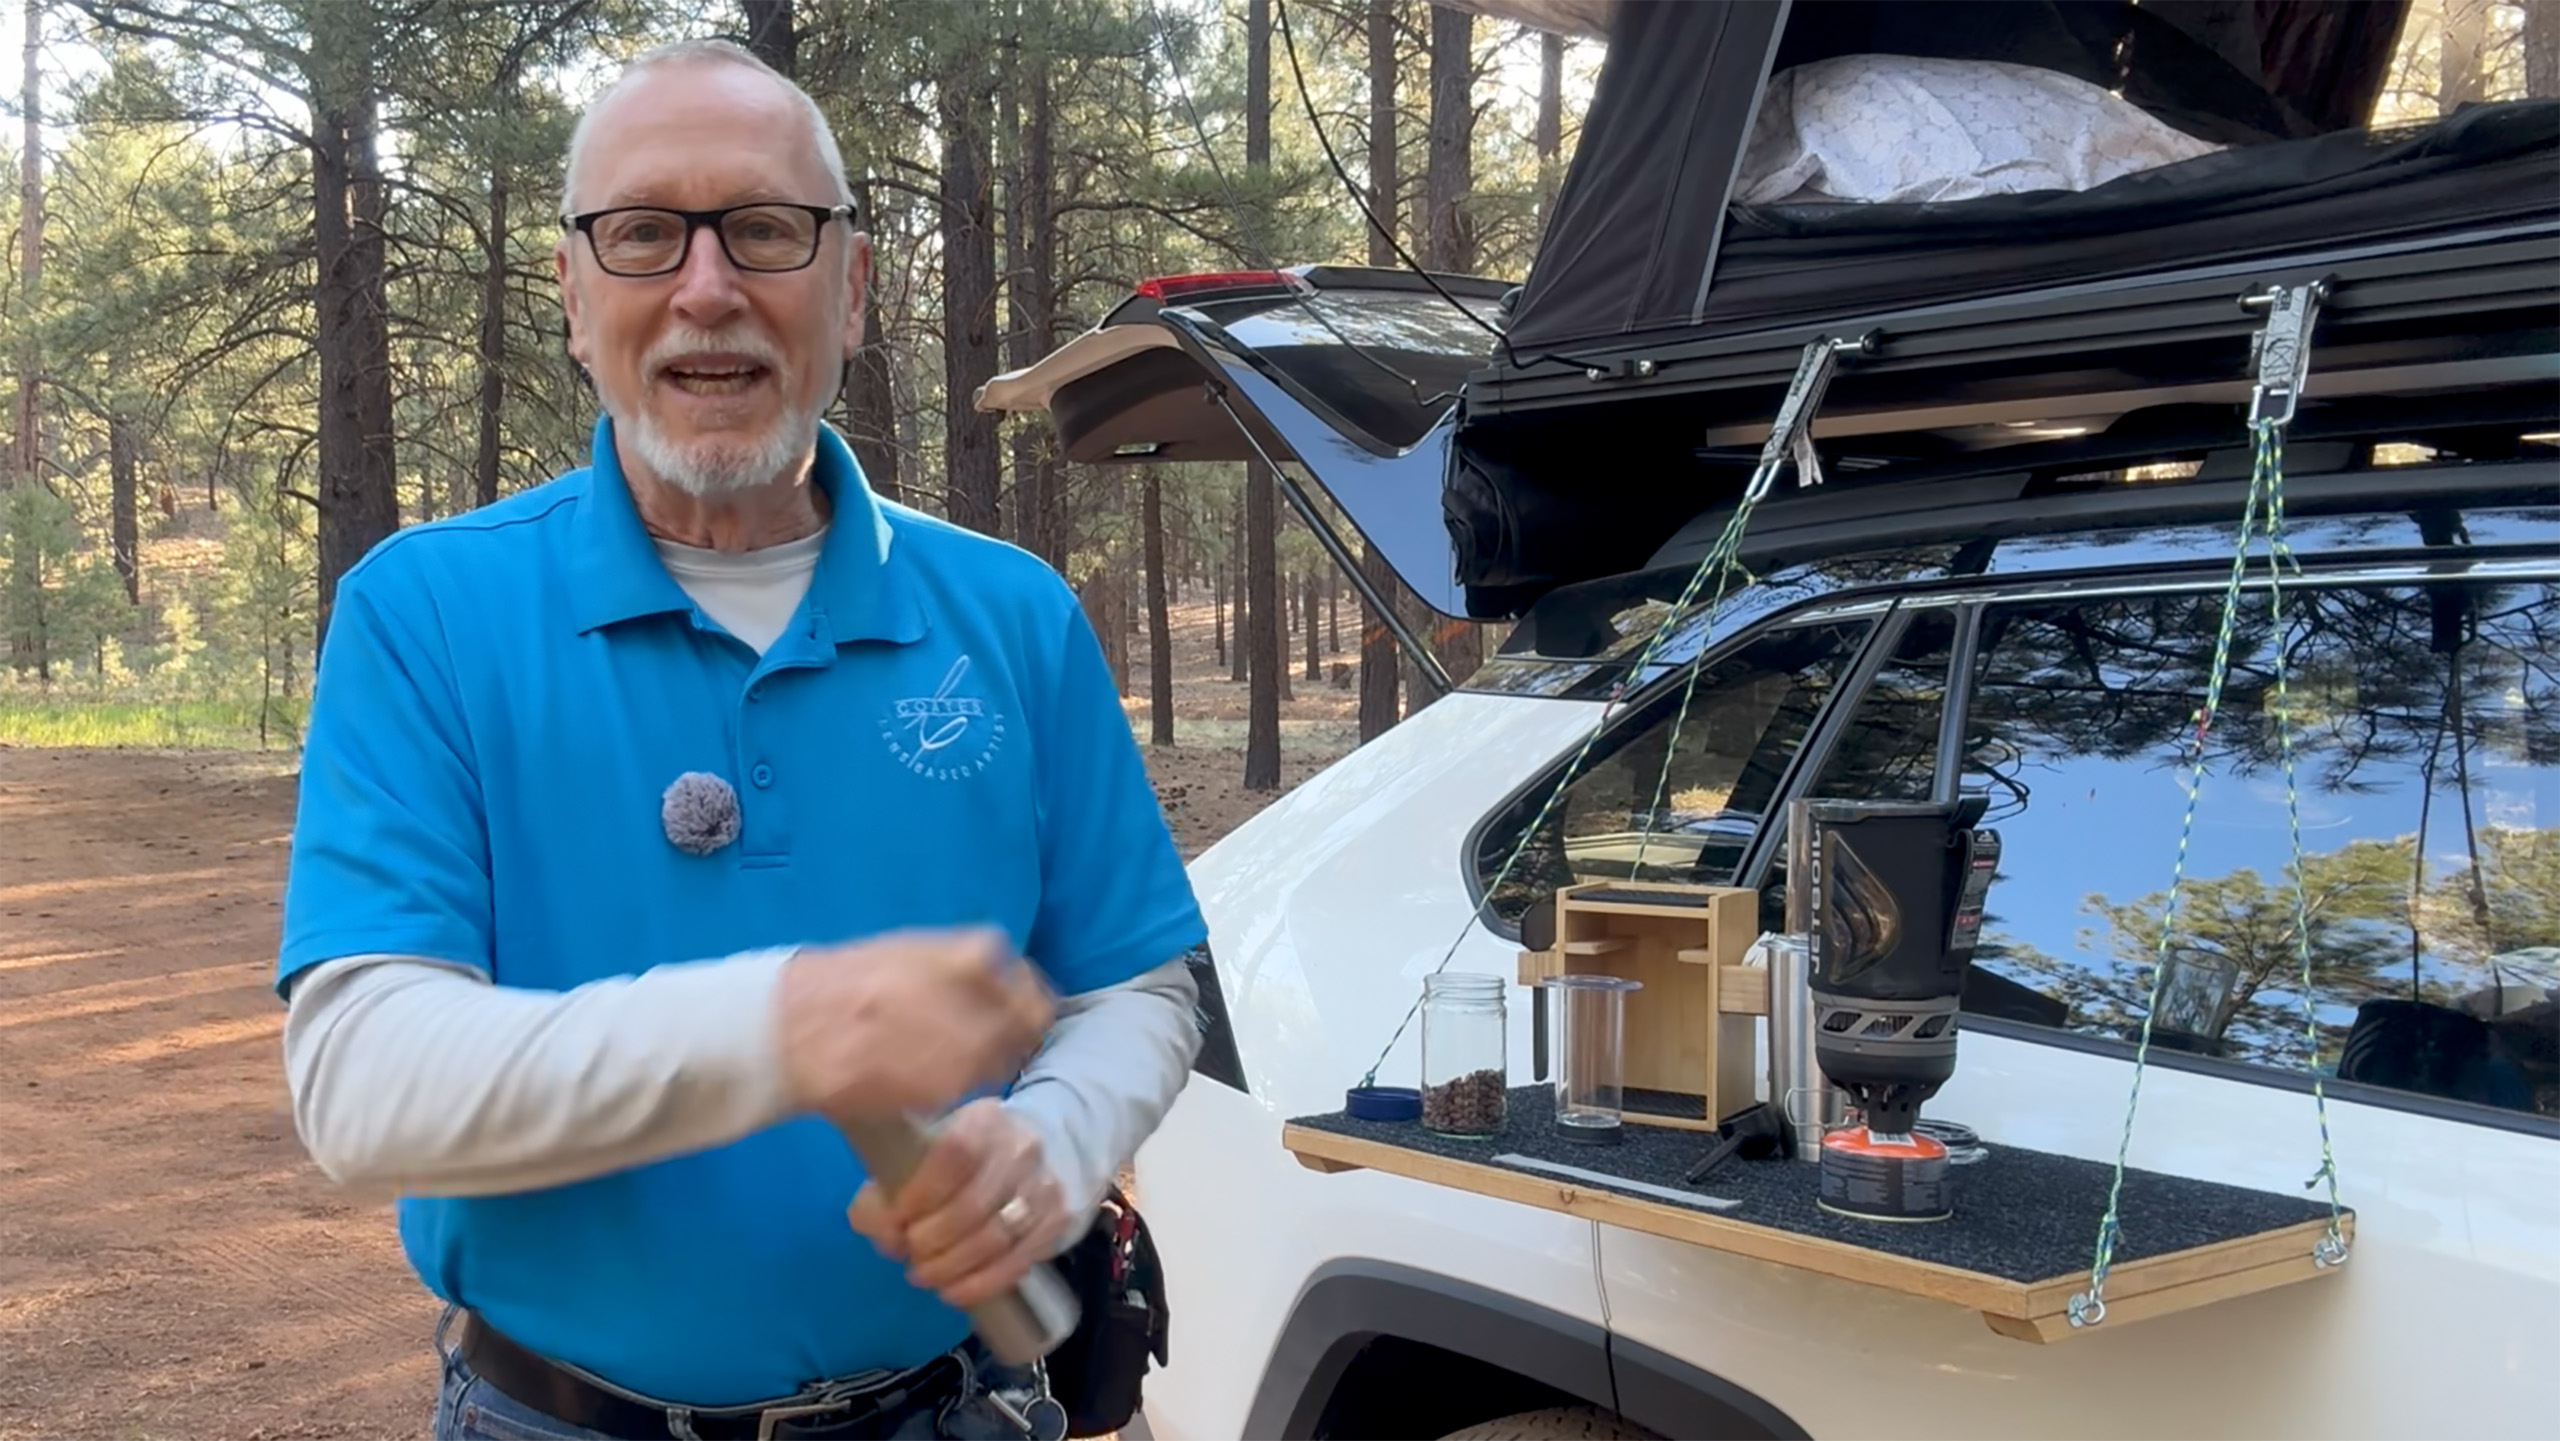
I am in the process of producing a video for PHOTOVISION Professional Photographer’s of America’s education website. My video is called Beyond the Horizon. It explores Boondocking, AKA Car Camping. Below are the plans for the most asked about build I put together. Having a table at a height which enables you to stand is a luxury in my opinion. If you agree and are a bit handy with some tools you can craft one inexpensively yourself.
In this article I’ll share my measurements and materials list to save you some time working it out for yourself.
Size Matters
Before you begin your gathering and construction you’ll want to look at how you will be using your table. I initially made mine to hold a two burner stove. Turns out that the table was just a wee bit too small for that. It was a squeeze after adding the propane cylinder which I failed to take into consideration. There turned out to be just a little less space for plates and bowls with the assembled stove aboard than I thought. Turns out that this is the perfect size for how I use it now. It’s not too big nor too small. Overall weight is a bit over three pounds.
My Table Uses
Preparing food is the main way I work with my set-up. There’s room for multiple plates and bowls. I currently use a Jet Boil unit to heat water for coffee and freeze dried meals when a want a hot meal. I find the freeze dried meals to be tasty enough and way less hassle than when I had the two burner propane stove. If you want to cook a bit more than I do you can make your measurements just a bit longer or use a single burner stove. The table is also helpful when working on various projects doing the day.
The Materials
If you have a circular saw or a table saw and a power drill you’ll be good to go for tools. If you are not quite so handy you can bring your measurements to the big box hardware store and they will cut your materials to size. Some include it as part of the service some may charge you a little for each cut.
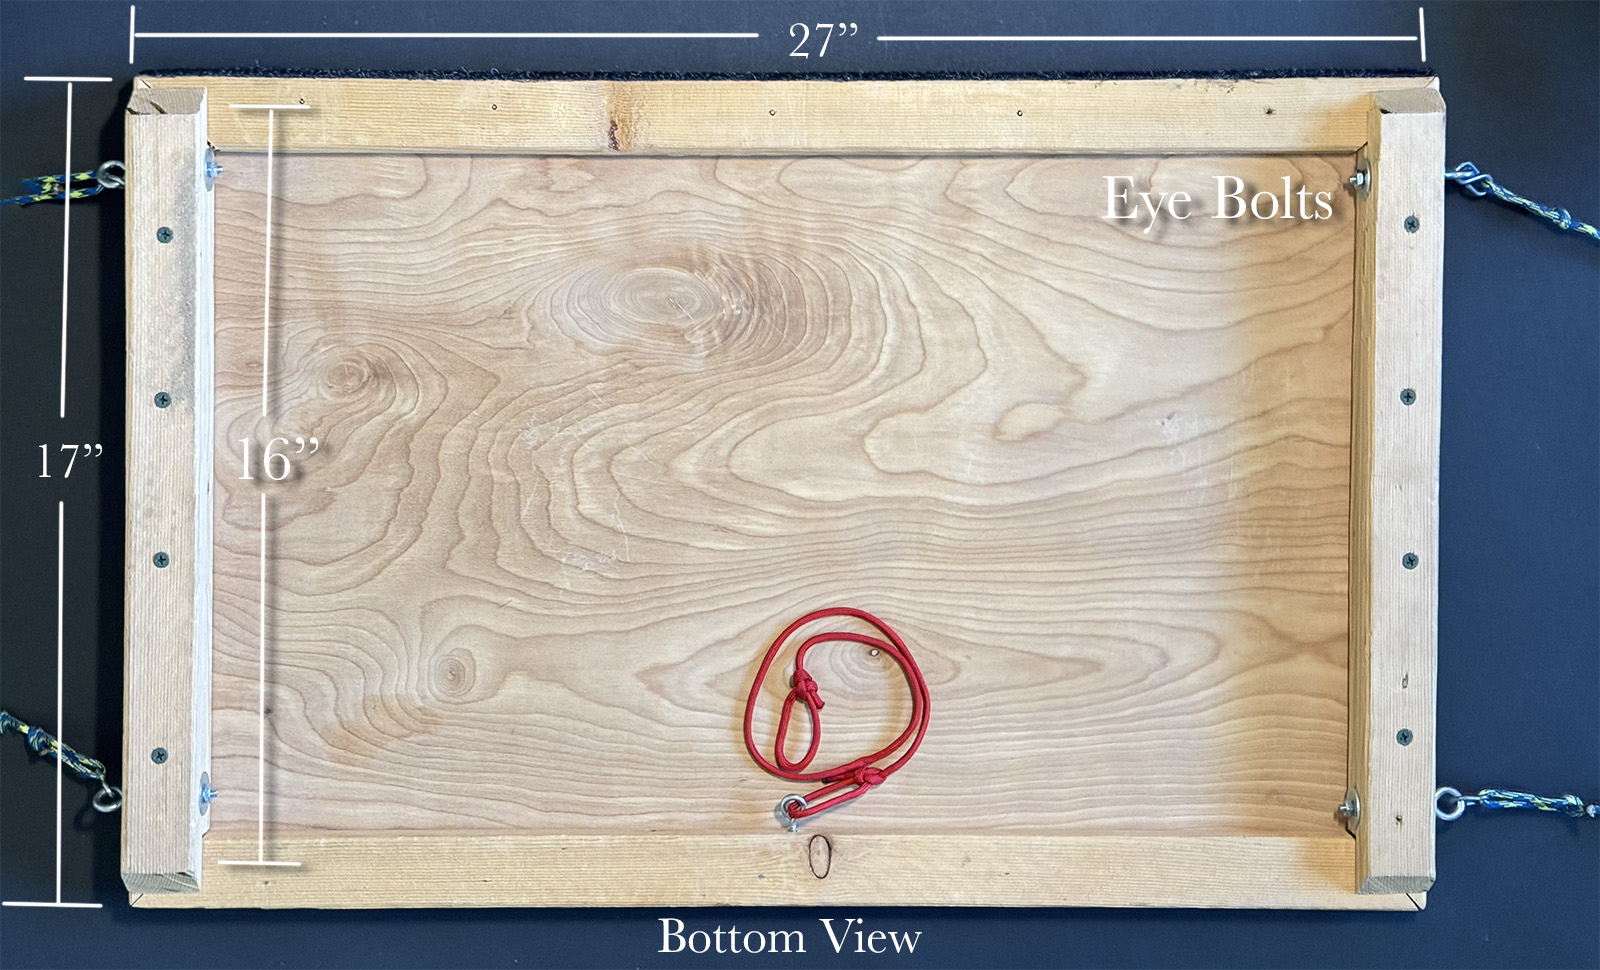
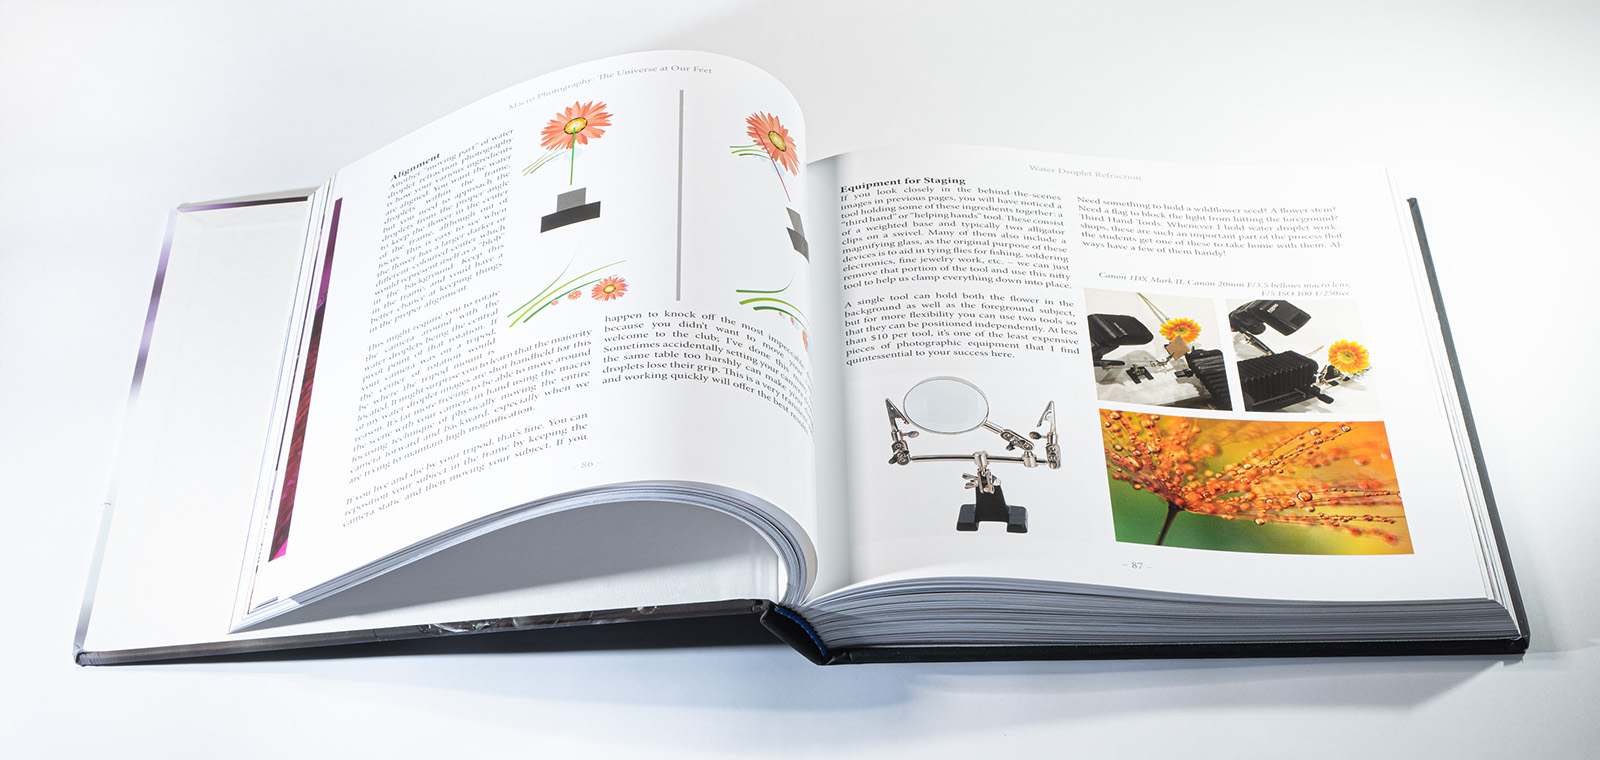
Bottom view. See text for instructions on size of screws and fasteners used in the project.
The top is 1/4 inch plywood, 17 X 27 inches. you can often check the scrap area and may be able to find a piece that fits your needs without having to buy a large sheet. Make sure you you get a quality piece of ply that is very flat. Oak Sanded Plywood in a 2 X 4 foot size can be purchased for around $25. To support and give the top strength I line the bottom with 1 X 2 inch Furring strip. Adding two more strips to the sides Get two 8 foot strips as they are under $2 a piece.
You’ll need 16 3/4 inch wood screw to secure the top. 8 1 1/2 inch screws for the side reinforcements. Four 2 1/2 inch by 1/8th inch eye bolts with nuts and eight washers. Four S hooks. Four Guyline tension hooks. 1 package of Guyline rope. (it’s good to have a lighter or match when you cut the lines to keep them from fraying) Two Velcro straps to attach to the roof rack. I found the Keeper Wrap-It-Up 1 inch X 6 inch Grey Bundling Strap at Ace Hardware.
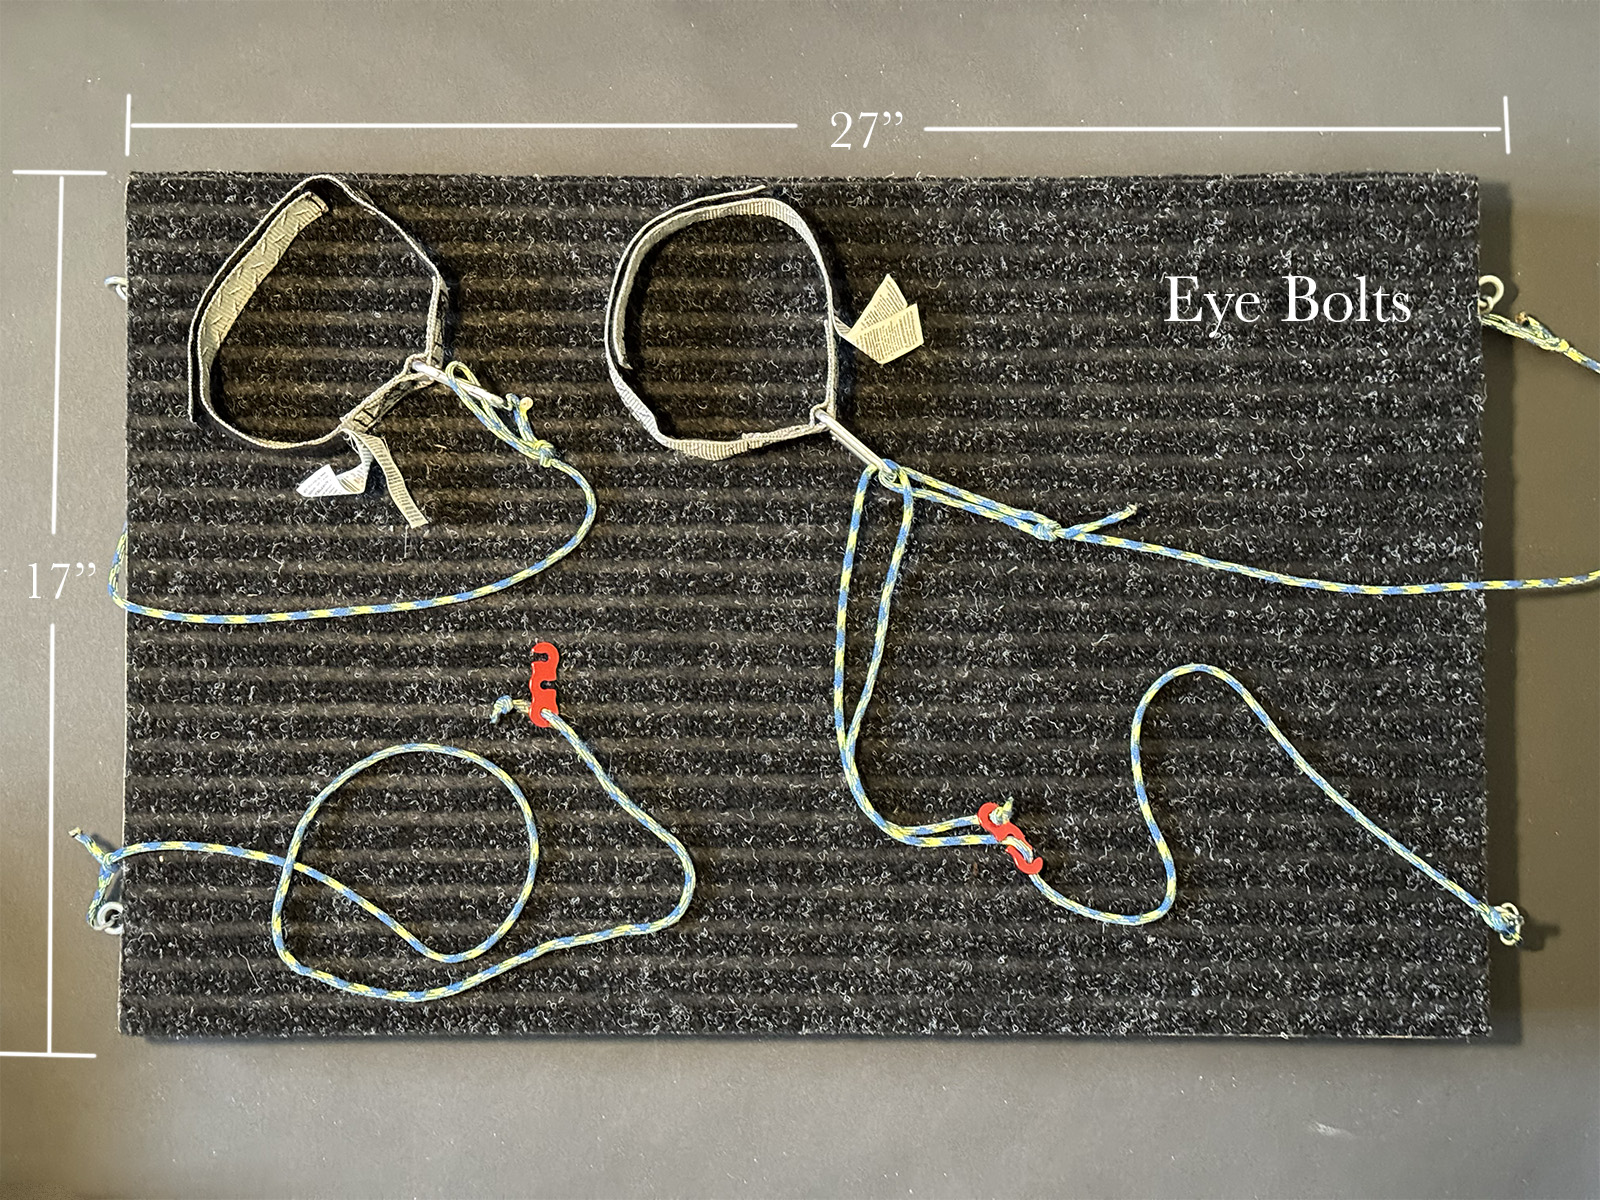
Final touch is layering with carpet. I use a black/gray utility mat. A 24 X 60 inch goes for about $20Big box hardware stores sell this by the foot. I staple a layer on top. Also a strip across the back of the table on the edge that rests on the car.
Top view with carpet stapled on place. There are four eye bolts to hold the lines. I use bowlines to attach the guylines. Strap have Velcro fasteners with a metal ring. The Velcro makes it easy to attach the table to the roof racks. The tension hooks allow you to adjust the table and keep it level.
International Photographic Competition (IPC) starts on Sunday.
If you have an interest in photography and would like to see some incredible work this is the place for you. Starting Sunday September 12 at 9AM EST through Wednesday you’ll have the opportunity to see the scoring along with comments when the judges challenge the results.
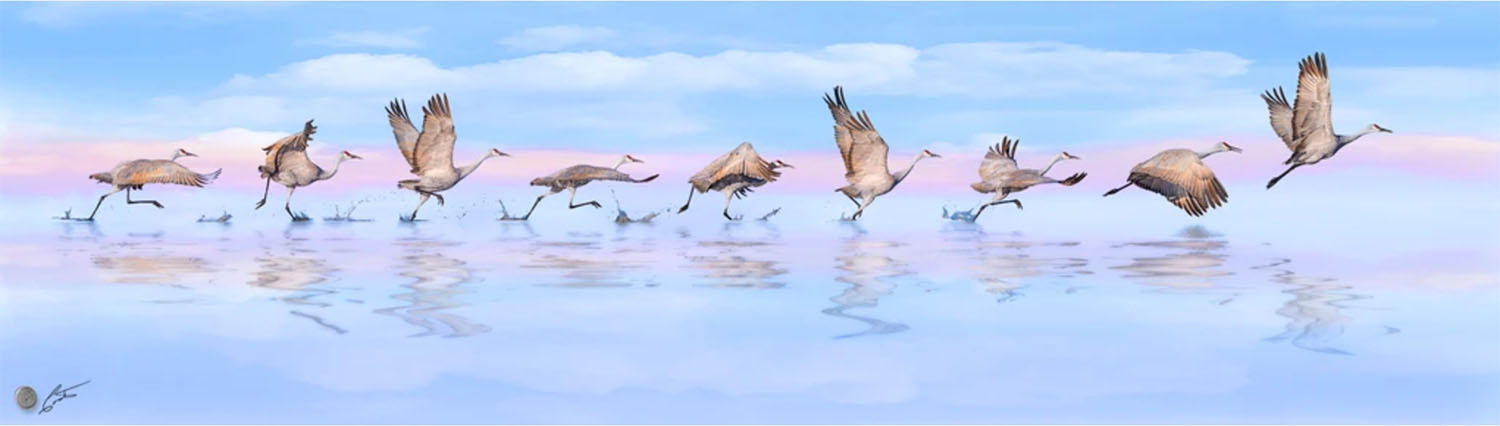
The header image above was titled ‘Taking Flight’ and was awarded LOAN Collection status two years ago.
Professional Photographers of America (PPA)
IPC is presented by PPA. It’s the chance for makers to have their work reviewed by trained judges. The resulting scores are part of the PPA Master of Photography Degree system. The degrees are designed to recognize above average work by above average photographers. This is also part of the initial selection process for Team USA in the Photographic World Cup as images are selected from the Image Excellence Award winners for the International Competition.
‘Orange Outburst’ is a water droplet photo made it into the PPA LOAN Collection last year. The LOAN Collection name will be changed to Image Excellence Award this year.
PPA image makers work all year to prepare their work for this event.
You can watch
While the competition is geared toward professional photographers and PPA members you are welcome to pull up a chair and join in the learning. You can stream IPC live from Sept 12–15. Judging starts each day at 9am ET. if you are not a PPA member? Create a free account to watch live. http://stream.theipc.org
Macro Photography: The Universe at Our Feet by Don Komarechka
Gotta tell ya, if you are wanting to start macro photography, or want to improve the macro work you are now creating, get this book. I’ve been a fan of Komarechka’s work ever since I saw his first snowflakes photos. He’s a master at his craft with a healthy curiosity that has him pushing the limits of the medium.
When I first saw the price on the book I was a little hesitant. So glad I pulled the trigger and got it. This is a solid reference on macro photography that beginners and experienced photographers will enjoy. I wrote a more in-depth review over at PhotoFocus. You can check it out here. https://photofocus.com/reviews/a-masterclass-in-macro-with-new-book-from-don-komarechka
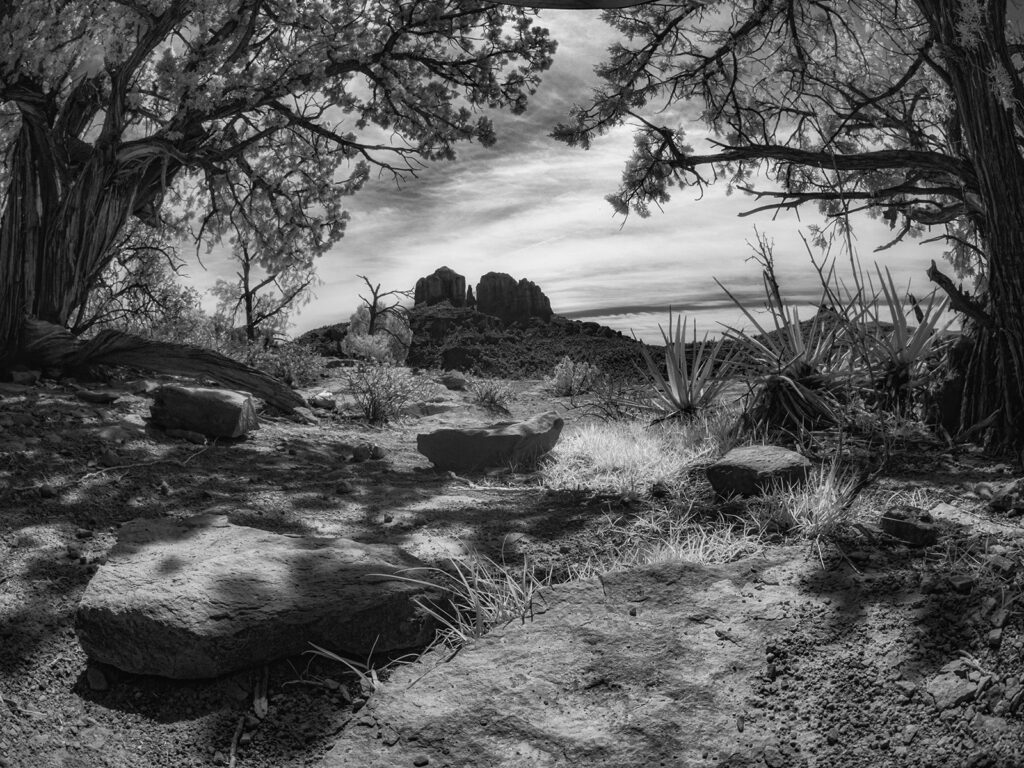
I’ve probably mentioned this before, but using an infrared converted camera increases your chances of coming home with a solid image when shooting in the middle of the day. I upgraded my infrared camera from a Lumix G6 to a Lumix GH4. If you have a camera languishing on the shelf not being used I recommend sending it off to LifePixel Infrared for a conversion. I know I was glad I did!
Midday
Those hours between 10AM and 3PM can be brutal on your images due to the high contrast. Infrared images thrive in that environment. I quite enjoy extending my keeper rate by working with infrared imaging.
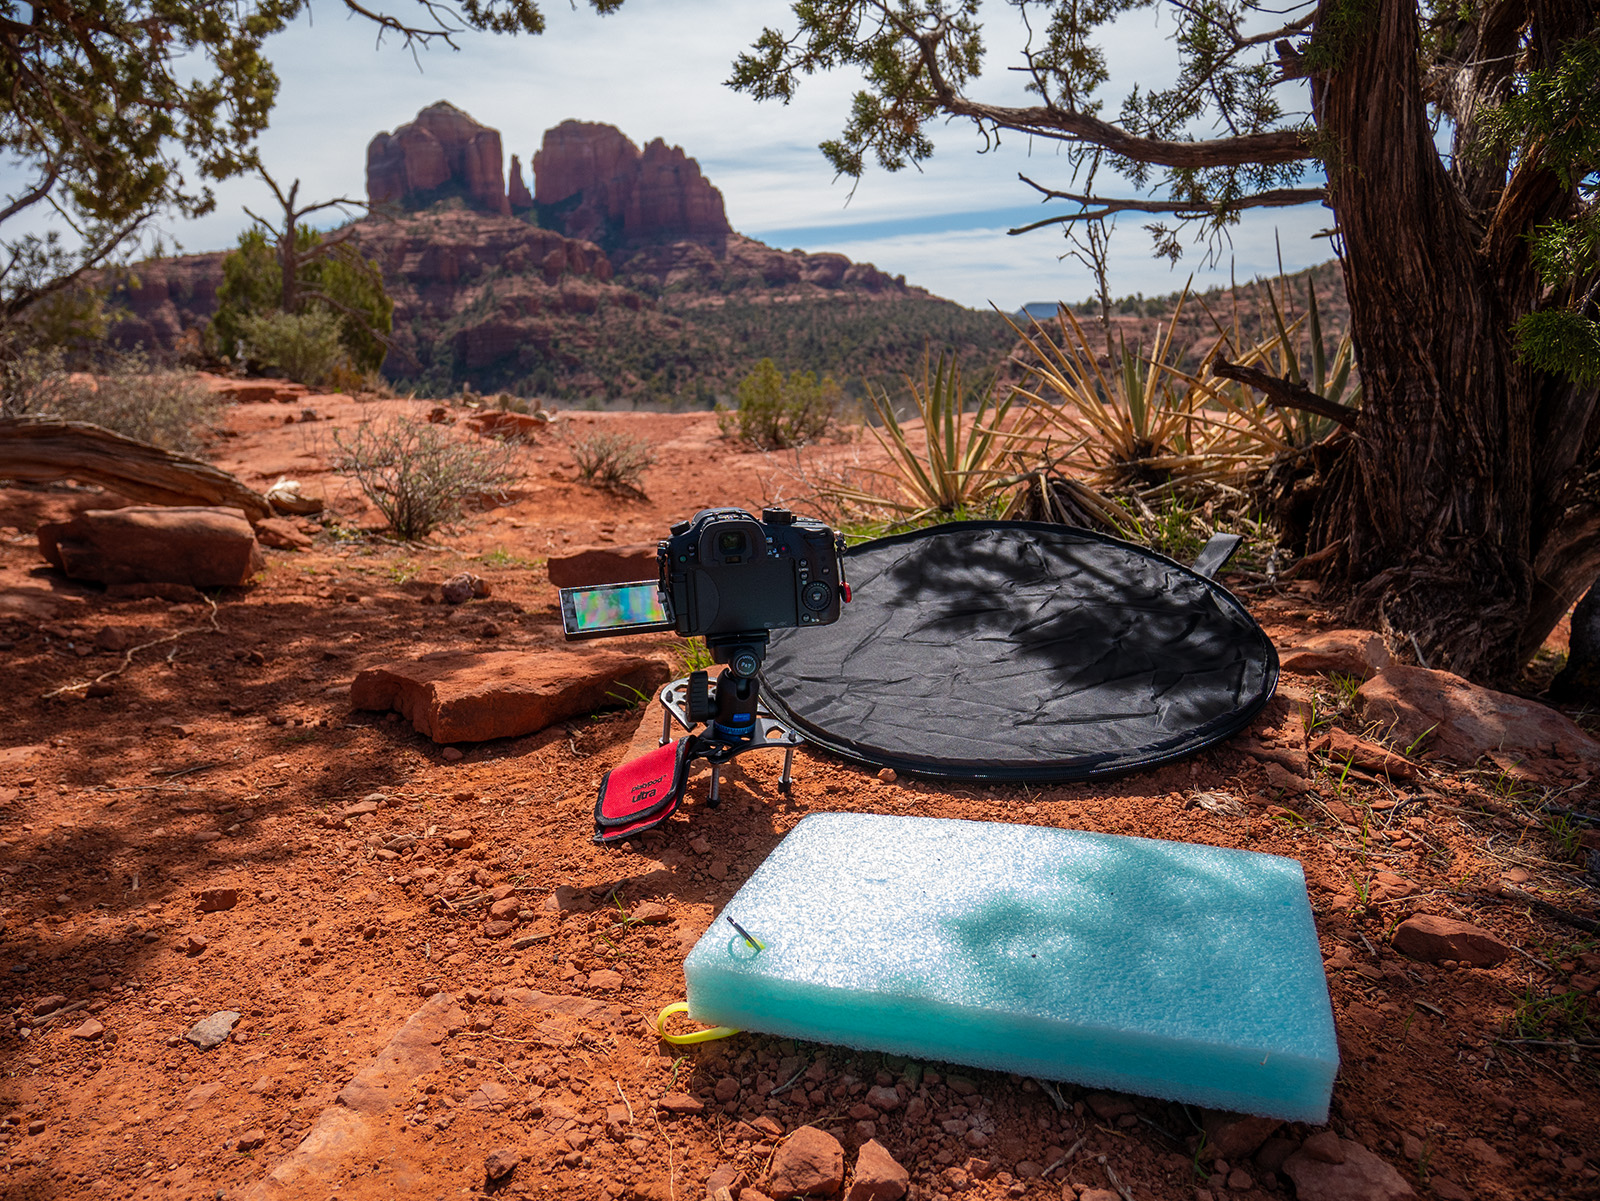
Platypod Ultra
From Sedona, Arizona, Cathedral Rock during midday. Renders in an interesting way using an infrared converted camera.
Another tool I find helpful is being able to easily have my camera low-to-the-ground in the Platypod camera support. I can hang the Platypod from my camera bag and since it is very light I hardly notice it’s there until I see a need for it. The Platypod is extremely helpful, especially if you have a flip screen on your camera. The flip screen allows you to be able to frame and focus the scene without having to get down on your belly. Bonus!
Photofocus
Here are a couple articles I wrote for Photofocus dealing with and expanding the uses of an infrared converted camera. Enjoy! Toning infrared images for a different look Infrared and summertime.
Number four of the five-part series on getting your photo book into print from my photographer friend Sara Frances. Start with Part One.
You are Designer and Editor
Paying outside services for book consultation, editing, cover, and design are the costs that put a book project out of reach to most photographers. Here’s the good news: your abilities with image making and with Adobe apps give you the tools to do this yourself. The power and facilities of Photoshop now provide almost everything you need; Both publishers and Adobe are noting that many books, including my own Fragments of Spirit, are now designed exclusively in Photoshop. Who better to select, sequence and design your photographic art into a beautiful book?
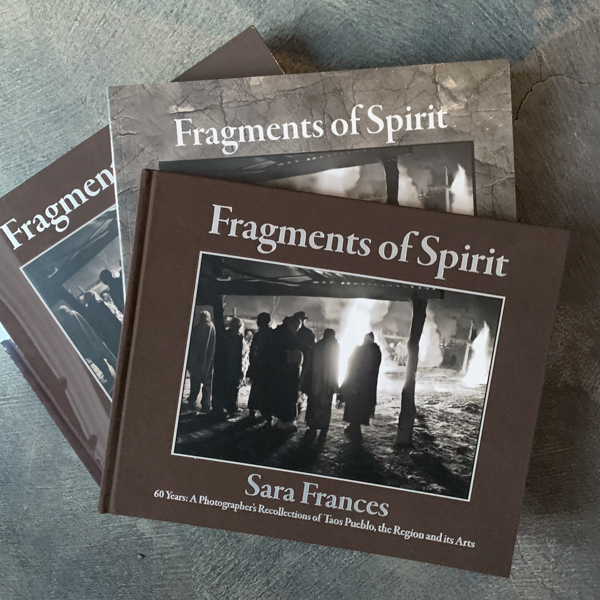
Cover of my own Fragments of Spirit showing both hard bound and soft bound versions. Note they must have separate ISBN numbers.
What do you need to know?
Once you’ve selected your eventual print house, query them about every detail of the specifications, and make a reference copy of all of this: file size and type, resolution, template, bleed margins, gutter, color space conversion, embedding images, vectors, layering, paper type and weight, cover stock, cover materials and debossing, single page or spreads, PDFs, FTPs, proofing, corrections, timing, delivery. You’ll be responsible for all of these, but it’s like paying yourself back for many things you already know how to do.
Three main pitfalls.
• Conversion to the specific CMYK required may make changes in your original file. Open the original and converted files side by side and compare as your monitor simulates that color space.
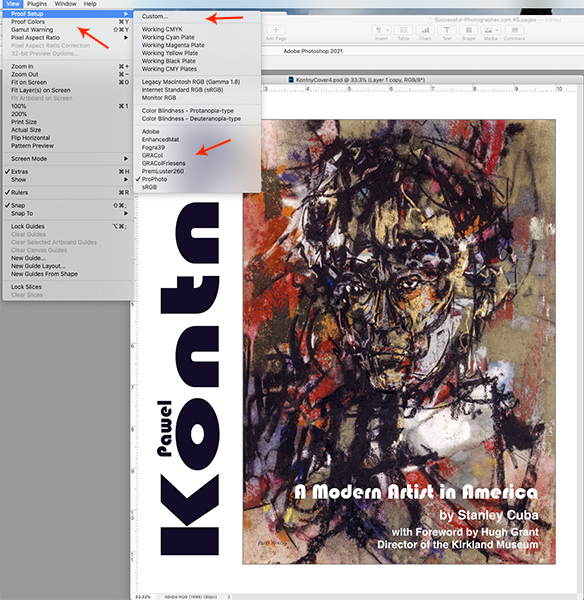
Go to View>Proof Setup>Custom and then a drop down menu. This is not sticky, so you have to recheck constantly, and it’s tricky to have two files open with different settings.
Where to find the Photoshop simulations of different color spaces. Click the Custom menu option for the long list, then save the ones you use most often lower down. Cover of an artist’s retrospective book I am currently designing for a museum.
• Different types of printing will require different contrast, saturation, and sharpness. This is an experience thing, and sometimes quite subtle. But you’re a stickler for precision, aren’t you? Ask (and pay) for a few pages in advance proofing to see directly what you need to do. Continuity is king. Sometimes proofing is with inkjet that will be similar, but not as sharp as the final printing, and possibly have a paper-driven color bias (this is not done on your studio Epson or Canon equipment.)
• Photoshop is a hybrid: not fully bitmap or vector in its file structure. Vector PDF submission is essential for all traditional offset printers I’ve encountered. I’ve found the easiest way to create the vector PDF is to open in Illustrator> convert layers to objects> save out as an Adobe PDF. Then Acrobat will take the single page or spread file and create one document. You’ll be uploading to the printer’s proprietary site.
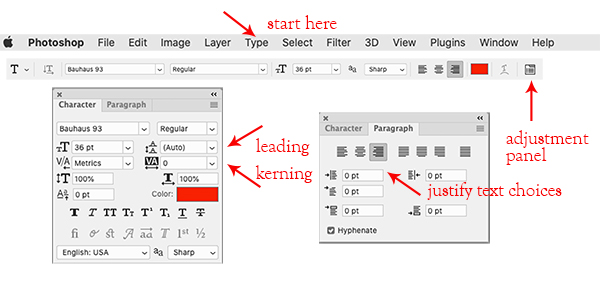
Settings that make you look like a seasoned pro with type manipulation in Photoshop.
Sound like a lot?
Not really, because you are only adding a few nuances to the skills for every piece of commercial work you manipulate and enhance.
Want more detail? Sign up for my Zoom online 8-week class at Osher Lifelong Learning Institute at the University of Denver, Boulder location. All teachers are unpaid volunteers. Next class starting 1/12/21.
Or, look for the next Professional Photographers of America Super One Day!
Sara Frances
Sara is a many-decades Master Photographic Craftsman out of Denver whose artistic focus has always been book making with images. Her albums won PPA merits starting well before digital capture, as well as for what is believed to be the first ever awarded portrait album. She has evolved from daily, shorter-term studio photography into exclusively special projects of long commitment. Her second hybrid photo/memoir art book, Fragments of Spirit, now published under her own mark, Photo Mirage Books, is available mid-December 2020.
Renewing her lifelong interest in creative writing, she was recently was accepted for Lighthouse Writers Workshop’s Poetry Collective, graduating a year later with a forthcoming hybrid work marrying over 275 manipulated iPhone images with 120 poems: What to Wear to Paradise.
Her three-year quest to learn all facets of the art book industry has influenced her to give back with hands-on publishing classes. She is a judge for the Independent Book Publishers Association (IBPA) and for Colorado Independent Publishers Association (CIPA.) She teaches for Osher Lifelong Learning Institute (OLLI) at the University of Denver, for PPA Super One Day seminars, and also mentors hybrid image/text projects.
Number three of the five part series on getting your photo book into print from my photographer friend Sara Frances. Start with Part One.
Limited Editions
Sometimes it’s just plain too scary to dive in with a 1,000 unit press run. Here are four kinds of limited edition printing, also called short run, appropriate for different needs. There will be fewer technical requirements, and turn around is generally very quick.
Totally handmade art books, perhaps an “edition” of just one to 10 that are highly original possibly with unconventional materials, just a few pages, often hand-sewn and assembled. This is mostly the province of fine art galleries or very personal projects. OK, this one depends totally on the photographer’s skills and inventiveness.
An immediate family history, portrait, event, or wedding book with as many as 50-100 pages, generally printed by a photo lab like Miller’s, a specialty house like Finao or Azura, or Shutterfly online (the most accurate of the consumer-oriented, but very professional printers—in my experienced opinion.)
Or Traditional Offset Printing
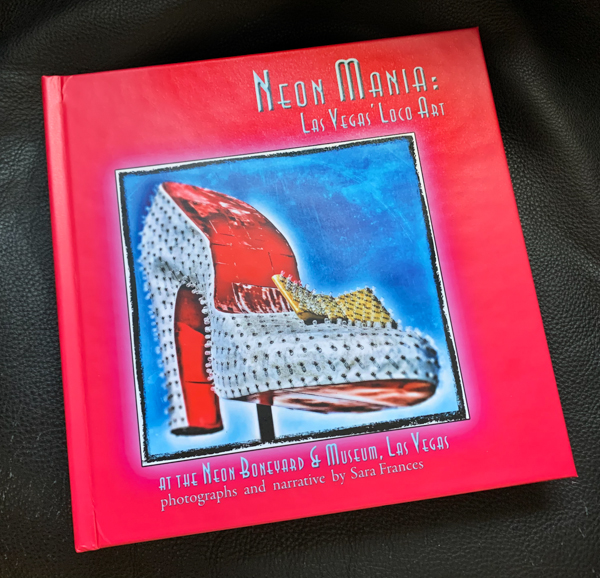
My one-off, personal project about rescued neon signs of Las Vegas. Shutterfly lay flat 10×10˝.
Photographers who don’t finance a typical run of 1,000 or more units, and instead choose “on demand” printing, (or minimum quantity initial purchase,) to sell in their galleries, studios, and to their mailing list of followers.
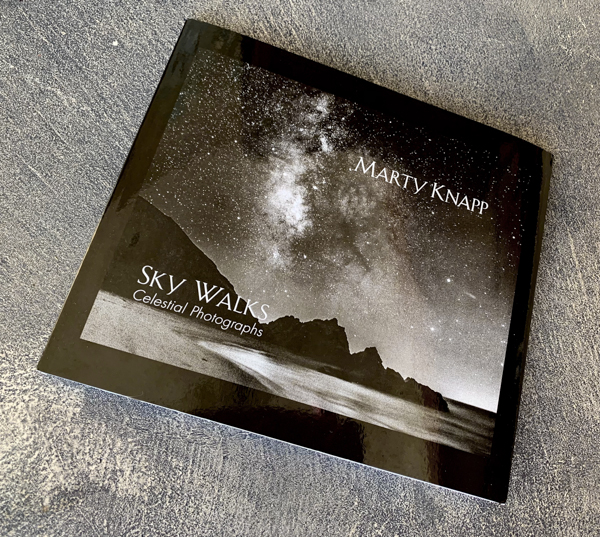
Cover of Marty Knapp’s gallery short run pre-paid order. BookMobile digital toner 8×8˝.
Pre-press proofing and review copies via a short run make it easy and cheap to take a last editorial dry run to revise minor faults in the complex printing concerns of precision color and content. This alone can save the heartache of simple errors discovered after the main print run is already in the warehouse and can’t be sold with confidence. I use this fail safe, intermediate step for all my books.
Big tip: Recommended examples of print houses that fulfill the last two needs are my favorite HFGroup.com (bookpartners.com) or BookMobile.com.
Money and relationship – full edition printing
When you’re ready to plunge into a full edition with a traditional offset printer, it’s about money and relationship. These two huge factors make it essential to choose a printer before you begin to design your book, seemingly putting the cart before the horse! It’s those niggling details that differ widely—the most costly error you could make is to design a 10×12” book only to find that 9.75×12” fits well with the printers equipment and would have cost $5,000 less. For me, the most important variant is the flavor of CMYK color space—the conversion to which may or may not mesh well with your original RGB files.
Time
The traditional route will take a good deal longer, but provide all sorts of quality controls along the way. Of course you’ll be footing the bill yourself for a large number of units, unless you can write a grant or raise Kickstarter-type funds. It’s true that the most economical book printers are off shore. Hong Kong, Peoples Republic, Turkey, Singapore, Korea, Canada. Fortunately there are many print brokers state side. Big advantage to deal locally, contract locally, and pay locally. You’ll easily save 60% or more and be confident that these companies are highly experienced in book printing. Of course you can also email with on-site tech to express your needs more fully—it’s been effective and prompt to ask questions of the actual factory. Totally exciting to partner and watch (even from a distance) the process unfold. For suggestions for getting bids, please email me at SaraFrancesPhotographer@gmail.com.
Sara Frances
Sara is a many-decades Master Photographic Craftsman out of Denver whose artistic focus has always been book making with images. Her albums won PPA merits starting well before digital capture, as well as for what is believed to be the first ever awarded portrait album. She has evolved from daily, shorter-term studio photography into exclusively special projects of long commitment. Her second hybrid photo/memoir art book, Fragments of Spirit, now published under her own mark, Photo Mirage Books, is available mid-December 2020.
Renewing her lifelong interest in creative writing, she was recently was accepted for Lighthouse Writers Workshop’s Poetry Collective, graduating a year later with a forthcoming hybrid work marrying over 275 manipulated iPhone images with 120 poems: What to Wear to Paradise.
Her three-year quest to learn all facets of the art book industry has influenced her to give back with hands-on publishing classes. She is a judge for the Independent Book Publishers Association (IBPA) and for Colorado Independent Publishers Association (CIPA.) She teaches for Osher Lifelong Learning Institute (OLLI) at the University of Denver, for PPA Super One Day seminars, and also mentors hybrid image/text projects.
For infrared conversion of my cameras I use LifePixel. Infrared allows you to put an older camera to use and opens up a new time time of day for productive image creation.
Learn Photoshop in a fun environment. Aaron Nace applies the right amount of fun with easy to understand and follow tutorials. Actions and brushes are included with lessons!
Best embroidery ever. Give Queensboro a try, get a $20 instant credit to get started by clicking on the logo! They specialize in great quality custom logo apparel and promotional products with the best customer service.
Platypod has become a great resource for being creative in getting your camera gear easily into unusual places. As an Platypod Pro I get to work/play with the gear even before it comes out. Head over to Platypod, subscribe to the newsletter and you will get special discounts reserved only for subscribers.