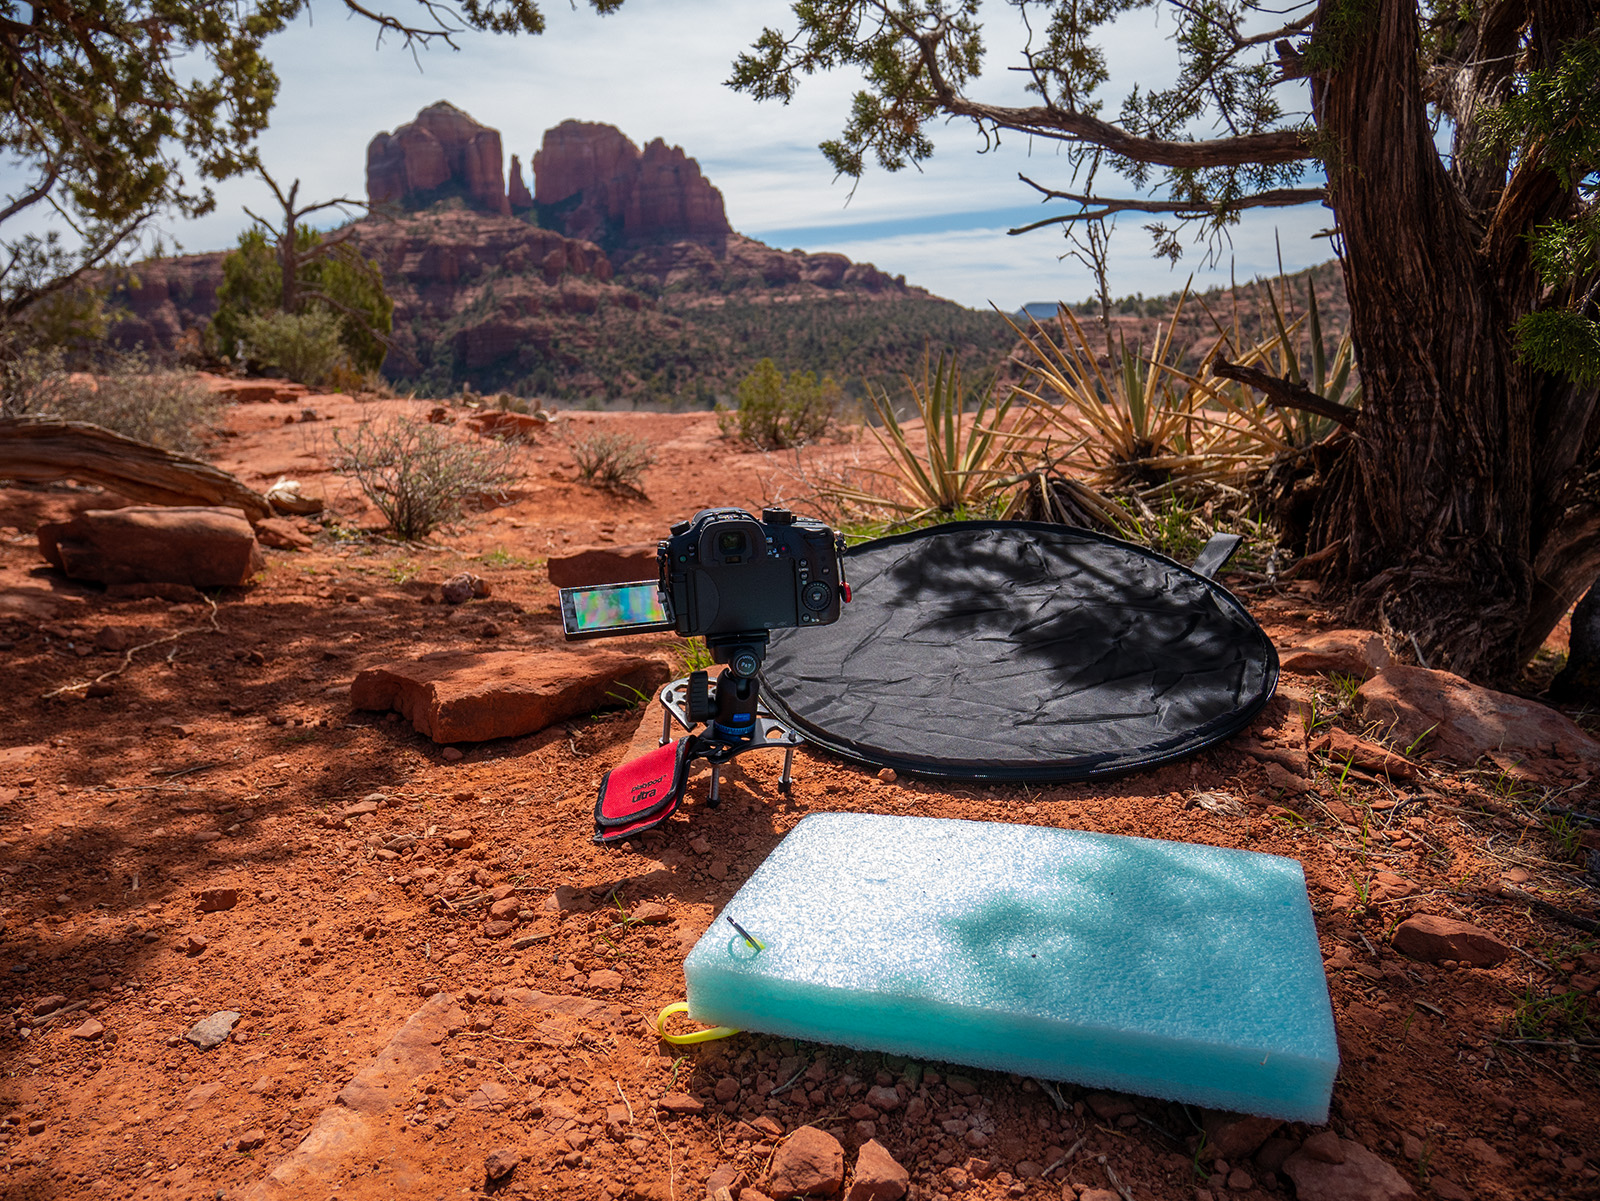
I’ve probably mentioned this before, but using an infrared converted camera increases your chances of coming home with a solid image when shooting in the middle of the day. I upgraded my infrared camera from a Lumix G6 to a Lumix GH4. If you have a camera languishing on the shelf not being used I recommend sending it off to LifePixel Infrared for a conversion. I know I was glad I did!
Midday
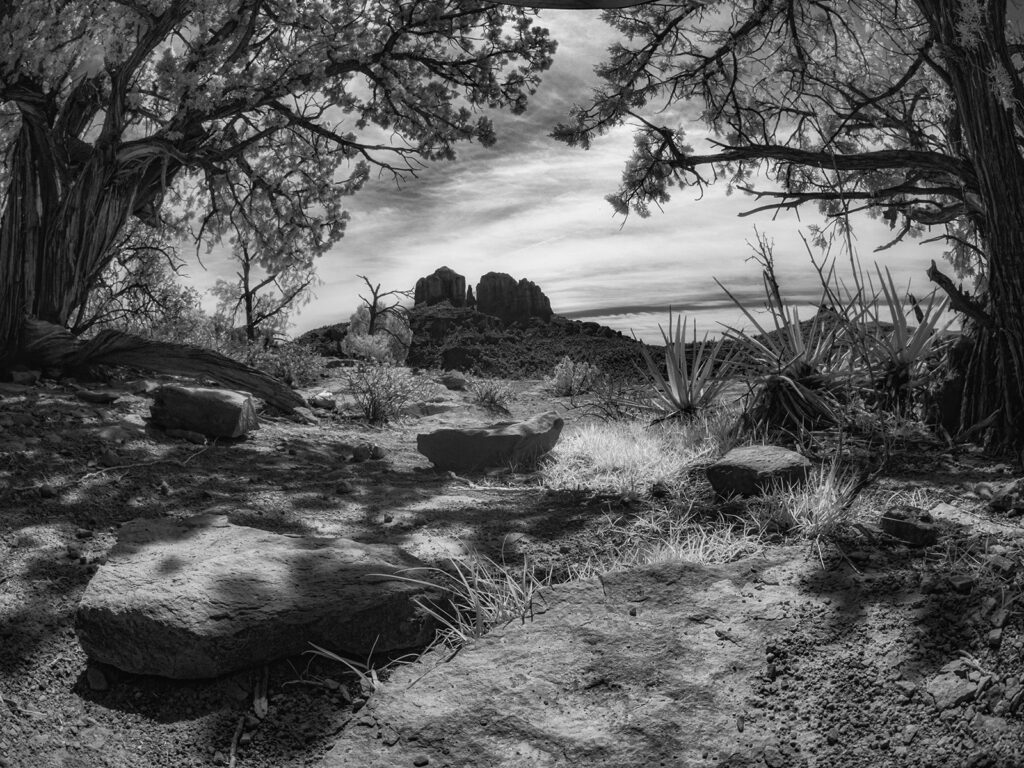
Those hours between 10AM and 3PM can be brutal on your images due to the high contrast. Infrared images thrive in that environment. I quite enjoy extending my keeper rate by working with infrared imaging.
Platypod Ultra
From Sedona, Arizona, Cathedral Rock during midday. Renders in an interesting way using an infrared converted camera.
Another tool I find helpful is being able to easily have my camera low-to-the-ground in the Platypod camera support. I can hang the Platypod from my camera bag and since it is very light I hardly notice it’s there until I see a need for it. The Platypod is extremely helpful, especially if you have a flip screen on your camera. The flip screen allows you to be able to frame and focus the scene without having to get down on your belly. Bonus!
Photofocus
Here are a couple articles I wrote for Photofocus dealing with and expanding the uses of an infrared converted camera. Enjoy! Toning infrared images for a different look Infrared and summertime.
For those that compete (or want to compete) at the International Photographic Competition (IPC) through the Professional Photographers of America (PPA) an important part of the process is presenting your image properly. There are twelve elements on which the images are judged. One of them is image presentation.
Think of it like this. Have you ever had an image that you thought was quite good? Then framed it and it looked even better? That is what you should try to make your image do when putting together your submissions.
Here is a video to give you one way to put together a presentation for a black and white image. This example is showing a double keystroke. The final image could be done with a single keystroke as well. As an artist it is your choice for the color (or tone) of your keystroke as well as the width. Coming soon, I’ll share some ideas on working with color images.
If you have any questions on PPA image competition, don’t hesitate to ask. I wish you the best in your competition journey.
Yours in Creative Photography, Bob
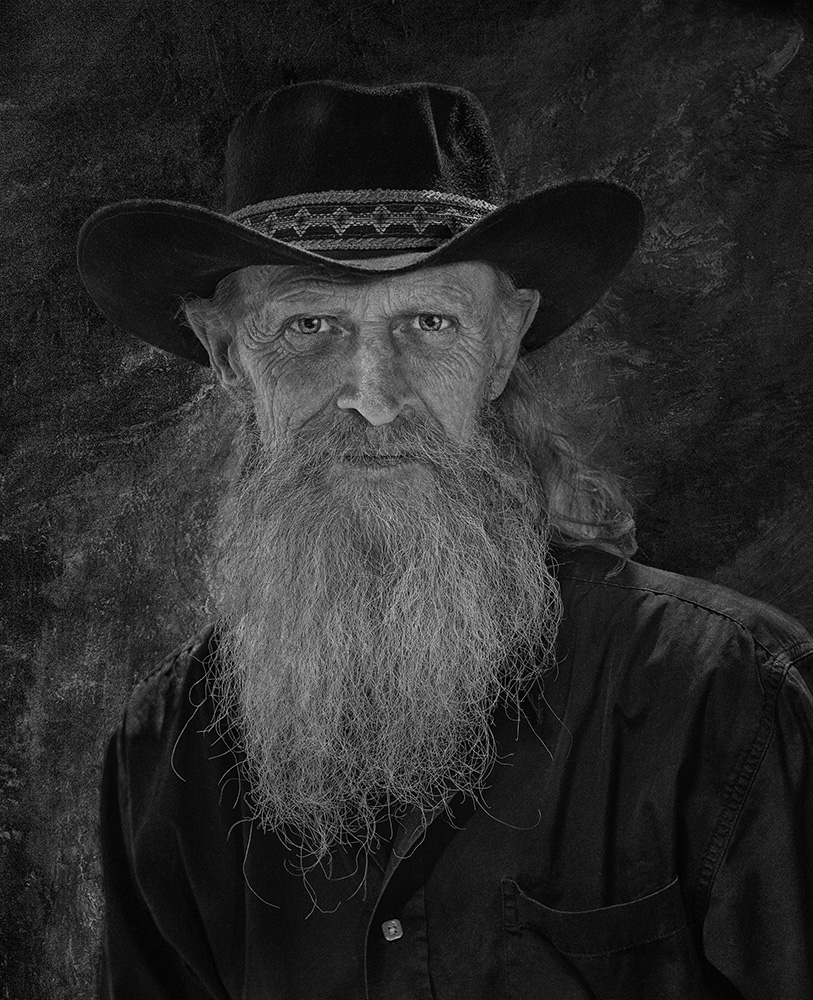
PS – The subject is Craig Christopherson a wood and metal sculptor. See some of Craig’s work here on Instagram. Image was made with the Lumix G9 and 42.5mm f1.2 Leica lens. You can see how I went from the original capture to the final post processed image in my blog on post processing with Adobe Photoshop and Skylum Luminar 4 software.
Here’s my final wrap up from Imaging USA in Atlanta.
As mentioned, but worth saying so again, networking and speaking with people is a great way to continue your education. And I don’t think you can put a price on that.
Accolades at IUSA
I mentioned some ASP accolades that were earned this year and I also want to recognize the Grand Imaging Awards. This is a way for people to be recognized to push and further their photography skills. While the GIA’s are the pinnacle you don’t wait until you think you have the imagery to win there, you get there by getting into it to learn. These results come from International Photographic Competition (IPC) which is a contest with yourself to become better than you were the previous year and to learn, sometimes through hard knocks, what you might do to better your skills. In my opinion, IPC has been probably the single most important vehicle in helping me become the image creator I am today. Not to mention that it generates a reason to send out a press release, not only when you are successful, but even just being a participant! (you know me and press releases for promoting my business!)
I was a Silver Medalist and Bronze Medalist by going four for four in the two of the image cases I submitted. Proud of those results indeed. I also managed to earn a Third Place GIA Award in the Non-Event Album category with architectural images made from a personal project captured at the Phoenix Art Museum.
There were other AZPPA peeps that did well too but these are the highlights. It has been so amazing to watch those that enter competition accelerate their photographic voices so quickly. AZPPA is having their image competition this weekend. Time to get in! If you are looking for feedback on your work with PPA Approved Jurors and Jurors in Training you can get in to get scores too. Awards are for AZPPA members only. AZPPA Convention
Creating Good Animal Photos from a Captive Environment – Part Two
Last zoo post I was sharing some ideas on learning wildlife photography skills while photographing captive animals. See Part One here
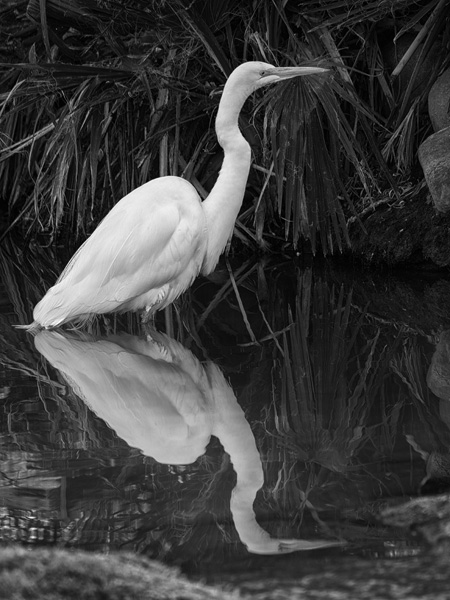
I followed this Great White Egret until the reflection was completed from beak to tail. The black and white treatment brings the bird to the highest contrast attention
One of the essential skills is to learn to queue on behavior. This means learning to see when the behavior will change. What will happen when you look at the feathers shaking in a certain way or excrement fall from a bird. These are indicators that signal flight or a change of wing position and either of those can lead to a more interesting photograph.
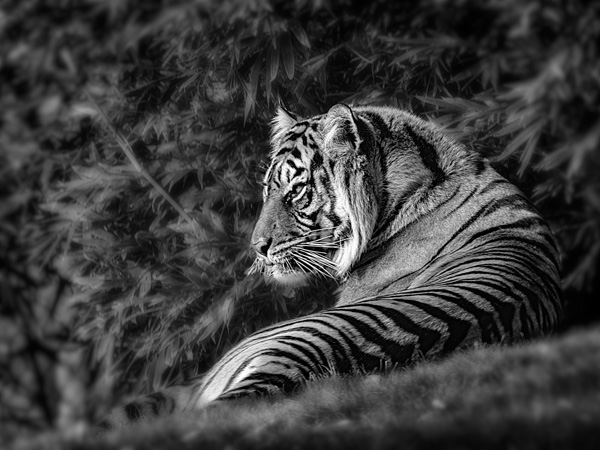
Processed this image to BW also. Slight sharpening of the tiger using Skylum software as an Adobe Photoshopplug-in. I also softened the foreground and background with a gaussian blur as well as a darkening Curves layer Significant help for me that increased my ‘keepers’ in photographing images of animals in zoos, parks and in the wild was a lens that has a long reach. The micro 4/3rds Panasonic Lumix system has been an enormous help. Being able to handhold an 800mm equivalent lens makes a huge difference because of the mobility and distance from the animals. The less you disturb your prey and having the ability to still fill the frame is golden.
Don’t lose sight of other opportunities when photographing wildlife. This split tree trunk was good for an abstract look of colors and tones.
My main camera these days is the Lumix G9. The stabilization system gives an extra six and one-half to seven stops of hand-holdability. This means that hand holding a lens of 800mm equivalent at 1/60th of a second is very possible with sharp results. My favorite lens is a zoom lens – Leica 100-400mm f4.0-6.3
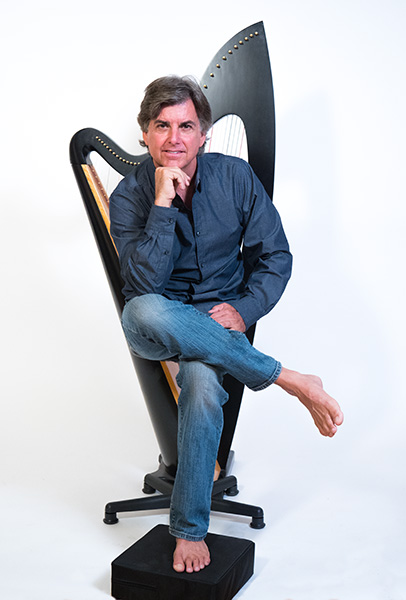
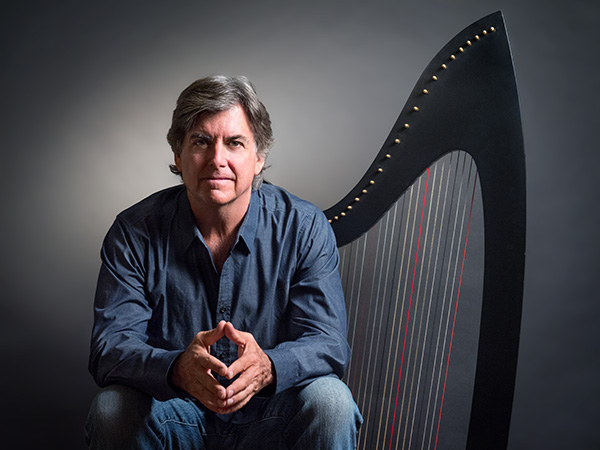
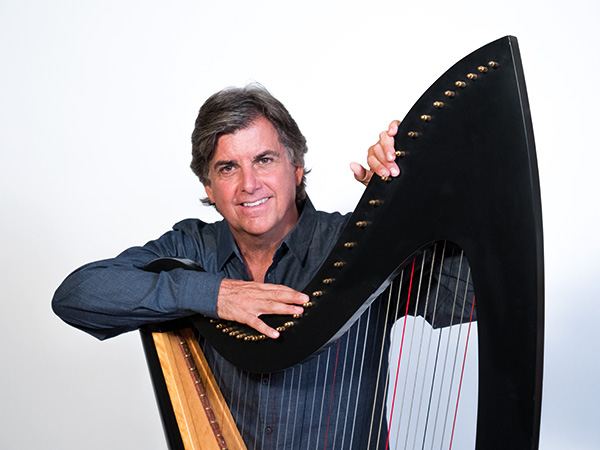
I enjoy working with creative people. It’s a blast. Creative folks tend to bring an extra little something to the photo session. I was working with Sedona musician Peter Sterling the other day. He had some specific thoughts on the session we were photographing for some headshots and CD cover art.
Once an idea is put forward, then it’s time to tweak the lighting to create the mood and feeling needed. We started with a high key background then went to a low key background with more dramatic lighting.
One of the first images from the session. * setup described below Harpist Peter Sterling
Above and below are unretouched photos on a high key background. Peter was an excellent subject as he made excellent eye contact with the camera and was easy to get relaxed. He made my job pretty easy!
I liked this one as a different look but wasn’t thrilled with the foot pad and stool. I wanted to crop in but it has a very casual feel, and it keeps growing on me.
Moved to a black background and worked on a more moody look. Peter asked me to retouch this one, and I like it a lot! ** the setup described below
When I do final retouching for artists, I always include a black and white version. This is often way better than sending off a color image and letting the newspaper or magazine do the conversion.
* White seamless backdrop with a Fiilex 360ex Variable LED light with 24×36 inch softbox as main light (camera right) Camera left another light with a smaller softbox used as fill.
** Black seamless backdrop and lights as above but adjusted for more drama. A 5-inch Fiilex Fresnel attachment was added to another light for the background
For infrared conversion of my cameras I use LifePixel. Infrared allows you to put an older camera to use and opens up a new time time of day for productive image creation.
Learn Photoshop in a fun environment. Aaron Nace applies the right amount of fun with easy to understand and follow tutorials. Actions and brushes are included with lessons!
Best embroidery ever. Give Queensboro a try, get a $20 instant credit to get started by clicking on the logo! They specialize in great quality custom logo apparel and promotional products with the best customer service.
Platypod has become a great resource for being creative in getting your camera gear easily into unusual places. As an Platypod Pro I get to work/play with the gear even before it comes out. Head over to Platypod, subscribe to the newsletter and you will get special discounts reserved only for subscribers.


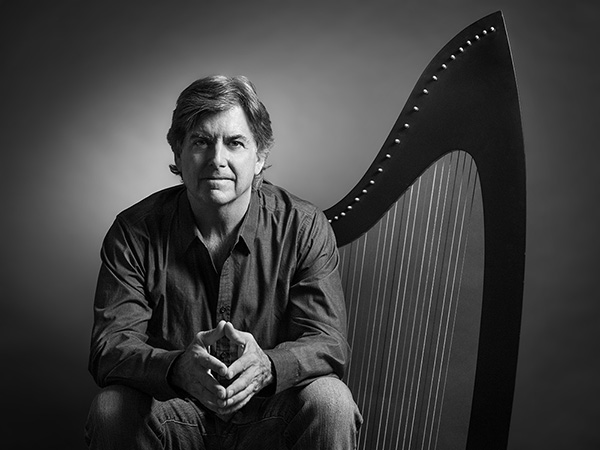
 Harpist Peter Sterling