At sunrise. At sunset. In the middle of the day. From below. From above. The constantly changing and rearranging palette of shape, form, and color keep me pointing my camera at the sky. I wonder if the Judy Collins song, a trendy song in my youth, might have something to do with it?
“I’ve looked at clouds from both sides now From up and down and still somehow It’s cloud’s illusions I recall I really don’t know clouds at all.”
Judy Collins
Check out the song at the bottom of this post! Turn it on while you are reading.
Here are a few cloud images from the last couple days.
Look at how many different cloud types are in this section of sky. Out west here in AZ this usually happens when a front is moving in after a dry spell. Just enough wind to change some shape and at different levels of elevation
When a wonderful cloud situation appears, I usually shoot the heck out of it. Horizontal, vertical. Wide-angle and zoom. All give a different look which may work differently for various applications. For example, You don’t typically want to put an image that was photographed with a long focal length into an image that was made with a wide-angle lens. You can’t always put your finger on it, but it just doesn’t ‘feel’ correct.
This image from later in the day
And, of course, what would a sunset be without a silhouette to give it a little interest.
You might ask, “Bob, why do you photograph the clouds?” And, I’m glad you did.
Number one, I enjoy them and like to review them when the sky is in a more monochromatic mode.
Number two, sometimes my images might need a little help as the day was cloudless and the right sky can add drama and life to an otherwise ordinary photo. Having a large selection of all types of cloud formations at your beck and call makes for believable results. When changing out a sky in a scene one must match the lighting direction and tone of the image, or it will have that, “That sky was replaced.” look.
Number three, I’ve found that adding cloud images to my artwork can add, life, depth, and dimension through using Photoshop’s Blend Modes. When using Blend Modes clouds can add pizazz because they contain lots of changing tones.
Number four, I’m not alone in my love of clouds. For example, on Instagram the hashtag clouds and cloudfreakHave almost Eighty-four MILLION posts.
The images in this post were captured with the Lumix LX100. This is a handy little guy (just a little bigger than pocket size) to have around. Fast glass, wide-angle to medium zoom range and all controls are available on the outside of the camera. Not necessary to go into the menus after initial set-up of the camera.
I’ll revisit clouds from the other side in a few days.
I’m still a bit limited in getting out to photograph I’m trying to keep my camera reflexes in good shape. I continue looking for creative photo opportunities close to home. Anytime I can study the behavior of birds, no matter the type I find it adds to the storehouse of knowledge that will make ALL my avian photography better.
A case in point. I’ve been watching birds from my back porch and seeing what I can do to show behavior. I prefer to show movement vs. a still portrait in my work when possible. I have noticed that birds will tend to repeat patterns if they are hanging out in one area. IE a hummingbird will approach a feeder or flower a certain way almost every time returning to the same branch to rest. If a bird goes to the top of a tree, there is a good possibility that the bird will return to the same branch in a short period. I often share that you need to observe wildlife for a while before picking up your camera for the most exciting images.
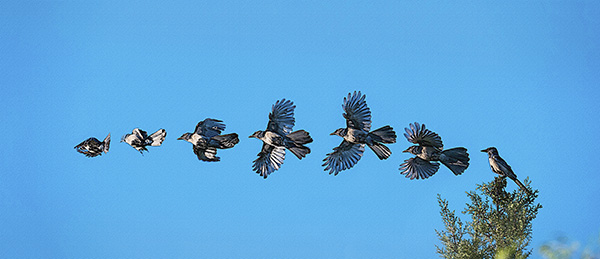
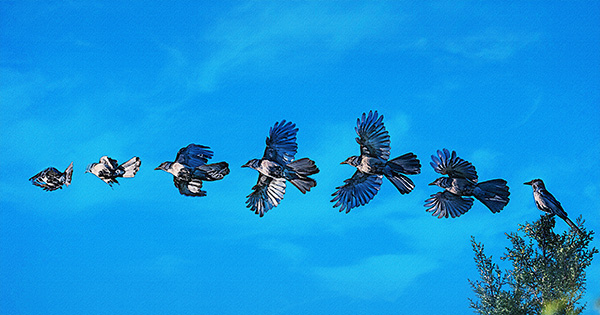
Screen capture from Adobe Bridge of bluejay flight
Most birds will take off into the wind. The bluejay above was facing the sun and the wind direction. The Great Blue Heron along with many other birds will usually offload some poo just before taking off. If startled or they are feeling threatened they will tend to turn away from the perceived threat.
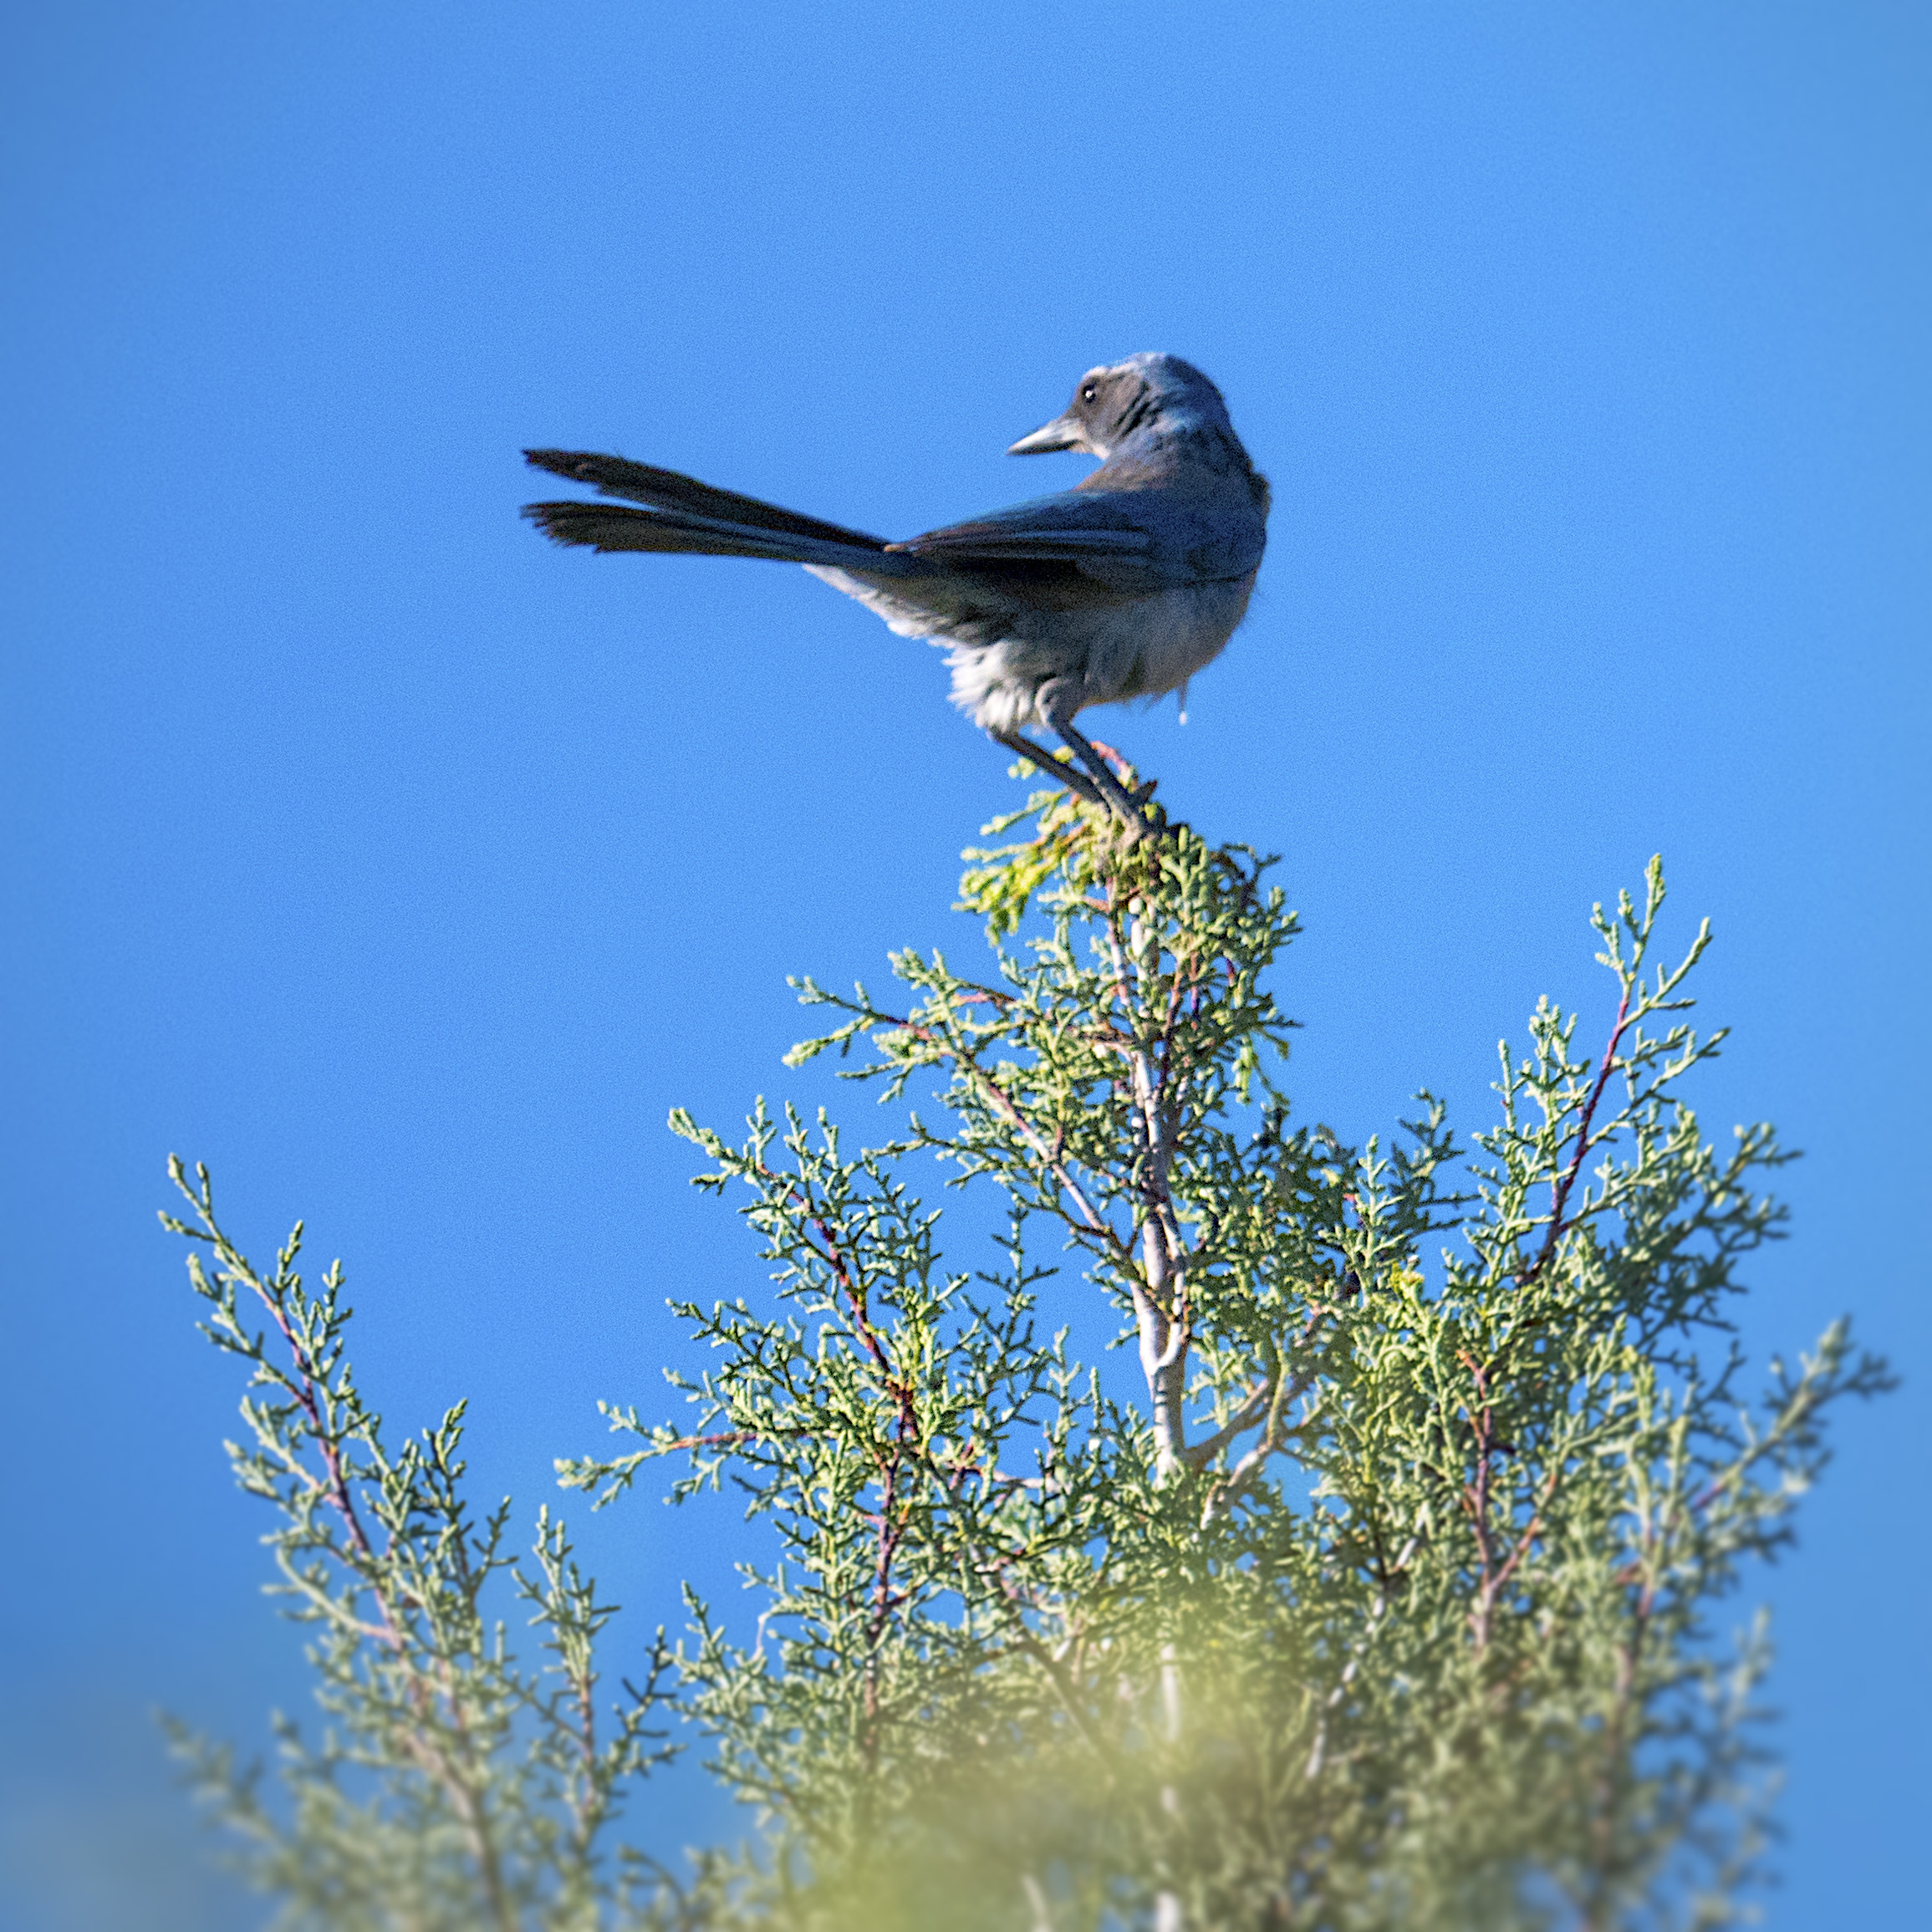
This bluejay landed in the top of the tree waving in the light breeze.
I watched as it left the tree and tried to memorize how it began its flight. Did it fly high and up or start to dive to create lift? How did the wings move? With that image in my mind, I set the Lumix G9 camera to SH which stands for Super High speed. It uses the electronic shutter to allow for twenty FPS. The Leica 100-400mm lenswas used fully racked out to its 800MM equivalent
Flight of the Bluejay with watercolor treatment
The image above was composited using Photoshop Layers and Masks. All relevant photos were selected in Adobe Bridge. Under the Tools Menu, I chose Load Files into Photoshop Layers which placed all files into a single PSD. Additional canvas size was added to the left side. Each image was offset and masked so that each image was not overlapping. Then a series of Photoshop Filters were applied to create a watercolor feel to the image.
Because the sky was flat, I added a cloud image to the Photoshop File.
A cloud image was opened and dragged into the flight file. Blend Modes were experimented with until I found one that added subtle sky detail.
This one might call for a Photoshop tutorial to show the progression of this image build. Let me know if you would like to see me produce one.
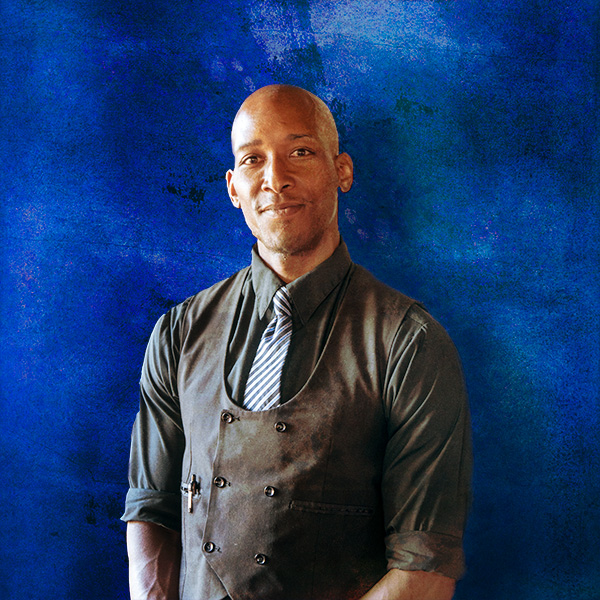
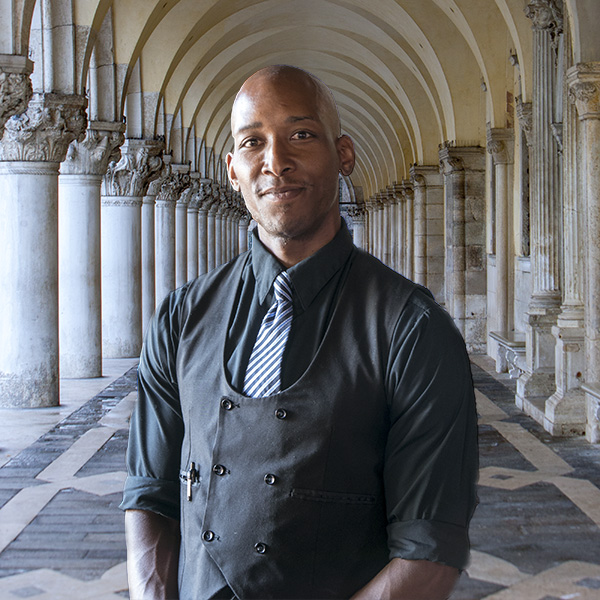
While out to dinner with my wife I was studying, as I always seem to do, the light as it played across the room. I also watch the shadows on faces as people step into different light situations. Ray, the waiter, was standing with the large light source of the front doors shaping his face. I was taken by the way the light split his face. I asked if he would mind stopping for just a moment so I could get a quick capture. He agreed.
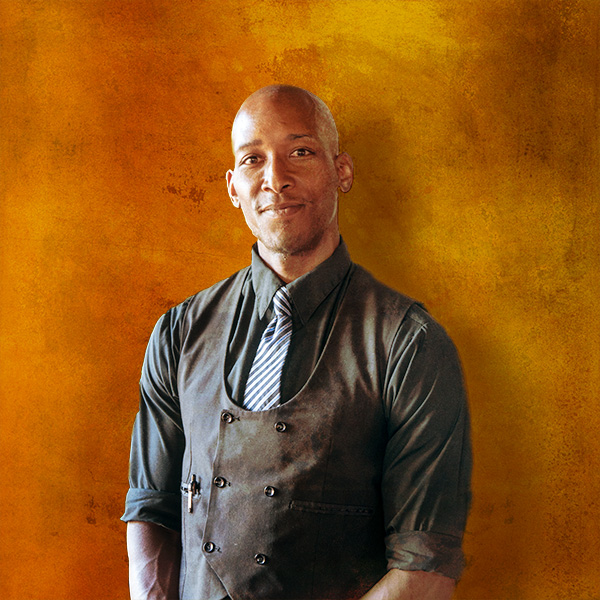
While the light and shadow were looking good on him The area in which he was standing left a little something to be desired. In the quest for the best of both worlds I exracted Ray for the scene, he was in and using textures, layers, blend modes and more shadows I created a bit more artistic space for him. As part of this exercise I also placed Ray into a scene I captured near St. Marks Square in Venice, Italy. See the tutorial for more info.
This video was requested by someone who saw the finished product and wanted to know how to accomplish this in post-production.
The image was captured with a Panasonic Lumix LX100 which I call the professional photographer’s point and shoot. Adobe Photoshop was the obvious choice for the completion of the personal project. I am always assigning myself personal projects to experiment, expand my skillset and keep in practice. If you don’t practice your photography and post-production skills on a regular basis, it always seems to be a strain rather than a pleasure to do post-production. Remember that to keep in top form you need to practice regularly, or the rust starts to form quickly. Think about professional golfers coming in from a hard day out on the course and heading straight the putting green or practice range as soon as their round is finished.
There’s a wonderful restaurant in Sedona; AZ called Mariposa. Award-winning chef/owner Lisa Dahl created a Latin-inspired Grill menu on the hill between Uptown and West Sedona. I highly recommend heading over there for lunch. Good stuff! This was a location that caused me to say, “There should be a restaurant here!’ every time I passed this location. Much of the thought involved had to do with the spectacular view.
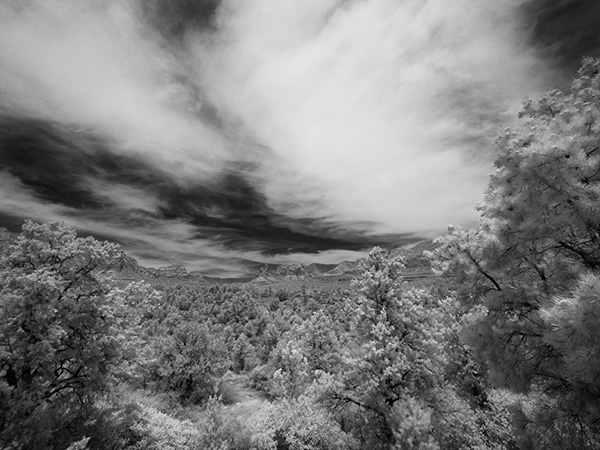
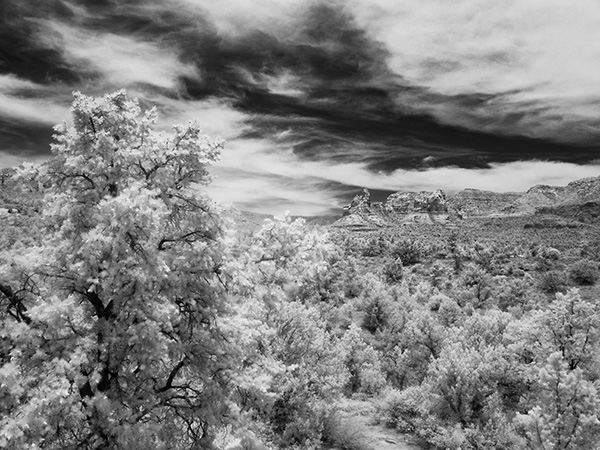
While passing by today, I saw some clouds and thought that a little-infrared imaging was in order. As always I recommend working the scene at least a little bit. Play with composition. Play with cropping. Play with different angles. As I didn’t have a lot of time I didn’t work the scene as much as I might have but here are three images.
First Capture. I only had a very wide angle zoom. The trees kind of overwhelm the red rocks in the middle ground in this rendition.
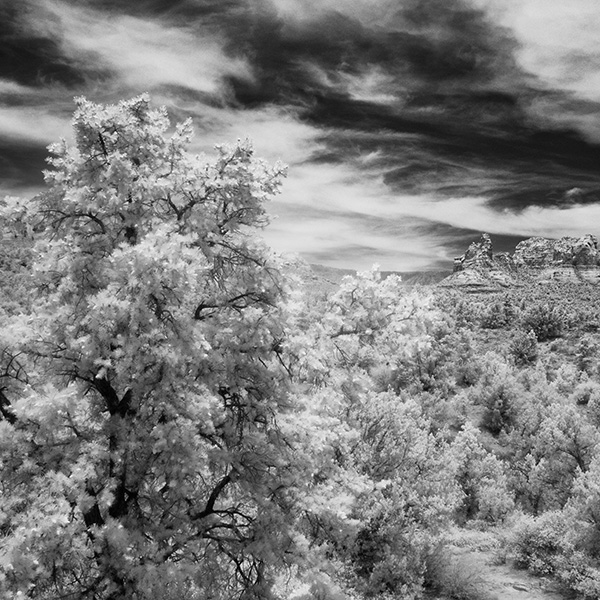
Zooming in a bit and using the play of the foreground tree to balance the red rocks in the background. Using the tighter crop also allowed the sky to read better as there was more movement in the area without clouds.
Here is one last version cropped to a square from the image above. It brings even more attention to the red rocks while honoring the glowing tree.
Images were captured with the Lumix G6 which was converted to infrared by LifePixel. Any camera you have retired just sitting on the shelf after upgrading your equipment can be brought to new life by a conversion. It opens the middle of the day to some creative image making. This is the standard 720nm filter that most looks like infrared of old. Infrared converted cameras that are live view capable make it possible to see the image in real time and not have to make focus adjustments as we once did with film cameras.
I processed these in Adobe Camera RAW and Photoshop to control contrast and set the proper tonal range. I then made a copy of the layer and used Skylum’s Luminar 2018** as a plugin to add a glow to the highlights and tweak specific areas for more contrast control, and then another layer to add a little noise to replicate the look of IR.
Yours in Creative Photography, Bob
** Use CODE COATES to get $10 off if you decide to buy Skylum software such as Luminar and Aurora HDR software.
In photography, you will often hear people exhorting you to ‘Look for the Light’! I don’t know how many times I heard and read that during my learning process over the years. I believe that my photography leaped forward when I first heard ‘Look for the Shadows.’ When I started looking for and shooting into, the shadows I saw a marked difference in the depth and dimension of my photographs.
Look for the shadows has become my watchword. Shadows are what make or break an image. If you are walking along and you see harsh shadows being cast by the trees and shrubs and you decide to put your subject in that same light, you will get harsh shadows. Seeing little pockets of soft shadows and using these areas will make for less contrast in your images. To me, soft shadow edge transitions lend beauty and form to a subject being placed on a two-dimensional surface that you want to read as three dimensions.
That being said I am always watching how the light and shadows interact which brings me to today’s post. We were out to dinner at my wife’s favorite restaurant J Wine Bistro in the VOC Sedona, AZ. I noticed the waiter Ray and saw the split light on his face from the light beside the front door of the restaurant. I asked Ray when he had a moment if he would strike a quick pose for me.
Ray with split light.
While I enjoyed the light shaping Ray’s face, I wasn’t thrilled with the background as you might imagine. So let’s play! I extracted Ray from the environment and went to work.
After extraction and some added texture and background.
A slight change in layer positioning adds a whole new color palette and feel to the image.
Last I thought I’d see how Ray liked being in Italy.
The original image was captured with what I call the professional photographer’s point and shoot. It’s the Lumix LX100. The LX100 is a nice handy camera that can fit in a large pocket. It has a fixed lens with fast f1.7-2.8 Leica glass and a decent zoom range of 24-72mm.
For infrared conversion of my cameras I use LifePixel. Infrared allows you to put an older camera to use and opens up a new time time of day for productive image creation.
Learn Photoshop in a fun environment. Aaron Nace applies the right amount of fun with easy to understand and follow tutorials. Actions and brushes are included with lessons!
Best embroidery ever. Give Queensboro a try, get a $20 instant credit to get started by clicking on the logo! They specialize in great quality custom logo apparel and promotional products with the best customer service.
Platypod has become a great resource for being creative in getting your camera gear easily into unusual places. As an Platypod Pro I get to work/play with the gear even before it comes out. Head over to Platypod, subscribe to the newsletter and you will get special discounts reserved only for subscribers.

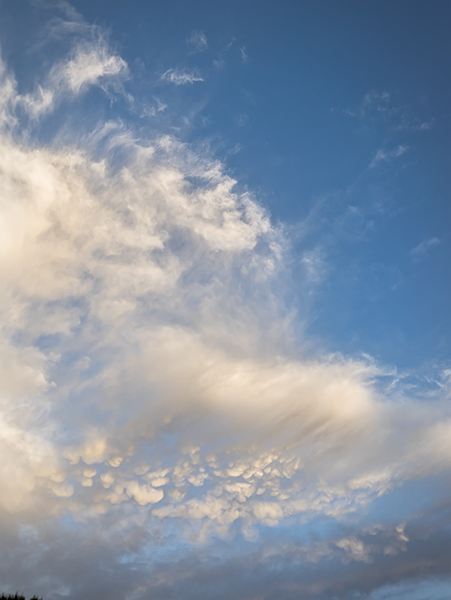 Look at how many different cloud types are in this section of sky. Out west here in AZ this usually happens when a front is moving in after a dry spell. Just enough wind to change some shape and at different levels of elevation
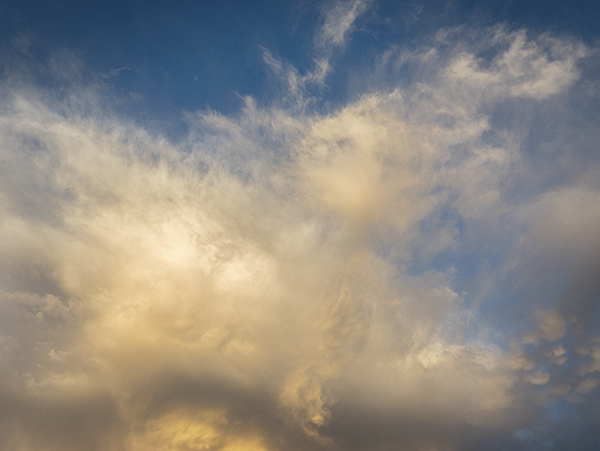 When a wonderful cloud situation appears, I usually shoot the heck out of it. Horizontal, vertical. Wide-angle and zoom. All give a different look which may work differently for various applications. For example, You don’t typically want to put an image that was photographed with a long focal length into an image that was made with a wide-angle lens. You can’t always put your finger on it, but it just doesn’t ‘feel’ correct.
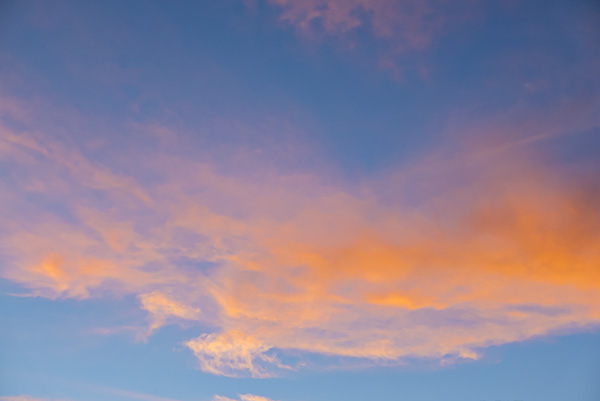 This image from later in the day
 And, of course, what would a sunset be without a silhouette to give it a little interest.