** ** I am not a health professional. I do not play one on TV and I didn’t even stay at a Holiday Inn Express. Please consult your doctor or health professional before adding exercise routines to your lifestyle.
Arrrggghhh!!
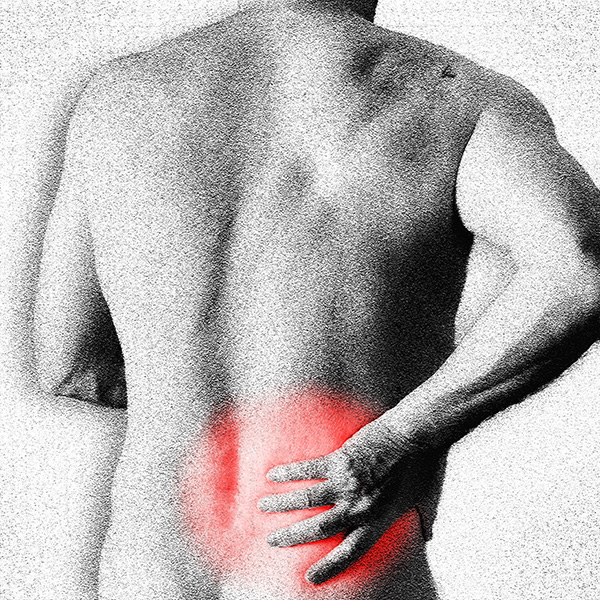
I have made this exclamation on more that one occasion (OK maybe there were a few choice words of the not so nice variety thrown in for good measure, but this is a relatively G rated blog) when I felt a disc slip or back go way out leading to excruciating and sometime debilitating pain.
This happens because of improper care and feeding (and use of) your body.
We as photographers tend to use and abuse ourselves without even realizing it. We carry heavy gear. We support weights in unusual positions. We hold uncomfortable positions for long periods of time waiting for ‘The Moment’.
Back pain can strike at any time…. Less often if we prepare properly!
Some Back and Lifting Basics
OK let’s stop the wrong behavior and get things into prime working order. First let’s review how to lift and carry loads properly. Here’s a link to a slide show from the Mayo Clinic on proper lifting techniques. Essentially you want to plan your attack. Where are you going to put what you are picking up. Bend from one knee or squat using your legs to do the lifting, not bend from the waist. Engage your core. tighten those stomach and core muscles to steady your back. If an object is too heavy for you don’t ‘Superman’ it – find someone to help or lighten the load and make more trips. Trust me it’s worth making more trips that you think will take you too much time now than to tweak your back and end up in pain for days or weeks and possibly loosing lots of work time!
After a long day shooting how do you feel? Would it surprise you to know that you should feel fine? If you are using proper photography techniques you should not feel back pain even after a long day at a wedding or chasing toddlers around your studio. When I was having consistent visits with my Chiropractor he suggested I might be hurting myself while photographing and I poo-pooed the idea until he suggested I have someone video me while I worked. Upon review of the video I was shocked! I found myself in unneeded bent up and twisted positions. Instead of moving my feet to keep my body aligned and supported properly I was consistently leaning and twisting to get the camera into position putting unneeded stress on the back and spine.
Tip – Have someone video you while you work. Review then build new habits for proper body positioning for less hassle with your back health.
Prevention!
A great way to avoid severe pain is to prevent it in the first place. The tips above can help with that but to really protect yourself getting in shape and building stronger body muscles is key. Please work with a professional especially when you first start out in any exercise program. Doing exercises improperly can cause damage or create pain that will keep you from coming back to the exercise floor.
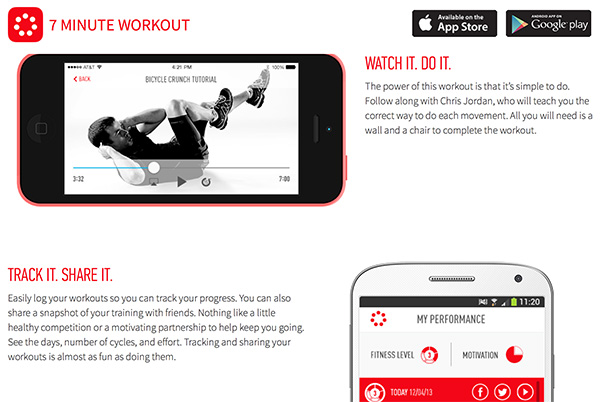
Here’s a solid, simple (with video instructions) exercise program with which to start. It’s the Johnson & Johnson Seven Minute Workout. Based on HIT – High Intensity Training techniques. Don’t let those words scare you! Basically it means you perform an exercise for 30 seconds followed by 10 seconds of recovery followed by the next exercise. The J&J team do a great job of instruction and keeping the workouts fresh. The nice part is it’s a free APP to download to your Smart devices like phone or tablet. In spite of the solid instruction in the videos I still recommend you get a trainer to coach you through the exercises the first time around to be sure your have good form.
There’s more but, this is a good start in protecting your back. Stay tuned for Parts two & three of ‘photographers health – back’ in future posts on Successful-Photographer.
Yours in Creative photography, Bob
** I am not a health professional. I do not play one on TV and I didn’t even stay at a Holiday Inn Express. Please consult your doctor or health professional before adding exercise routines.
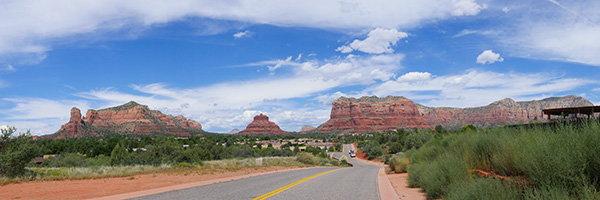
Playing some more with the in-camera panorama stitching on the Lumix GX8 again… This time in the Village of Oak Creek with Bell Rock and Courthouse Butte as the stars of the show. I used the 20mm f1.7. This combo worked very well when keeping the lens pointed straight ahead. If you tilt the camera up there will be a bit of bending of the horizon.
Here’s the original capture SOOC with a minus 2/3rds of a stop exposure adjustment to bring down the sky to a deeper blue. One of the benefits of being able to see what you camera is capturing I could tell that it was going to be a bit overexposed before shooting.
Here’s the finished image with a bit of post production. Darkened the road. Removed a couple vehicles. Increased saturation a little. Added some contrast with Google’s NIK Detail Enhancer. The only place I ran into a stitching evidence was after applying the Detail Enhancer the blue portions of the sky showed the beginnings of unwanted lines. Using a Layer Mask took care of that problem.
This image could easily print to 14 X 42 inches and probably larger if I wanted to work at it a bit and depending on what material I was printing on.
The gift of Professional Family Portraiture to a family that is losing a child at birth… Is priceless.
It’s recruitment month at Now I Lay Me Down To Sleep and I encourage you to consider becoming an affiliated photographer. There is a tremendous need. When I first heard about the organization and it’s mission I thought, “There’s NO WAY I could ever do that!” Eventually after attending a seminar put on by Sandy Puc I decided to try. Over the years I’ve been with the organization in many roles, as a photographer, trainer, board member & image reviewer as I see this is an amazing way to give back to the community.
You can do it.
Is it easy? Nope
Is it rewarding? Yep
“Now I Lay Me Down to Sleep is one of those ways that I enjoy serving my community as a photographer. When a Now I Lay Me Down to Sleep call comes in, I remember why I love photography.”– Mike Fulton, NILMDTS Area Coordinator and Affiliated Photograph
Learn more from the videos below and the NILMDTS web site.
Last night I was at my local and the Lumix GX8 with a 20mm f1.7 lens was in my hand. Played with some presets. Shot RAW and jpeg.
And, since I wasn’t really thinking I never moved away from the 1.7 f stop. But, it’s pretty amazing what you can do in post to save an image. Just to make it a little tougher I used one of the saved jpegs with a deep BW setting to work with.
The first image is straight out of camera.
This is SOOC with a deep contrast BW setting from the camera
I opened the above jpeg in Adobe Camera Raw by highlighting the image in Adobe Bridge and pushing CMD R MAC, (CTRL R PC) This gives you all the controls or ACR although it doesn’t give you access to the RAW info of the file it allows you to use the adjustment tools.
In this case I added a good dose of clarity to add a bit of tooth to the image, opened up the shadows, knocked down the highlights and opened up the shadows just a bit with a curves bump. Both have an interesting feel but I feel the second one with just a touch more punch worked better.
For infrared conversion of my cameras I use LifePixel. Infrared allows you to put an older camera to use and opens up a new time time of day for productive image creation.
Learn Photoshop in a fun environment. Aaron Nace applies the right amount of fun with easy to understand and follow tutorials. Actions and brushes are included with lessons!
Lightning, waterdroplets, sound, time-lapse, HDR sequences, smiles and much more control for your camera!
Cameras Get Smarter -
A High Speed Smart Camera Remote
Best embroidery ever. Give Queensboro a try, get a $20 instant credit to get started by clicking on the logo! They specialize in great quality custom logo apparel and promotional products with the best customer service.
Platypod has become a great resource for being creative in getting your camera gear easily into unusual places. As an Platypod Pro I get to work/play with the gear even before it comes out. Head over to Platypod, subscribe to the newsletter and you will get special discounts reserved only for subscribers.