I’ve seen this quote attributed to Tom although I’m certain it belongs to him as there are variations in place attributed to others. I try to research my quotes for accuracy. With that in mind if you know who the originator of this quote was, please let me know.
“I am a great believer in luck, and I find the harder I work, the more I have of it.” – Thomas Jefferson
You might ask, “What in the heck does this have to do with art, Bob?”
It all has to do with getting in there and doing the work. Whether you feel like doing it or not. Many times I will happen into a fortunate art situation just because I keep on trying even though things have not worked out crazy good in the past. If you see a concept, you need to keep acting on it until it comes to fruition.
Here’s an example. I love photographing wildlife, especially birds. I enjoy the texture of their wings. Studying and anticipating their movements to capture more compelling images. The time alone searching out new behaviors. It can be very frustrating to try to come up with something original. That doesn’t stop me from going out and trying. Over and over. And over. Until that magic moment when the luck part comes into play. Because I was still there trying I was treated to this perfect moment of a Snowy Egret chasing fish.
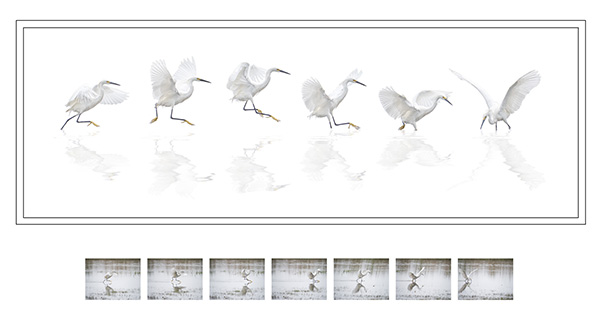
I captured approximately 200 images of the bird working the shallows in front of me. And this is the composite I thought I wanted to accomplish.
Working composite of Dance of the Snowy Egret
I had sifted through and extracted many images of the snowy egret to get this far but wasn’t happy with what was happening. It was the vision I originally had in my head while I was photographing the bird, but it just wasn’t working form, although my wife loved it. So I kept working.
So I kept working. And working.
And because I kept working on it even though I wasn’t happy I had another stroke of luck. In turning off the background to clean up my extractions of the birds, I saw the image in it’s simplest form. All attention became focused on the positions of the birds with absolutely no distractions.
PPA Loan Collection Image – Dance of the Snowy Egret by yours truly
I entered the image in the International Photographic Competition from Professional Photographers of America, and it was judged into the Loan Collection in the Master Artist category. That judging is based on twelve elements (click here for more on the twelve) including composition, technical excellence, and storytelling. Also, how the artwork was accomplished is a significant part of the criteria which is why the reference images are shown.
I feel I was lucky on two fronts in the creation of this photo. But I did work hard to get ultimately get there
But I did work hard to get ultimately get there.
Yours in Creative Photography, Bob
PS – I think one additional piece of luck was the equipment I’ve been using. Because the micro 4/3rds format is so small and light I was able to handhold a 600mm equivalent lens and track the egret comfortably for a long period of time. Heavier gear would have required a tripod and been much less mobile. Lumix GX8 with the 100-300mm f4.0-5.6 lens
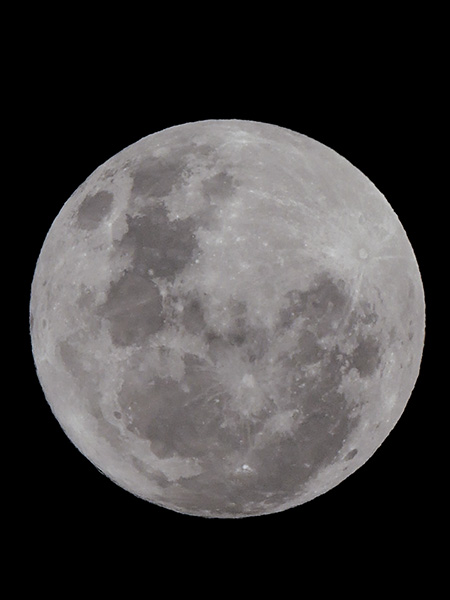
While out waiting for the moon to make its appearance the night before the Supermoon I worked a couple of cameras. I set up the Lumix GX8 to do a time-lapse of the sunset/moonrise. Glad that I also had the Lumix GX85 as a second camera to mess about with while the time-lapse was being recorded.
Here’s a still I pulled for the time lapse sequence.
The time-lapse was pretty simple. The settings are available in the camera. No need for an intervalometer. Under the Time Lapse Shot menu, you have the choice of Start time which can be immediately (now) or a time set in the future. Shooting Interval which is the amount of time between frame captures. Image Count which is the number of frames to be captured. In this case, I fired one frame every four seconds.
I thought I had a better position for the moonrise which was quite a bit to the right of where it actually showed up. I stopped the captures pretty early after the moon made its appearance. Looks like I need to calibrate my compass.
I was able to add some interest because I choose to have the camera process the still images to a 4K video. 4K video enables you to move around in the image without losing quality which I did in Adobe Premiere. Did you catch that part about the camera processing the time-lapse? A very cool feature. I choose the output settings including quality and frames per second. In this case, I used twenty-four.
For the video below I changed the output settings to 12 frames per second. I did a little color correction and added movement in Adobe Premiere.
Tomorrow I’ll show you what I was photographing with the Lumix GX85.
Testing out some features in the Lumix GX8 while shooting the moon.
What better moon than the full one of October with clear skies? I used the Leica DG Varia Elmar 100-400mm lens racked out to 800mm. This combo allowed me to get crisp solid captures when zoomed all the way out to 400mm which is 800mm equivalent in full frame cameras. I continue to be pleasantly surprised with this lens.
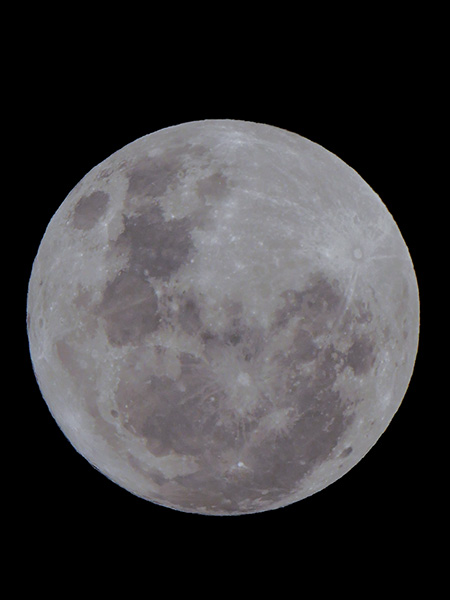
I made multiple images to try out the digital zoom feature in the GX8 to see what you give up in quality buy zooming in camera. It can go 2X and 4X.
This shows what you see in the viewfinder when you apply the digital zoom.
What are the advantages of the digi-zoom over shooting in RAW and upping the resolution in the file during post production? None if you are only getting the moon. On all my exposure tests I was able to get a better-looking file when resizing the RAW file. When you use the digital zoom you MUST be in jpeg mode, so you are loosing some information right from the beginning. The advantage is that you can see what the image looks like in the viewfinder. If I were just using the moon image all by itself as we see here, I would choose to shoot RAW. Where the difference come in is if we are shooting the moon in relation to some other part of a scene. In that case, we would get the compression of shooting a longer lens which wold render the moon larger in the scene in relation to the objects. We’ve all made that shot when we first started out where the scene is gorgeous, and the moon is an integral part of the beauty, and it turns into this tiny little white dot in the view. Of course, our eyes make us think it is bigger than it actually is but lens optics rule the day!
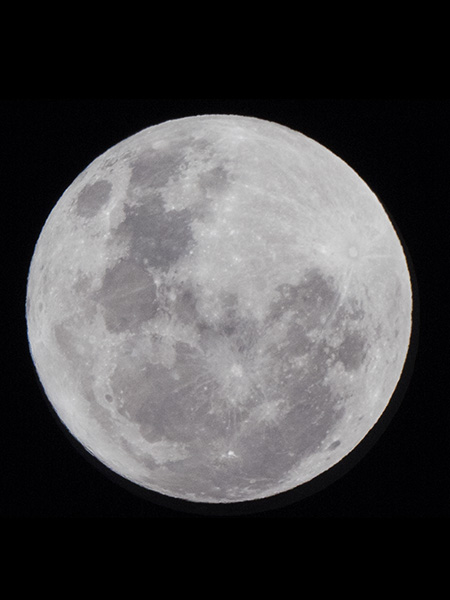
Here are the images all made to meet up with the full frame of the 4X capture.
4X capture
2x capture
RAW capture cropped to match 4X zoom view and output as a 20MP file. Quality is much better in my opinion.
I didn’t have time last night to get the moon into a scene, but I’ll try to set something up in the future to show you the value of engaging the digital zoom feature.
Yours in Creative Photography, Bob
PS – Please note that the moon has been rotated in post-production for all images to use a vertical orientation.
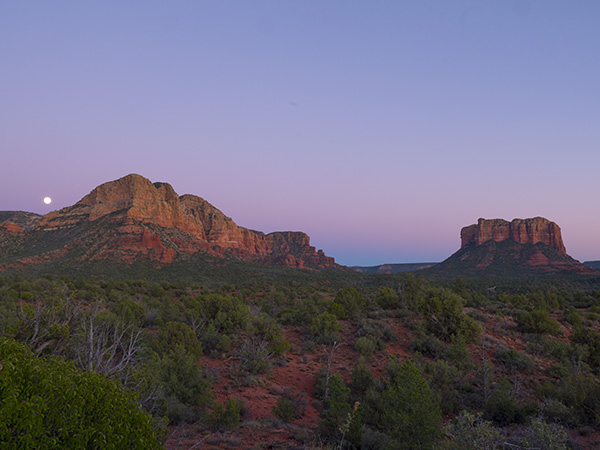
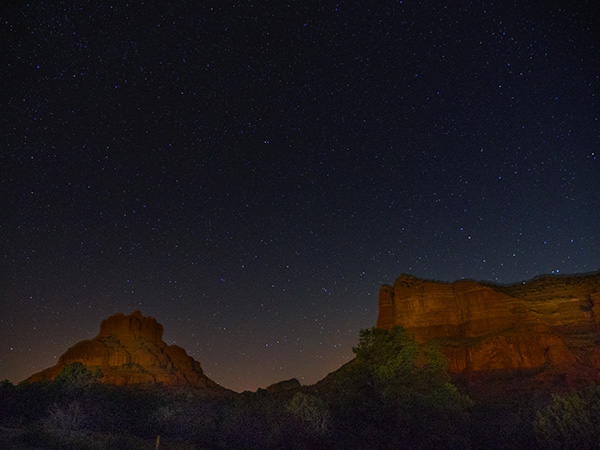
Last week I showed you some night sky photography with some stills blended together. When shooting night skies getting some detail into the foreground takes a bit of work when you are shooting in a dark skies compliant area like Sedona, Arizona. While I was capturing those images with my Lumix GX85 I set up the Lumix GX8 on a tripod for a time lapse sequence.
The lens was the Vario 12-35mm f2.8 set at f2.8. ISO 200 and 30-second exposures. I set the interval to 32-seconds to give the camera a little time to reset. Noise reduction setting was disabled as the camera would have been taking an extra 30 seconds to create the noise reduction for each image. Way too long for what I was trying to do. Using the camera’s processing I was able to make videos at various settings without any problems at all. Here is a minute and a half video showing all of the results including an edit with Photoshop.
Stars are making a circle around the north star. Funny how they twinkle just as they do when you are looking at them live.
Time Lapse Video of 140 images processed in-camera at twenty-four, twelve , eight and four frames per second. I also processed the images in Adobe Photoshop using the timeline to create a ten frames per second video.
One note. I was able to take the RAW files into Photoshop and process the red rock area different than the sky area which allows more detail and color to be in the final video. All the files were imported into Adobe Premiere and resized, captioned and rendered to HD. The videos I made in-camera were processed out as 4K files which gives more possibilities in the final movie. I could have left them large and then had the possibility of movement like panning or zooming through the video to create even more interest.
Here is a still image processed from the same scene. A one second and a thirty-second exposure blended with extra process in MacPhun’s Intensify CK
There is a new Firmware version out for the GX85 the leverages the 4K video feature called Post Focus. Post Focus will run a little video capture that will make an image with approximately forty focus points. You can pull any of the still frames, and each frame of the video is focused in a different place. You can then play back the video in camera and select any frame you wish and save as an eight megapixel still frame. See the video below.
You ask, “Wait a minute Bob, why is this a nice feature?”
Number one, it enables you to choose what’s in focus in the image after the fact. For example, you are capturing an image of someone’s face with a VERY shallow depth-of-field without a lot of time to check on your focus point. You can dial in the corner of the eye or the beginning of the iris or the other eye if you’d like for creative possibilities. Here’s the cool part. You can take a few of these images and put them together with a process called Focus Stacking and control exactly what is in focus or out of focus in your photo.
Single still frame with just the middle portion of the image in focus bringing attention to the Plus 25 bar placed on the red bag.
Number two on the cool list, we can now do the focus stacking right in camera and have it saved as a jpeg right to the card. This can save a bunch of time. Before you had to take the video into another program, save each image as a single frame and then run those frames through Photoshop or another program to obtain your stacked focus image.
This image was Focus-Stacked in-camera to show detail throughout the entire range. Total time for processing about thirty-seconds
Nuber three, you can use this feature the way I have been to get a hyper-focus image but stacking all the images together. This will allow you to use a macro lens which can give incredible detail. Usually, that detail is very shallow depth-of-field, but with Focus Staking you can get focused detail from the front to the back of the image.
Here’s the video showing all the points of focus that were captured. The original is a little over one second long. I slowed it down to about twenty percent so you can see it move through all the focus points.
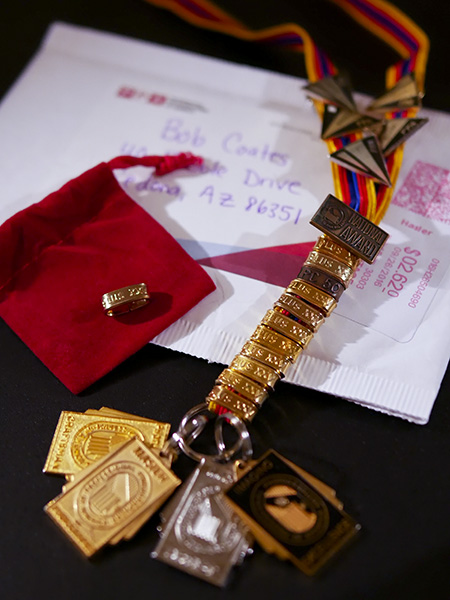
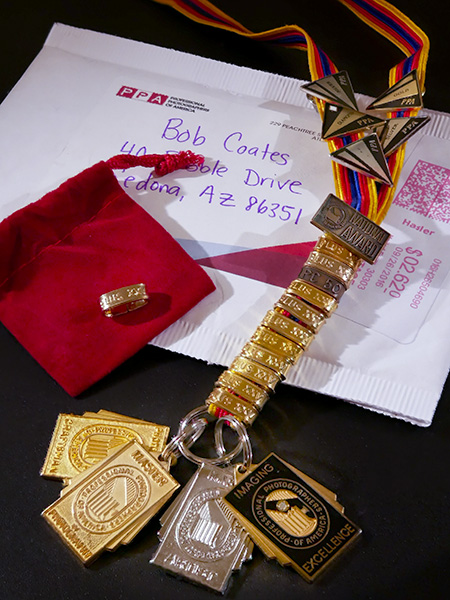
This is a photo of the representation of my achievements and service to photography through Professional Photographers of America (PPA). The bar on the red bag is the newest sent to me and shows 25 merits earned through service, education, and imaging competition. The medals on the bottom of the ribbon are degrees earned and the small rectangle in the PPA National Award presented by Arizona PPA. As members of the association, we are charged with wearing the medals at conventions and PPA events. It is a message to other members that we are accomplished photographers available to answer questions.
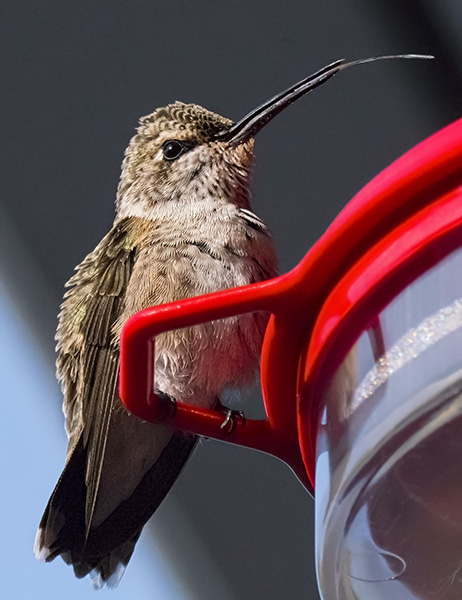
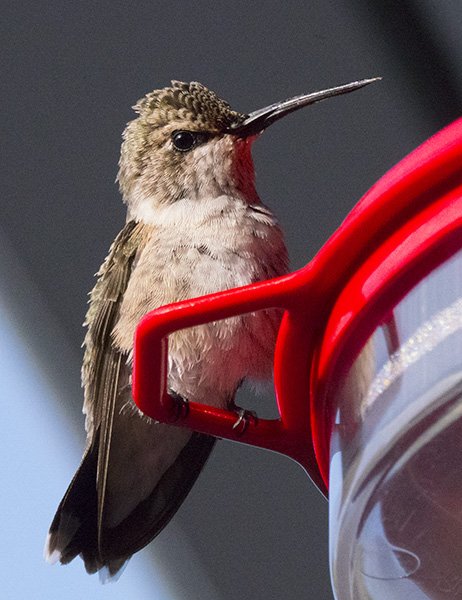
Hanging out this morning and thought I’d do some camera testing with my Lumix GX8 and the 100-300mm G Vario f4-5.6 (200-600mm equivalent) lens. I made these images handheld with stabilization turned on. Settings for these were f14 1/2000th sec at ISO 6400. I’ll share some hummingbirds in motion images at different settings a little later. I became enamored of this little critter because he had so much peppy personality. Looks like he just arrived from a long migration. He’s not one of our local birds and seems a little worse for wear.
Hummingbird Straight out of the camera. He’s checking me out.
After seeing me, he stuck out his tongue! Not sure if that was social commentary or not. Here’s the little guy after processing with MacPhun Noiseless and MacPhun Tonality (for sharpening the feathers just a bit more. Explanation below)
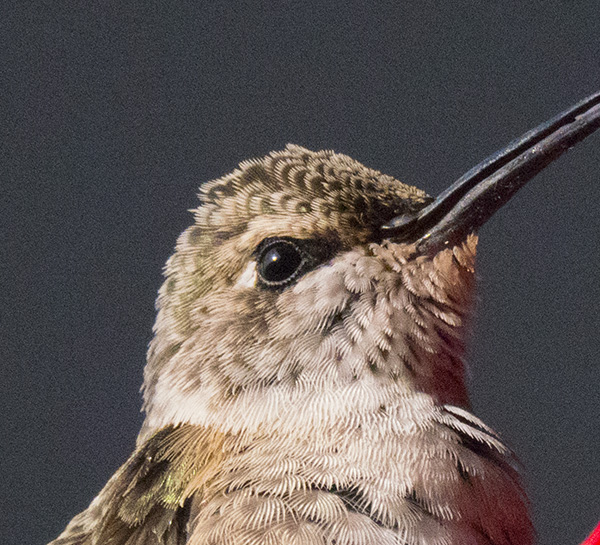
So these images turned into a processing exercise. Some photographers mention that they are concerned with noise in images from smaller chip cameras like the micro 4/3rds. Personally, I feel that we get a little too hung up on that as the newer algorithms that are used in processing give a very natural feel to the noise that replicates the grain structure we had back in film days. (can you hear my creaky bones as I talk???)
To see if there was an elegant solution for those who have a concern when you push the camera to higher ISO’s thought I’d see how software might be of help. Oh man, it does if you are on a MAC. I’m using MacPhun Noiseless, and it worked a charm. MacPhun is only for MAC OS systems. I’m sure there are similar products for those on PCs. One of the problems I had in the past with noise reduction programs is the removal of detail that I wanted/needed in some parts of the image. I’ll let you decide, but I don’t think that’s a problem anymore!
On to the processing!
Original detail capture SOOC.
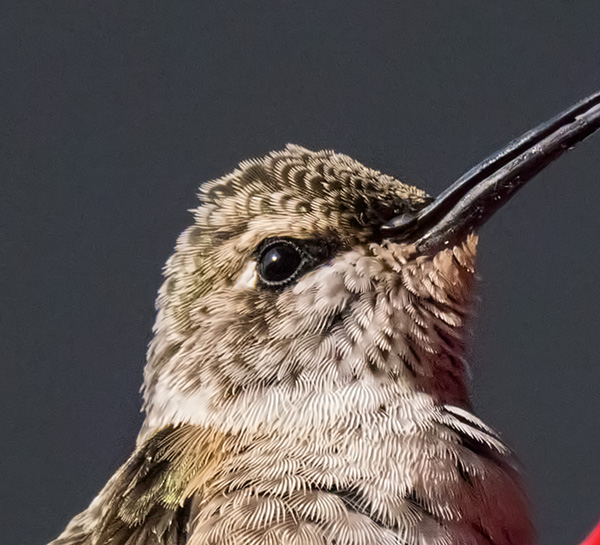
Here’s the image after running MacPhun’s Noiseless software. There are lots of settings and possibilities. This was a fairly aggressive treatment. It smoothed out the noise in the background nicely without losing detail in the feathers.
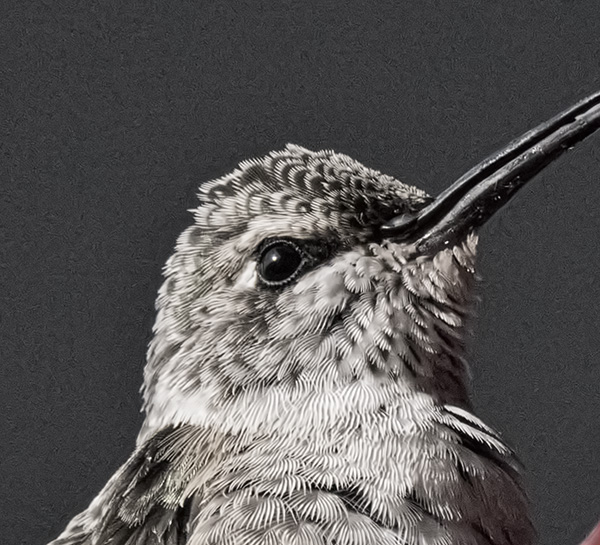
This is the final. I used the Tonality software from MacPhun to sharpen the feathers a bit more. “Wait a minute Bob! isn’t tonality made for making an image black and white?” You bet. But, I liked the controls that allowed me to sharpen small details and micro control the contrast in different areas of the image. The secret is to do this on a separate layer and change the Layer Mode to Luminosity in Photoshop. Then only the information that is Luminous is applied to the image. Using a Layer Mask, I applied the sharpening to only the feathers.
Here is the Tonality layer without a mask. You can see where it sharpened the background as well hence the use of the Mask in Photoshop in addition to changing to the Luminosity Mode.
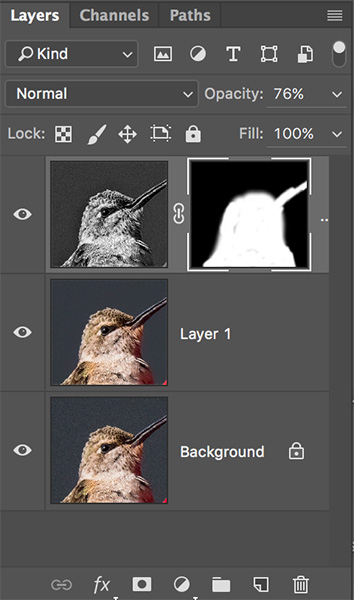
Here’s the Layers Palette. Background Layer is original capture. Layer 1 is with noise removal. Top Layer is Tonality with a mask.
For infrared conversion of my cameras I use LifePixel. Infrared allows you to put an older camera to use and opens up a new time time of day for productive image creation.
Learn Photoshop in a fun environment. Aaron Nace applies the right amount of fun with easy to understand and follow tutorials. Actions and brushes are included with lessons!
Best embroidery ever. Give Queensboro a try, get a $20 instant credit to get started by clicking on the logo! They specialize in great quality custom logo apparel and promotional products with the best customer service.
Platypod has become a great resource for being creative in getting your camera gear easily into unusual places. As an Platypod Pro I get to work/play with the gear even before it comes out. Head over to Platypod, subscribe to the newsletter and you will get special discounts reserved only for subscribers.
 “I am a great believer in luck, and I find the harder I work, the more I have of it.” – Thomas Jefferson
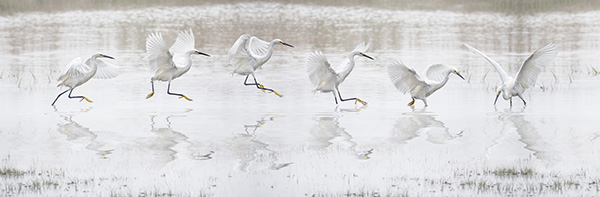 Working composite of Dance of the Snowy Egret
 PPA Loan Collection Image – Dance of the Snowy Egret by yours truly