by successfulbob | 4K photo mode, 4K video, Lumix GX85, Lumix Lounge, photography creativity, photography gear, video
In-Camera Focus Stacking
Cool beans!
Yep, I said it. Cool beans. This feature is quite handy when you want to photograph with a macro lens and show some incredible depth of field in your image.
The 4K Photo Mode in the Lumix GX85 and the G85 called Post Focus which allows you to choose the frame with the focus where you want it, after the shot, also allows you to focus stack the images together to enhance the depth of field. One downside to using this method is that we are pulling stills from the video which means there is 8MP worth of file size with which to work. A file of this size will get you to a 20-inch print with no problem, but if you want to go bigger, you’ll need to use a different method. I’ll share that with you in the next day or so.
Let’s take a look.
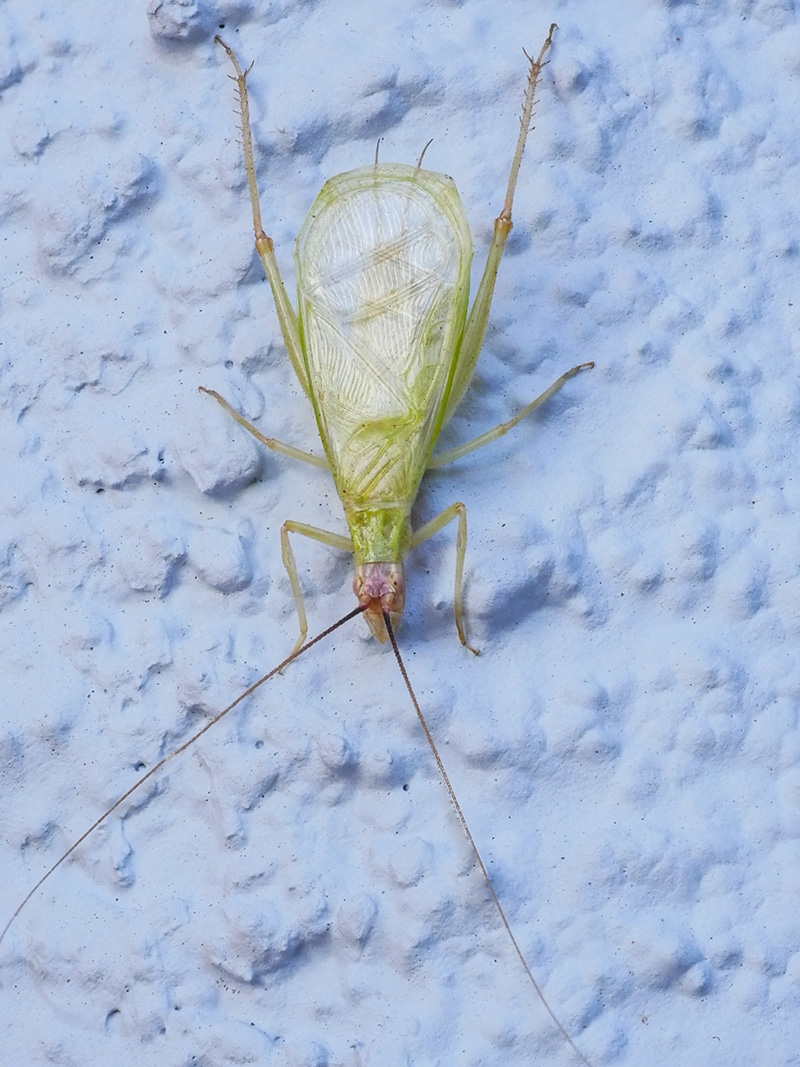
 I call this Green Bug. This image is a single frame grab from the 4K video. Printable and OK. But let’s see something a little better.
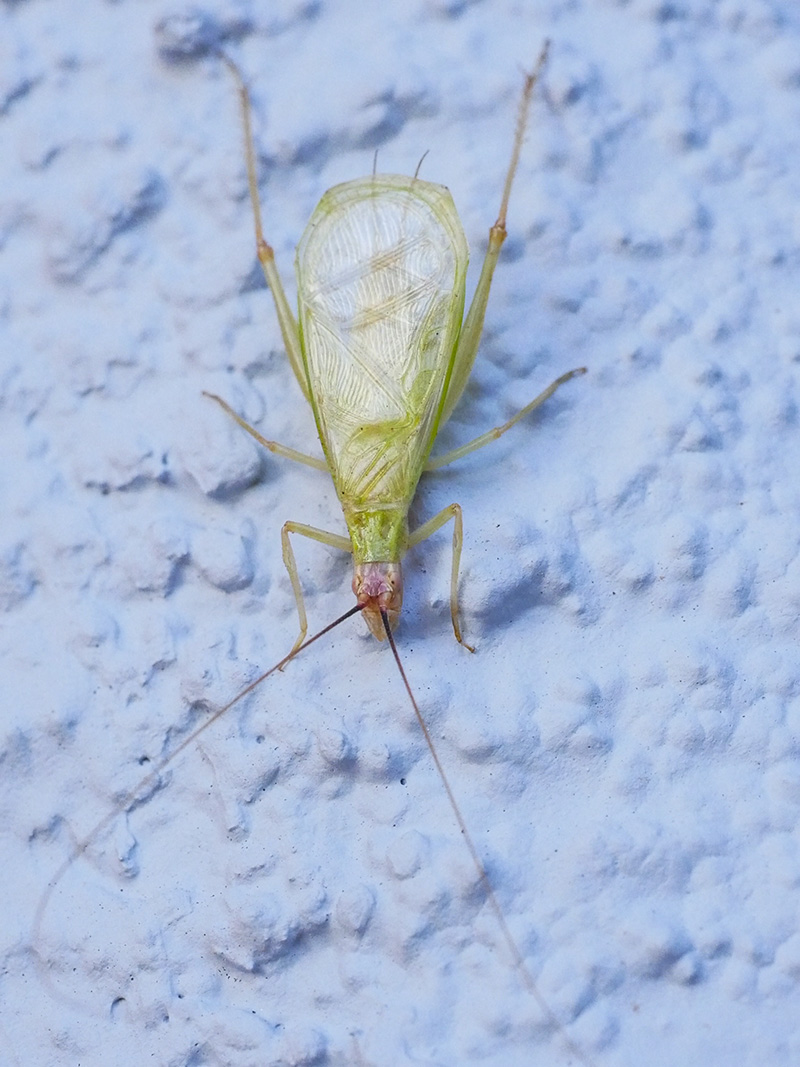
Now let’s take a look at the image after all the images in the stack have been combined to show the sharpest parts of each frame in the video.
 Check out the detail throughout the photo now.
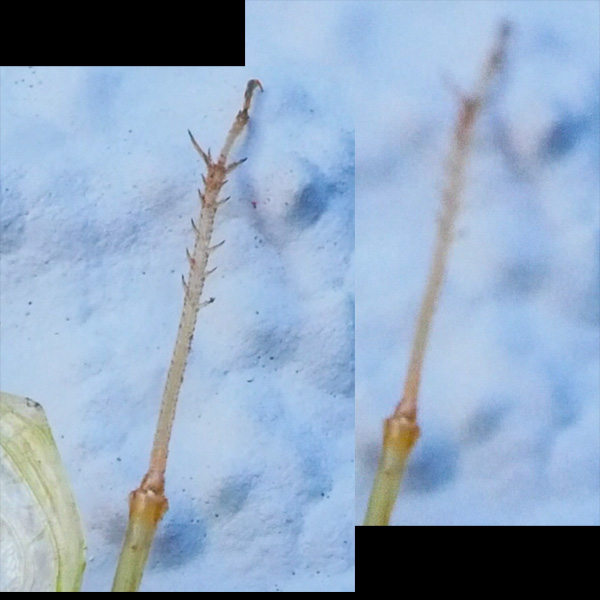 Here’s a little zoom in on the back leg of my friend the Green Bug.
Click Here to see the original video clip
This video image was captured with the Lumix GX85 with a 45mm f2.8 macro lens.
Tomorrow I’ll take a look at the Focus Bracketing feature that allows us to bypass the video and capture full-size images.
Yours in Creative Photography, Bob
by successfulbob | landscape photography, Lumix GX85, Lumix Lounge, panorama, photography
Multiple Photo Captures – Part Two
Yesterday I shared a time-lapse video shot and processed with my Lumix GX8 and Adobe Premiere Pro.
While those frames were being recorded I used the GX85 to photograph some still images. Here are a couple in-camera panoramas. Cameras are becoming more like portable imaging computers with each new release.
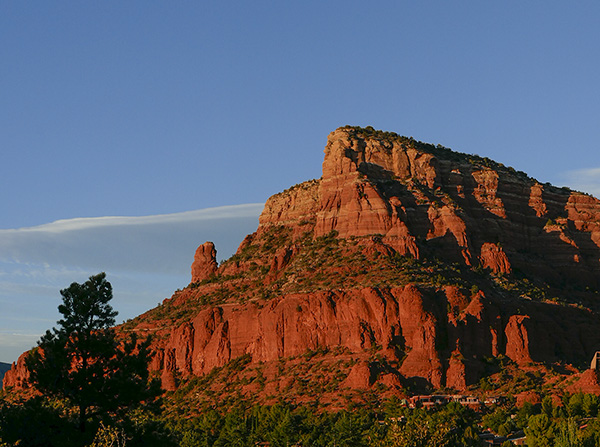
 Stitched in-camera Sedona pano. Hwy 179. The camera is held in the vertical orientation to give a slightly taller image. If there was lots of cloud action I would have taken a second pano and stitched them together in Photoshop for an even taller rendition of the scene.
 The field of view depends on how long you continue to pan. A longer panning time gives a different aspect ratio.
Here’s a tip for creating smooth panorama photos with clean stitching. This is an old videographer’s trick. Point your body and feet to where you would like the panorama to end. Then using your stomach muscles turn back to the starting point of the image. Make sure the camera is tight against your forehead and is not tilted. Then using your stomach muscles gently pivot to the end of the field of view. The stomach muscles are larger and more stable giving you a smoother movement resulting in less stitching errors. One final note, there is a preview of your capture in the viewfinder. You will want to go a little bit further than you see or your image will be truncated just a bit. If you are moving too fast or too slow or the light is too low, the camera will return an error message.
 Of course as the sun begins to set colors can change immensely
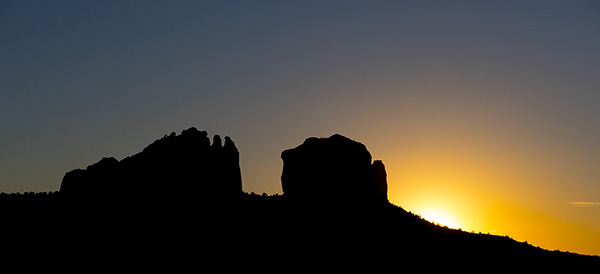 And of course, don’t forget to turn around. This is the back side of Cathedral Rock in silhouette.
Our creative tools are getting better and better. It’s a fun time to be an image maker.
Yours in Creative Photography, Bob
Save
by successfulbob | Lumix GX85, Lumix Lounge, photography, photography gear, wildlife photography
Sedona Wetlands Photo Gear Testing
Well, I gotta tell ya it’s been very busy and I’ve been remiss in posting here for about a week. I photographed a four-day event coverage job with its attendant post-processing along with my regular work. There are only so many hours in a day so the blog had to wait.
I’m back!
And I got a lens I was lusting after to add to my quiver that I’ve started testing. The Lumix 100-400mm G Leica DG Vario-Elmar f 4.0-6.3 lens is as beautiful as I thought. I do not normally get too excited about glass for my cameras. I think of them as tools, and if they do their job as advertised, I’m cool with them. Occasionally, a lens tends to perform over-and-above That’s when I get excited. The 100-400mm is one of those lenses.
I went back out to the Sedona Wetlands for a quick test and here are some results.
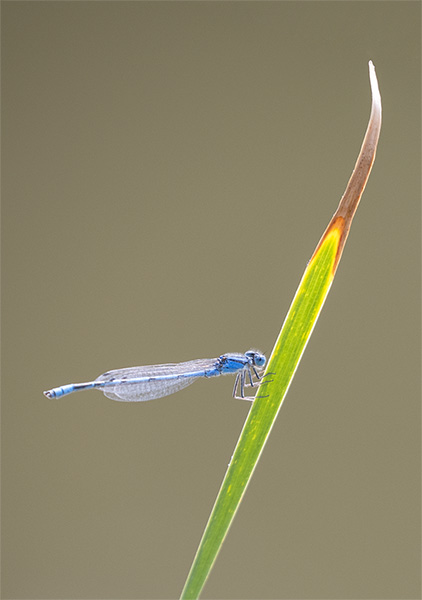 Blue Dragonfly – I was unable to identify this dragonfly. Wonder if it’s because it’s a juvenile and the wings haven’t changed yet. Any ideas??!!
Even though there were quite a few of these critters darting in and out of the stalks of green I could barely see them. They are tiny. Tiny and almost transparent. With some patience, I was able to finally track one of the dragonflies down that took a moment to rest. Excellent detail of something I almost couldn’t see. Oh by-the-way, I was hand-holding the shot with the lens racked all the way out to the 800mm equivalent. As a matter of fact I handheld all the images in this post at the 800mm equivalent. The GX85 was the camera and was a help in this regard as it is using five-axis image stabilization.
 Even at f6.3, there’s some beautiful separation from the background with this lens.
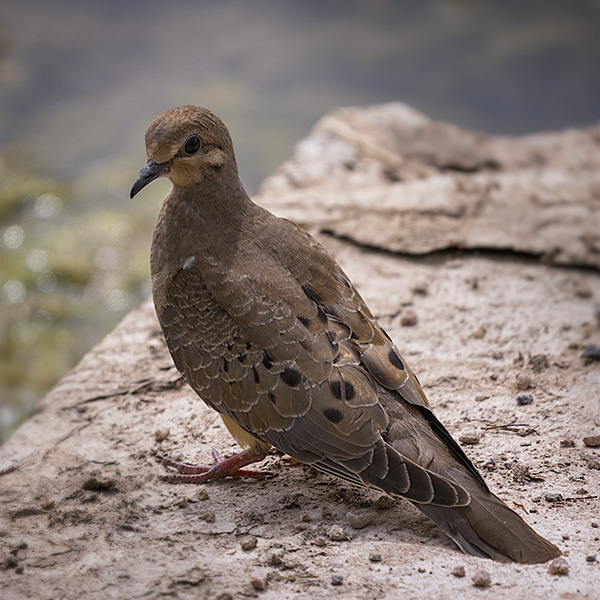
 Mourning Dove – A bird capable of attaining flight speeds of 55 MPH hung around for a portrait. Sweet.
Not so much a beautiful photo, but a test to see the amount of detail that can be represented in the feathers. Sharpness is enhanced in this camera by the removal of the anti-alias filter. I might look to extract the bird from the background and use the pattern of the feathers in an art piece. We’ll see.
Yours in Creative Photography, Bob
Save
Save

by successfulbob | Lumix GX85, Lumix Lounge
Photographing the Moon
The half moon was high in the cloudless sky. I thought this would make an interesting test of the Lumix GX85 and the 100-300mm f4.0-5.6 lens extended all the way. I don’t recommend handheld shooting at this range with the lens set at 600mm equivalent. At night. But, I’ve been interested in how far the in-camera and lens stabilization can be pushed on this new camera.
And I keep finding myself pleasantly surprised.
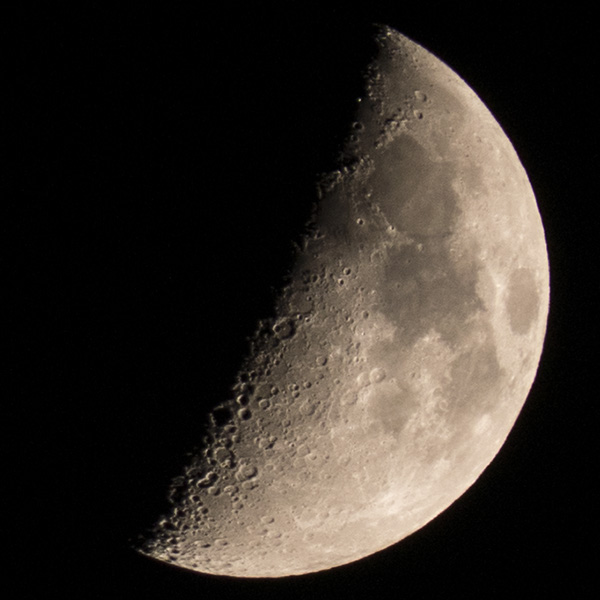 Half moon photographed handheld with 600mm equivalent lens at f5.6 ISO 200 1/250th of a second
I don’t have a huge image to work with as after it was cropped from the frame it was about 750 pixels. What impressed me is the detail and sharpness of what was captured. I’m liking this little camera a lot.
Yours in Creative Photography, Bob
by successfulbob | landscape photography, Lumix GX85
Night Sky Photography – Lumix GX85
Thought I’d give the red rocks under the night sky a shot. We have dark skies ordinances in Sedona and the Village of Oak Creek. Add to that the undeveloped land under the Park Service and State Parks the stars can shine.
It was a new moon night, and the clouds had parted for places unknown. It was a very clear night. When the cat woke me up, I decided to run out and see what I could do with the new Lumix GX85. I added the 15mm f1.7 lens and started taking multiple exposures for combining later in post-production. There are all kinds of rules for focusing properly and how long your exposures can be before the stars start to move and streak during your exposure depending on lens choice. I’m not going to share that part cause some photographers have been doing night photography much longer than I. A bit of searching on the web can get you that info. After I have practiced more, I’ll share some of that information after I’ve tested more.
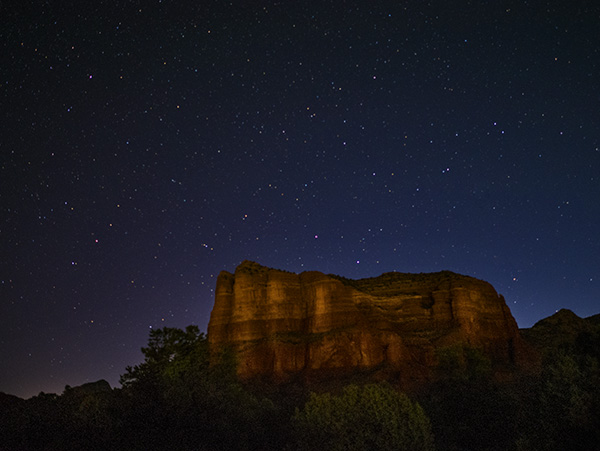
 Castle Rock in the Village of Oak Creek, Sedona, AZ
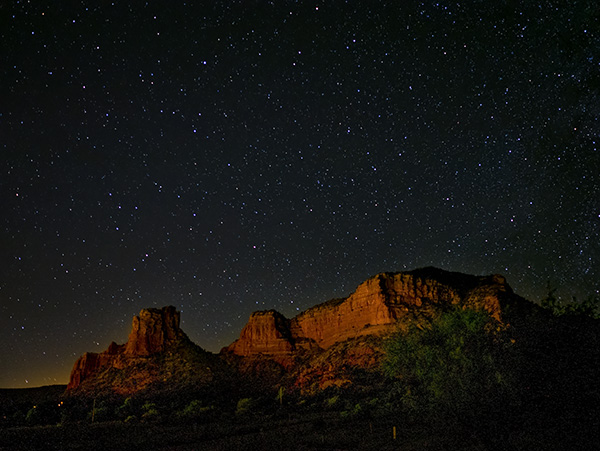
 Courthouse Butte Looking north. I will share time-lapse video sequences captured by the GX8 in a future post.
Both images were made with multiple exposures layered together using Adobe Photoshop.
It’s a new world for me to play in.
Now all I have to do is be able to stay awake overnight!
Yours in Creative Photography, Bob
Save

by successfulbob | landscape photography, Lumix GX85, Lumix Lounge, panorama
Lumix GX85 In-Camera Panorama Photos
If you follow me and my work you’ll find I enjoy capturing panoramic photos. Maybe it’s because I live in wide-open spaces. Whatever the reason they give a slightly different viewpoint of an area that doesn’t come across in storytelling in any other format.
Today I wanted to share a couple ideas about the in-camera feature in a lot of the Panasonic cameras. Stitched panoramic photos and how I use them. When I want a full-on capture of a panoramic scene I will tell you I shoot multiple images and stitch them together using Photoshop or another program. That is what will get the best quality beyond a shadow of a doubt. I will also, depending on the density of the scene shoot bracketed exposures to ensure the highest quality rendering for a print including the highlights and shadows.
Let’s give you a little preview of one of my favorite spots to photograph here in Sedona.
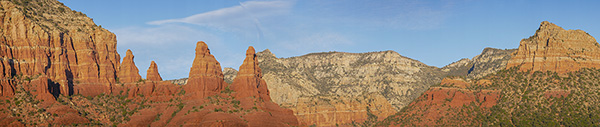
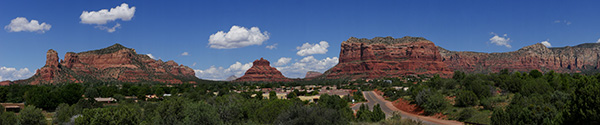 Castle Rock formation with Bell Rock and Courthouse Butte in the Village of Oak Creek in Sedona, Arizona
This image came out of the camera 6100 pixels wide 1/2000 sec ISO 800 f13 with Lumix Vario 35-100 f2.8 lens
When I want a full-on capture of a panoramic scene I shoot multiple images and stitch them together using Photoshop or another program. That is what will get the best quality beyond a shadow of a doubt. I will also, depending on the density of the scene, shoot bracketed exposures to ensure the highest quality rendering for a print including the highlights and shadows.
I use the in-camera pano feature more as a ‘sketch’ of a scene. Why is that? Number one – When making the pano capture there can be some slight stitching errors. You’ll sometimes find these in very simple areas like plain blue sky or conversely in very, very detailed areas. Number two – The files are rendered as a jpeg which means that the camera settings are baked into the file and that information will be stripped during the compression process. Number three – Finally, the files are not that large. Panoramas tend to need to be printed large to appreciate them.
So why do them in camera at all? I mentioned the ‘sketch’. Number one – This finished jpeg stands as a quick reference of the scene which can be filed with the RAW captures. Number two – It can be uploaded via the in-camera Wifi to send off to others to share what I’ve just seen. Number three – There might not be time, for example when traveling with others to complete a full-on capture of the frames. Number four – Sometimes I am just looking for a ‘record’ of the area to remember to go back to because there weren’t great conditions. I do this when scouting locations.

An overcast day in Sedona. This image ends up with quite a bit of ‘depth’ due to the weather and distant mountains. In-Camera Pano 7600 pixels wide. 1/100th at f7.1 ISO 800
Hope this give you some ideas on how to leverage features in a way you might not have considered before.
Yours IN Creative Photography, Bob
Save