by successfulbob | bird photography, fine art photography, inspiration, Lumix GX7, Lumix Lounge, photography, photography competition, photography creativity
World Photographic Cup
I was excited to receive a call while on vacation with my wife in New Mexico from PPA headquarters. They were calling to share the news that I was named to the Top Ten in the Illustrative Category. I learned I was eligible for a Grand Imaging Award. Unfortunately, I did not earn a GIA Award but I was named to the World Photographic Cup – Team USA It was quite and honor to have an image be recognized at that level.
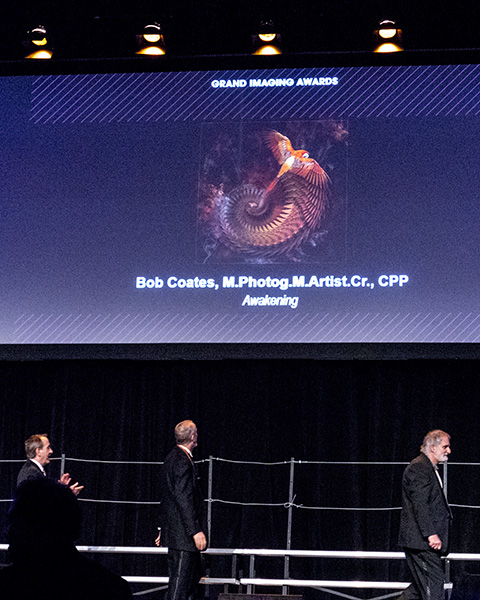 A photo taken by a friend as I headed across the stage during the Grand Imaging Awards at the PPA Convention in Atlanta, Georgia last week.
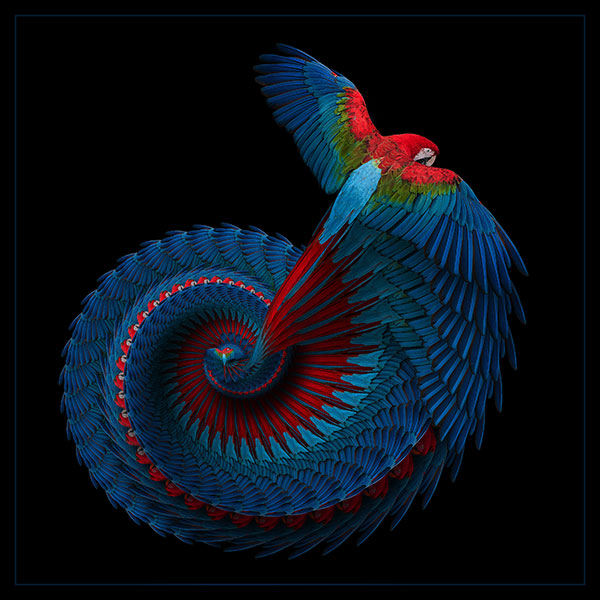
Here’s a better look at the image. It was created using a macaw that I photographed at Sarasota Jungle Gardens in Florida. The bird was extracted from the scene and duplicated numerous times into a spiral nautilus composition. Texture, smoke, shadows and color layers were added to add more depth and dimension.
 This is the final image.
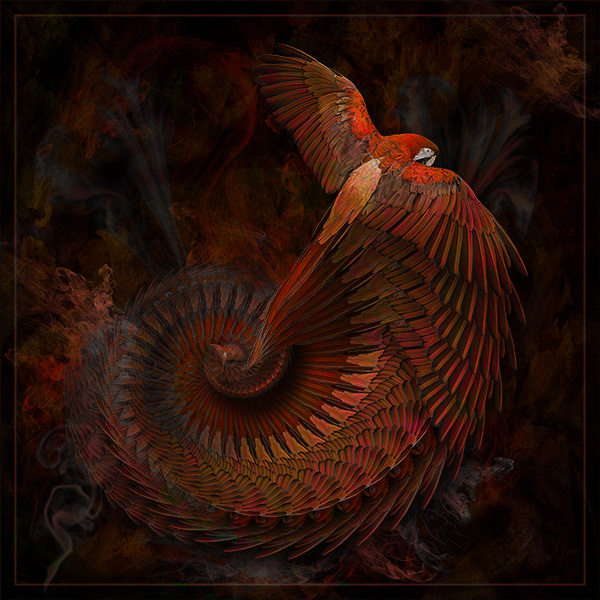
 Here is an earlier version on the way to the final.
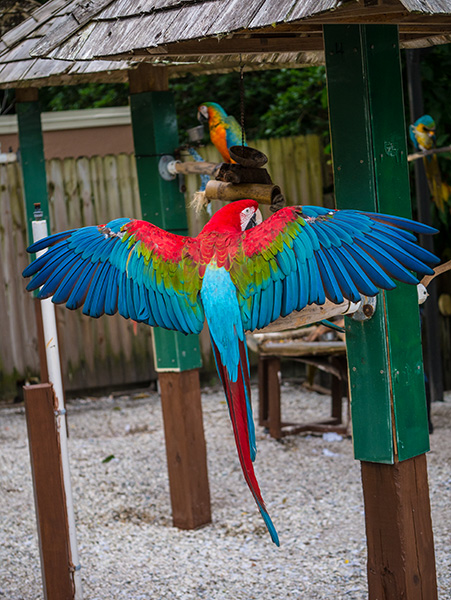 Original capture – Tech info from original capture Lumix GX7 Lumix Vario 35-100mm f2.8 1/250 sec f2.8 ISO 400
After selecting the bird from the background I used Adobe Photoshop Layers and a Step and Repeat technique you can learn more about here. https://chd.lzi.mybluehost.me/step-repeat-photoshop-tutorial/
Yours in Creative Photography, Bob
by successfulbob | architectural photography, landscape photography, Lumix FZ 1000, Lumix Lounge, photography, photography creativity
Inspired by the Unfamiliar
Just back from PPA‘s Imaging USA…
And, I can’t tell you how many times I heard, “Oh, you’re from Sedona! You are so lucky to have such a beautiful place in which to live!”
Now I don’t actually dispute that statement because I am lucky and I do live in a beautiful place. But, photographically we all live in beautiful places. Why do I say that? Because it is the light in which makes a beautiful photograph not necessarily the subject matter. Believe me I’ve seen plenty of butt-ugly photographs of the red rocks of Sedona.
The other part of the equation is that I believe we are inspired by the unfamiliar. When we see the same things before us day after day I believe our eyes and minds become fatigued by the repetition. Moving out of my comfort zone to new visuals on a regular basis via the travel I do when presenting programs around the country I find stimulates my creativity. Just by virtue of seeing something I am not used to can lead to creating new imagery that is interesting to me.
Wherever You are is Beautiful
Wherever you are is quite interesting when seen with new eyes. There have been many times a photographer from out of town has come into my neighborhood and shown me new ways to see the beauty around me. And I have shown others beauty in their own neighborhood.
I have found I really enjoy seeing new things. I think the secret is to use the same eyes at home as we do on the road. I suggest you and I try to not wait to travel to look at our own city or town with new eyes… I guarantee you will start creating more and better images. Although it doesn’t hurt to get a little ‘refresher’ by taking a little trip as a reminder.
One Image from the City of Atlanta
The convention was in Atlanta, Georgia. This image was captured from the Onmi Hotel 11th floor. I enjoy the architecture, lines, forms and light as I look out over the city.
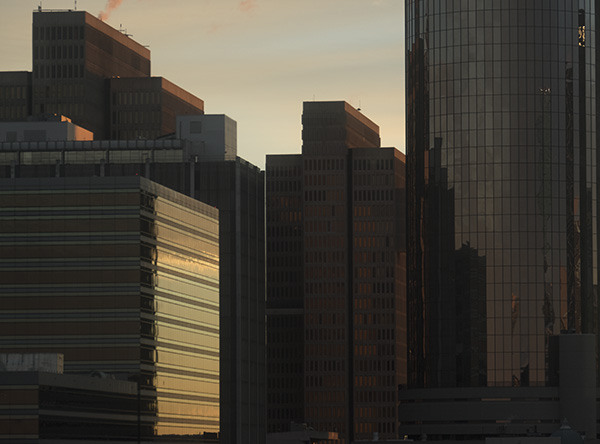 This is pretty much SOOC (straight out of camera)
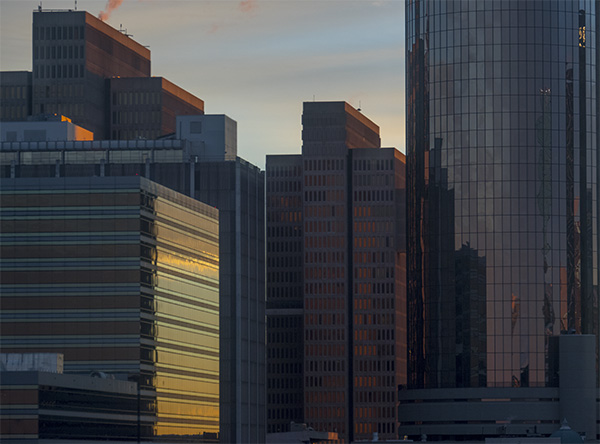 This version is with color correction and a bit of artistic adjustment.
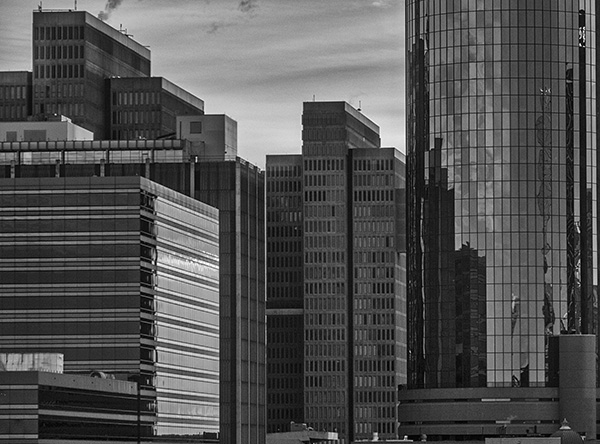 Using NIK Silver FX Pro 2 to create a black & white version makes tone and form more of the star than the color.
All three images have a slightly different feel due to different processing. I’m sure there’s even more but that’s all the time I have today. I be sharing more of my ‘city safari’ images in posts next week.
For those who have inquiring minds about gear and settings for the capture… Lumix FZ1000 1/200 sec f4.5 ISO 200 in Aperture Priority
Yours in Creative Photography, Bob
by successfulbob | 4K video, landscape photography, Lumix GH4, Lumix Lounge, photography, photography creativity, photography education, photography gear
Using Still Frames from Time Lapse
When making a time lapse (view time lapse video here) image you can leverage a thing I often do to create a solid look of a scene by using images captured over a time period to get the best of all worlds. As our eye can change the size of the pupil in any scene when looking into the shadow or highlight area we sometimes need to arrest time and blend it into a single image to represent what the eye would actually see. I call this an advanced form of HDR imagery as the images are not captured in one go but with the camera on a tripod blend images that were made while the sun was up, as it was going down, and long after it had crept below the horizon.
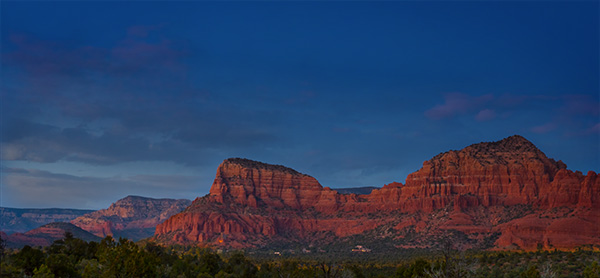 Here’s the final image.
 Here are the images combined and used to create the final. The photo on the left was used for the treeline across the bottom. Next image was used for the cloud formations. The third image was used for the red rocks. and the final image was blended for the deep colbalt-blue sky.
Why use Multiple Images?
I went back and selected images based on the subject matter that was exposed exactly for the area of the scene and using masks blended them together for the final look.
The use of images captured over time verses capturing all the images in a single HDR capture is the quality of the information in the highlight areas and shadow areas as they are captured exactly as they should. This will give you less noise in shadows and cleaner highlights, allow the glow of light in a scene and more.
Gear
A Lumix GH4 was mounted on a tripod with the 7-14mm f4 Vario lens. Images were captured every three seconds over a long time period for the time lapse video. If I was using this for the ultimate capture of a scene verses also for a time lapse I would set the interval for more like an image every five minutes or so.
Yours in Creative Photography, Bob
PS – this technique can also lead to multiple iterations and mood of a scene… Try it you’ll like it!
by successfulbob | 4K photo mode, 4K video, Lumix G7, Lumix Lounge, macro, photography creativity, photography gear
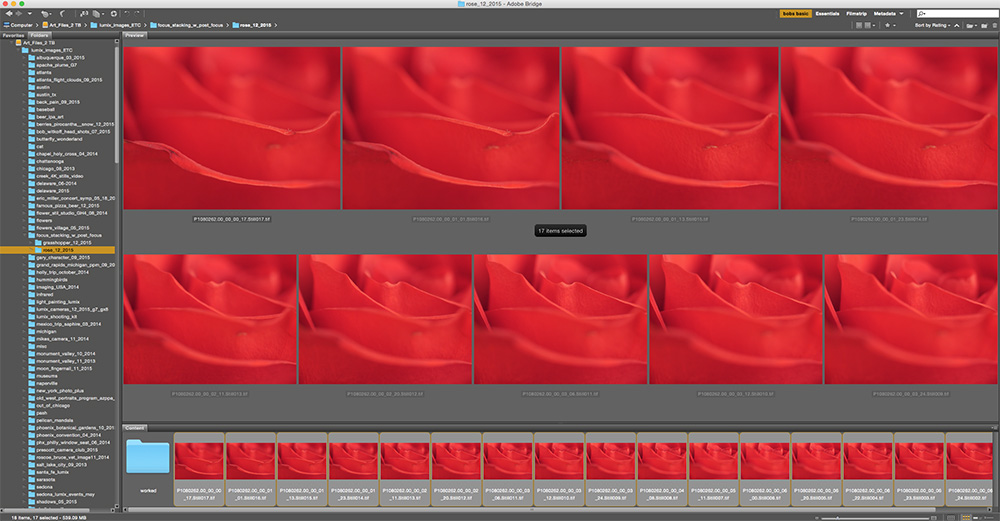
Using Post Focus Photography
It’s a feature I wasn’t sure I had a reason for but again in the studio I used the Post Focus Setting on the Lumix-G7 to focus stack to get a different look from my 45mm Macro lens. This image started with a seven second video clip with the focus point being moved by the camera as the camera searched through all of it’s focus points. I’ve found the camera to capture as little as one second of video to as much as ten seconds depending on subject matter and how deep the focus goes through the scene.
 This is my favorite rendition of the rose.
Create the Image from the Video
The steps I used were to download the video. Open it in Adobe Premiere Pro and select the still frames I wanted to work with and saved them as TIFF images. I wanted a soft and sharp movement through the final image. All 17 selected images were loaded into a single Photoshop document by using the Adobe Bridge command Tools>Photoshop> Load Files into Photoshop Layers after selecting all the images. Once the images are in Photoshop all layers were selected and under the Edit menu the Auto-Align setting was applied. Then under the Edit menu Auto Blend Layers was selected with the settings Stack Images with the Seamless Tones & Colors checked. This will take all the ‘Sharp Bits’ Of the image and mask them in.
 The set of images saved out to individual files for the Post Focus video capture.
 Layers Palette after adding images to file, aligning images and blending. Photoshop automatically created the masks.
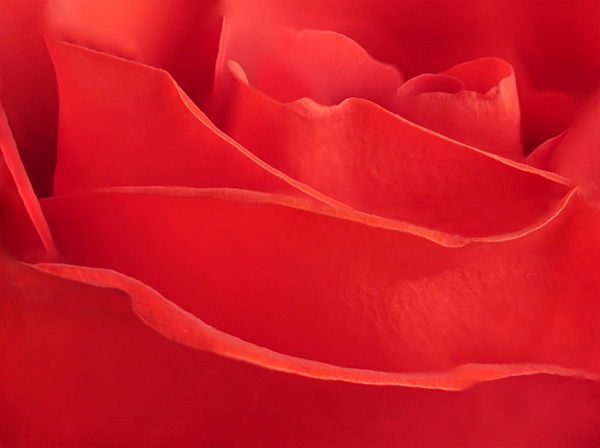 Rose photograph after blending and cleaning up imperfections in the flower. Used Photoshop Tools then moved in to NIK Color EFX Pro 4 for further modification.
Talking Photography Tools
The tools we have to work with like Photoshop & NIK Color EFX Pro 4 can take images to an entirely new level and I keep trying to push to see what I can do. I hope this has been a help to you and at the very least given you some inspiration to think about image making in a new light.
Yours in Creative Photography, Bob
PS – The Google NIK entire collection of software plugins is only $149. Great suite of tools!
by successfulbob | inspiration, photography creativity, photography education
Creativity & Photography & You
You are either Creative OR you are not!
True or False??
Many say true. I say, & so should you, false.
Found this chart on Design School a web site for creative graphic designers I think we as photographers face the same challenges and fears as any other creative does i any genre. I’ve also found when I’ve looked outside the traditional channels for getting creative about photography I find there is a whole world of ideas that we can apply. Here’s a great thought starter for jumping your creativity up a notch or three.
Find more awesome design content at designschool.canva.com
Put some, or all of these ideas, into play & you will find new and exciting things happening in your photographic life.
Yours in Creative Photography, Bob
by successfulbob | Lumix GH4, Lumix Lounge, people photography, photography creativity, photography education, photography gear, photoshop tutorial
Anatomy of a self portrait
Sometimes it’s good to push yourself.
I had an assignment from a game of Survivor we are playing in the Arcanum (a place of growing your photography skills at your own pace with a group of like minded folks. Click the link for a peek under the Arcanum’s hood)
The assignment was to shoot a self portrait to help share a bit of who you are. So I decided to make it a learning experience. Here’s the thought process I went though.
First I wanted to give people an idea of how busy it can be in my head. So the title became ‘Under the Hood’.
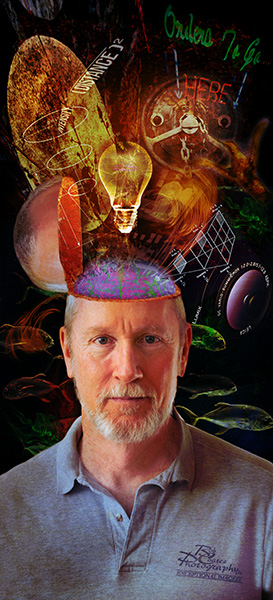
Let’s see what’s under the hood in Bob’s Brain…
Set up the photo
Start with a solid head and shoulders studio self portrait. Main light forward and bounced off the wall to get a large source with medium contrast. Two strip light soft boxes with egg-crate grids attached were set to camera left and right slightly behind pointing to skim and add separation and spice to the look. Lumix GH4 camera with the 42.5mm 1.2 Nocticron lens mounted on a tripod with the Wifi activated allowing camera control from my IPhone. I use Paul C Buff lights and modifiers because of the good value, selection and great service when needed.
On to the Photo Art
Original concept was to have a zipper peeling back from my forehead to allow the reveal. After some experimentation that didn’t feel like it was going in the direction I wanted. Next thought was to cut off the top of the head and tilt it back but that made it difficult to show what was coming out of the head. Finally, on the third try I took the top of the head and tilted it to the left and got the base image for which I was looking.
Adding Photo Elements to Tell the Story
Then the search was on to search for and create elements that were to tell the story. Inverse square law. Brain. Smoke brushes. Neon signage. “Wait I’ve got an idea, a light bulb went on in my head.” Textures for blending element together. All images were layered in Adobe Photoshop using various blend modes. You can see the Layers and their Masks used to put this together. Got a question? Give me a shout…

Photoshop Layer stack showing Layers and masks…
Hope this inspires you to take a project and push yourself to a new limit.
Yours in Creative Photography, Bob
