OK. I went back to the same file I worked on yesterday and reprocessed using a couple different techniques. Here is the new version captured with the Lumix G6 and the 7-14mm f4 lens.
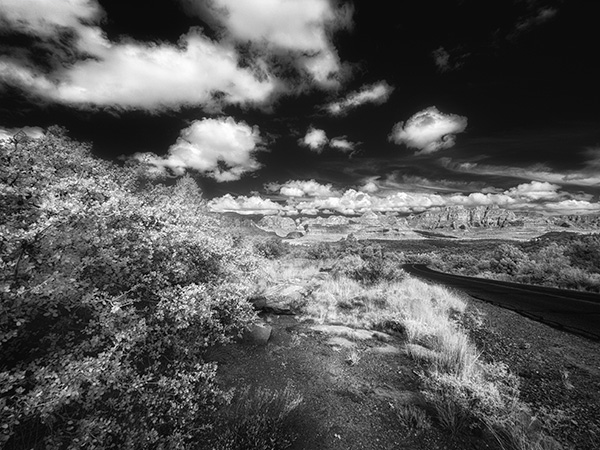
Different processing led to a cleaner more detailed IR image.
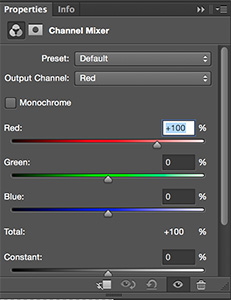
First I used Adobe Camera RAW to process the file twice. Once for the foreground which was in shadow and again for the background which was in full sun. Using a Layer Mask I blended the two files together. Then using the Channel Mixer I swapped the Red and Blue Channel information as this file is still comprised of RGB information. When you first open the Channel Mixer adjustment Layer you’ll see the Output Channel set to Red at 100%. Change this to 0%. Go to the Blue color and change it to 100%. Then change the Output Channel to Blue and make the Red color 100% and the Blue color 0%. This is to give a ‘blue sky effect’. I didn’t like that effect so I kept going.

Swapping the Channels gave me a better image ultimately so I will keep this as part of my IR processing in the future.
Next using NIK Silver FX Pro 2 I converted to Black and White adding some mid-tone structure and fine structure. in NIK Color FX Pro 4 I added a bit of Glamour Glow with neutral color. This helped increase the IR look. A little goes a long way before you blow out some highlights so be careful here. Final bit of tweaking is a blank Layer set to Soft Light Mode using the Brush Tool with Black or White color to dodge and burn the image just a bit to control where the eye travels throughout the photograph.
Looking forward to working in IR more often. Gives a great look to noon-day sun images when you would normally refrain from making image captures.
Yours in Creative Photography, Bob