This will be a new series of posts about our health working as photographers. Let me preface this by saying I am not advocating that you follow blindly anything I share here. These are ideas and programs that are working for me. I have found most of these to also be regular problems for other photographers too. Consult with a physician or do your own research before embarking on any ideas shared here in this or other Photographers Health posts.
I reiterate – I am not a medical professional. I don’t play one on TV. I didn’t even stay at a Holiday Inn Express last night…
Computer Work Station Practices for Photographers
We spend an awful lot of time at our computers these days and that can be a severe health issue in and of itself. We hold ourselves in odd positions for long periods of time. We don’t move enough thereby putting ourselves at risk for back and neck issues, carpel tunnel syndrome and more.
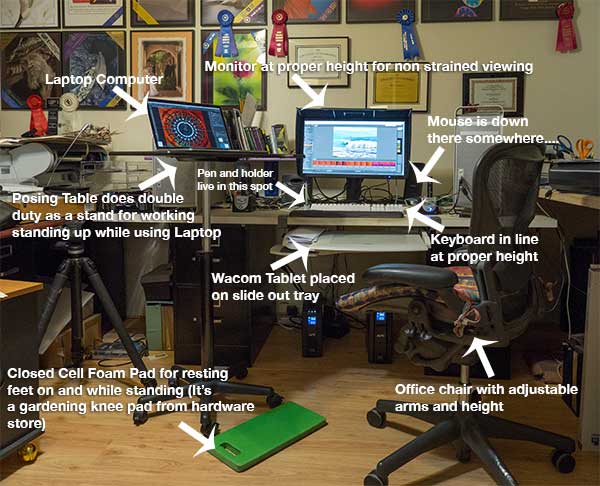 My work station at Bob Coates Photography.
Here’s how I’ve started to take back my health from the computer station.
Here’s a place to find good set up information for your work station. OSHA gets you moving in the right direction.
A quick review of the important stuff.
• Top of the monitor at or just below eye level.
• Head and neck balanced in line with your torso. (You might want to get someone to watch you while you work to make sure you are in a correct position. If no one is around to help you set up a video camera and watch yourself for a while you might be surprised by what you see.
• Elbows close to your body and supported.
• Some support for your lower back.
• Wrists and hands in line with your forearms
• Plenty of room for your keyboard and tablet.
• Feet flat on the floor
Here’s a link to a more in-depth checklist for good practices and to see how your current workspace is helping or hurting you.
As photographers we have an additional piece of equipment to work with that is not addressed in the guidelines above, a tablet. If you are not already using a tablet for your work I’d put it high on your list. “But Bob, I tried a tablet and I can’t get used to it. I hate it!” “No Excuse!” I reply. The way to fall in love with your tablet is to hook it up. Make sure the settings are correct for the click and double-click sensitivity and pen pressure. Yes there are settings and preferences and ways to test all that before you get started. Most who don’t like a tablet didn’t realize that this machinery is also software driven to customize your experience. Once you’ve got the settings correct for you disconnect your mouse for four to five days. By the end of that time you will be an old pro and realize not only the health benefits of not having your hand in an awkward position trying to make selections with your mouse leading to possible Carpel Tunnel Syndrome, but the time savings. Where you put the pen on the tablet is where your Curser will appear. This seems to be one of the most difficult things for newbies on the tablet to grasp. You don’t drag your Curser from place to place. You put your pen where you want it to be. Very cool.
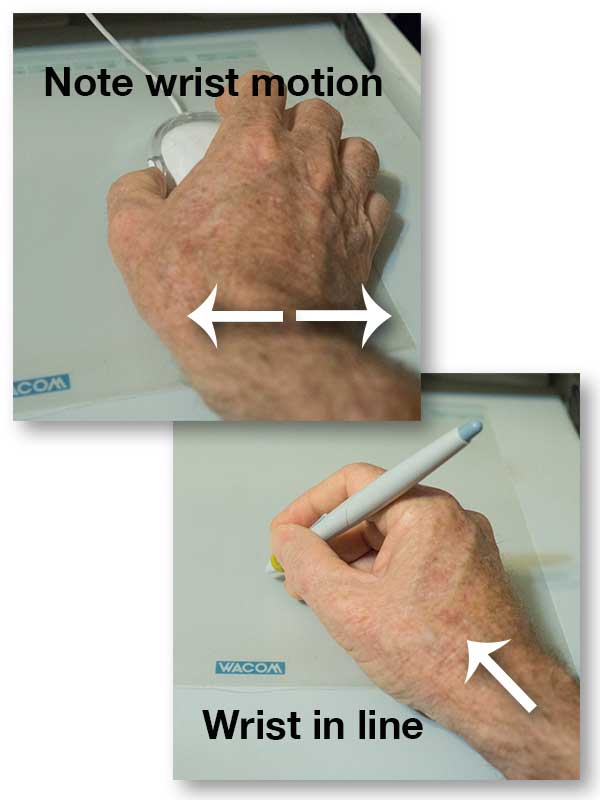 When you use a mouse you do a lot of work moving your wrist back and forth. When using the pen tool your wrist is held in a more neutral position using your arm and fingers to do more of the work making it much easier to make selections. This is a classic tablet I bought well over ten years ago. They design them a bit more sexy these days!
My tablet of choice over the years has been the Wacom brand. They have all different types, sizes and styles of tablet at different price points to meet every need and every budget. That sounds like an ad but it’s not. It’s an industry standard piece of equipment. I have a larger Wacom Tablet for my work station in the office that I bought a bunch of years ago and a smaller one for when I teach on the road with my laptop. If you have a question about which might be best for you drop me an email with info on the type of work you do, how long you do it, in the office? on the road? etc… and I’ll give you some ideas.
I mount my tablet on a roll-out tray so it is right in front of me. My keyboard is on the desktop right in line and above that and the monitor straight above that.
This is probably enough info for today. This has definitely turned into a two part post! In the next installment I share more ideas on staying healthy while working on your computer. Please don’t hesitate to share your ideas here too!
Yours in Photography, Bob