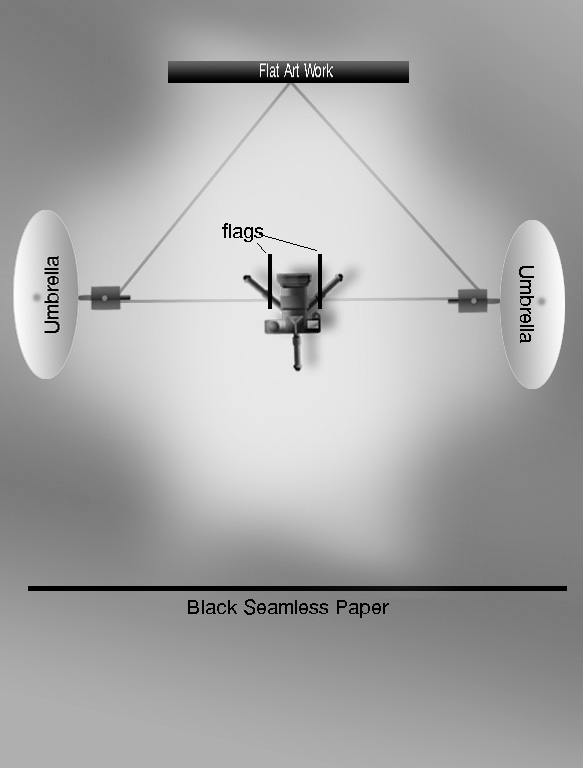
I’ve been working with a way to shoot flat art that really simplifies the set-up and gets you better color than some other ways. No longer a need for polarizing filters and busting butt trying to get even light across the field of the artwork by trying to use 45 degree angles with lights pointed at the art… See the diagram for the set up here’s how it works for me…
Take a measurement of the art. The lights should be at a distance as an equilateral triangle that is longer than the longest dimension of the art to be photographed. If you have really large art you can stack another umbrella light over the first to get larger coverage.
Lights on umbrellas should be facing the CAMERA. We are lighting the flat art with the spill from each umbrella. This makes it extremely easy to get the light falling on the art to 1/10 of a stop over the entire surface with virtually no effort.
Set up flags so that the light doesn’t flare the lens since the lights are pointing toward the camera.
Take meter readings to ensure the light is within even across the art. Use that reading on your camera with an expo disk. Make an exposure with the expo disk in place with the metered settings from the artwork’s position and use that exposure to set a custom white balance on your camera.
If you are shooting artwork with glass or with highly specular highlights from the paint or glaze set up a black background behind the camera and cover the tripod with black velvet. Get out of the way and trigger the camera with a remote. There will be no reflections or any light for the artwork to “see” hence no glare or specular hotspots to deal with. The color will be spot on since you are using a custom white balance. I’m sure you could also use the Macbeth checker system also but the Expo disk works great for me. I also add a checker chart and gray card just in case, but haven’t had to use them since adding expo disk….
BTW the camera can be anywhere along the center line it doesn’t have to be in between the lights it can be forward or behind the lights.
One other thing to be careful about is lens choice. Ideally a tilt shift or very flat lens with no distortion is best. Use a level on the artwork and the camera lens to make sure they are on the same plane. Spending more time here will save you lots of hassles once you get to the computer. If you use a wider angle lens you can get some barrel distortion. If you don’t do enough of this work you can use the flattest you have. Camera raw has a lens correction tool that can get you very close but even then you should check that the image is perfectly square by pulling down some guides. A VERY small amount of transform tool using warp can get you back on the straight and narrow.
Since I have been using this system I no longer have issues with shifts in color from hot spots or polarizing filters. And most important no more fighting with artists about getting the ‘right’ color. Before there were always problems, no more. Try it you’ll like it!! Any questions give me a shout….
The black seamless paper is only necessary when you have glass that you can’t remove for one reason or another or if there are specular reflections in your room. You would also need to cover your tripod with black velvet to reduce reflections also..
Yours in Creative Photography, Bob
PS Thanks to commercial photographer and educator Jim Lersch for the diagram materials… Jim Lersch Photography


