If you asked the question above you probably were not a black and white film photographer from past days. We usually learned about the reticulation effects when we treated our film badly by either getting it too hot, processing it at the wrong temperature or some other variable I can’t remember now.
But, after seeing the effects, I remember trying to screw up the film for art purposes. I came across the look when I was messing about (read that playing) in Photoshop.
Photographed around sunrise with haze in the distance. Straight out of camera (SOOC) Lumix GX8 with Lumix G Vario 100-300mm f4.0-5.6 lens @ f5.6 1/1250 sec ISO 800 @ 300mm (600mm equivalent)
I choose this lens to compress the scene.
After processing.
I had made a set of images one morning near dawn, and I was feeling a bit of a ‘Japanese aesthetic’ in what I saw through the viewfinder. Things like that can happen when you are out shooting thinking you are getting one thing then, being a bit disappointed upon return to the studio process the files. I still felt I had something worth which to work. I liked the distance imparted by the haze that we don’t usually see in the high desert due to the dry air. This particular haze was thanks to some forest fires sharing some smoke with us.
After trying various filters, I stumbled on a look that reminded me of the reticulation of old. I pushed for it some more, and you see what I got above.
Not sure I’m where I want to be with this set of images. I’m going to put them away for a little while then revisit at a future time. Sometimes you need to try something out and come back later to see how you feel about it. There are a lot of compositions involving this same scene. Who knows? These files may be a treasure trove with this processing or some other treatment.
Or, it could just be a pile of… We’ll find out later.
Something old could be new again. Reticulation anyone??
Yesterday I took on the task of going hiking in Oak Creek Canyon in Sedona, Arizona to capture infrared photos. OK, maybe tough isn’t the correct word for this assignment. I love almost all aspects of working in photography. Getting out into nature and exploring is high on the list of the good parts.
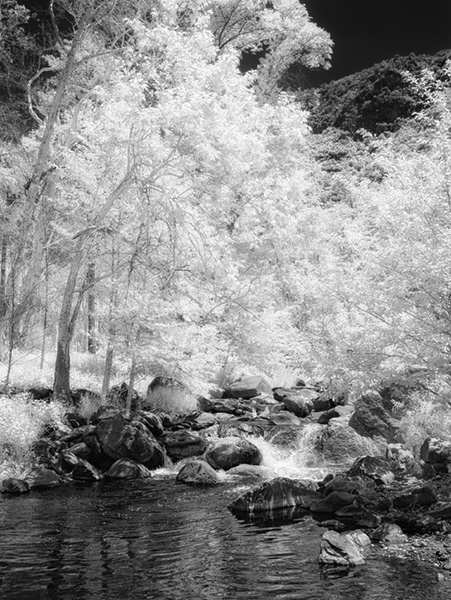
I’m up in Oak Creek Canyon between Sedona & Flagstaff. The picnic area is called ‘Halfway.’ So named because it’s halfway between the hugely popular (& crowded) swimming hole known as Slide Rock and an excellent trail called West Fork. Halfway is a little less traveled spot as you have to scramble down a fairly steep embankment while climbing over rocks. Once down to the creek there’s a bit of rock hopping to navigate your way around.
On to today’s thoughts on working the with a camera converted to infrared. I had my Lumix G6 converted by LifePixel with a standard IR filter ad it is working out pretty much as I had hoped it would. I find myself using the 20mm Lumix f1.7 lens quite often. It’s sharp, fast, light and has a very low profile. I guess at a 40mm full frame equivalent it pretty closely matches a standard field of view which I feel lends itself to most of my infrared captures.
As I make my IR captures I have been bracketing exposures. When I first started I was bracketing by five stops as I was learning how the camera ‘sees’ with the IR filter installed. I’ve now moved to a three-stop exposure bracket but I also set an exposure compensation adjustment depending on the dynamic range of the scene in front of me. I am capturing the images in RAW plus jpeg with the camera set to black and white. White balance is set to daylight.
The image above is two jpegs blended together to achieve the tonal contrast for which I was looking. After getting the tones blended in Photoshop using a mask, the Layers were merged and a trip to NIK Silver FX Pro 2 for some sharpening. I used the Structure and Fine Structure settings si tweak the sharpness and change the resulting layer blend mode to Luminosity. Only the luminous information is then transferred to the image. Then NIK Color FX Pro 4 was added utilizing the Glamour Glow to add some IR life to the highlights. The shadows were protected from the glow.
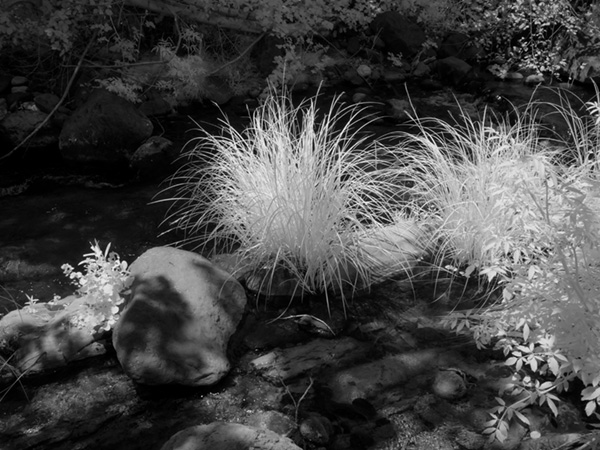
This image was processed from a single jpeg which was opened in Adobe Camera RAW. Jpegs can be opened in the RAW editor to use the controls available but it does not have all the information of a RAW file. I was just trying to control contrast with this treatment so I didn’t feel the need to start with the RAW file. Exposure was adjusted as well as the highlight and shadow detail. A soft light layer was added for some dodging and burning. A vignette completes the treatment. I enjoy all the textures and tones of this scene.
Infrared photography can take midday, which is usually a tough time of day for making photographs and turn it into a blast.
That was my play yesterday. I created a few more scenes I’ll share with you tomorrow.
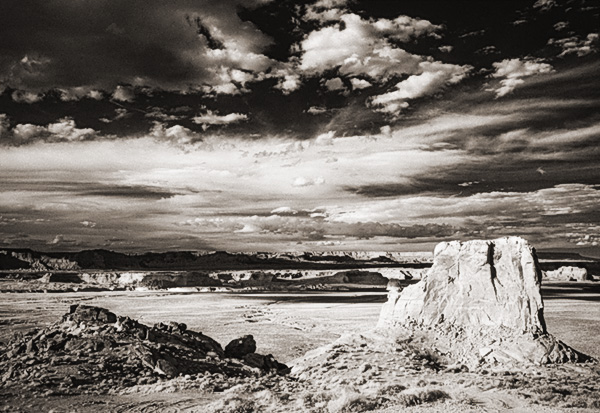
Stud Horse Point Infrared Photography – Page Arizona
Infrared imaging can add interest to a scene that otherwise would be OK but rather mundane. I have a Lumix G6 that I had converted to IR by LifePixel. It’s great to take an older camera that isn’t getting much use and have it converted to Infrared. Or if you don’t have an older candidate that will work you can but up a used camera and have it repurposed.
But why is it good Bob?
Some times of day are just not conducive to solid imagery. Usually, midday is less than ideal for making photos and that is when IR photography can shine especially when there are clouds and or trees in the scene. Here was an example where I wasn’t thrilled witht the lighting. We were hoping for great color in the sunset. You know how that goes. All looks good then falls flat. Rather than come home empty handed I kinda like the outcome of these.
Outside Page, Arizona – Stud Horse Point
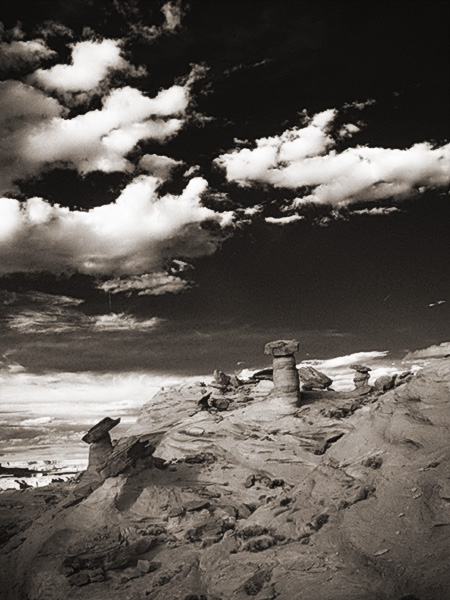
Hoodoos at Stud Horse Point
When capturing IR photos I tend to shoot in RAW + jpeg with the camera set to black and white. The black and white allows me to get a better sense of how the scene will render as the RAW image will come in with a magenta cast. I also bracket exposures as the camera’s meter and histogram are still ‘thinking’ in full spectrum color mode.
I picked the RAW images I wanted to process. Then output them to Photoshop and added some dodging and burning. Then took the image to NIK ColorFX Pro 4 to add some Glamour Glow and a little grain to emulate the look of film IR. As a final step, I evened out the overall color and added a light sepia tone over the image using a Hue/Saturation action.
I do! I always try to improve my skills by pushing out of my comfort zone and create different images from different places.
I always try to improve my skills by pushing out of my comfort zone and create different images from different places.
So how do you do it? One of the best ways is to continually practice and expand your skillset. Anyone who is at the top of their game in any sport, yes I consider photography a sport as well as an art form, practice daily. Why do I consider it a sport? Depending on your photographic genre you need coordination, timing, and stamina. This goes for shooting sports, weddings, wildlife or other fast moving situations. Why art? Art because you need to create or recognize wonderful lighting in order to have your images rise above the ordinary. Both the ‘art and sport’ parts of your work can be improved by working on your muscle memory. And, you guessed it, that takes practice.
Guess what? Your composition gets better when you practice too.
You also need to practice your post production as well… And the more you do it, well you get the idea.
I always try to improve my skills by putting myself in different situations and today I’ll share some images from the Phoenix zoo. For a little accompaniment push the button to listen to Paul Simon’s song ‘At the Zoo’.
Paul Simon with Garfunkle “At the Zoo’ from around 1967. (am I showing my age here??)
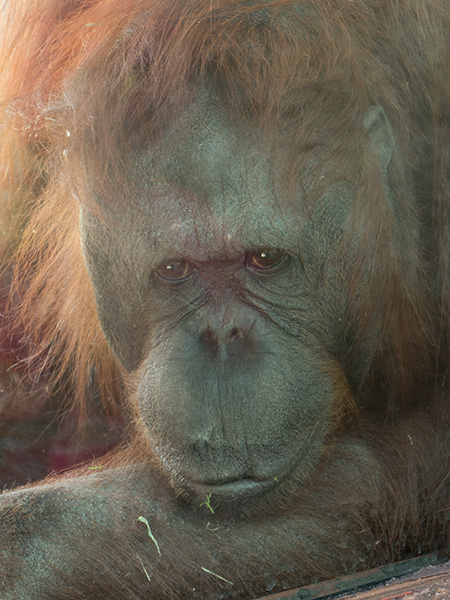
Orangatang at Phoenix Zoo. Captured with Lumix FZ1000 1/40th sec f4 ISO 200 – With a range of 25-400mm the FZ1000 is a very handy lens covering a wide variety of situations.
“OK Bob, so how is this zoo practice good for practicing other types of photography?
I’m fighting crowds to get the angle I want. Looking to capture expression which happens very quickly. In this instance, I am also going to be working hard in my post processing because this image was made in less than ideal lighting conditions through a thick, colored, and dirty pane of glass.
Did I say it wasn’t an ideal situation? That never happens on a regular photo shoot… (cue the laughter bouncing off the walls!)
Here is the final image I was able to pull from the original capture.
A couple of post processing tips I picked up from working on this photo of the orangutan. Adobe Camera RAW has a feature called DeHaze. This was quite helpful in getting a lot of the reflections and dirt on the glass to disappear. Did a much better job than I thought it would!It was designed to help with scenics to take some of the blue out of a landscape image but it worked very much like a Polarizing filter in this situation. I will be revisiting this filter more in the future. I love how tools and setting designed for one thing can be leveraged to do more.
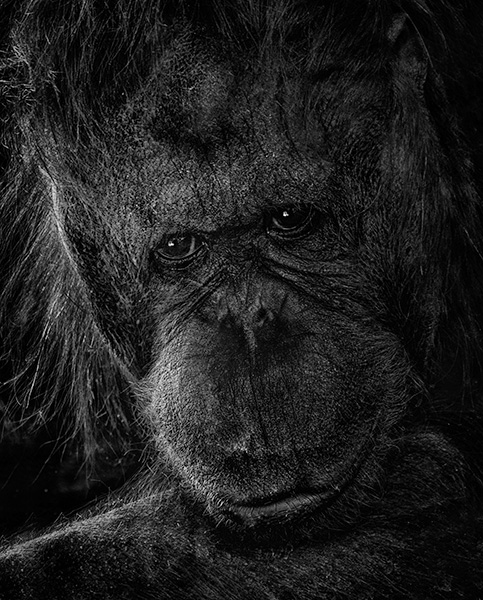
After the initial processing in Photoshop I moved over to my favorite black and white conversion tool NIK Silver FX Pro 2. I made my black and white selections in the filter. These process out onto their own layer, and with a Mask, additional adjustments can be made. One more time back into Silver FX Pro 2 (it’s free now!) and I made some adjustments to the Structure, dialing in very strong enhancements to the mid tones and the fine structure. I changed the Mode of that new layer to Luminosity and filled the mask with black. Then I was able to paint with white on the mask to selectively sharpen specific areas of the image.
Last on the list was a Soft Light Mode Layer to dodge and burn.
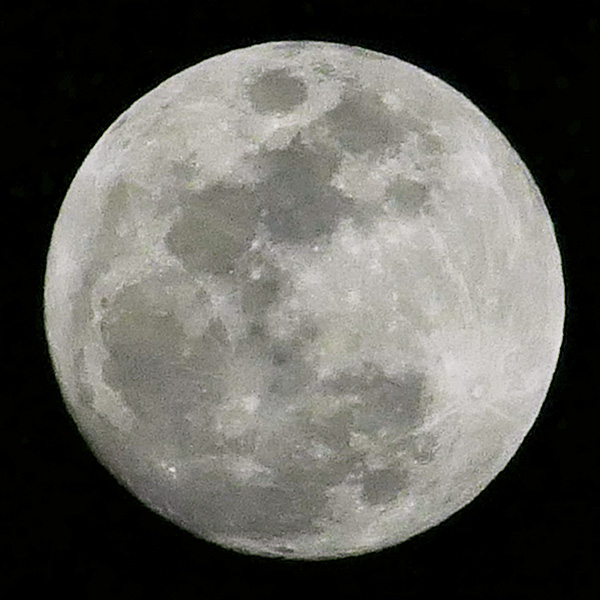
Pulled into the driveway the other night and saw the full moon starting it’s ascent from the eastern horizon and I immediately ran for my camera. Now we’ve all had the wonderful (I say sarcastically) experience of photographing the moon and being disappointed by the amount of volume it took up in the entire image surface. You know, way too small for what we had in mind when we made the photograph.
The FZ1000 is 400mm at the long end of the zoom at f4. While solid even that is pretty short for something that is 238,900 miles (give or take a centimeter or two) away from the camera. The camera has a setting called Digital Zoom and shows and captures the image at a larger size. 1600mm in this case. This does degrade the image vs having optics do the job. But have you priced a 1600mm lens lately? In spite of a bit of degradation of image quality I like the Digital Zoom because I can see exactly how the image will fill the frame.
Even after cropping in there’s 2300 pixels of moon that when made smaller and placed in an art piece will have plenty of detail
Now are these images good for study of the craters on the moon’s surface? Heck no! But will they be good for art projects where a moon is needed? You betcha!
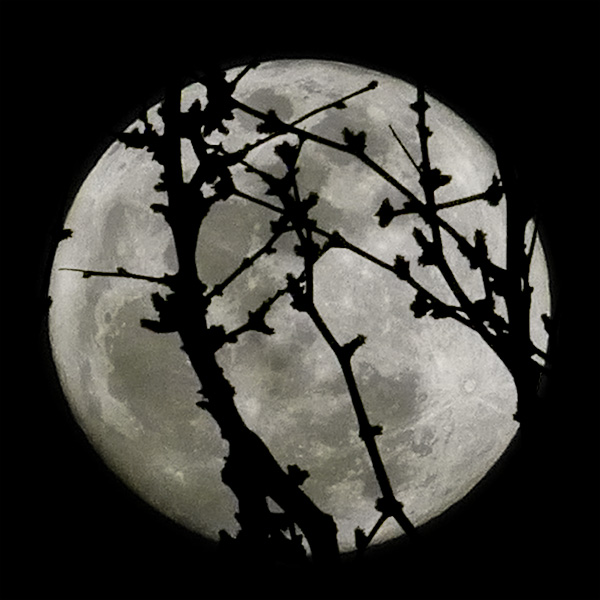
One way to add interest to a moon shot is to silhouette an object. I wish I had thought about this a bit more but didn’t have much time to scout out a more appropriate subject but you’ll get the idea with these mesquite branches starting to bud out with our warm weather.
Moon with mesquite branches
One thing to be aware of when attempting this when you have the foreground element in focus there will be a blob of light behind your subject. To help this along I took one of my plain moon images and placed it under the mesquite layer and put it into Multiply Blend Mode. This allowed the image of the moon with detail to show through.
For infrared conversion of my cameras I use LifePixel. Infrared allows you to put an older camera to use and opens up a new time time of day for productive image creation.
Learn Photoshop in a fun environment. Aaron Nace applies the right amount of fun with easy to understand and follow tutorials. Actions and brushes are included with lessons!
Best embroidery ever. Give Queensboro a try, get a $20 instant credit to get started by clicking on the logo! They specialize in great quality custom logo apparel and promotional products with the best customer service.
Platypod has become a great resource for being creative in getting your camera gear easily into unusual places. As an Platypod Pro I get to work/play with the gear even before it comes out. Head over to Platypod, subscribe to the newsletter and you will get special discounts reserved only for subscribers.