by successfulbob | black & white, infrared photography, landscape photography, Lumix G6, photography, photography creativity, photography gear, photography software
Photographer Muse – Part Two (or Deux if you prefer)
I shared how much I enjoy working with Pash. I can’t give her enough credit for coming up with concepts she would like to pursue that lead me to new imagery. She knows how to move, and hold a pose, when necessary. Both are equally powerful skills. See my original post about my muse here.
Learn more about Pash and her work with modeling, mask making, performance and more here.
And now to the images.
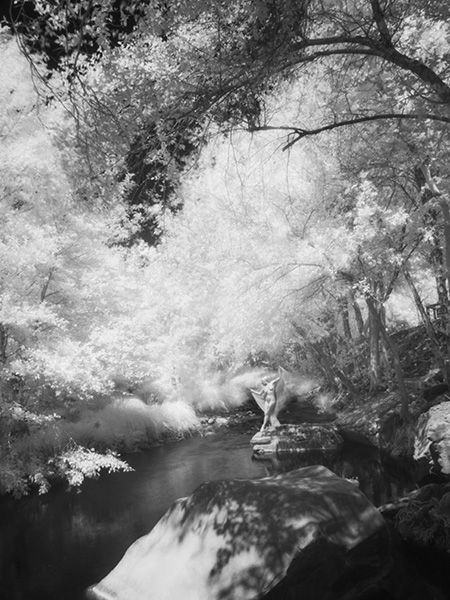
 This image is pushed to high exposure.
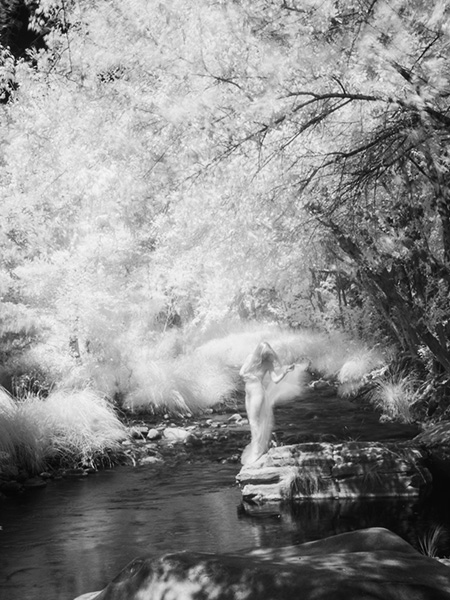
Going very high key with the exposure of the image with the ND filters in place allow the wind to play a part giving an even more ethereal feel to the image as the leaves and cloth wrap blow gently.
ND filters are by Tiffen. It’s the Pro100 package which includes the holder, a 1.2, and a 1.2 graduated filter. For this shoot, I had a 3.0 and the graduated filters. You can buy much less expensive filters but in ND you get that for which you pay. These are very thick optically pure glass filters.
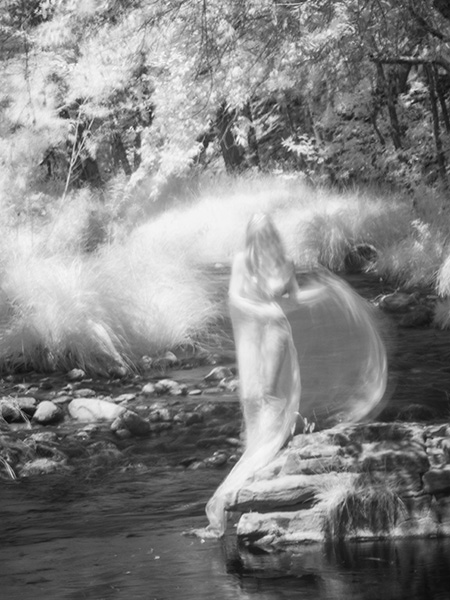 This one turned out a bit spooky!
 All the images were photographed in the same space, but all have a different feel.
A different view of the creek and the amount of space my model Pash takes up within the frame makes for a very different look for all the photos. Let me know which one is your favorite and why. It would be interesting to see the various responses.
All images were created in Infrared made with Lumix G6 converted by LifePixel.
A 14-140mm (28-280mm 35mm equivilent) lens was used. This allowed for the significant changes in framing without spending time swapping out lenses. Files were processed with Adobe Photoshop and Skylum’s Luminar 2018.** Some images were givin a little extra glow. I set up a preset in Luminar to get the image close to where I wanted then tweaked from there.
If you haven’t captured photos in infrared with a digital camera here is what a file looks like when downloaded in RAW to the computer.
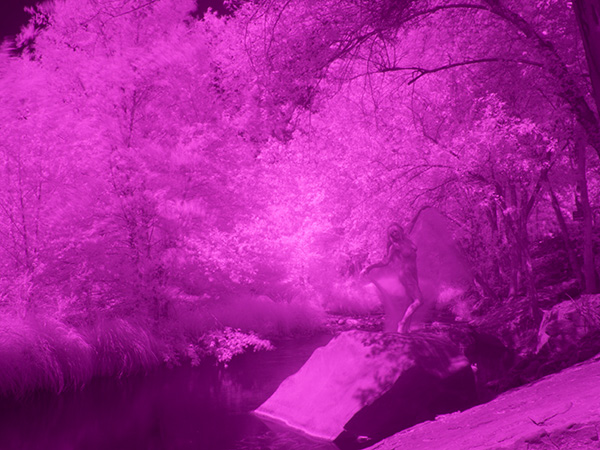 SOOC Infrared RAW file.
The files captured in the IR spectrum need some work as you can see. The nice part of using the Panasonic camera with live view set to monochrome allows you to get a better idea of what the final image will look like. If you shoot RAW plus jpeg, you will end up with a magenta version as above and a black and white version. Can be very handy when you first start shooting IR.
Yours in creative Photography, Bob
PS – Save $10 on Luminar 2018 by using the Promo Code COATES
by successfulbob | cloud photography, photography, photography creativity, photography gear, photography software
Clouds Illusions – Part Two
A couple of weeks ago I shared some clouds and ideas about photographing them and some thoughts on using them in working on your art images. (see the post here)
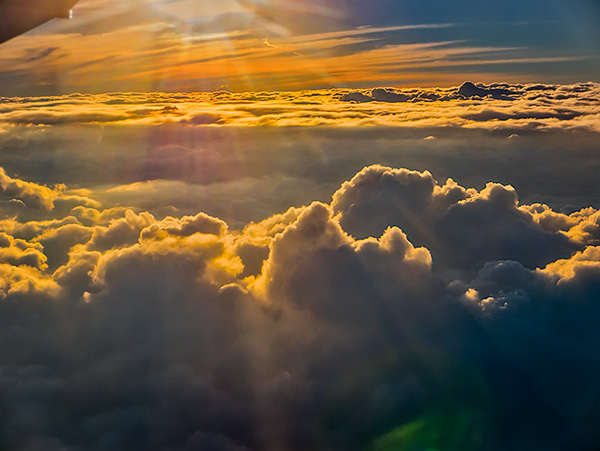
 Sunset was coming together looking over the clouds from the window seat.
I referred to Judy Collins’ song “Both Sides Now” referring to clouds and said I would share some images inspired by Julianne Kost’s book ‘Window Seat.’ After seeing her book, I thought about my pictures out the porthole of the plane as I traveled around the country on my Panasonic teaching forays. I have quite a collection of photos of clouds from above I thought that they deserved a post of their own. So here you go. Images are from the upper side of Both Sides Now.
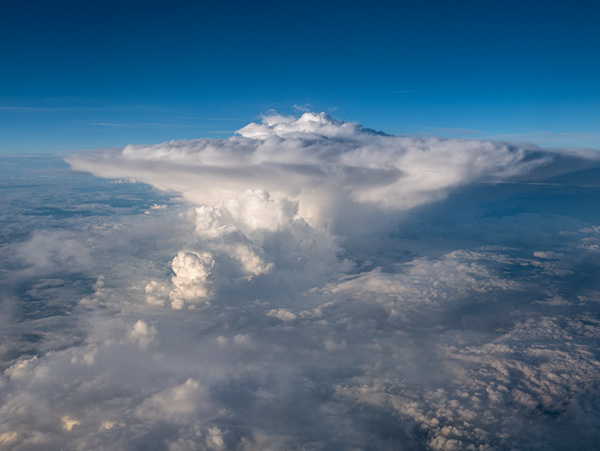 Watching a thunderhead form from this angle is quite different.
 I enjoy the ‘cloudscape’ with its own set of clouds above.
It turns out that all of the cloud photos in this post were made with the Pansonic Lumix LX100 which I refer to as the ‘professional’s point and shoot camera.’ It has a smaller chip, but the lens is sweet and fast. It’s on a magnesium body, and all the critical controls are available on the outside of the camera just as we had back in the day. That said, it has a ton of features we didn’t have then including eleven frames per second burst captures. If you go into 4K Photo Mode, you can pull 3,400-pixel stills at 24 frames per second. And plenty more.
On the downside, it does not have a superzoom so if you get this for travel photos you’ve got to do some zooming with your feet, but that’s what keeps the size down.
It’s on my list to work with the clouds from above and try to put them in art pieces. I’m hoping I can make it work and give almost a sense of ‘Something is wrong here, but I can’t quite figure it out.’ But that will be a post for another day.
Yours in Creative Photography, Bob

by successfulbob | commercial photography, LumixGH5, people photography, photography, photography gear, photography lighting resources
Go Pet Friendly – Part Two
Here’s a follow-up to the post from the other day about shooting an author’s photo and some support images for a book project. Amy Burkert and her husband Rod are on the road searching and researching pet friendly travel venues and a book is being written about traveling with pets as an addition to the Go Pet Friendly website
One of the images was the whole crew and the thirty-seven foot Winnebago with which they travel the country. Lighting conditions were a bit on the contrastly side with high sun and shade under the awning.
 Go Pet Friendly home on the road and the family that lives there.
I used two Paul C Buff White Lightning X-3200 lights to control the contrast of the scene. The main light was fitted with a thirty-six-inch Octabox and the other was used for fill with a thirty by sixty inch foldable softbox camera right. A couple of braketed exposuers were made to get a lighter exposure on the tree that was in shadow to bring back some detail that would have blocked up otherwise.
The lights were powered with Paul C Buff Vagabond Mini battery packs. Portable power comes in very handy on location as it keeps from dealing with cords. It makes it easier to position lights exactly where you would like them to be.
Amy also wanted to show off her ‘children’ Ty and Buster.
 Amy and her dog Ty pose for a portrait
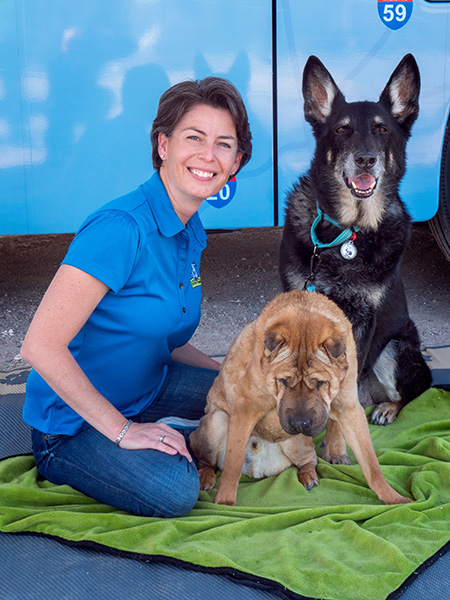 Amy, Ty and Buster pose in front of the RV
Images captured with the Lumix GH5 and the Leica 12-60mm G LEICA DG VARIO-ELMARIT PROFESSIONAL f2.8-4.0 lens
Yours in Creative Photography, Bob
by successfulbob | landscape photography, Lumix G9, photography gear
Lumix G9 and Mega Files
Panasonic recently released the Lumix G9 as the stills flagship camera. Just received mine and I am exploring new features. Here is an exciting treat that will get you some serious megapixels. It’s called High-Resolution Mode. You can double or quadruple the 20 MP files size. That is correct. The G9 can serve up an eighty Megapixel file.
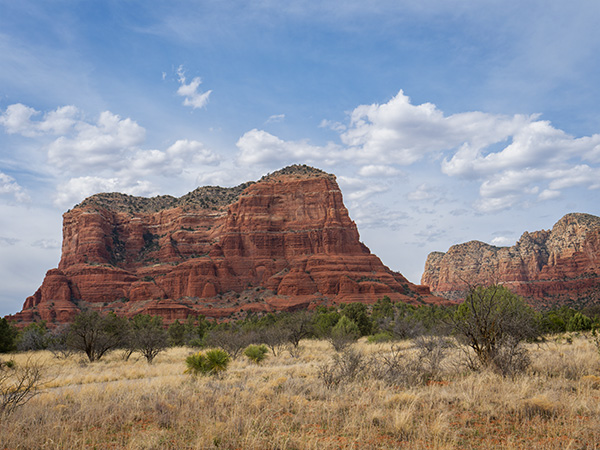
Below you’ll see my first test shot using the red rocks of Sedona. It doesn’t hurt to live in a place with some beautiful scenery. ; )>
Pictured below is Courthouse Butte in the Village of Oak Creek where the red rocks begin.
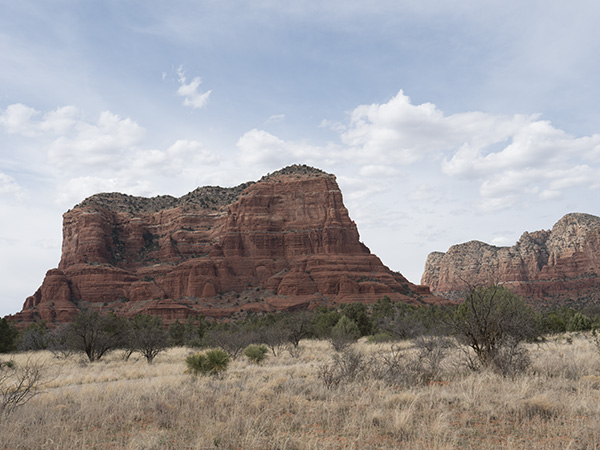 Above a RAW file straight out of the camera (SOOC) with no processing in Adobe Camera RAW. (ACR)
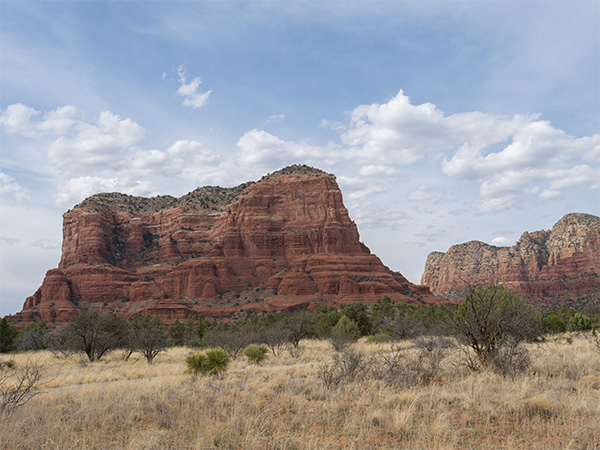 The image after a little massaging in ACR. Adjustment were made of highlights, shadows, blacks and whites, saturation and vibrance. All settings were changed sparingly, but that led to quite an excellent rendering of the scene.
 Here is the final image after a trip into Luminar 2018 software for a little image enhancement. Settings were adjusted (gently) for clarity, saturation, contrast, highlights, shadows and polarizing filter.
I wasn’t sure how much of much of a difference there would be with the added megapixels. There was a huge difference. With that number of pixels to work with, there is a lot of ‘headroom’ when making adjustments. The base file opens with an approximately 235 MB. That is twenty-six by thirty-six-inch file at 300ppi native. And it looks gorgeous.
You might ask, “How is this possible, Bob?” Here’s how. The camera makes eight exposures while off-setting each capture by one-half pixel then uses that info to render the larger file. Of course, that can be a drawback. You won’t be photographing moving subjects with an 80 MP files size. But… I will be trying that. I see possibilties of artistic captures with moving water, trees in the wind, people moving, or disappearing, in a scene.
I’ll report back with my testing in future posts.
Yours in Creative Photography, Bob
Photographed with the Lumix G9 and the Leica12-60mm f2.8-4 lens
by successfulbob | architectural photography, infrared photography, landscape photography, Lumix G6, LumixGH5, photography creativity
Infrared Capture for Photographing Architecture
We don’t necessarily think about using IR capture when taking everyday images of architecture. It can give you a different look. And I like it.
Always the difference will be dependent upon what the final image use will be. Since I am my client when doing architecture images for art presentation, I get to choose. I’ll show you a couple of different captures and let you decide. Let me know what you think.
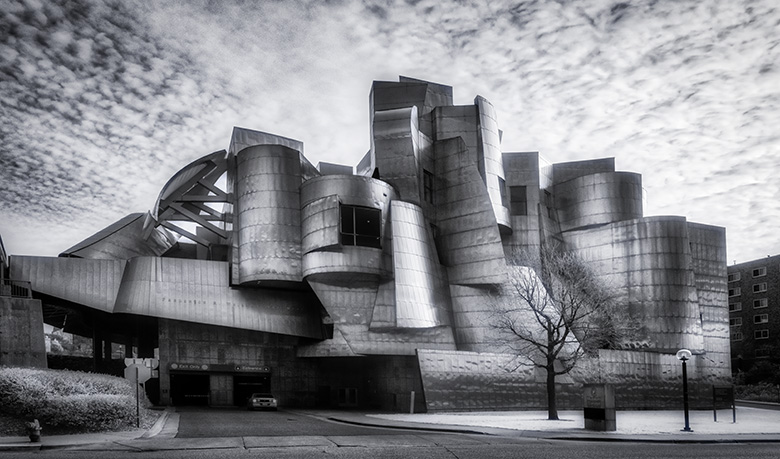
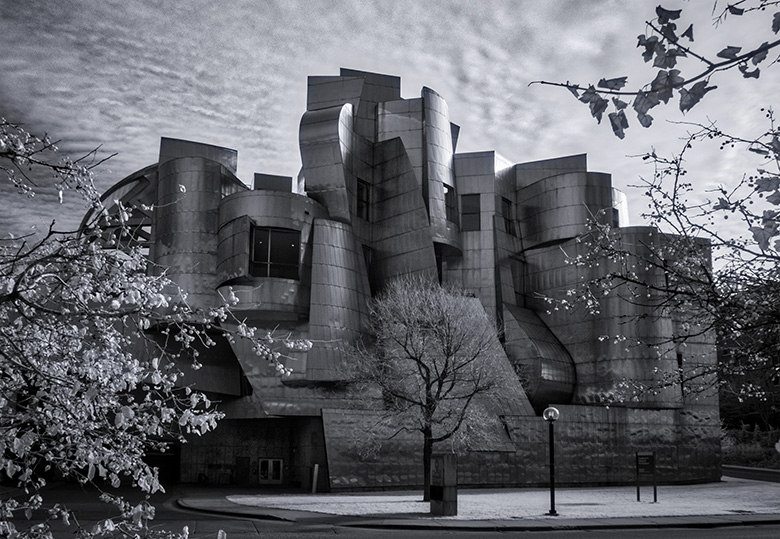
 Weisman Museum IR capture Lumix G6 Camera converted to Infrared Capture by LifePixel Processed in Adobe Camera RAW and Skylum (AKA MacPhun’s) Luminar
I think the infrared gave this image a bit of an otherworld feeling complementing otherworld style architecture.
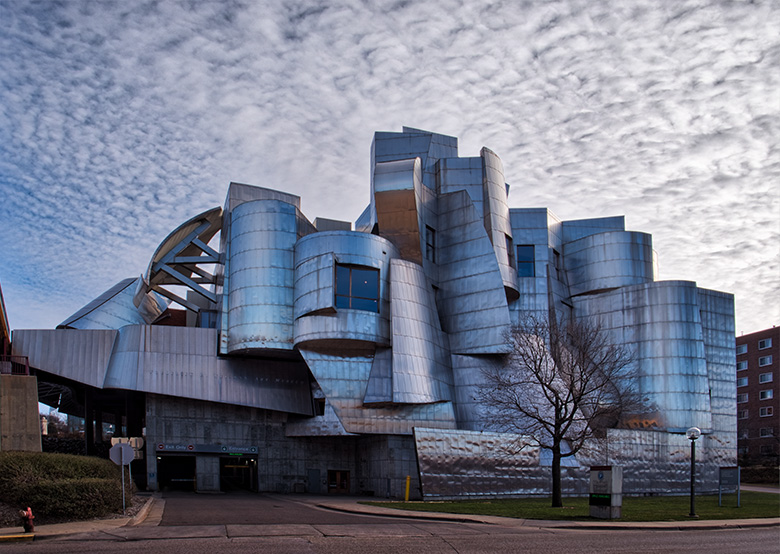 Here’s a color capture made with the Lumix GH5. Processed in Adobe Camera RAW and Skylum (AKA MacPhun’s) Luminar
I always try to work a subject over and above a straight-forward rendition. This includes different angles, framing, and processing. See a couple of images below for examples. I would have tried quite a few different ideas, but I stopped on my way to the airport and didn’t want to miss my flight. Art suffers from a tight schedule!
 While not showing off the architecture quite as much I feel the framing made for a more interesting photo.
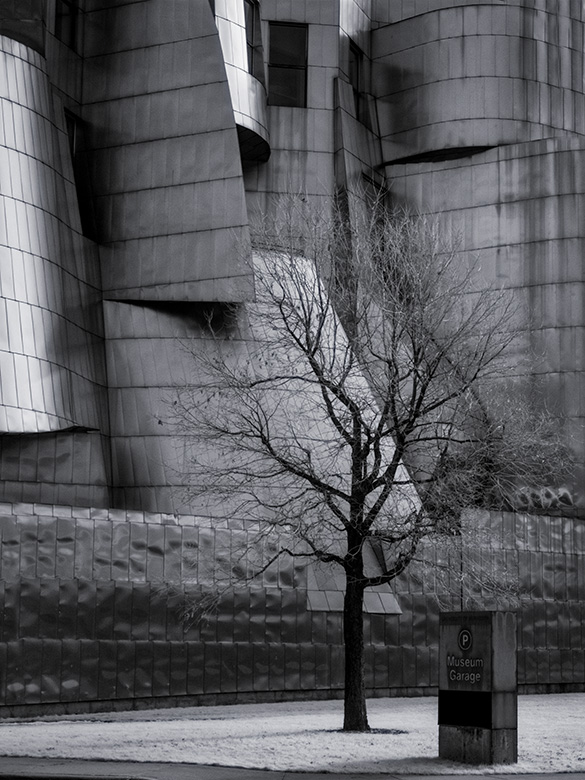 Details can always add to the story. I liked the barren tree against the architecture in this image.