by successfulbob | photography, photography gear, photography software
Lumix GH2 Camera Files from Panasonic
My first exposure to the Lumix line of cameras came when I was trying to find a smaller lightweight camera for travel. My wife was always giving me grief for hauling 35 plus pounds of full-frame DSLR gear with me on vacation. I said, “What are you worried about? you aren’t carrying it!” After that she replied, “You aren’t either, the gear often stays in the room ’cause it’s too heavy to lug around.” Don’t let her know this but I’ve found she’s right most of the time and I should listen more often, but I’m a guy. What can I say?

Made with the Lumix GH2 in Florida in 2012
Anyway, back to the story.
I tried three different ‘point and shoot cameras with no success because I finally listened! The reason they didn’t work for me? The files would fall apart when I tried to push them past anything larger than a 12-inch print or use the images in combination with other photos in my PhotoSynthesis process of creating my art.
And then… I found the Lumix GH2 and got a couple lenses. A wide angle and a 14-140mm zoom. (28-280mm FF equivalent) I added a small pouch for extra batteries, a tiny tripod and the other goodies you need for a two week trip to France. I had that camera on my shoulder with the 14-140mm lens and the pouch at my waist, and it never left my side for our entire trip. The best part?? When I returned I started working the files and ‘Viola!”, The files held up. I started running to all my photographer friends and telling them about this discovery. That led to my eventually becoming a Lumix Ambassador. That’s a story for another day.
I’m telling you all this because I decided to take a look at the GH2 files and give them a run through some of the newer software including Photoshop, Luminar 2018 and Aurora 2018. I amazed at how well the files do even today in 2018. These files are six years old, and there have been quite a few improvements in the subsequent iterations of the Lumix line. When the GH3 came out I started using it for my professional work and found that I could do about 85% of my jobs with it. In the beginning, I shot the camera side by side with my full frame DSLR for safety. Then I knew what tasks could be completed with the GH3 and the DSLR sat on the shelf more often. When the Lumix GH4 came out, I did a few more side by side comparisons before realizing I could do all my work with the micro 4/3rds camera. And all my DSLR gear went on the market, and I haven’t looked back since.
Until today. I thought I’d share some of the images from the GH2 circa 2012. Here are a couple more images.
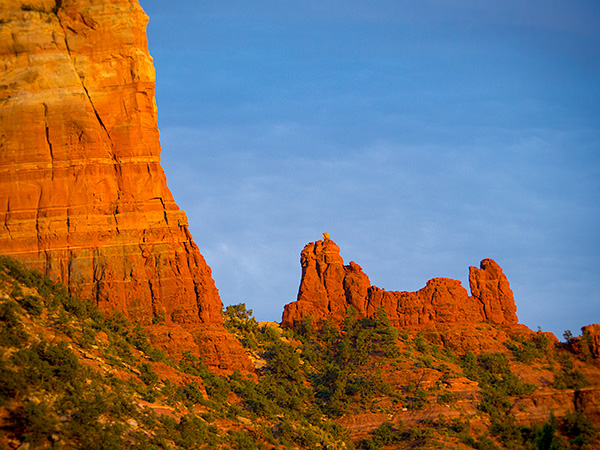
Snoopy Rock in Sedona, AZ Photographed with the Lumix GH2 and processed with Photoshop and ** Skylum Software.
Here’s an image using the PhotoSynthesis process that I use in layering textures and giving more of an art feel to an image. And below that the original capture.
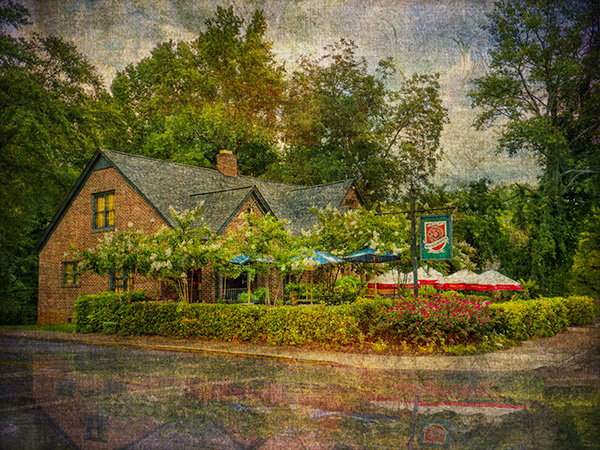
Manchester Arms Restaurant just outside Atlanta. GH2 again.
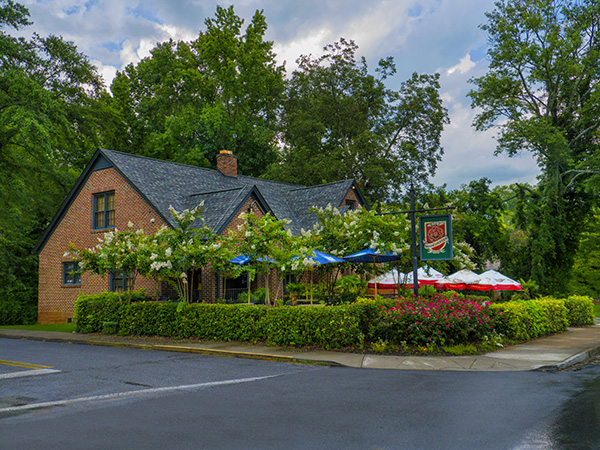
Original capture
In a couple of days, I’ll show you some images and the artwork created during my trip to France.
Yours in Creative Photography, Bob
** Skylum software includes Aurora HDR – Luminar – and CK Creative KIT. Special deal on Aurora HDR through July 4th. On any of the software add PROMO CODE – COATES to get an additional $10 off
PS – The latest flagship camera for stills (first one!) is the Lumix G9. This thing rocks!
I haven’t forgotten about the clouds from above post I said I get you…

by successfulbob | infrared photography, landscape photography, Lumix G6, photography software
A Little Infrared – View from Mariposa Restaurant
There’s a wonderful restaurant in Sedona; AZ called Mariposa. Award-winning chef/owner Lisa Dahl created a Latin-inspired Grill menu on the hill between Uptown and West Sedona. I highly recommend heading over there for lunch. Good stuff! This was a location that caused me to say, “There should be a restaurant here!’ every time I passed this location. Much of the thought involved had to do with the spectacular view.
While passing by today, I saw some clouds and thought that a little-infrared imaging was in order. As always I recommend working the scene at least a little bit. Play with composition. Play with cropping. Play with different angles. As I didn’t have a lot of time I didn’t work the scene as much as I might have but here are three images.
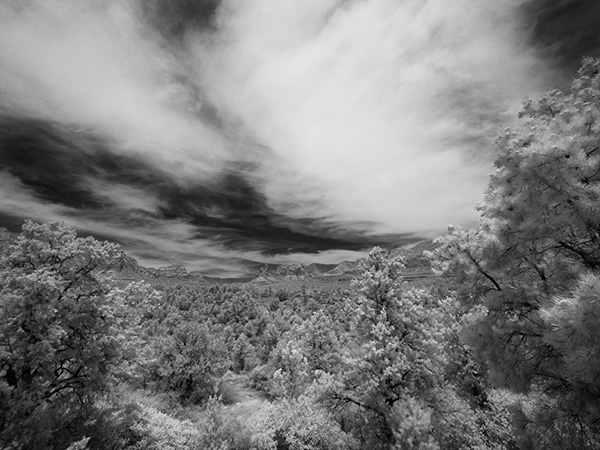 First Capture. I only had a very wide angle zoom. The trees kind of overwhelm the red rocks in the middle ground in this rendition.
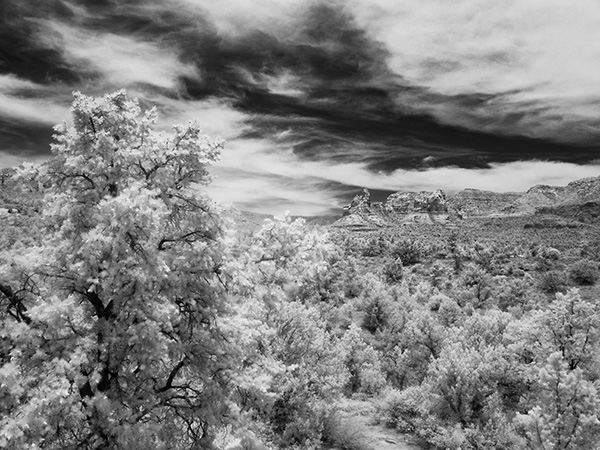 Zooming in a bit and using the play of the foreground tree to balance the red rocks in the background. Using the tighter crop also allowed the sky to read better as there was more movement in the area without clouds.
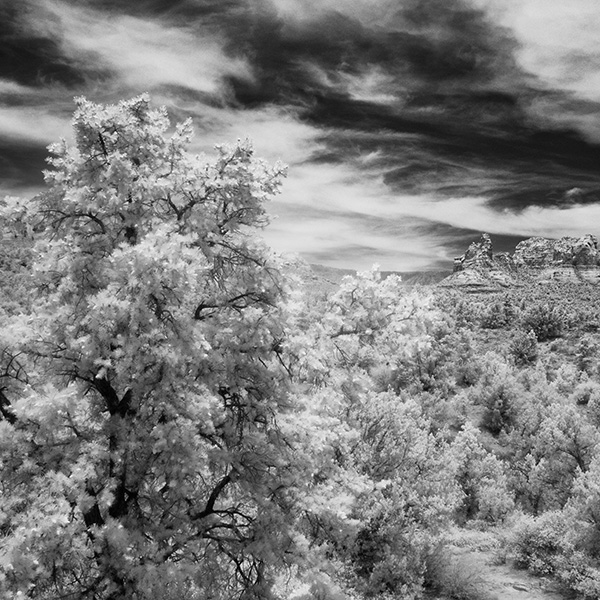 Here is one last version cropped to a square from the image above. It brings even more attention to the red rocks while honoring the glowing tree.
Images were captured with the Lumix G6 which was converted to infrared by LifePixel. Any camera you have retired just sitting on the shelf after upgrading your equipment can be brought to new life by a conversion. It opens the middle of the day to some creative image making. This is the standard 720nm filter that most looks like infrared of old. Infrared converted cameras that are live view capable make it possible to see the image in real time and not have to make focus adjustments as we once did with film cameras.
I processed these in Adobe Camera RAW and Photoshop to control contrast and set the proper tonal range. I then made a copy of the layer and used Skylum’s Luminar 2018** as a plugin to add a glow to the highlights and tweak specific areas for more contrast control, and then another layer to add a little noise to replicate the look of IR.
Yours in Creative Photography, Bob
** Use CODE COATES to get $10 off if you decide to buy Skylum software such as Luminar and Aurora HDR software.

by successfulbob | landscape photography, LumixGH5, photography, photography software
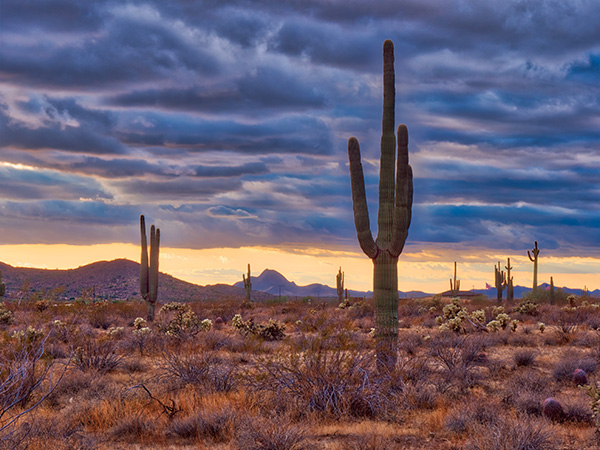
Desert Cactus – Working Files to Completion
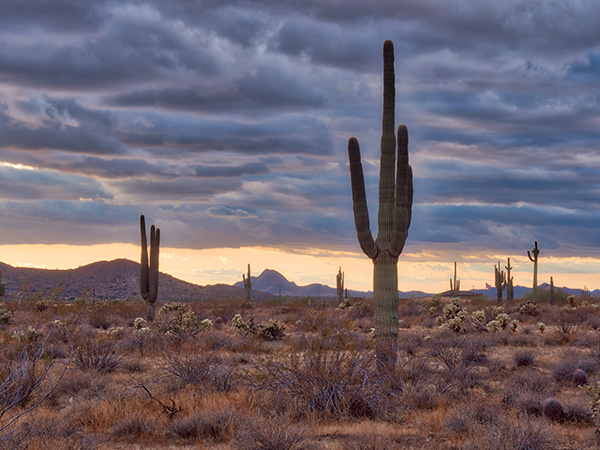
As I wasn’t having a ton of luck getting images from the driveway due to mobility issues I decided to go back into my archives and see if there were any images which I hadn’t processed. I found this desert cactus on a side road in Phoenix. A saguaro cactus is an iconic object screaming “DESERT!” in my mind. Last January as I was heading out of town for a speaking engagement I was watching this scene develop and pulled to the side of the road to explore possibilities.
 Here is the original five stop bracket. It was a bit overcast, so I probably could have made three exposures and been OK, but I like to err on the side of caution to have more information rather than coming up short.
These five images were fed into Aurora HDR 2018 **. I’ve found Aurora to be a solid performer in creating natural looking HDR images without much ghosting or obvious ‘HDR LOOK’ for images that become overcooked.
 Without too much fiddling in the Aurora program the image has a full range of tones with just the slightest halo around the main cactus in the foreground in the sky.
 With a small amount of dodging and burning and a Curves ayer cleaned the image up nicely. I often use a Photoshop Layer in Soft Light Mode to Dodge and Burn. Painting with black will darken and painting with white will lighten. I use my brushes at a very low opacity and build up or knock down density to avoid seeing the brush strokes.
 Here’s the final image after a stop in Luminar 2018** for some finishing touches and enhancements.
I hope some of these steps will give you some ideas for processing your images. If you have any questions or would like me to address a particular type of image processing, let me know.
Yours in Creative Photography, Bob
** Use Coupon Code – COATES – to receive $10 off on the software programs
by successfulbob | cityscape photography, Lumix G9, photography education, photography gear
Skyline of Columbus Ohio
I was off teaching outside of Columbus, Ohio in Dublin this past weekend. These days when I travel for business, I try to schedule some time for doing some photography on either side of the event. Weather doesn’t always work out for the best as plans are made in advance! But you take what you can get.
I was planning on photographing the Columbus skyline from the bridge at night with the river reflection. There were recent floods which left the banks mud-stained, the wind was blowing about twenty mph and, the skies were less than desirable. Other than that it was excellent! ; )>
The nasty weather didn’t stop me from making a few images from the area. I got to the Main Street Bridge and did the best I could. I’m still testing the Lumix G9 and its 80MP capabilities, and it impresses me.
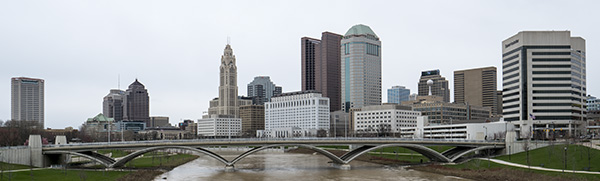 This is a panoramic crop from an 80MP file. After cropping, the photo is ~ ten inches by thirty-six inches at 300dpi. A file size I could print to approximately seventy inches wide with no problem.
Lens 12x60mm Leica f2.8-4.0
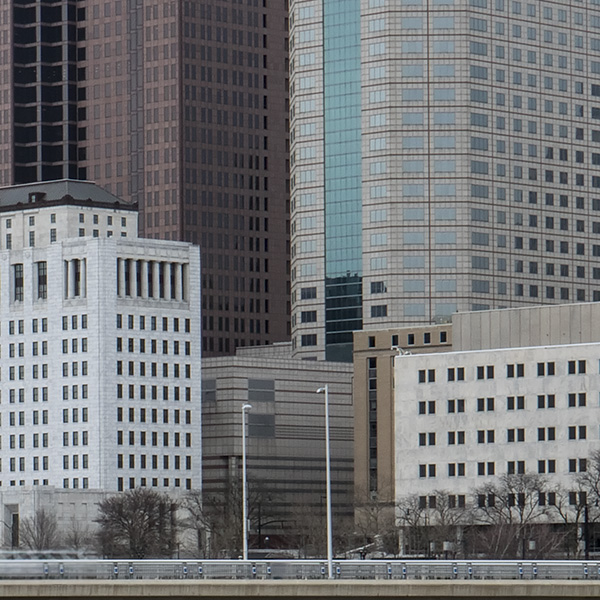
 This is a tiny section of the skyline cropped to give you an idea of the detail.
I thought it might be fun to try and get the bridge in the foreground with the city in the background through the supports.
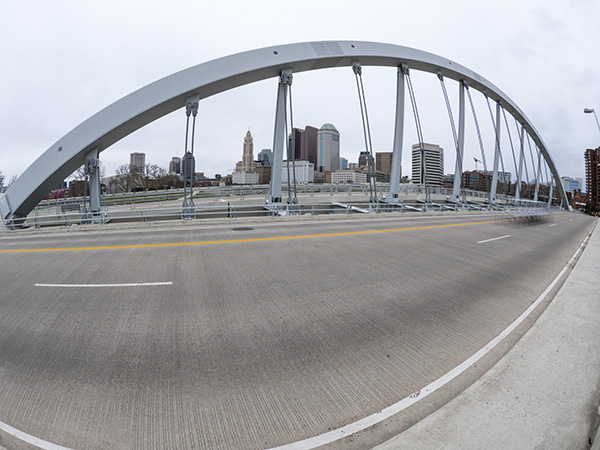 This was made using the 8mm f3.5 fisheye lens.
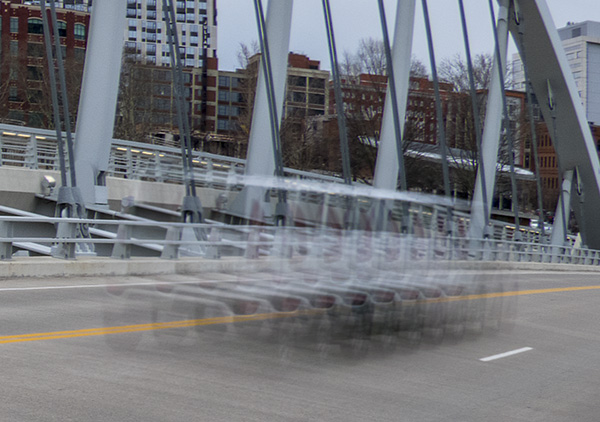 Crop section of moving car. The repetition is due to the multiple captures being made to create the 80MP file.
This image shows that capturing a moving subject during the exposure is not such a great idea. Or is it? I’m thinking about some creative possibilities in making a scene be devoid of people. Or just giving the hint of people in a scene. What about water photographed with a slow shutter speed?
I’ll be playing (er I mean working with) this large MP capture feature and let you know how it works out. If you’ve got any thoughts, ideas or examples of your testing, this feature, let me know.
Yours in Creative Photography, Bob
by successfulbob | landscape photography, Lumix G9, photography gear
Lumix G9 and Mega Files
Panasonic recently released the Lumix G9 as the stills flagship camera. Just received mine and I am exploring new features. Here is an exciting treat that will get you some serious megapixels. It’s called High-Resolution Mode. You can double or quadruple the 20 MP files size. That is correct. The G9 can serve up an eighty Megapixel file.
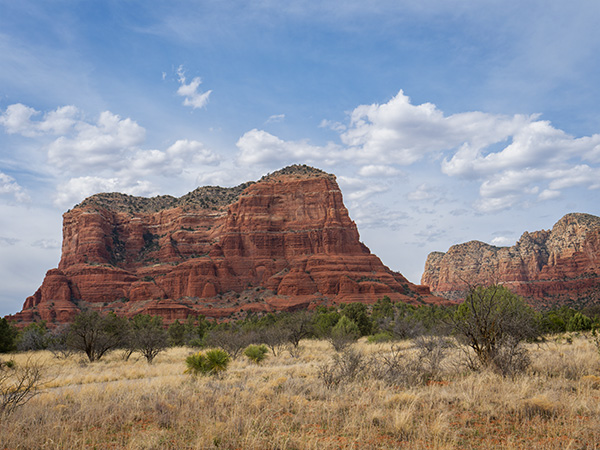
Below you’ll see my first test shot using the red rocks of Sedona. It doesn’t hurt to live in a place with some beautiful scenery. ; )>
Pictured below is Courthouse Butte in the Village of Oak Creek where the red rocks begin.
 Above a RAW file straight out of the camera (SOOC) with no processing in Adobe Camera RAW. (ACR)
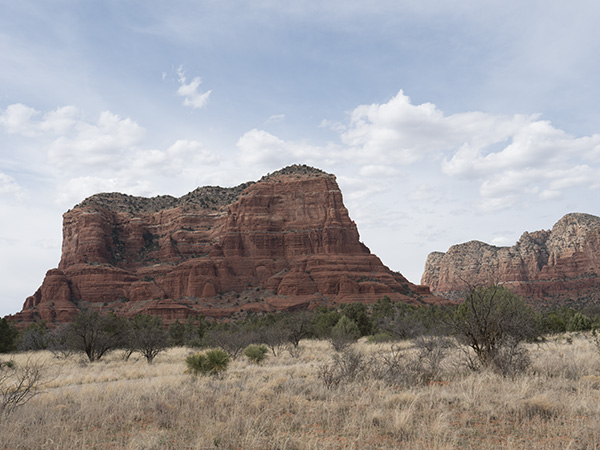
 The image after a little massaging in ACR. Adjustment were made of highlights, shadows, blacks and whites, saturation and vibrance. All settings were changed sparingly, but that led to quite an excellent rendering of the scene.
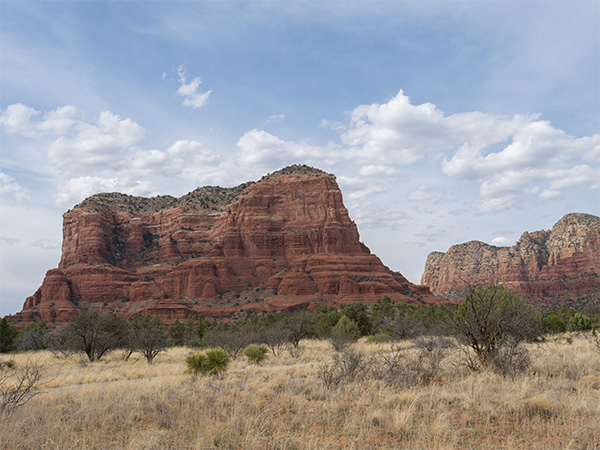
 Here is the final image after a trip into Luminar 2018 software for a little image enhancement. Settings were adjusted (gently) for clarity, saturation, contrast, highlights, shadows and polarizing filter.
I wasn’t sure how much of much of a difference there would be with the added megapixels. There was a huge difference. With that number of pixels to work with, there is a lot of ‘headroom’ when making adjustments. The base file opens with an approximately 235 MB. That is twenty-six by thirty-six-inch file at 300ppi native. And it looks gorgeous.
You might ask, “How is this possible, Bob?” Here’s how. The camera makes eight exposures while off-setting each capture by one-half pixel then uses that info to render the larger file. Of course, that can be a drawback. You won’t be photographing moving subjects with an 80 MP files size. But… I will be trying that. I see possibilties of artistic captures with moving water, trees in the wind, people moving, or disappearing, in a scene.
I’ll report back with my testing in future posts.
Yours in Creative Photography, Bob
Photographed with the Lumix G9 and the Leica12-60mm f2.8-4 lens