by successfulbob | Lumix GX7, macro, photography, photography education
Here’s an extension of the another post on getting in close by adding tubes to the lens… Playing with flowers and their pistols.
 Small roses photographed after a short shower.
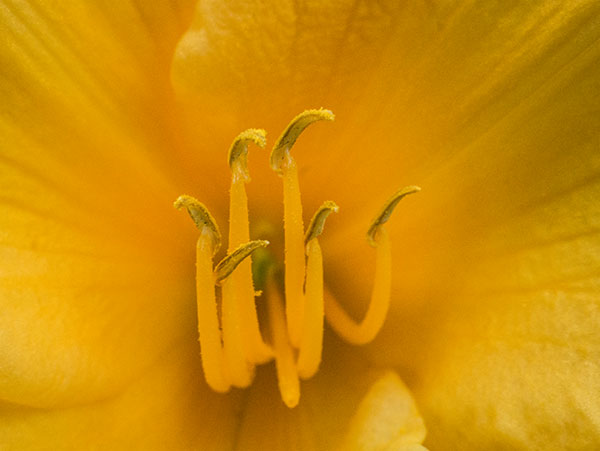 Day lilly image close-up. Playing and practicing
Vello Econo AF Extension Tubes. The Econo tubes were only $49.95 I’d thought I’d give them a whirl. More info here. The Lumix GX7 was great with the 35-100mm f2.8 Vario lens having the view of the image on the screen and being able to set the point of focus exactly where you want it to be.
Yours in Photography, Bob
by successfulbob | Lumix GX7, Lumix Lounge, macro, photography
Getting in close can really change how you can see the world…
But, purpose built macro lenses can get pretty pricey and with the new micro 4/3rds systems still growing it’s selection of lenses I was looking for a way to get in close without breaking the bank. Enter extension tubes. If you use them it allows you to convert any of your lenses to give you a whole new look. There is obviously the traditional extension tube manufaturing company Kenko that run around 180 bucks. I found a similar economy version made by a company called Vello. And they even call it Econo AF Extension Tubes. Since the Econo tubes were only $49.95 I’d thought I’d give them a whirl. Happy to report they work just fine. And, a bonus is that the auto-focus works just fine. With the Lumix GX7 having the view of the image on the screen and being able to set the point of focus exactly where you want it to be.
The kit contains a 10mm and 16mm tubes. You can use them alone or you can stack them for a 26mm extension. Ideally you want to be on a tripod when using extension tubes but if you are really steady and have the camera set at a fast enough shutter speed you can get away with hand holding as I have done here because I was on a trip and left the tripod at home.
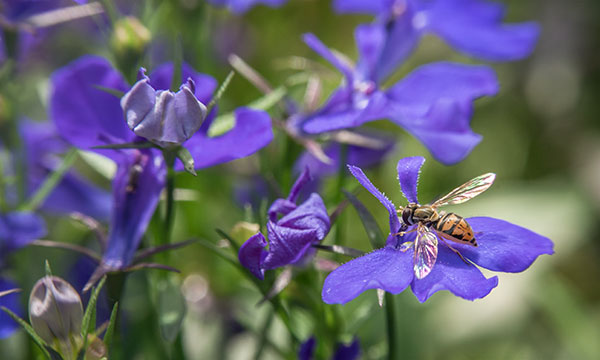 Without just a little info you won’t be excited about this photo. The wasp is smaller than the tip of my little finger and the flowers are about the size of the last joint on my little finger.
Captured with the Lumix GX7 and the 35-100 mm f2.8 Vario Lens at 100mm with, I believe, 26mm of extension tubes attached. ISO 400 – f8 at 1/60th sec. Note that the lens was at it’s longest setting in order for the tubes to focus properly. You can’t zoom throughout the entire range on a zoom lens.
I’ll revisit this idea in some future posts as I really like the different perspective you achieve by getting in close. As always if you have any question don’t hesitate to ask or drop a comment on the page.
Yours in Photography, Bob
by successfulbob | black & white, fine art photography, landscape photography, Lumix GX7, Lumix Lounge
Sometimes you just have to play…
I was experimenting with some slow shutter speeds and the ocean. Don’t consider this a finished piece but a sketch of the direction I want to head with this series. I might want to get horizons to line up a bit more maybe not. Probably get the tones to match a bit more… Or maybe not! Sometimes you just have to put things together and live with them for a while… Let me know what you think.
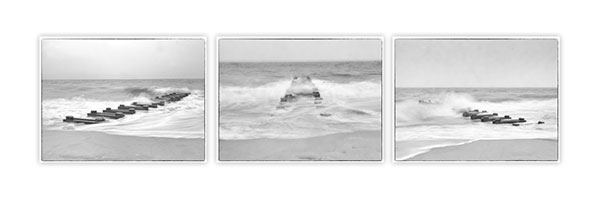
Breakwater on the beach – Rehobeth Beach, Delaware
captured with a Panasonic Lumix GX7 and 12-35 f2.8 Lumix Vario lens. Had a variable neutral density filter added to get a slower shutter speed to allow the water to become more ethereal…
Yours in Photography, Bob
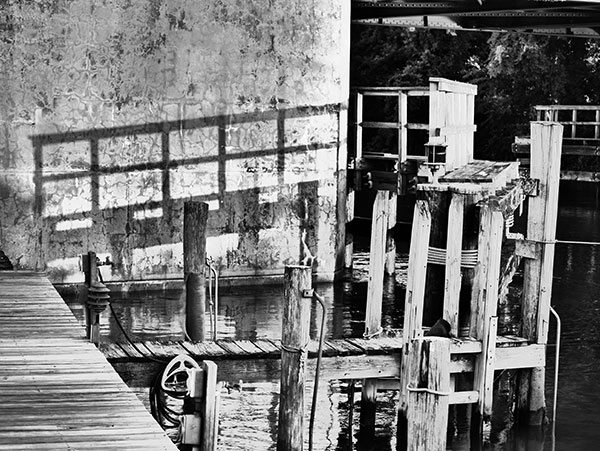
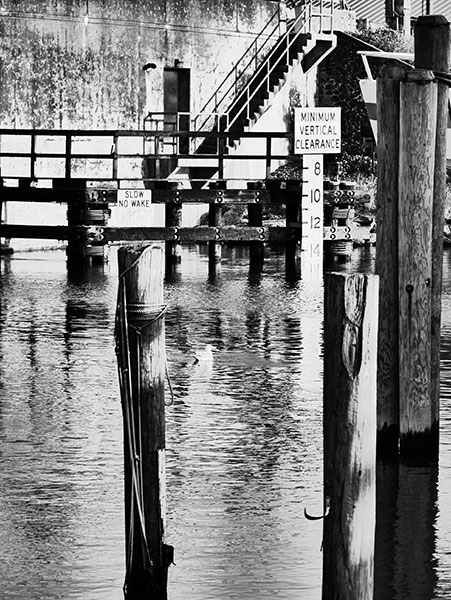
by successfulbob | black & white, graphic design, landscape photography, Lumix GX7, Lumix Lounge, photography, photography education
I really enjoy the use of this preset on my Lumix GX7.
It’s called Impressive Art. It adds a slight glow to hard contrast lines, saturates and shifts colors and punches up the contrast. I’ve used this with success as is on a few videos for a totally different look. (take a peek at video here)
But my favorite way of using this setting was suggested by my fellow Lumix Luminaries to use Impressive Art but adjust output to Black and White. It gives a very graphic look to the image. I like it and have already used this setting to generate happy clients for my biz.
Here are a few from the canal in Lewes, Delaware. I was enjoying an evening Dogfish IPA at the bar and was attracted to the shadows, lines and reflections on the water… I couldn’t just sit there!
 Reflections
 Shadows and Line.
 Shadows, Line, Reflections.
When using the presets on the camera make sure that you are capturing in jpeg. If you just shoot RAW you will see only the hint of what you thought you were capturing as the camera jpeg disappears when you download it. For the best of both worlds choose to capture in RAW + jpeg. Then you will have the camera settings but also access to all the information presented to the camera so you can do your own processing
by successfulbob | architectural photography, Lumix GX7, Lumix Lounge, photography, photography education, photoshop tutorial
Speaking of Austin, Texas…
Wandered around downtown for a bit. Spent a little time in and around the capitol building. Lots of stunningly beautiful architectural detail. Could probably spend a day or two photographing and still want to come back for more, but I share a couple I was able to snag while there…
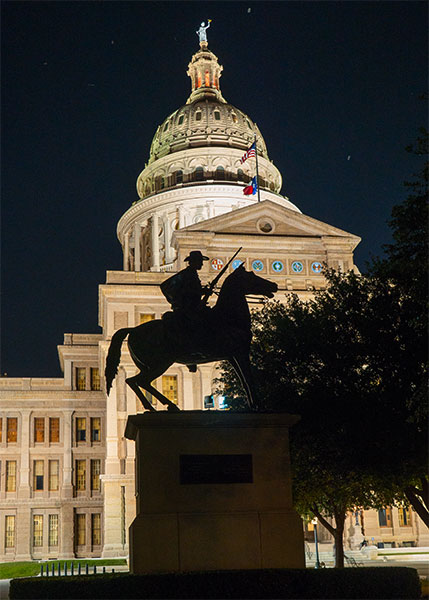 Silhouette of the salute to the Terry Rangers. There’s a couple quotes attached of which here’s one, “There’s no danger of surprise when the Rangers are between us and the enemy.”
I think the silhouette of the statue in front of the capitol dome tells more of the story of the place and has more depth than a straight shot of the dome. No my camera sensor is not dirty… Lights attract bugs. Bugs attract bats which is what you see in the sky above the dome.
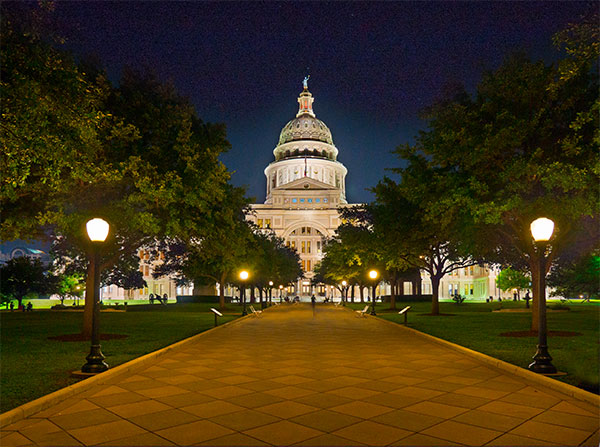 Texas State capitol building and entry walk in Austin.
The wide view of the capitol building was made combining two exposures out of a 5 exposure sequence made with the Panasonic Lumix GX7. Each image was processed in Adobe Camera RAW (ACR) using the highlight and shadow sliders along with exposure and saturation. Even though the two images were made within milliseconds of each other when I placed one on top of the other there was a tiny registration problem. This can happen even when you have the camera mounted on the tripod so I use the technique below whenever I stack images for blending. Photoshop to the rescue!
Here’s how.
Turn the bottom layer from background layer into Layer Zero. Highlight both layers in the Layers Palette. Under the Edit menu select – Auto Align Layers. Make sure Auto Align is selected in the projection. I leave Vingette Removal and Geometric Distortion unchecked. Depending on the image and lens used you might want to remove Vingette. Click OK. In seconds the layers are perfectly aligned.
Next a mask is added to the top layer and painting with a brush and black chosen as the color allow any parts ot the image below to show through until the blending is to your satisfaction. You might want to save out the file at this point and continue any additional work on a copy of the file. If there was an error made in the masking the mask will still be available for adjustments instead of starting over from scratch.
Tomorrow we’ll go inside the capitol building for a couple photos….
Yours in Photography, Bob
