
by successfulbob | photography software
New Photo Processing Software for MAC
Some very interesting software for photo editing has been released by the folks at MacPhun. Basically, you can set up this software very simply or you can build workspaces to create intricate working areas for complex projects. This is new stand-alone software and the price? Only $69. You can try it for free to see if it something that will work for you. Here are the details below.
 LUMINAR NOW AVAILABLE
Offer Available: November 17, 2017
Short Description of Luminar:
Luminar is a new all-in-one photo editor designed to ensure the ultimate in creativity and convenience. The Luminar user interface is built around the idea that every photographer is different, and therefore their photo editing needs are different too. Users can choose from pre-built user interface configurations that match their editing style and needs or create their own.
Pricing:
Retail Price: $69
Launch Price for Macphun Users: $49
Launch Price for New User Price: $59
Luminar Key Features:
• Adaptive User Interface
• Multiple Modes: From basic to advanced
• One-click switch between modes
• Change modes anytime
• All-in-one photo editing tool set
• Includes essential editing tools for different photography styles
• Live editing, live processing, live previews
• Non-destructive editing
• Works as a standalone app or plug-in
• RAW converter & processor
•History Panel
Take a look & try it for free.
Yours in Creative Photography, Bob

by successfulbob | Lumix Lounge, macro, photography, photography software
In-Camera Focus Bracketing
Yesterday I shared info on in-camera focus stacking of images captured with the Post Focus Photo Mode in the Lumix GX85. The PFPM is a great feature for getting images from moving objects, quick captures and times where you won’t need to crop into the image very much because the still frames pulled from the video are eight megapixels. Eight megapixels can get you to a twenty-inch print with no problem but when you want to go big it’s time for a new feature built into the camera.
Focus Bracketing is different than the Post Focus Photo Mode in that the camera will be making image captures using the full-size files and changing the focus between each shot automatically. Here’s the screen you will see to set up the capture of multiple images with one push of the button.
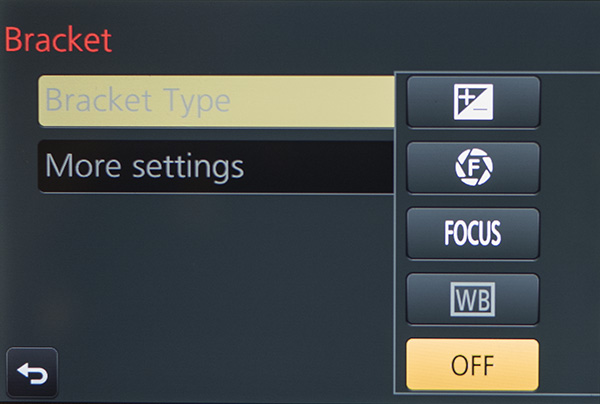 The new Bracket Menu. Options include Exposure Bracketing, Aperture Bracketing, Focus Bracketing and White Balance Bracketing.
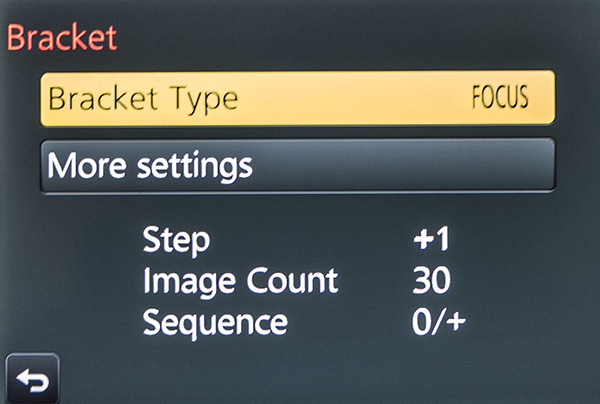 Menu with the Focus Bracket Chosen.
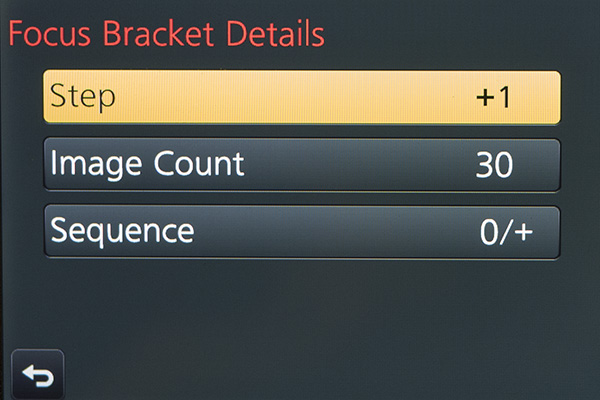 Each one of the menus adds choices. You’ll need to experiment and ‘bracket’ your choices as you learn the results. Step – is the distance that the focus will move on each exposure. Image Count – will be the number of frames made with a single push of the shutter button. You’ll want to ensure there’s enough to cover the scene. Sequence – is the order the images are taken in. Choices are 0/+ to start close and go far (I recommend) or 0/-/+ which will alternate how the bracket is accomplished. I found that Photoshop tends to choke when creating the focus stack using this setting.
Here’s an example of a completed capture and focus stack using Adobe Photoshop taken at Horseshoe Bend just outside Page, Arizona. The Focus Bracketing allowed for a much deeper depth of field in the final image.
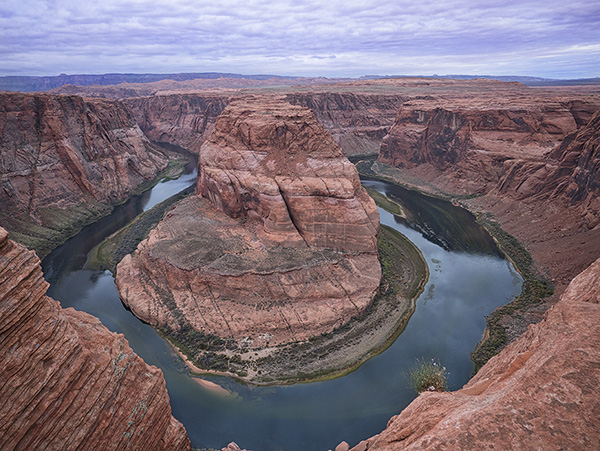 Horseshoe Bend, Page Arizona. The depth of field extends from the near foreground to the far distance.
People ask why do you want to go to all this work? I just set my camera to a smaller aperture like f16 or f22 for deeper depth of field. There is some science that will come into play here. When you use smaller apertures, you will introduce diffraction into your image which will soften the image. There is a sweet spot in lenses between f5.6 and f10, depending upon the lens, that is the absolute best quality the lens can produce. That is the f stop to use when focus stacking. All the sharp areas will be the sharpest and highest quality when combined.
I’ll look at the actual focus stacking technique in a future post using Adobe Photoshop. There are also automatic software solutions like Helicon Focus, Zyrene Stacker, and possibly others for you to check out if you plan to do a lot of stacking.
Til then.
Yours in Creative Photography, Bob
Save
Save
by successfulbob | bird photography, Lumix GX8, Lumix Lounge, photography, photography education, wildlife photography
Hummingbird Photo – Lumix GX8
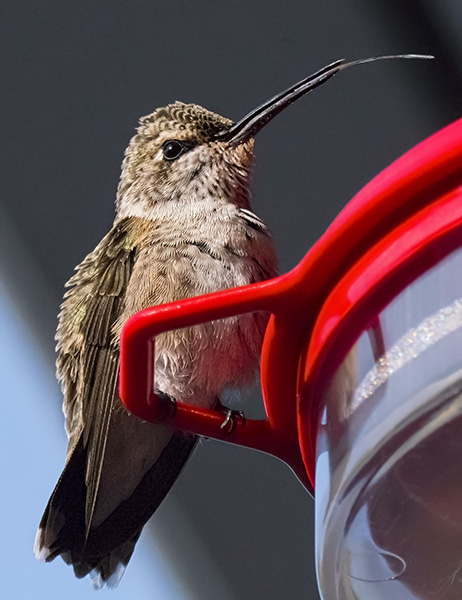
Hanging out this morning and thought I’d do some camera testing with my Lumix GX8 and the 100-300mm G Vario f4-5.6 (200-600mm equivalent) lens. I made these images handheld with stabilization turned on. Settings for these were f14 1/2000th sec at ISO 6400. I’ll share some hummingbirds in motion images at different settings a little later. I became enamored of this little critter because he had so much peppy personality. Looks like he just arrived from a long migration. He’s not one of our local birds and seems a little worse for wear.
 Hummingbird Straight out of the camera. He’s checking me out.
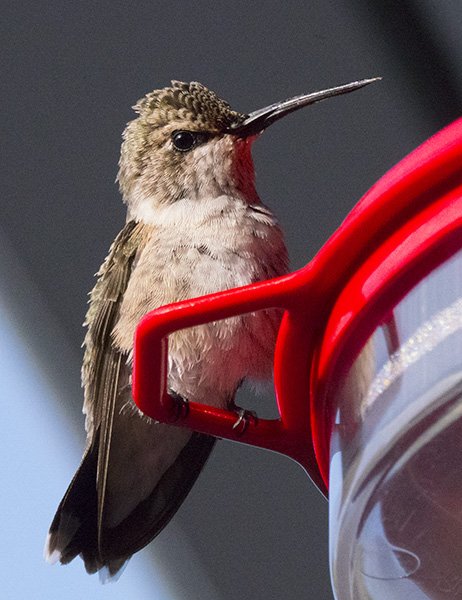
 After seeing me, he stuck out his tongue! Not sure if that was social commentary or not. Here’s the little guy after processing with MacPhun Noiseless and MacPhun Tonality (for sharpening the feathers just a bit more. Explanation below)
So these images turned into a processing exercise. Some photographers mention that they are concerned with noise in images from smaller chip cameras like the micro 4/3rds. Personally, I feel that we get a little too hung up on that as the newer algorithms that are used in processing give a very natural feel to the noise that replicates the grain structure we had back in film days. (can you hear my creaky bones as I talk???)
To see if there was an elegant solution for those who have a concern when you push the camera to higher ISO’s thought I’d see how software might be of help. Oh man, it does if you are on a MAC. I’m using MacPhun Noiseless, and it worked a charm. MacPhun is only for MAC OS systems. I’m sure there are similar products for those on PCs. One of the problems I had in the past with noise reduction programs is the removal of detail that I wanted/needed in some parts of the image. I’ll let you decide, but I don’t think that’s a problem anymore!
On to the processing!
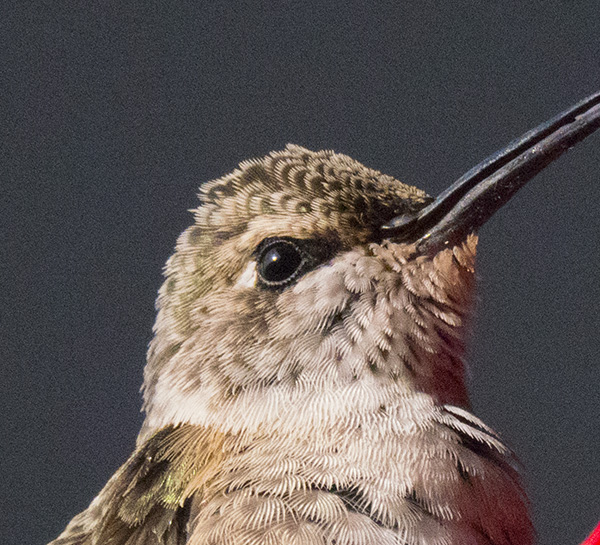 Original detail capture SOOC.
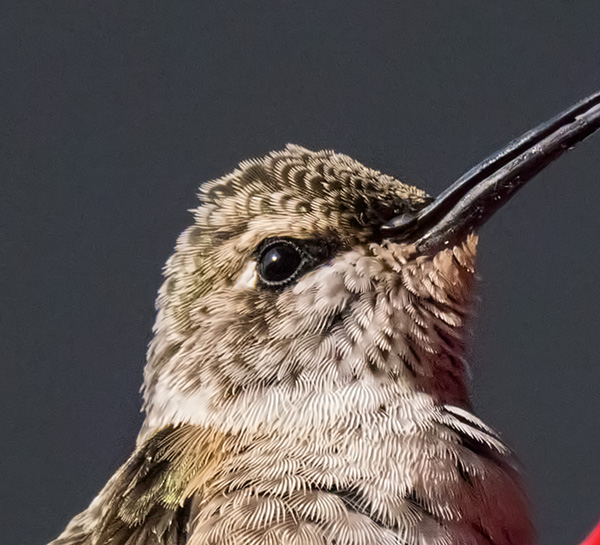
 Here’s the image after running MacPhun’s Noiseless software. There are lots of settings and possibilities. This was a fairly aggressive treatment. It smoothed out the noise in the background nicely without losing detail in the feathers.
 This is the final. I used the Tonality software from MacPhun to sharpen the feathers a bit more. “Wait a minute Bob! isn’t tonality made for making an image black and white?” You bet. But, I liked the controls that allowed me to sharpen small details and micro control the contrast in different areas of the image. The secret is to do this on a separate layer and change the Layer Mode to Luminosity in Photoshop. Then only the information that is Luminous is applied to the image. Using a Layer Mask, I applied the sharpening to only the feathers.
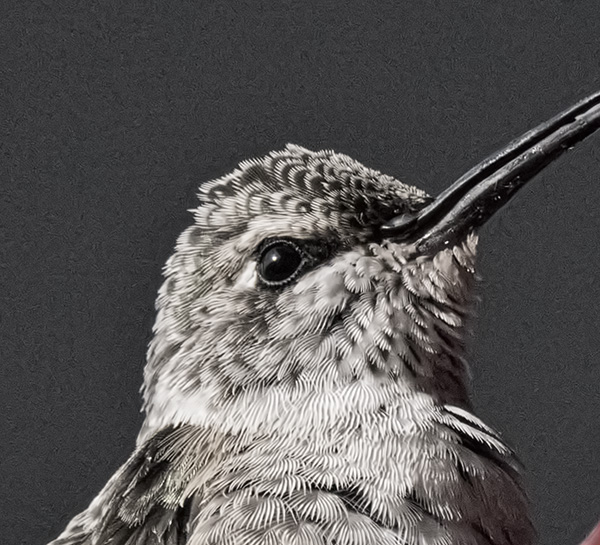 Here is the Tonality layer without a mask. You can see where it sharpened the background as well hence the use of the Mask in Photoshop in addition to changing to the Luminosity Mode.
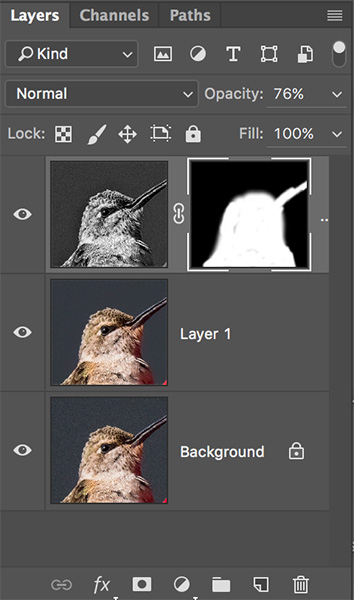 Here’s the Layers Palette. Background Layer is original capture. Layer 1 is with noise removal. Top Layer is Tonality with a mask.
Yours in Creative Photography, Bob
Save
Save
Save
by successfulbob | HDR photography, landscape photography, Lumix FZ 1000, Lumix Lounge, photography, photography software
Earth Day Photography – Landscape Photography Magazine
Landscape Photography Magazine put out a call to photography artists to create an image of sunrise on Earth Day of this year. The image I created was accepted into the curated collection gathered from that day. Here is my entry as it appears in the Landscape Photography Magazine Earth day PDF. Download your copy for free & get a 60% off deal on a new subscription. If you are a landscape photographer I know you’ll love this. (disclosure: I am not an affiliate of LPM magazine. Just think they do a great job!)
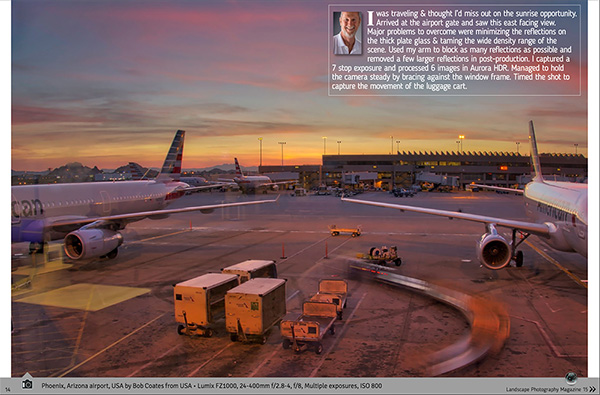
 Earth Day Photo – Capture Lumix FZ1000 25-400mm f2.8-4.0 @f8 Multiple Exposures ISO 800
Text from image follows below
“I was traveling and thought I’d miss out on the sunrise opportunity. Arrived at the airport gate and saw this east facing view. Major problems to overcome were minimizing the reflections on the thick plate glass & taming the wide density range of the scene. Used my arm to block as many of the reflections as possible and removed a few of the larger reflections in post-production. I captured a 7 stop exposure and processed 6 images in Aurora HDR *. Managed to hold the camera steady by bracing against the window frame. Timed the shot to capture the movement of the luggage cart.”
Yours in Creative Photography, Bob
*Until July 5th there is a Fireworks Bundle available from MacPhun
Special Bundle price: $99 – Over $300 in Savings
Creative Kit 2016 – 6 Powerful photography apps
Creating Powerful Photos of Fireworks – Video Training from PhotoFocus
8 Intensify presets and 3 Noiseless Presets created especially for fireworks images
PhotoBulk app by Eltima Software – Resize photos and add watermarks
Uplet app by Eltima Software – Upload photos from your Mac to Instagram
Save
Save

by successfulbob | photography software
MacPhun Software Bundle – Fireworks!
Fireworks indeed.
Who doesn’t like photographing fireworks? It’s a blast if you’ll excuse the expression.
Ever been disappointed when you returned from session photographing the incendiary display? (I have in the past) Part of the problem is fireworks contains lots of challenges for the photographer and if you don’t study up previous to your shoot on proper techniques you set yourself up for failure.
Even if you’ve had success in the past it’s wise to review because we don’t get very many opportunities to practice.
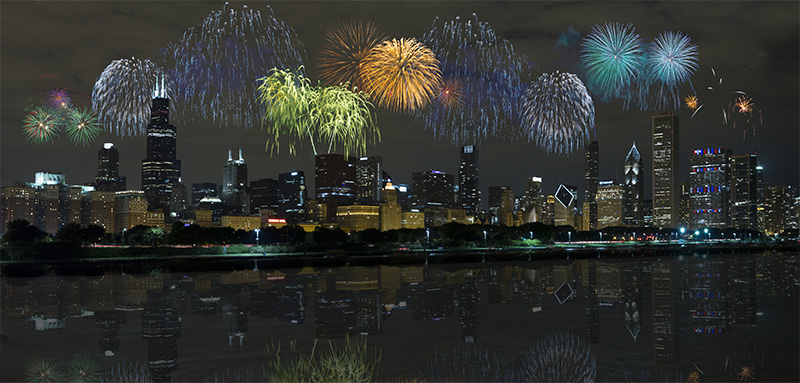 This is a composite I put together for fun. (first fireworks image I could put my hands on to illustrate this post)
This was imaged during a trip to Chicago. The skyline was to the left and the fireworks were to the right from my vantage point. I took a bit of creative license with this.
SHOOTING FIREWORKS – CREATIVE KIT PROMOTION
Available: Now through July 5
Key Features:
Special Bundle price: $99 – Over $300 in Savings
Creative Kit 2016 – 6 Powerful photography apps
Creating Powerful Photos of Fireworks – Video Training from PhotoFocus
8 Intensify presets and 3 Noiseless Presets created especially for fireworks images
PhotoBulk app by Eltima Software – Resize photos and add watermarks
Uplet app by Eltima Software – Post photos from your Mac to Instagram
Yours in Creative Photography, Bob