by successfulbob | Lumix Lounge, LumixGH5, photography, photography creativity, photography software
Turning a Simple Image into Something More Complex
It’s always a push to try out new gear and push the boundaries a little bit. I was taking the Lumix GH5 out for a spin with the Leica DG Vario-Elmarit 100-400mm lens which works well for wildlife and images that need a long reach. I was curious how I could use in my everyday art photography.
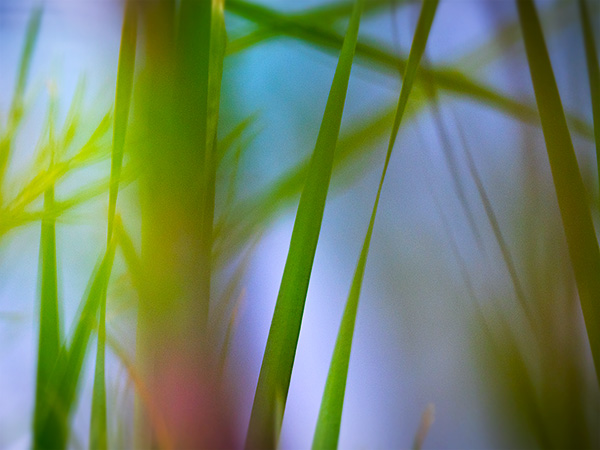
Since I was out in the wetlands and the birds were not cooperating I started playing. I had already experimented with motion while making exposures to get fantastic color palettes and forms. I would never have thought that a scene with great depth of field which I’m showing down below would have started with a lens of this reach. Here’s the scene. The Wind is blowing. Grasses are swaying gently. I focused in the middle on a single blade of grass. This emphasis point made for an overall softness on the scene due to the depth of field and the foreground being way out of focus and moving. The sharp piece of grass in the middle followed by more falloff and motion and in DOF with the background grasses.
 First image Straight out of Camera as a RAW File.
“OK, Bob, I don’t get it. What do you see that I don’t?”
Here you go with a little processing in Adobe Camera RAW you will start to see where I am going with this.
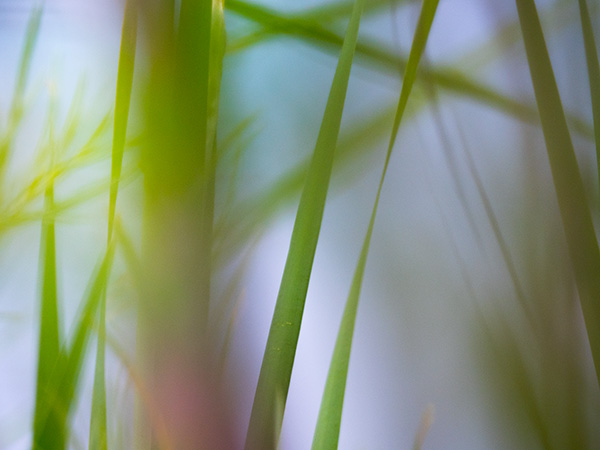 Added a little Saturation, Clarity, Contrast, Shadows, Highlights and Whites up and Blacks down to get to this point.
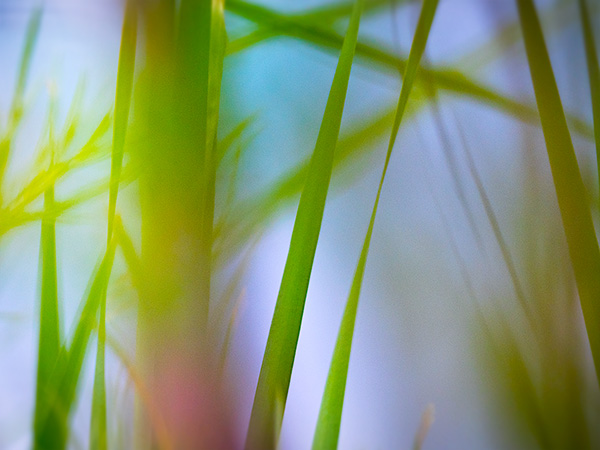 Photoshop for a little clean-up on the grass stalk that had some scratches on it with the next stop MacPhuns’ Focus CK plugin to add a bit more sharpness and color and a slight vignette.
  Final settings were a change of Mode to Multiply and the use of MacPhun’s Luminar to add some more color and snap. I enjoy the feeling of depth and dimension achieved by this process. I’ve got a deal below for you to get Luminar and some other goodies below!

Luminar + Creativity Mega Preset Pack, Essential Pro Secrets for Unleashing your Creativity eBook, Ultimate Posing Card Collection, Overlays Variety Pack and first 3,000 customers will also receive a collection of Light and Bokeh Overlays for $69. Total value $250.
If you are already a MacPhun User pay only $49 when you use my coupon code or $59 if you are not already a Macphun user.
You Get:
Luminar, The Supercharged photo editor for Mac that adapts to your skill level.
Creativity Mega Preset Pack – 26 beautiful presets from Presetpro to create stunning looks in Luminar
Essential Pro Secrets for Unleashing your Creativity ebook by Ian Plant – Creative lessons and techniques for how to make your photos match the depth of your passion
Ultimate Posing Card Collection – Hundreds of ideas for boudoir, family, indoor, newborn, wedding photography and more
Overlays Variety Pack – Sky, snow, rainbow, leaf, and fireworks overlays to create a unique look in your images
ADDITIONAL BONUS FOR FIRST 3,000 CUSTOMERS – Light and Bokeh Overlays
Save
Save
Save
Save

by successfulbob | photography creativity, photography software
Aurora HDR 2017 Software Deal
I’ve been really enjoying the program from MacPhun to create HDR images. I feel I am able to get more realistic images and still be able to tweak photos for the ‘traditional’ HDR look. This month gets you a deal to not only get the software but to get Trey Ratcliff’s instruction on how to get the most out of it. Check it out.
 This software is for MAC OS only at this time.
AURORA HDR 2017 + TREY RATCLIFF’S COMPLETE HDR TUTORIAL 3.0:
Aurora HDR 2017 + Trey Ratcliff’s Complete HDR Tutorial 3.0 for only $89. Total value $189 Savings over 50%
Upgrade pricing starts at $49 for users of Aurora HDR, and is $69 for Aurora HDR Pro users
You get:
Aurora HDR 2017, The world’s most advanced HDR photo editor for Mac.
Trey Ratcliff’s Complete HDR Tutorial 3.0: Perfect for everyone who wants to learn to shoot HDR images from beginners to advanced users.
6+ Hours of instruction
Trey’s RAW image files

Yours in Creative Photography, Bob

by successfulbob | landscape photography, Lumix Lounge, Lumix LX100, panorama, photography creativity, photography education, photography gear, photography software
Panoramic Photography – One More Time
Here’s one more use of panoramic photography that I haven’t mentioned in previous posts. Change the number of Mega-Pixels in your camera.
“Say what?” You ask? “And once you explain, tell me why I want to try that?”
Ok, here goes.
You can expand the number of pixels in an image in order to be able to make a larger print by making multiple images and overlapping the capture. After you get back to the studio move those images into your favorite photo stitching programs like Adobe’s Photoshop or AutopanoPro and put the images together. Photoshop has gotten very good at merging images together including a new feature called Content-Aware Fill that can automatically clean up the blank space that can sometimes surround your image.
This morning I had my Lumix LX100 with me. I call this the professional’s point and shoot because it has fast glass and is quite versatile with all important controls on dials just like the old days. No need to move into electronic menus to access your settings. All of this is in a quite small package. But the camera is only 12.1MP which yields a 36-megabyte file. In today’s example, I shot five exposures overlapping each by 30-40 percent. After merging the photos I ended up with a 97-megabite file. 97 divided by 3 equals a 32MP capture.
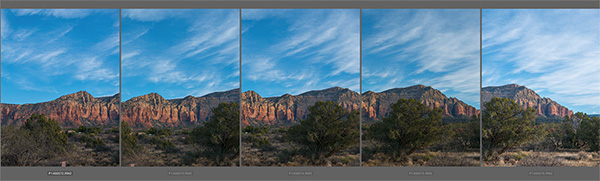 Here is a screen capture of the five images when highlighted in Adobe Bridge.
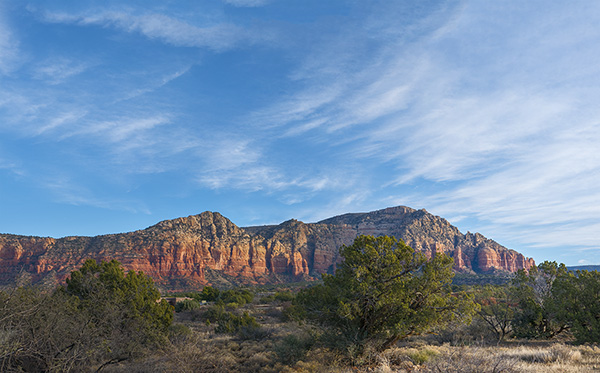 After the images above were assembled in Photoshop and massaged with Luminar from MacPhun.*
With this technique, you can get file sizes you have only dreamed about with a little extra work. Remember if you want to really make a huge file you can use a long lens and do row after row of images and blend them all together. Make sure you capture each row the same way. I always go left to right and top to bottom during my captures.
Yours in creative Photography, Bob
PS – * Luminar software is currently only available for the MAC platform but from what I understand they will be releasing a PC version later this year. Luminar can be used as a stand-alone processing program or as a Plug-in. There’s a sale on ’til the end of the year the link above will take you there.
PPS – The MacPhun software Aurora 2017 HDR is also on special until the end of the year. I’m enjoying the creative processing from MacPhun products.
by successfulbob | landscape photography, Lumix GX7, Lumix Lounge, panorama, photography, photography creativity
Let’s Talk Panoramic Photography – Part 2
In looking through my files for some examples of in-camera panoramic photos I came across some more examples I wanted to share. I feel the format adds another arrow to the creativity quiver. Here’s a few made with the Lumix GX7.
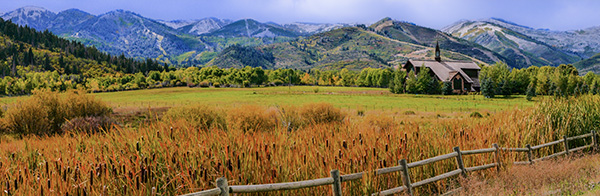
 Outside Salt Lake City – Panorama format is perfect for telling the dramatic landscape story.
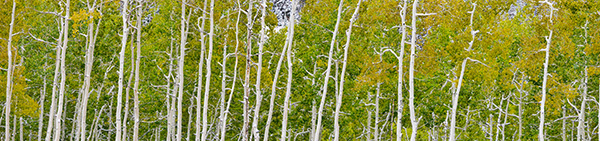
 Another from the Salt Lake City Trip.
 A different way to share a scene.
As I was going through my photos, I realized I didn’t share a slightly different idea to leverage the in-camera panorama feature. Sometimes the resulting photo just doesn’t quite cut it as far as capturing the scene. Or you want a file that will have a different aspect ratio but is still a panoramic image. Or, you need more pixels but don’t have time to create a full set of images for future stitching. So here’s two rows followed by the final.
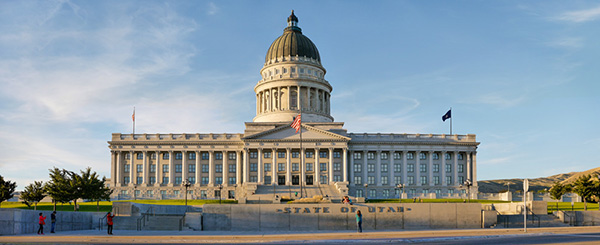
 Showing the dome.
 Showing the base.
 Here’s the final with the two stitched in-camera panorama images using Adobe Photoshop.
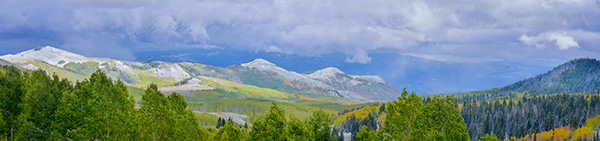
 From the Red Butte Arboretum in Salt Lake City.
 One more.
Think about the ways you can use the panorama feature. I don’t have one at my fingertips, but you can also make the panorama vertical.
Yours in creative Photography, Bob

by successfulbob | inspiration, photography, photography software
 MacPhun Software – Luminar & Aurora
What are we going to do when our software updates stop allowing us to use Google’s NIK Software? Right now it’s free for download if you want to use it! I highly recommend if you haven’t already taken advantage of this deal get to it. It’s good stuff! I even paid for it originally and was happy to do so.
But it won’t be around forever.
It may be Adobe or it may be our computer operating systems that will make the software no longer usable. For Apple computer users one answer lies with MacPhun Software. Some of the folks who were at NIK Software before Google bought them out have been working on some solutions at MacPhun.
At first, they came out with some stand-alone solutions for handling noise and adding creativity. They bundled them into a nice package called Creative Kit which had six different software solutions usable as plug-ins for Photoshop and Lightroom. Next came Aurora HDR software.
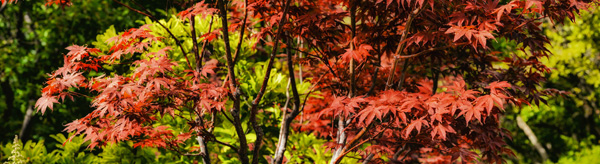
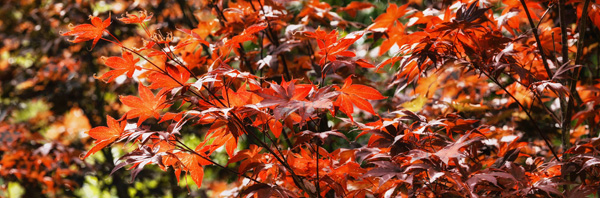
Here are a few images I dressed up using the software and since it’s a holiday promotion here you go.


 Next came Aurora HDR software followed by Aurora 2017* (see the deal below!). I like Aurora 2017 because it allows me to get the HDR process to increase the density range of an image but without the images screaming ‘HDRRRR!!!.’ And I still have the creative possibilities available. It is also a stand alone program. I have been fortunate to be able to work with MacPhun’s new software as it becomes available and I’m having a great time playing with the possibilities. I think you’ll like it too.
There’s a new stand-alone product that has just hit the market combining the software that is called Luminar**. Learn more about it below with a special deal until the New Year.
* Check out the Aurora 2017 Deal DetailsAurora HDR 2017 + Bonuses for only $89. Total value $175. Savings of 49%Give your holiday photos a truly unique look this year with Aurora HDR 2017 and our new Winter Preset Pack. Plus, improve your photography with training from Nature Photography Guides and Trey Ratcliff!
You get:
Aurora HDR 2017, the world’s #1 HDR software for Mac photographers
2 eBooks by Nature Photography Guides: “Forever Light: the Landscape Photographer’s Guide to Iceland” & “Iceland: Black & White Photography Portfolio by Sarah Marino” will inspire your photography to new heights.
Creative HDR Presets Pack: Use these exciting new presets to stylize and experiment with your photos.
20-minute Deep Dive video from Trey Ratcliff: Learn from the most influential HDR shooter of our generation, and co-developer of Aurora HDR 2017!
** Check out the Luminar Deal DetailsLuminar + Bonuses for only $59. Total value $319 Savings of 80%Celebrate the holidays with an incredible deal on our most popular photo editor to date and a host of bonuses sure to put a smile on your face!
You get:
Luminar, super-charged photo software for any Mac photographer
3 eBooks from Andrew S. Gibson: Mastering Photography, Mastering Composition & Mastering Lenses. The “Mastering” series is designed to help improve the creative aspects of your photography. They are aimed at intelligent and creative photographers who understand that light and composition are just as important as knowing which buttons to press on the camera.
Over 300 high resolution sky overlays: Use Luminar and this set of warm, blue or dramatic skies to enhance any image. Perfect for any photographer who has photos with dull or lifeless skies – bring them to life with this exciting collection!
Creative Portraits Preset Pack for Luminar: Make even more amazing photos with this speciality pack of presets ideal for improving any portrait.
How to Shoot Sandscapes by Baber Afzal: In this video, you’ll learn pro techniques for capturing the best sandscape photos possible.
Lots of good things for you. Happy Holidays!
Yours in Creative Photography, Bob
Save
Save