I’ve been photographing advertising and marketing images for Sound Bites Grill in Sedona for the last four years. It’s been great working with Steve & Michele. We’ve been collaborating since before the restaurant opened. They have just redone some decor adding to the collection of guitars displayed on the walls and they understand the need for keeping the imagery fresh and up-to-date.
I made these images with the Lumix GH4, some supplemental lighting and HDR captures. Images were completed using post production in Adobe Photoshop.
Different views of Sound Bites Grill interior advertising photos.
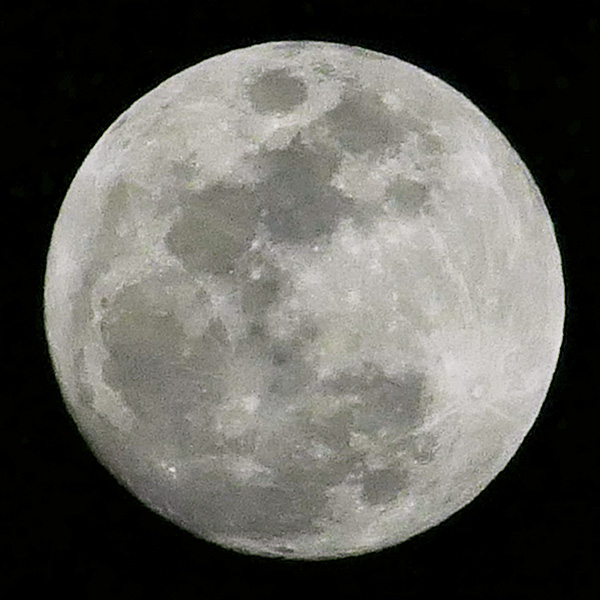
Pulled into the driveway the other night and saw the full moon starting it’s ascent from the eastern horizon and I immediately ran for my camera. Now we’ve all had the wonderful (I say sarcastically) experience of photographing the moon and being disappointed by the amount of volume it took up in the entire image surface. You know, way too small for what we had in mind when we made the photograph.
The FZ1000 is 400mm at the long end of the zoom at f4. While solid even that is pretty short for something that is 238,900 miles (give or take a centimeter or two) away from the camera. The camera has a setting called Digital Zoom and shows and captures the image at a larger size. 1600mm in this case. This does degrade the image vs having optics do the job. But have you priced a 1600mm lens lately? In spite of a bit of degradation of image quality I like the Digital Zoom because I can see exactly how the image will fill the frame.
Even after cropping in there’s 2300 pixels of moon that when made smaller and placed in an art piece will have plenty of detail
Now are these images good for study of the craters on the moon’s surface? Heck no! But will they be good for art projects where a moon is needed? You betcha!
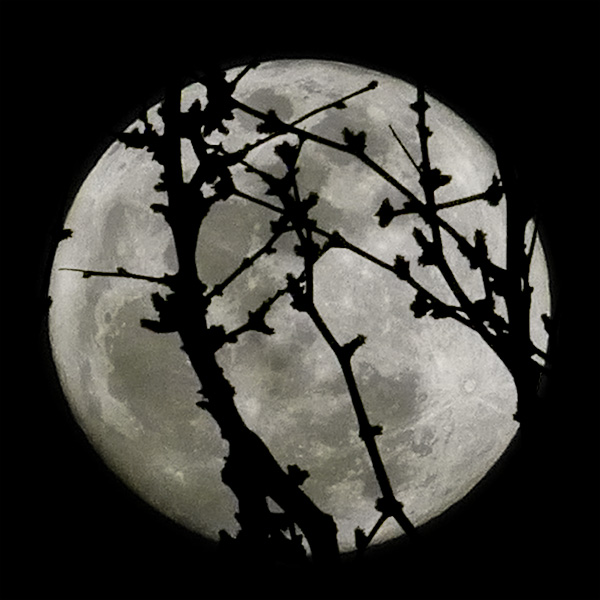
One way to add interest to a moon shot is to silhouette an object. I wish I had thought about this a bit more but didn’t have much time to scout out a more appropriate subject but you’ll get the idea with these mesquite branches starting to bud out with our warm weather.
Moon with mesquite branches
One thing to be aware of when attempting this when you have the foreground element in focus there will be a blob of light behind your subject. To help this along I took one of my plain moon images and placed it under the mesquite layer and put it into Multiply Blend Mode. This allowed the image of the moon with detail to show through.
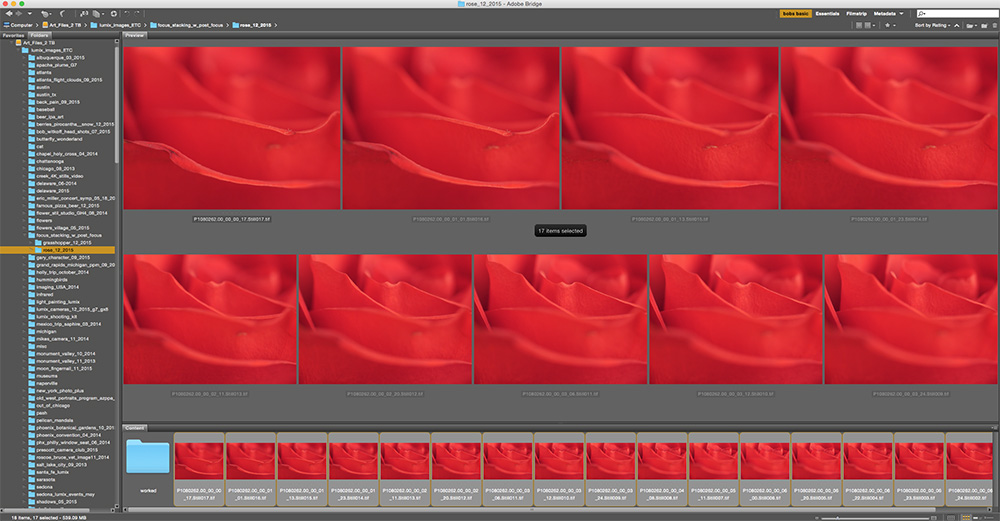
It’s a feature I wasn’t sure I had a reason for but again in the studio I used the Post Focus Setting on the Lumix-G7 to focus stack to get a different look from my 45mm Macro lens. This image started with a seven second video clip with the focus point being moved by the camera as the camera searched through all of it’s focus points. I’ve found the camera to capture as little as one second of video to as much as ten seconds depending on subject matter and how deep the focus goes through the scene.
This is my favorite rendition of the rose.
Create the Image from the Video
The steps I used were to download the video. Open it in Adobe Premiere Pro and select the still frames I wanted to work with and saved them as TIFF images. I wanted a soft and sharp movement through the final image. All 17 selected images were loaded into a single Photoshop document by using the Adobe Bridge command Tools>Photoshop> Load Files into Photoshop Layers after selecting all the images. Once the images are in Photoshop all layers were selected and under the Edit menu the Auto-Align setting was applied. Then under the Edit menu Auto Blend Layers was selected with the settings Stack Images with the Seamless Tones & Colors checked. This will take all the ‘Sharp Bits’ Of the image and mask them in.
The set of images saved out to individual files for the Post Focus video capture.
Layers Palette after adding images to file, aligning images and blending. Photoshop automatically created the masks.
Rose photograph after blending and cleaning up imperfections in the flower. Used Photoshop Tools then moved in to NIK Color EFX Pro 4 for further modification.
Talking Photography Tools
The tools we have to work with like Photoshop & NIK Color EFX Pro 4 can take images to an entirely new level and I keep trying to push to see what I can do. I hope this has been a help to you and at the very least given you some inspiration to think about image making in a new light.
Yours in Creative Photography, Bob
PS – The Google NIK entire collection of software plugins is only $149. Great suite of tools!
It’s a new learning platform put together by photographer Trey Ratcliff of Stuck in Customs fame and a few others. You apply to be an apprentice in the Arcanum and a Master will ask you to join his or her group called a Cohort. You have challenges to meet and along with the rest of the group’s support and feedback you increase your photography skills at your own pace. You can find out more by clicking on the link.
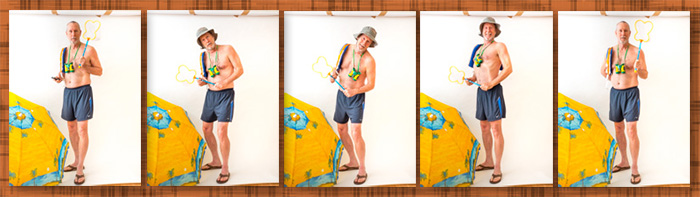
And now to the rest of the story for today. As a side event within the Arcanum a team of masters and a team of apprentices are facing off in a Survivor type environment of photography challenges and teamwork. Images are scored each for each challenge and the highest scoring team gains immunity and the losing team sends a member home. It’s a fun little exercise and is pushing people to be creative. We were given the challenge to create an image based on a swimsuit. Being at a loss to find a model I created something quite different from the expected with a self portrait.
Here are the comments of the judge, Luke Ballard…
Video of my critique by Luke (BTW highest score is three)
As my wife said, “It pays to not take yourself too seriously!” She got quite a laugh out of this when she discovered me putting this together in my studio. She even had a hand in helping with the styling as she remembered a hat I bought on vacation in Cedar Key, Florida. Here are some of the outtakes from putting this together.
I used the Lumix GH4 and the 35-100mm f2.8 lens with a single Paul C Buff flash head bounced off the wall camera left. I used the Wifi connected to my IPhone to see what the camera was seeing and operated the camera remotely. Then, since my wife was there laughing, I put her to work triggering the shutter with the phone so I wouldn’t have to remove the phone in post production.
For infrared conversion of my cameras I use LifePixel. Infrared allows you to put an older camera to use and opens up a new time time of day for productive image creation.
Learn Photoshop in a fun environment. Aaron Nace applies the right amount of fun with easy to understand and follow tutorials. Actions and brushes are included with lessons!
Lightning, waterdroplets, sound, time-lapse, HDR sequences, smiles and much more control for your camera!
Cameras Get Smarter -
A High Speed Smart Camera Remote
Best embroidery ever. Give Queensboro a try, get a $20 instant credit to get started by clicking on the logo! They specialize in great quality custom logo apparel and promotional products with the best customer service.
Platypod has become a great resource for being creative in getting your camera gear easily into unusual places. As an Platypod Pro I get to work/play with the gear even before it comes out. Head over to Platypod, subscribe to the newsletter and you will get special discounts reserved only for subscribers.