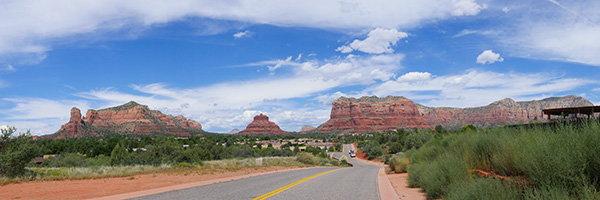
Playing some more with the in-camera panorama stitching on the Lumix GX8 again… This time in the Village of Oak Creek with Bell Rock and Courthouse Butte as the stars of the show. I used the 20mm f1.7. This combo worked very well when keeping the lens pointed straight ahead. If you tilt the camera up there will be a bit of bending of the horizon.
Here’s the original capture SOOC with a minus 2/3rds of a stop exposure adjustment to bring down the sky to a deeper blue. One of the benefits of being able to see what you camera is capturing I could tell that it was going to be a bit overexposed before shooting.
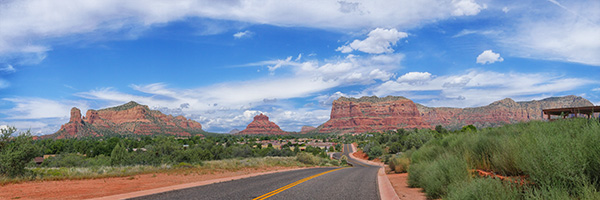
Here’s the finished image with a bit of post production. Darkened the road. Removed a couple vehicles. Increased saturation a little. Added some contrast with Google’s NIK Detail Enhancer. The only place I ran into a stitching evidence was after applying the Detail Enhancer the blue portions of the sky showed the beginnings of unwanted lines. Using a Layer Mask took care of that problem.
This image could easily print to 14 X 42 inches and probably larger if I wanted to work at it a bit and depending on what material I was printing on.
Last night I was at my local and the Lumix GX8 with a 20mm f1.7 lens was in my hand. Played with some presets. Shot RAW and jpeg.
And, since I wasn’t really thinking I never moved away from the 1.7 f stop. But, it’s pretty amazing what you can do in post to save an image. Just to make it a little tougher I used one of the saved jpegs with a deep BW setting to work with.
The first image is straight out of camera.
This is SOOC with a deep contrast BW setting from the camera
I opened the above jpeg in Adobe Camera Raw by highlighting the image in Adobe Bridge and pushing CMD R MAC, (CTRL R PC) This gives you all the controls or ACR although it doesn’t give you access to the RAW info of the file it allows you to use the adjustment tools.
In this case I added a good dose of clarity to add a bit of tooth to the image, opened up the shadows, knocked down the highlights and opened up the shadows just a bit with a curves bump. Both have an interesting feel but I feel the second one with just a touch more punch worked better.
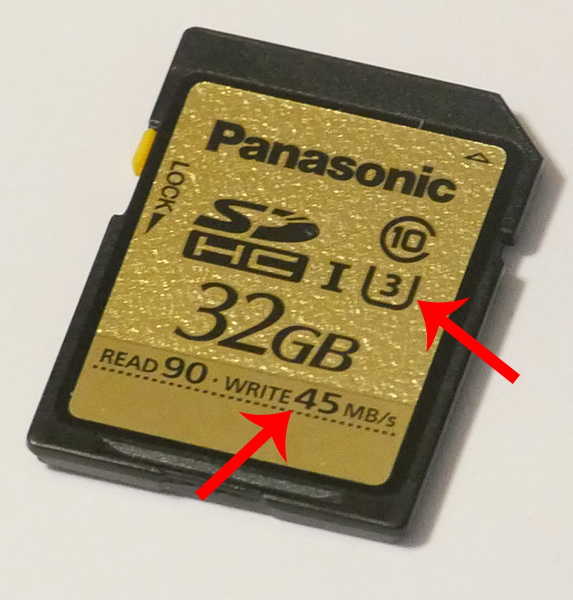
Got word that the Lumix call center has been receiving a number of calls from people who are confused about which SD cards are recommended for which models. In the past “Class 10” were regarded as the fastest out there. The link below shows the speed of each type of card.
Most important numbers to look for when choosing an SD Card for cameras. The write speed.
Also, most people are not aware that SD cards have three speed ratings – Read, Write and Copy. The fastest speed, usually quoted, is the READ speed. The WRITE speed is the important one to consider when selecting a card.
This time of year Arizona can lay out a pretty nice palette for us to enjoy. It’s called monsoon season and thunderheads will pop up in the afternoon and put on a show. I gather all kinds of cloud formations for use in my artwork. I decided to challenge the Lumix G7 (new baby brother to the GH4) to see how well it could do in capturing some panoramic photos of the sky in camera. In the past I’ve found that sometimes the lack of definition in sky scenes made it difficult and I would find stitching errors there occasionally. So I shot some soft cloud formations and some harder edged formations and here’s what happened…
I really thought that the camera might have problems with the lack of definition with this panoramic cloud capture. No problem at all!
Overall did a great job on this one. There was one small area on the left that I had to look hard to find a small stitching error that was easily rectified with the Patch Tool from Adobe Photoshop
Here was another that had an error. It was off to the right and was in the transition area from bright clouds to very dark clouds. After a quick crop this is what’s left.
And, not to forget that the camera can create panoramas in different directions. No stitch errors on this or about 10 other files I let the G7 create.
My overall thoughts on the new panorama stitching in the G7 gets high marks. I always recommend using good camera technique. I point my body to the direction where I want to end up. Then using stomach muscles turn back to the start of the panorama and slowly pivot using the stomach to make the movement to capture the image. If it is a very important pano I will always shoot it several times just in case. Many times an in camera stitching error can be traced to operator error of not capturing the scene smoothly. Even though you can play back the panoramic image at a larger size on the camera you might miss small errors that wouldn’t show up in another pass with the camera.
Had a radio show interview with Mike Tabback on the weekly Tech Talk radio show. I’m on once a month to chat about cameras, photography, shooting techniques, Photoshop and more…
In this weeks episode we chat about some of the new Lumix cameras and our Luminary meeting in Sarasota, Florida. In the second half we talk about the International Photographic Competition for photographers put on by Professional Photographers of America. I am one of 45 the Judges who volunteer almost a week of their time to judge and critique entries. It is quite an honor and intense experience to be part of that event!
For infrared conversion of my cameras I use LifePixel. Infrared allows you to put an older camera to use and opens up a new time time of day for productive image creation.
Learn Photoshop in a fun environment. Aaron Nace applies the right amount of fun with easy to understand and follow tutorials. Actions and brushes are included with lessons!
Lightning, waterdroplets, sound, time-lapse, HDR sequences, smiles and much more control for your camera!
Cameras Get Smarter -
A High Speed Smart Camera Remote
Best embroidery ever. Give Queensboro a try, get a $20 instant credit to get started by clicking on the logo! They specialize in great quality custom logo apparel and promotional products with the best customer service.
Platypod has become a great resource for being creative in getting your camera gear easily into unusual places. As an Platypod Pro I get to work/play with the gear even before it comes out. Head over to Platypod, subscribe to the newsletter and you will get special discounts reserved only for subscribers.