Yep, I said it. Cool beans. This feature is quite handy when you want to photograph with a macro lens and show some incredible depth of field in your image.
The 4K Photo Mode in the Lumix GX85 and the G85 called Post Focus which allows you to choose the frame with the focus where you want it, after the shot, also allows you to focus stack the images together to enhance the depth of field. One downside to using this method is that we are pulling stills from the video which means there is 8MP worth of file size with which to work. A file of this size will get you to a 20-inch print with no problem, but if you want to go bigger, you’ll need to use a different method. I’ll share that with you in the next day or so.
Let’s take a look.
I call this Green Bug. This image is a single frame grab from the 4K video. Printable and OK. But let’s see something a little better.
Now let’s take a look at the image after all the images in the stack have been combined to show the sharpest parts of each frame in the video.
Check out the detail throughout the photo now.
Here’s a little zoom in on the back leg of my friend the Green Bug.
While out waiting for the moon to make its appearance the night before the Supermoon I worked a couple of cameras. I set up the Lumix GX8 to do a time-lapse of the sunset/moonrise. Glad that I also had the Lumix GX85 as a second camera to mess about with while the time-lapse was being recorded.
Here’s a still I pulled for the time lapse sequence.
The time-lapse was pretty simple. The settings are available in the camera. No need for an intervalometer. Under the Time Lapse Shot menu, you have the choice of Start time which can be immediately (now) or a time set in the future. Shooting Interval which is the amount of time between frame captures. Image Count which is the number of frames to be captured. In this case, I fired one frame every four seconds.
I thought I had a better position for the moonrise which was quite a bit to the right of where it actually showed up. I stopped the captures pretty early after the moon made its appearance. Looks like I need to calibrate my compass.
I was able to add some interest because I choose to have the camera process the still images to a 4K video. 4K video enables you to move around in the image without losing quality which I did in Adobe Premiere. Did you catch that part about the camera processing the time-lapse? A very cool feature. I choose the output settings including quality and frames per second. In this case, I used twenty-four.
For the video below I changed the output settings to 12 frames per second. I did a little color correction and added movement in Adobe Premiere.
Tomorrow I’ll show you what I was photographing with the Lumix GX85.
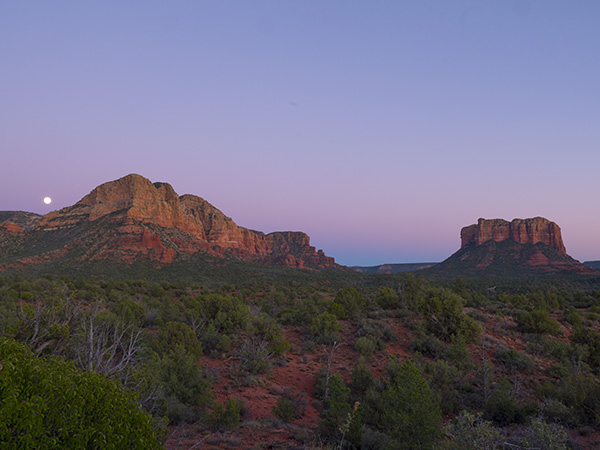
Last week I showed you some night sky photography with some stills blended together. When shooting night skies getting some detail into the foreground takes a bit of work when you are shooting in a dark skies compliant area like Sedona, Arizona. While I was capturing those images with my Lumix GX85 I set up the Lumix GX8 on a tripod for a time lapse sequence.
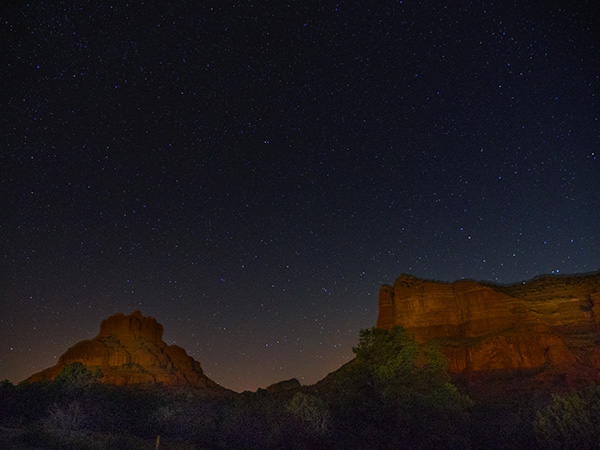
The lens was the Vario 12-35mm f2.8 set at f2.8. ISO 200 and 30-second exposures. I set the interval to 32-seconds to give the camera a little time to reset. Noise reduction setting was disabled as the camera would have been taking an extra 30 seconds to create the noise reduction for each image. Way too long for what I was trying to do. Using the camera’s processing I was able to make videos at various settings without any problems at all. Here is a minute and a half video showing all of the results including an edit with Photoshop.
Stars are making a circle around the north star. Funny how they twinkle just as they do when you are looking at them live.
Time Lapse Video of 140 images processed in-camera at twenty-four, twelve , eight and four frames per second. I also processed the images in Adobe Photoshop using the timeline to create a ten frames per second video.
One note. I was able to take the RAW files into Photoshop and process the red rock area different than the sky area which allows more detail and color to be in the final video. All the files were imported into Adobe Premiere and resized, captioned and rendered to HD. The videos I made in-camera were processed out as 4K files which gives more possibilities in the final movie. I could have left them large and then had the possibility of movement like panning or zooming through the video to create even more interest.
Here is a still image processed from the same scene. A one second and a thirty-second exposure blended with extra process in MacPhun’s Intensify CK
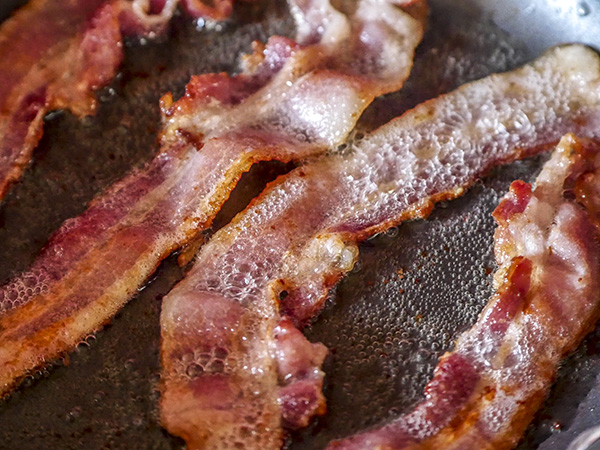
Happy Independence Day! Fireworks lined my frying pan yesterday with a sizzle and a pop in anticipation of the holiday.
Everybody likes bacon.
Almost.
For those that don’t, you can leave the post now unless you want to follow along and see how you pull a still photograph from a video clip shot with the Lumix GX8.
4K video bacon frying (you can almost smell it MMMM)
Now this was not a commercial photo shoot. I just grabbed my camera while I was frying up some Smithfield Farms bacon so it was a handheld grab using 4K Photo Mode. The Photo Mode sets the video so you can pull still images from the video without the problem of ‘rolling shutter’. Rolling shutter is what would happen if you tried to pull a still from ‘normal’ video where you are trying to absolutely smooth video. Because the video capture is 4K, four times the size of HD video, it’s possible to pull an 8MP still frame. That’s good for a twenty-inch size print.
Bacon photograph
When choosing the above still frame I was able to step through the video one frame at a time deciding on the best grease bubbles formed from the heat as the bacon browned. I uploaded the MP4 video to Adobe Premiere Pro played the video until I was close to the image for which I was looking. Then I was able to quickly step through individual frames using the arrow keys. Once the frame is selected a simple push of the camera icon saves the image out as a still. Easy as that. You could also easily save the image out using the back of the camera but I prefer using the larger screen to make my decisions.
There are a number of Lumix cameras that have the 4K Photo Mode including the Lumix G7, GH4, LX100, FZ1000, and more.
Here’s a different time lapse from the same location as a few days ago at Sound Bites Grill. Was able to set the tripod up on the deck that overlooks this wonderful scenery in Sedona.
This time I set the camera behind a red rock stone column in order to stay out of the gusts of wind that caused some extra work on my last time lapse at this location. I also unclasped the camera strap and tied down the camera for even more stability. I was able to do this quickly because I have the Peak Design Camera Strap. I really enjoy the ability to quickly be able to remove the camera strap when shooting video or time lapse images. This cuts down on the wind profile of the gear leading to to steadier capture. It also make it easy to change the type of strap if I’d rather use a wrist strap instead of over the shoulder. This is a pretty cool system with lots of options.
But I digress… How about the video Bob? Here you go…
Sunset time lapse in Sedona
I used similar settings as the last time lapse on the Lumix GX8 capturing a frame every three seconds processing out to a 4K video .MP4 in camera at 24 frames per second. Then taking that video into Adobe premiere Pro to add some Ken Burns movement through the scene.
I was hoping that the clouds your view scudding across the scene were going to be there as the sun snuck beneath the horizon and giving spectacular color, but alas, it did not. Such are the vagaries of predicting the weather.
Of note, as you study this time lapse be aware of the look of the red rocks after the sun has gone down and the sky begins to move toward cobalt blue and the density range begins to tighten up. This is an ideal time to capture the red rocks as the light is being reflected off of clouds and there’s lots of depth and dimension and beautiful color. I can’t tell you the number of times I will be at a scene with other photographers and they pack it up and leave moments after the sun sets. I wait that extra fifteen to twenty minutes AFTER the sun goes down to get much more intense images. Does it always work? Nope. but way more often than you might think and the rewards are worth it. I’ll address this in more detail in a future post.
For infrared conversion of my cameras I use LifePixel. Infrared allows you to put an older camera to use and opens up a new time time of day for productive image creation.
Learn Photoshop in a fun environment. Aaron Nace applies the right amount of fun with easy to understand and follow tutorials. Actions and brushes are included with lessons!
Best embroidery ever. Give Queensboro a try, get a $20 instant credit to get started by clicking on the logo! They specialize in great quality custom logo apparel and promotional products with the best customer service.
Platypod has become a great resource for being creative in getting your camera gear easily into unusual places. As an Platypod Pro I get to work/play with the gear even before it comes out. Head over to Platypod, subscribe to the newsletter and you will get special discounts reserved only for subscribers.
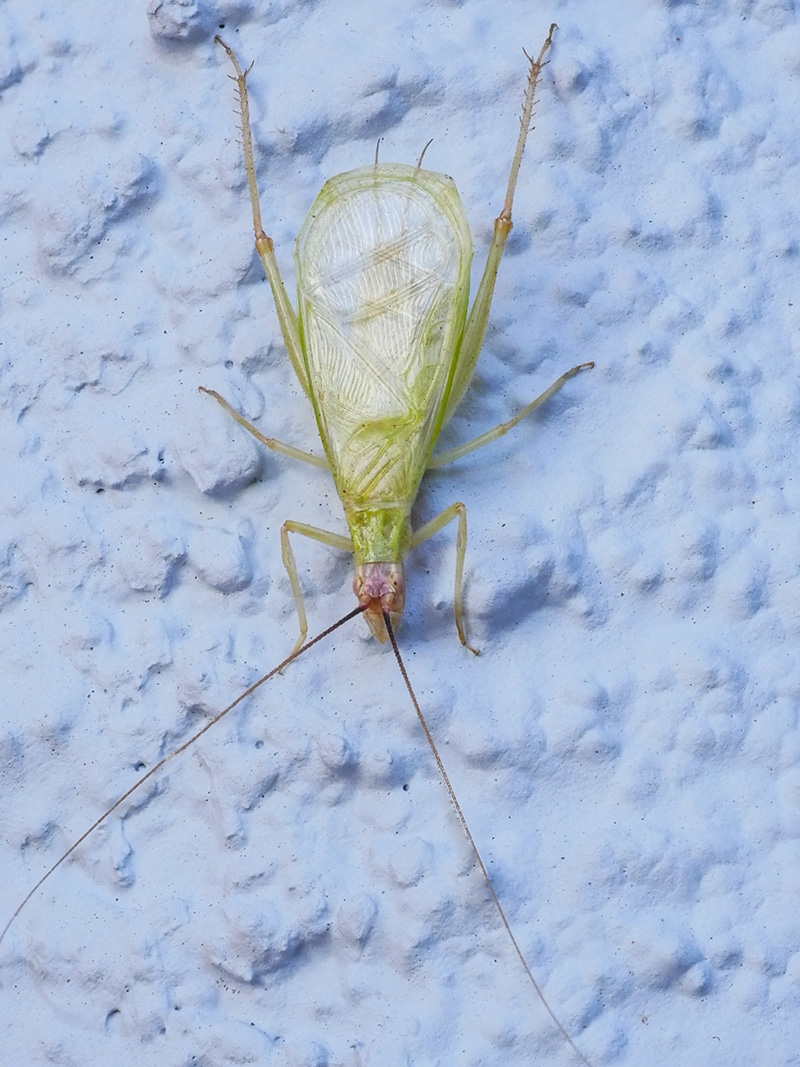
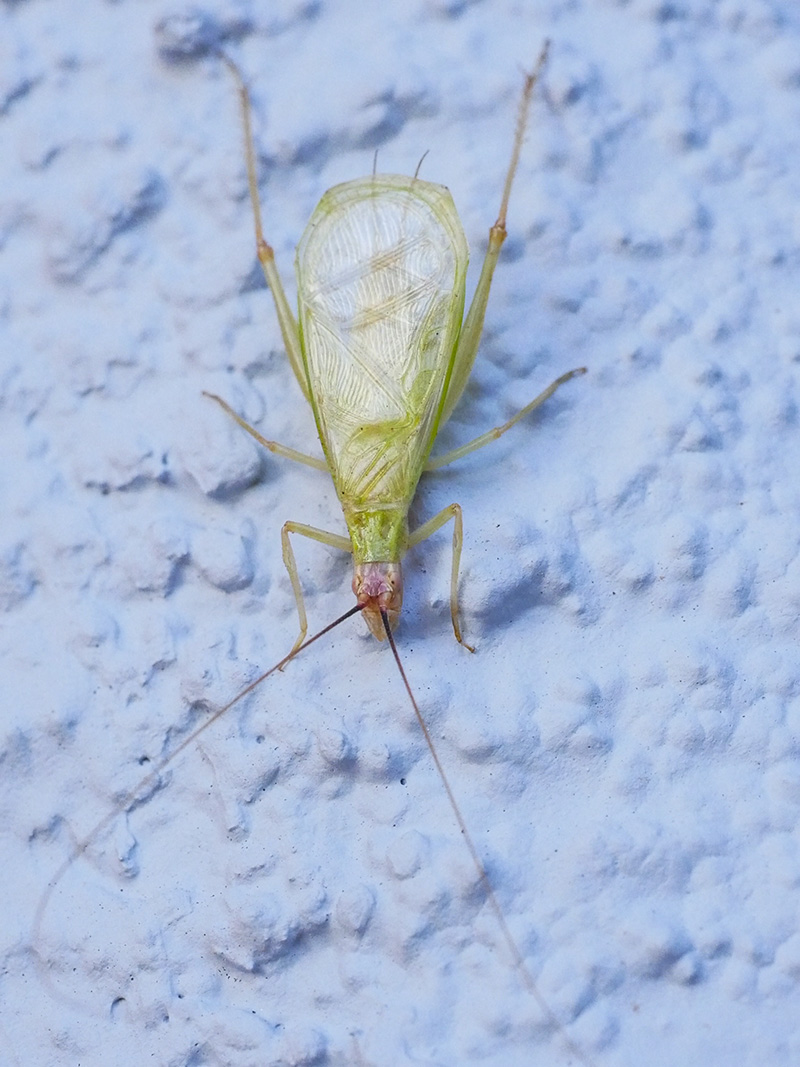 I call this Green Bug. This image is a single frame grab from the 4K video. Printable and OK. But let’s see something a little better.
 Check out the detail throughout the photo now.
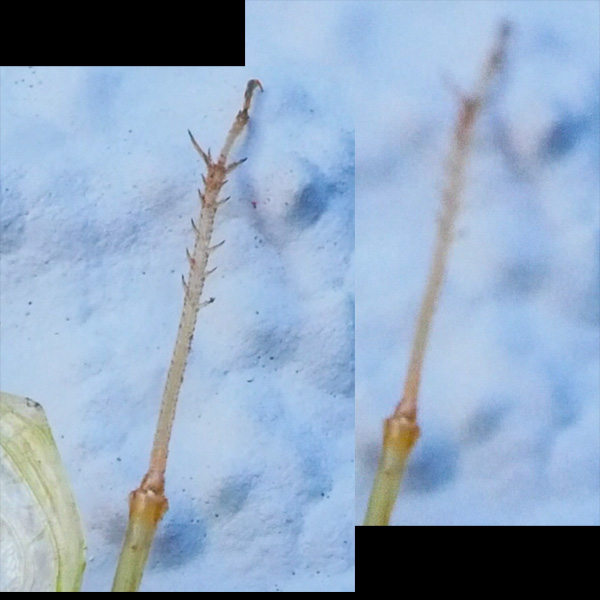 Here’s a little zoom in on the back leg of my friend the Green Bug.