I enjoy the ability to create time-lapse video in the Lumix line of cameras. Built into the cameras are settings that many cameras need an add-on to complete the captures. One of these is an intervalometer which makes it possible to set the number of images to record and the timing in between each capture that is made. Even better is the in-camera processing to see your videos almost immediately without having to download images to a computer for processing.
In today’s post, I’m going to look at three versions of in-camera processing and then another version where the jpeg files were downloaded, processed through Adobe Camera RAW and then run through Time-Lapse Assembler for a different look. Time-Lapse Assembler is a free download.
First, let’s take one of the original jpegs that I processed through Adobe Camera RAW and added a little zip and pizazz with the MacPhun Plugin from their Creative Suite called Focus CK.
Original SOOC (straight out of camera) capture
Cropped to 16×9 aspect ratio and added some clarity and saturation in Adobe Camera RAW. Then finished off with MacPhun’s Focus CK plugin to add a bit more snap and intensity.
Here are the three versions processed straight out of the Lumix GX8 camera sized to 4K. You can choose any number of settings for size along with the number of frames per second. I used 6 fps, 12 fps, and 24 fps. Because I made these in 4K I am able to add additional movement to the videos without loosing quality.
Images were resized to 16×9 aspect ratio and saturation along with clarity was added. They were then saved out to jpegs. The files were processed into a six-image fps and twenty-four image fps videos. These were not able to have panning and additional movement as they were processed to HD size.
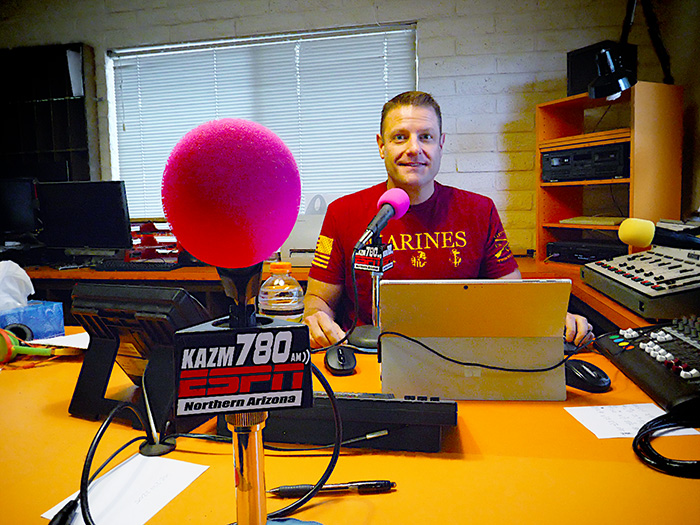
Post Focus is a handy mode to have in your toolkit. It makes it possible to create a hyper focus image with depth of field that rocks the house. Here’s an example I made when I was recording the Tech Talk Radio show with Mike Tabback at KAZM Radio in Sedona.
Here’s the Tech Talk Show which aired on May 10, 2017. We chat about the new technology in the Lumix GH5 including an almost endless focus available in using the Post Focus Mode. Find the demo capture and final image below.
KAZM – Tech Talk Show with Mike Tabback and Bob Coates Photography
First, here’s the video clip created with Six K Photo Mode. The recorded clip is less than two seconds. I have extended it to about six seconds in order you to see the camera making its way through the 225 focus points.
Above is the image fully merged using the in-camera settings of show host Mike Tabback.
Sharp front to back! And everywhere in between
Creates an almost image size of almost 5000 pixels.
There would have been no way to have the KAZM logo on the microphone in focus as well as Mike further into the scene no matter what f-stop was used in a single capture. When a lens gets stopped down to the smallest aperture diffraction and diffusion get introduced to the image which can hurt image quality.
Image was made with the Lumix GH5 camera with the 12-60mm f2.8-4.0 Leica DG Vario-Elmarit Lens
Yours in Creative Photography, Bob
PS – If you have questions about using this technique or any ideas for future blog posts don’t hesitate to give me a shout. As a Lumix Luminary, I get the opportunity to work with a lot of the new technology including the GH5 Camera and some of the newer lenses that have been released. Leave a comment on this post or email bob@bcphotography.com
Care and Feeding of Batteries for Digital Photography
There’s nothing worse than running out of battery power in the middle of a job or while out and about making images. I’ve come up with a fairly simple way to ensure that when I need more power for my cameras it is always at the ready. Check out the video.
Hope you find this helpful in keeping your batteries ready to go at all times.
This video was recorded with the Lumix GH5. Fiilex LED lighting with a softbox was used to supplement overhead room lighting. I set the camera for 4K Video and used the tracking mode for focus since I was using a tripod. The camera was triggered using the iPhone and the Panasonic Image APP to control settings, focus, and start/stop during the session.
While I was in Florida for the Lumix Luminary summit on the GH5 I had scheduled a couple of extra days in Florida to photograph wildlife and nature scenes.
Thanks to fellow PPA member Rob Bird I was able to get to some cool areas with great subject matter. One of the benefits of being a PPA member is that you have photographer contacts who know the lay of the land all around the country. We got up and going for what I call dawn patrol to capture the city of Tampa at sunrise. I decided I’d work a couple of cameras with my Lumix GX8 capturing a time lapse of the whole sunrise while I used the Lumix GX85 for stills.
Tampa sunrise set to the music of Eric Miller – ericmiller-worldmusic.com The video was put together using ScreenFlow a screen capture program that has some pretty powerful video processing features.
The time lapse features of the Lumix cameras are pretty amazing. You don’t have to add an intervalometer because it is built-in. You can select your timing between image capture, the number of frames, start and stop times in an easy to use interface. But, here’s the incredible part. You can process the finished time lapse in the camera. Choices for how many frames per second and quality level is chosen. In this case, I prepared the files to a 4K .mov video. 4K allows me to move around within the image in post-production when using a smaller timeline.
Through the Internet, I have met an avid advanced amateur photographer/videographer named Aloy Anderson. Aloy is always pushing to learn new and creative ways to use his cameras. I have never attempted stop-motion video myself even though it is a capability built into the Lumix Cameras. When Aloy shared his project with me, I asked if he’d mind sharing some of his thinking and his process with me. And now with you.
I invite you to check out his stop-motion video called Jungle Movie “Be Brave” and turn the rest of the post over to Aloy. Enjoy!
“My name is Aloy; I’m a photographer and Youtube content creator from Miami. From an early age watching Sesame Street, I’ve always been curious about how to make stop-motion animation films. In those days it took a 35mm camera with “miles” of film to develop which was out of my reach. When I realized my new Lumix G7 had the feature built in I was pleasantly shocked. I had to give it a try. My video “Jungle Movie” my first attempt at a storyline video.
When you enter the stop motion menu on the Lumix camera choose whether you will snap each shot independently with the shutter button or the camera can be set to shoot at your preset interval. I do a little of both to give me time to reposition the set pieces and camera placement. For simplicity, I chose 5 seconds between each shot to give me time to move the characters quickly and get out the way.
Stop-motion can be very tedious and time-consuming, and it’s tempting to take the easy way out by leaving the camera on a tripod in one spot. That would be a mistake akin to watching a whole movie from one angle. I suggest different scenes and locations for variety, using a wider lens to show establishing shots and standard lenses for shallow depth of field moments. Before you begin, have a definite storyboard in mind. I like to use manual focus and exposure for each shot.
Here are some tips.
1) Don’t to move each piece too far between each shot as I did in some of my Jungle Movie. The resulting video will have choppy movement. A few centimeters is a good start.
2) Keep the camera on a tripod or table-top to maintain a solidly grounded scene.
3) Every few shots check to make sure your exposure or focus point hasn’t changed.
4) As you improve, you will know what not to do next time and come up with more complex ways to tell your story.
5) Imperative before you begin, set your camera’s aspect ratio to 16:9 which will allow it to play back full widescreen rather than a smaller 4:3 photo size.
6) Finally, have fun!
I guarantee your first 10-second video attempt may look like a five-year-old did it but you will have a good laugh watching it play back with all its faults.
The good thing about the Lumix is when you’re finished making captures the camera will ask you how to customize your video rendering such as how many frames per second it will be and at what resolution. It will then stitch all those photos together into an MP4 file. The only downside is it will be a “silent” movie. In my case, I imported the MP4 into my video editor and added music and text titles to polish it off. It is crucial to add some form of audio to keep your video engaging. This information is not an exhaustive tutorial by any means, but the fun is learning as you go.
I invite you to visit my Youtube product review channel and my Flickr Photography album. Most importantly I would like to thank Bob Coates for inviting me to write this piece. Hopefully, you will have a good time learning this type of creative way to use your camera.”
Aloy Anderson.
Thanks to Aloy for sharing his first foray into stop-motion.
Yours in Creative Photography, Bob
PS – Most Lumix cameras have the stop-motion and time-lapse features built into the camera. If you have any questions about which camera might be best for your needs let me know.
For infrared conversion of my cameras I use LifePixel. Infrared allows you to put an older camera to use and opens up a new time time of day for productive image creation.
Learn Photoshop in a fun environment. Aaron Nace applies the right amount of fun with easy to understand and follow tutorials. Actions and brushes are included with lessons!
Best embroidery ever. Give Queensboro a try, get a $20 instant credit to get started by clicking on the logo! They specialize in great quality custom logo apparel and promotional products with the best customer service.
Platypod has become a great resource for being creative in getting your camera gear easily into unusual places. As an Platypod Pro I get to work/play with the gear even before it comes out. Head over to Platypod, subscribe to the newsletter and you will get special discounts reserved only for subscribers.

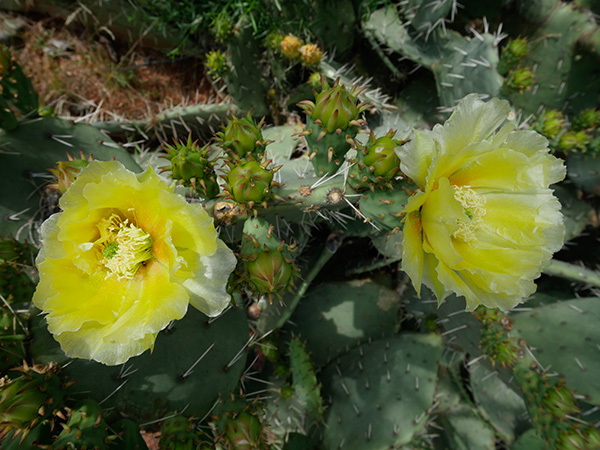 Original SOOC (straight out of camera) capture
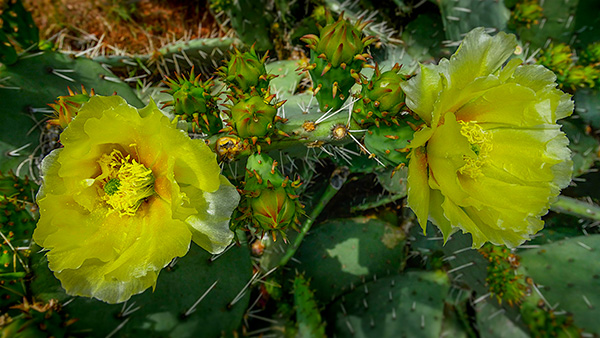 Cropped to 16×9 aspect ratio and added some clarity and saturation in Adobe Camera RAW. Then finished off with MacPhun’s Focus CK plugin to add a bit more snap and intensity.