And, the anatomy of post production of an image to meet the pre-visualization. That’s what we’re talking about today. I saw the final image in my head before I even made the photo. (if I could only get there in time) Here’s the story…
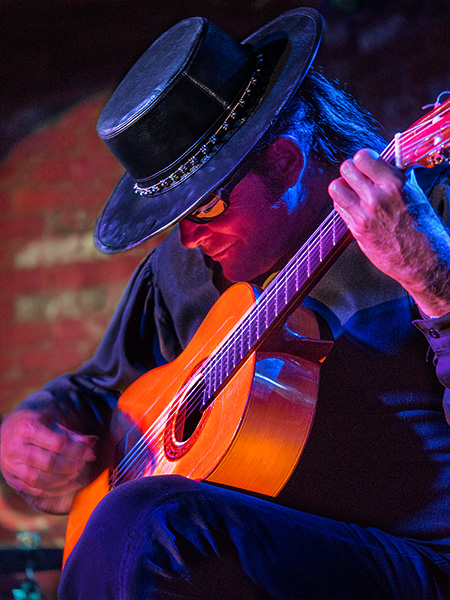
Esteban is an extremely gifted artist with the guitar and I have been fortunate to photograph him on numerous occasions. This last time (see post here) I made images of him for marketing and promotion I was gifted with seeing a lighting situation during a live performance that I knew would be wonderful in color. And, then especially in black and white. If only I could get to the right position, with the right lens, before the dynamics of the situation changed.
Moved quickly across the room while changing lenses. Dropped to the floor and fired off about 8 frames before he came out of the position and the lighting changed.
Here’s the color version followed by an Animated Gif showing the steps of post production…
Esteban playing guitar after post production. See the animated .gif below for most of the steps used.
Straight out of camera. Remove background distraction. Add a Tonal Contrast and Glamour Glow with NIK filters. Bring back some detail in strumming fingers from another capture. Burn some highlights. Tone down clothing to shift focus. Tone down background. Tone down guitar.
Toning was done with a variety of techniques including Curves Adjustment Layers and Soft Light burn layers. You see how we can drive the focus to where we would like the viewer to look first. The eye goes to the area of highest contrast. Then the viewer is invited to look around in the image by the use of diagonal lines in the composition.
Tomorrow this will be taken to another level when the image is converted to black and white followed by more adjustments.
Yours in Creative Photography, Bob
PS – Original image was captured with the Lumix GH4 with the 35-100mm f2.8 Vario Lens under stage lighting conditions during a live performance.
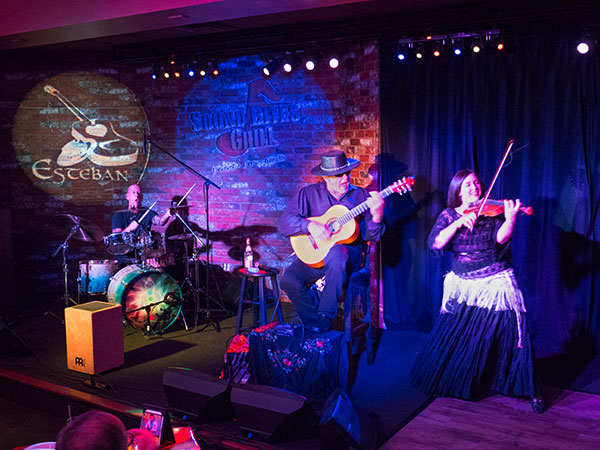
Esteban has a new percussion master as part of the Dinner Show at Sound Bites Grill in Sedona so I was asked to capture some new marketing images. They are playing on Saturdays and Mondays through May.
Here are a couple stage views.
Dinner show at Sound Bites with Esteban and company… (daughter Teresa Joy is on violin)
During a lively portion of the show!!
While I was photographing the show I saw the light! Esteban was in deep and intimate with his guitar and I saw this beautiful light
reflecting from the soundboard onto his face. I rushed to run to the angle and hope the communion would continue while I captured the photograph. In another post I’ll talk about the whys and hows of the post production that went into the final black and white
I photographed the show with the Lumix GH4 and used the f2.8 Lumix Vario lenses 12-35mm and 35-100mm. This combination allows for the wide angle to telephoto needed. The GH4 has a great dynamic range allowing me to capture the depths of shadow and the bright LED lighting.
I took my Lumix GH4 out for a hike yesterday. I was accompanied by it’s friends the 7-14mm f4, it’s cousin 12-35 f2.8 and it’s big brother the 35-100mm f2.8. This combination of camera and lenses gives me the 35mm equivalent focal range of 14-to 200mm with fast glass. Add a spare battery, a five in one 20 inch Westcott reflector, some extension tubes and put it all in a small Tenba ‘Switch 10’ bag and I’m ready for almost anything I might come across photographically.
Oh, did I mention all of that gear weighs just a bit over six pounds? Throw in a MeFoto backpacker tripod and water for the hike and it’s still under ten pounds. TOTAL.
The Lumix Micro 4/3rds Mirrorless system rocks!
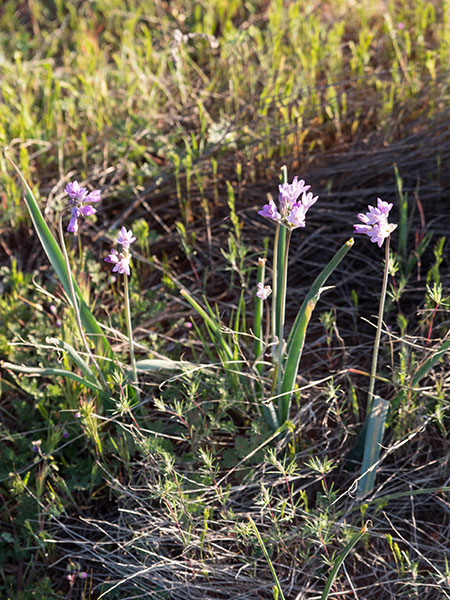
Happened upon this stand of delicate little lavender flowers.
Mounted the GH4 with 35-100mm on the tripod. Added a 10mm Vello extension tube and it looks like this in full sun.
Open the 5 in 1 Westcott reflector, take off the cover and use the scrim between the sun and the flower and look at the change.
I think I’ll take the kit out for a hike again tomorrow.
Yours in Creative Photography, Bob
PS – If you use the links to Amazon.com as an affiliate I will receive a small percentage form the sale. It helps support photographer education and the Successful-Photographer web site. TIA.
Step and Repeat Level 4 is a continuation of Photoshop Tutorials using repetitive individual photo elements in a geometric pattern to create artistic images. Although this tutorial stands on it’s own for advanced Photoshop users you might want to check out the Step and repeat videos Number 1-3 before viewing this one. You can start here.
You may notice the Arcanum. It is a different way of learning and you can check it out here http://thearcanum.com
Step and Repeat Level 3 is a continuation of Photoshop Tutorials using repetitive individual photo elements in a geometric pattern to create artistic images. Although this tutorial stands on it’s own for advanced Photoshop users you might want to check out the Step and repeat videos Level 1. You can start here. Then also view Level four.
You may notice the Arcanum bumpers on the video. What’s that? I am a Master in the Arcanum and invite you to come take a look around at a different way of learning. You can check it out here http://thearcanum.com
For infrared conversion of my cameras I use LifePixel. Infrared allows you to put an older camera to use and opens up a new time time of day for productive image creation.
Learn Photoshop in a fun environment. Aaron Nace applies the right amount of fun with easy to understand and follow tutorials. Actions and brushes are included with lessons!
Lightning, waterdroplets, sound, time-lapse, HDR sequences, smiles and much more control for your camera!
Cameras Get Smarter -
A High Speed Smart Camera Remote
Best embroidery ever. Give Queensboro a try, get a $20 instant credit to get started by clicking on the logo! They specialize in great quality custom logo apparel and promotional products with the best customer service.
Platypod has become a great resource for being creative in getting your camera gear easily into unusual places. As an Platypod Pro I get to work/play with the gear even before it comes out. Head over to Platypod, subscribe to the newsletter and you will get special discounts reserved only for subscribers.