by successfulbob | bird photography, Lumix GX8, Lumix Lounge, photography, photography education, wildlife photography
Hummingbird Photo – Lumix GX8
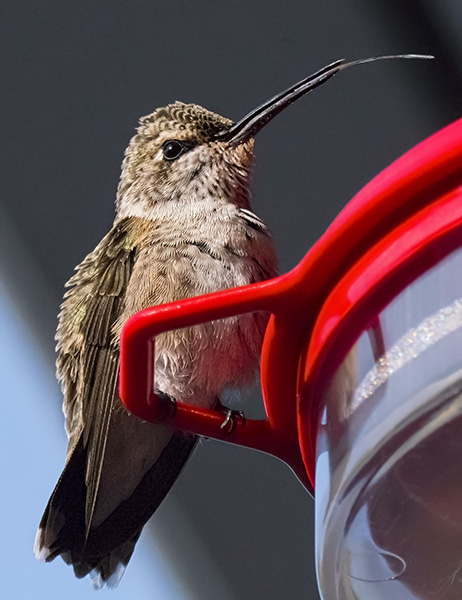
Hanging out this morning and thought I’d do some camera testing with my Lumix GX8 and the 100-300mm G Vario f4-5.6 (200-600mm equivalent) lens. I made these images handheld with stabilization turned on. Settings for these were f14 1/2000th sec at ISO 6400. I’ll share some hummingbirds in motion images at different settings a little later. I became enamored of this little critter because he had so much peppy personality. Looks like he just arrived from a long migration. He’s not one of our local birds and seems a little worse for wear.
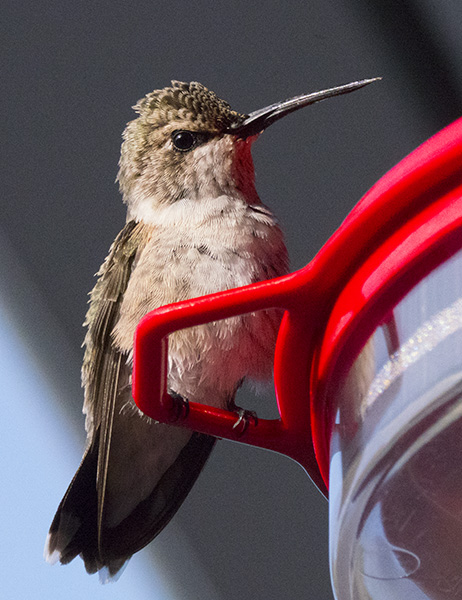 Hummingbird Straight out of the camera. He’s checking me out.
 After seeing me, he stuck out his tongue! Not sure if that was social commentary or not. Here’s the little guy after processing with MacPhun Noiseless and MacPhun Tonality (for sharpening the feathers just a bit more. Explanation below)
So these images turned into a processing exercise. Some photographers mention that they are concerned with noise in images from smaller chip cameras like the micro 4/3rds. Personally, I feel that we get a little too hung up on that as the newer algorithms that are used in processing give a very natural feel to the noise that replicates the grain structure we had back in film days. (can you hear my creaky bones as I talk???)
To see if there was an elegant solution for those who have a concern when you push the camera to higher ISO’s thought I’d see how software might be of help. Oh man, it does if you are on a MAC. I’m using MacPhun Noiseless, and it worked a charm. MacPhun is only for MAC OS systems. I’m sure there are similar products for those on PCs. One of the problems I had in the past with noise reduction programs is the removal of detail that I wanted/needed in some parts of the image. I’ll let you decide, but I don’t think that’s a problem anymore!
On to the processing!
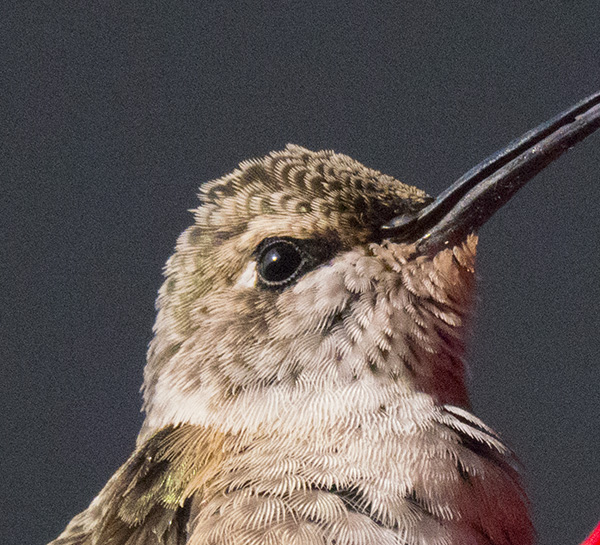 Original detail capture SOOC.
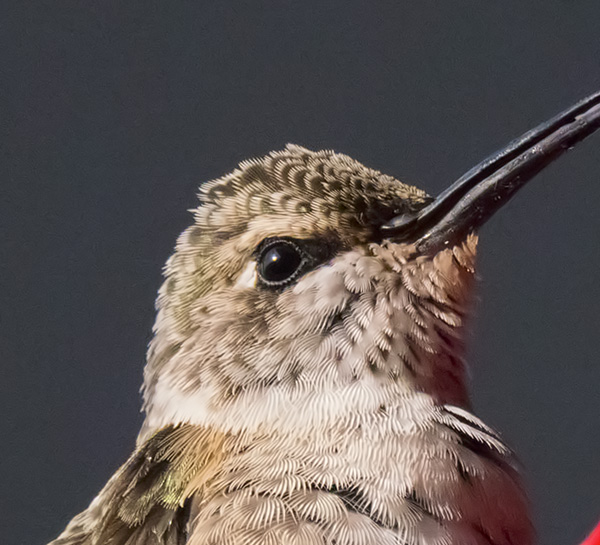 Here’s the image after running MacPhun’s Noiseless software. There are lots of settings and possibilities. This was a fairly aggressive treatment. It smoothed out the noise in the background nicely without losing detail in the feathers.
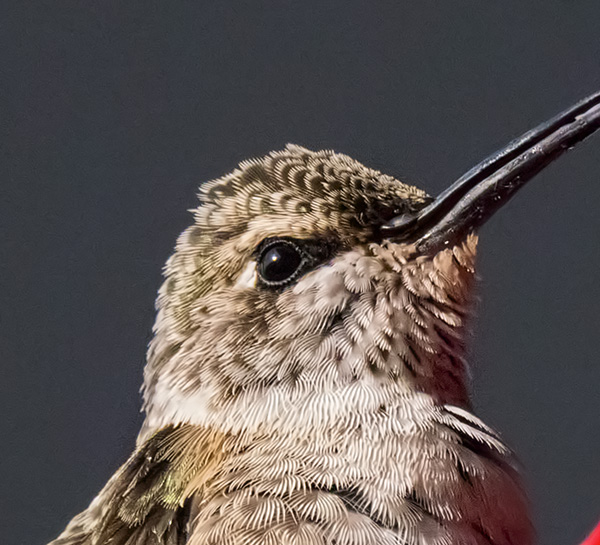 This is the final. I used the Tonality software from MacPhun to sharpen the feathers a bit more. “Wait a minute Bob! isn’t tonality made for making an image black and white?” You bet. But, I liked the controls that allowed me to sharpen small details and micro control the contrast in different areas of the image. The secret is to do this on a separate layer and change the Layer Mode to Luminosity in Photoshop. Then only the information that is Luminous is applied to the image. Using a Layer Mask, I applied the sharpening to only the feathers.
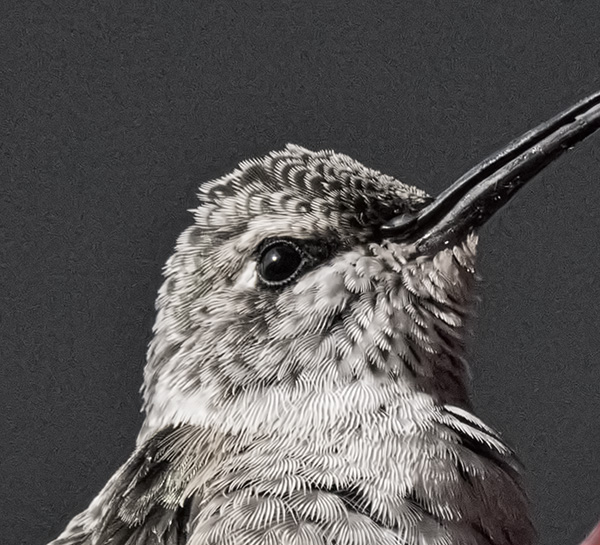 Here is the Tonality layer without a mask. You can see where it sharpened the background as well hence the use of the Mask in Photoshop in addition to changing to the Luminosity Mode.
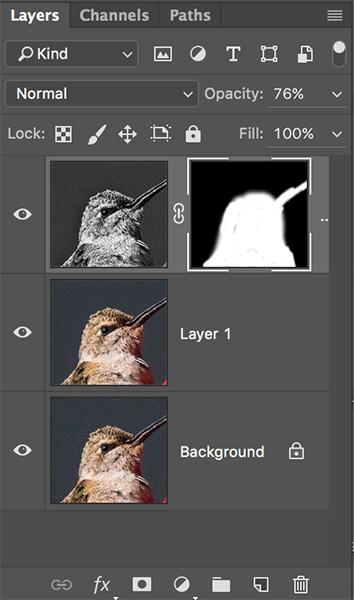 Here’s the Layers Palette. Background Layer is original capture. Layer 1 is with noise removal. Top Layer is Tonality with a mask.
Yours in Creative Photography, Bob
Save
Save
Save
by successfulbob | imaging competition, photography, photography creativity, photography education, tuesday painterly photo art
Tuesday Painterly Photo Art
Karen Nakamura – M.Photog.,M.Artist
Judging gets you exposed to a lot of imagery. You can be critically thinking and talking about thousands of photographs over the course of a year. What is interesting is that there are some artists whose work seems to jump out from the rest showing something different. Judging is blind as far as knowing who the maker may be during the competition. At a later date a maker’s work may be seen with a name attached and I really enjoy talking with the maker and Karen was one of those people.
That’s why I asked her to join us on Successful-Photographer in this post. Here’s Karen!
How Karen learned
“I’ve been creating art pretty much as far back as I can remember. I’ve taken art classes since the 3rd grade. I’m really lucky because my mom would give us art projects throughout the year when I was little. I’ve taken everything from painting, drawing, sculpting, 2 and 3-dimensional design, photography, photoshop and industrial arts.”
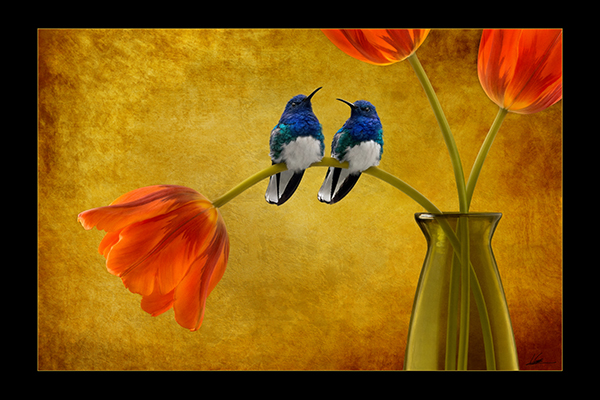
 The Perfect Perch – I’ve been wanting to add birds to my floral images. I went to the San Diego zoo and photographed a beautiful White-necked Jacobin hummingbird. I then photographed the tulips to match the light on the bird and then photographed the vase.
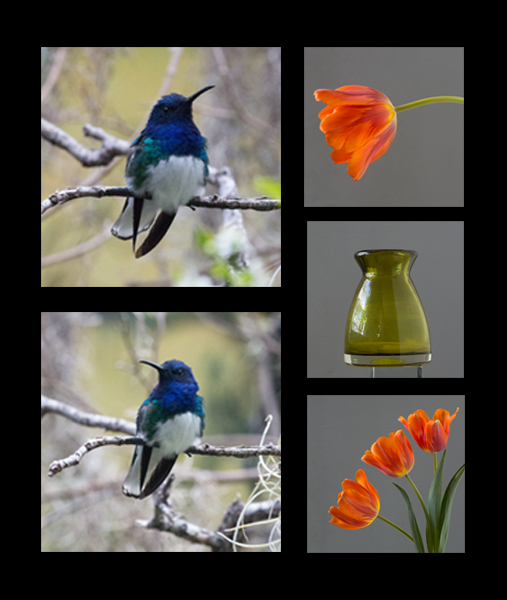 The vase wasn’t exactly what I wanted so I decided to stretch it. The hummingbird was shot natural light at f13 1/160 800ISO Tulips and vase were shot with natural light with reflector. F11 1/60 160ISO
Words of wisdom on learning and/or thoughts on creating art
“Anyone can create art. Just follow your heart. Don’t compare yourself to others and don’t care what others think. Create art that makes you happy because that’s what it’s all about. The more you create, the better you will become. Eventully you will develop your own style.”
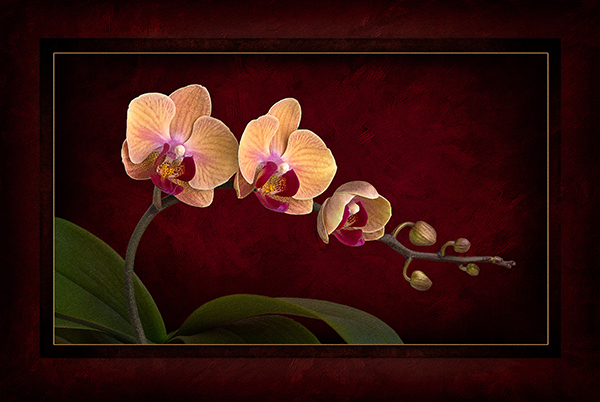 Orchid Bloom – I’ve had this orchid for about five years. The plant sits on my kitchen cabinet and when the window light hits the flowers, the colors are so striking. The orchid spray wasn’t perfect so I added one more flower to the stem. The leaves were taken from another orchid image to complete my piece.
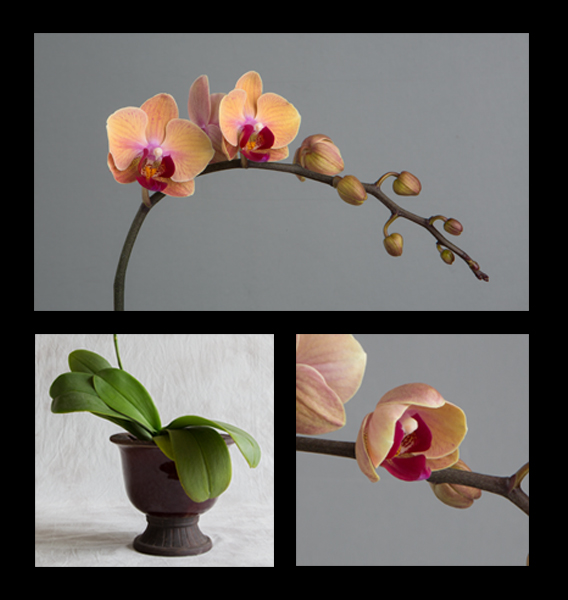 The orchid spray was shot in a studio setting with one main light and one reflector. @ f16 1/125 100 ISO The orchid plant was natural window light with a reflector. F11 1/60 400ISO
“To be inspired look at other peoples art, look at art history books and go onto social media sites like pinterst and instagram. Follow artists that inspire you. To learn how to create art, watch videos on Youtube or watch videos on site like Creative Live. Hands on classes and workshops are one of the best ways to learn a techique.”
 Delicate Beauty – The freesia is one of the first flowers I photographed back in 2012. I really didn’t like how it came out, so I set it aside until I went to the Natural History Museum in Los Angeles and photographed a Swallowtail hovering over flowers. I didn’t know what I wanted to do with my butterfly images until I went back into my library of flowers and came across the freesias again. Visually the light matched so I decided to play around with the three subjects until I created this art piece.
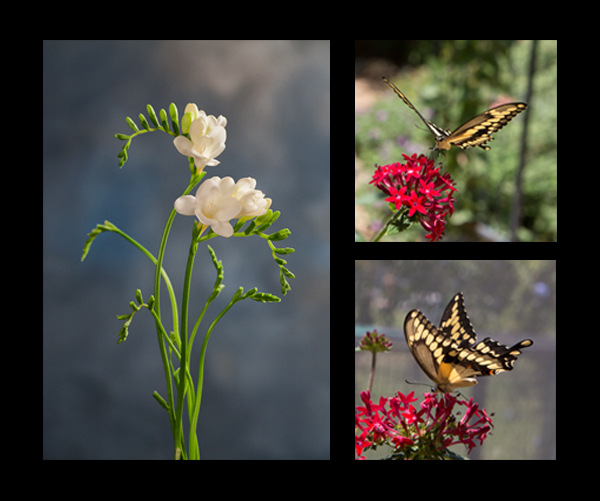 The butterflies were shot in diffused sunlight f8 1/1600 800 ISO. The freesia was studio lit with one main light, one reflector and a backlight. f16 1/125 100ISO
Karen Nakamura Bio
PPA Master Photographer and Master Artist, Karen Nakamura, is widely acclaimed for her signature style images of flowers. She is gifted with a unique take on them that evolves with each new blossom she shoots. Some of her inspiration and creativity comes from an adoration of orchids, which she tended to as a hobby.
Karen also has a fine art background, attaining her Bachelor’s of Fine Art from Cal State Long Beach.
Karen has earned the Professional Photographers of America’s Photographer of the Year awards every year since she first entered the PPA International Photographic Competition back in 2010.
Professional Photographers of America honored Karen with its 2013 Diamond Photographer of the Year and 2014 Artist Diamond Photographer of the Year. Diamond Photographers of the Year had all four competition images accepted into the prestigious PPA Loan Collection. Karen has won the coveted Canon Par Excellence Award, representing the pinnacle of achievement at the Professional Photographers of America regional level. She is one of the first photographers to earn the California Masters Degree from Professional Photographers of California.
You can learn from Karen! Her PPA Super 1 Day Class
Floral Photography and Compositing Course Date: Thursday, October 6, 2016
PPA Super One Day Class
Check out more of Karen’s work – www.karennakamuraphotography.com
Hope you enjoyed Karen’s work!
Yours in Creative Photography, Bob
Save
Save
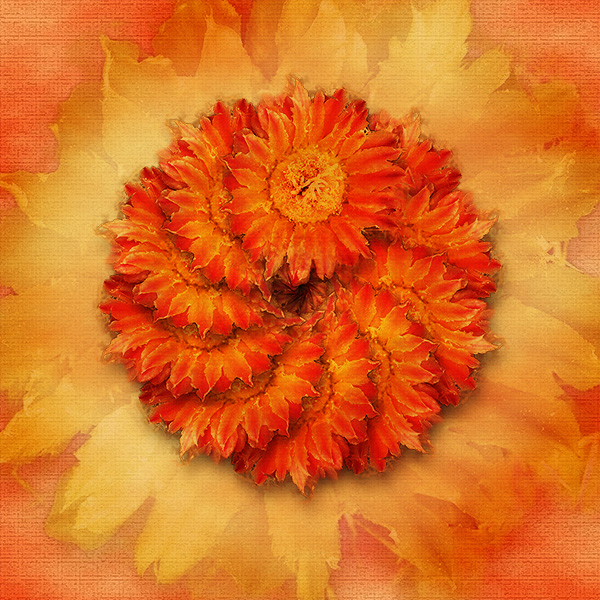
by successfulbob | Lumix Lounge, Lumix LX100, photography, photography creativity, photography gear, photography lighting resources
Using a Mini-Scrim for Better Photos
A very simple way to control light is through the use of a scrim. For small subjects and objects, a regular 42-inch round scrim or super size scrims of 60 inches or more can be a bit of overkill for just mucking about. Westcott makes a wonderfully portable sized, five-in-one that is only twenty inches and when folded in it’s carrying case is a tiny eight inches for about twenty bucks.
Here’s a quick example using a neighbor’s cactus that was showing some attractive color blossoms. Look carefully at the difference between photos and I think you’ll see that learning to use a scrim can help get you better lighting in your images.
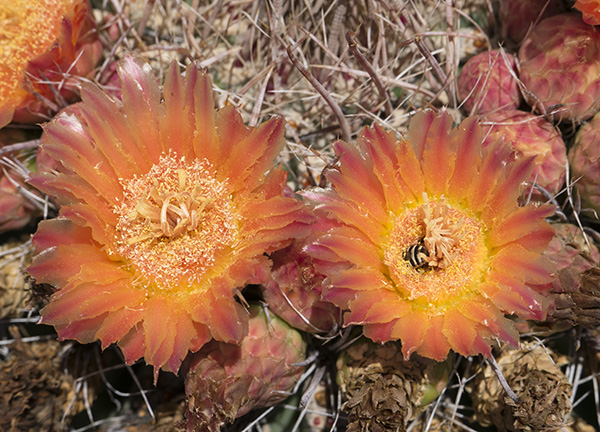 This first image was captured with full sun as the light source. Colors are bright and you might think that this works. Look at the harsh, deep dark patches in the shadow with no detail. This is the same kind of look you will get if you use on-camera flash.
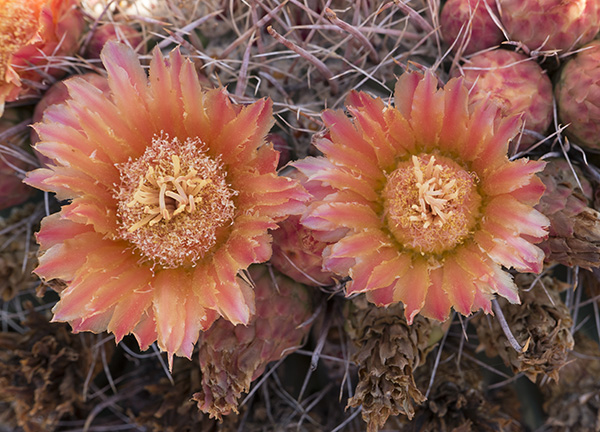 In order to tame the harsh shadows, I next captured the blooms in full shadow. This results in slightly less contrast and the color has become muted. I suppose the color could be pumped up in post-production but the shadow are still a bit blocked up.
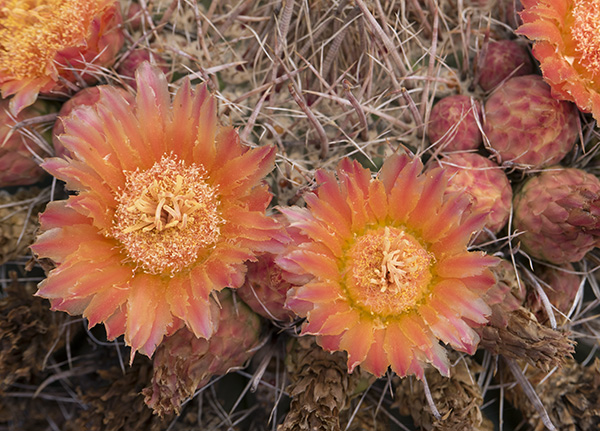 Here a scrim was placed between the sun and subject. Even though the scrim is only twenty inches because of it’s close proximity to the flowers it is acting like a very large light source. Very nice overall light with soft shadows and color fidelity. All images were processed with the same settings straight out of the camera. (SOOC)
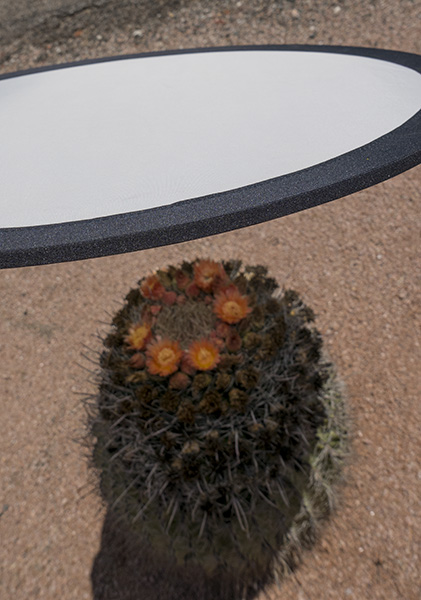 A quick grab of the scrim in action. In addition, the kit comes with four other surfaces to reflect or block light in various intensities and colors. Black, gold, silver and white can all also be used to bend light to your will.
You can take this same lesson and apply it to larger subject such as people by using a larger scrim. Practice with it and you will find the larger the scrim and the distance it is to your subject you will be able to control the shadow edge transitions and depth of the shadow on your subject. Moving it further away while still covering your subject will give you slightly stronger shadows. Conversely, the scrim closer will make the light softer.
 Sometimes you just gotta play! NIK filters, Photoshop extraction’ Layers and the Transform Tool.
These photos were captured with the Lumix LX100 the camera I call the ‘Pro’s Point & Shoot.’ A solid little performer built on a magnesium frame for about $700.
Yours in Creative Photography, Bob
Save
Save
Save

by successfulbob | inspiration, photography, photography - art quote, photography education, success education
Sunday Photo/Art Quote – Henry David Thoreau
Sometimes I head a little far afield of even the art world when I choose the quotes for this Sunday morning art thought.
Today is one of those days.
But I’ll bring it around. I promise.
Walden by Thoreau is an interesting read and his sharing of thoughts on slowing down and observing the world in which we hang out in real time and that it is a good idea. You don’t have to take as much time as he did, but you can slow down and observe for small chunks of time.
I find it quite helpful. On to today’s quote, so we are on the same page.
 “Only that day dawns to which we are awake.” Henry David Thoreau
I share this idea today because I find many people, including myself, often living in the past or the future instead of the present. Don’t believe me? Ever drive home and then wonder how you got there? In the shower do you feel the water cascading from your head down your body and hear the musical splashing of the drops onto the floor? Or, are you on auto-pilot missing these moments and planning what you should be doing after you get to work? Or are you wallowing in the past upset with something someone said and replaying that conversation over and over ad nauseum??
Other examples abound. Reading and not know what you’ve read moments later. Shaving your face and missing the whole left side. Brushing your teeth and not knowing whether you’ve done the top inside yet. You get the idea.
We can become better creators if we learn to be in the present and learn to observe more. See more details, Retain more of those details. For help with seeing more and recalling what you see, you might want to try Amy Herman’s book Visual Intelligence. It’s a guide to visual understanding and communicating more clearly. Her book is based on a course for law enforcement, such as the FBI, police officers and CEO’s, ER professionals to become more observant.
Getting control of our thoughts is the first step. Slowing the constant cascade of the unstructured noise that our brains are capable of generating. Meditation can be of tremendous help in quieting the mind. I recommend Jon Kabat-Zinn and his book Wherever You Go There You Are. He also has a set of guided meditations that are wonderful as you start down the road of being in the here and now. Mindfulness Meditations.
Hope you enjoy this reading list. I hadn’t intended to go this deep. Sometimes writing can lead you to a rabbit hole, and the exploration can take you to interesting places. Just ask Alice.
Yours in Creative Photography, Bob
PS – Here’s the tie in. When you see better and remember what you see you can be a better creator of images. Happy reading!
 Walden by Henry David Thoreau
 Visual Intelligence – Amy E. Herman
 Wherever You Go There You Are – Jon Kabat-Zinn
Save
Save
Save

by successfulbob | fine art musician portrait, graphic design, Lumix GH4, Lumix GX8, Lumix Lounge, musician photography, people photography, photographer of musicians
Jackie Venson at Sound Bites Grill
Sound Bites Grill has a new addition to the ‘Wall of Fame.’
Jackie Venson and her band were enshrined at the SBG Wall last night.
 Here are Jackie Venson and her band in art form.
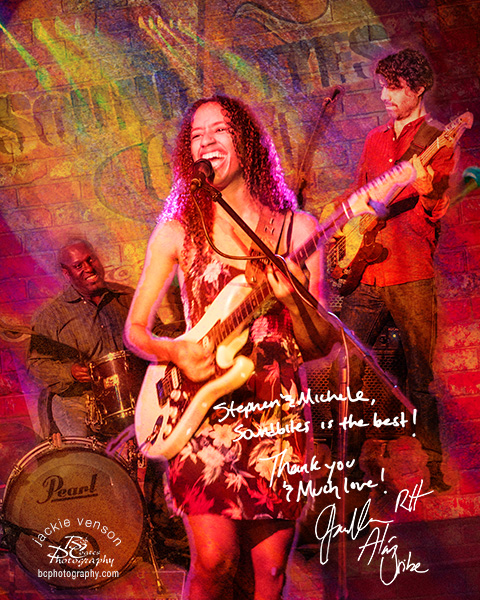 Here’s how it looks on the Wall. The autographs are done in advance on a white piece of paper with black Sharpie pen. I’ll show you all the elements used to create the final image below.
The ‘Wall of Fame’ image is created with photos captured during the live stage performance in the Sound Bites Show Lounge. Each performer is tracked on stage individually. Then they are extracted from the background and placed into a new environment. Texture, shadows, glows along with sharpening, blurring parts of the combined images are all combined in Adobe Photoshop to create the final art piece. Capturing the musicians during the live performance gives the final art image a stronger feeling of emotion created during the performance that a static image just doesn’t have.
 Here are the elements for the final image. Layers and Masks along with Blend Modes were utilized in creating the painterly look.
Images are currently being captured with the Lumix GH4 or Lumix GX8 cameras. I enjoy that the sensors have enough density range to allow a single capture of the harsh LED lighted scene. A slight adjustment in post production using Adobe Camera Raw (ACR) of bringing down the highlights and opening up the shadows makes for a well-exposed photo. In previous cameras due to the extreme light variations, there was a need to capture three images and blend them together to achieve the same result.
Yours in Creative Photography, Bob
PS – Can’t wait until Jackie, Alán Uribe on bass/backvox and Rodney Hyder on drums come back for their next show at Sound Bites Grill

 Hummingbird Straight out of the camera. He’s checking me out.
 After seeing me, he stuck out his tongue! Not sure if that was social commentary or not. Here’s the little guy after processing with MacPhun Noiseless and MacPhun Tonality (for sharpening the feathers just a bit more. Explanation below)
 Here’s the image after running MacPhun’s Noiseless software. There are lots of settings and possibilities. This was a fairly aggressive treatment. It smoothed out the noise in the background nicely without losing detail in the feathers.
 This is the final. I used the Tonality software from MacPhun to sharpen the feathers a bit more. “Wait a minute Bob! isn’t tonality made for making an image black and white?” You bet. But, I liked the controls that allowed me to sharpen small details and micro control the contrast in different areas of the image. The secret is to do this on a separate layer and change the Layer Mode to Luminosity in Photoshop. Then only the information that is Luminous is applied to the image. Using a Layer Mask, I applied the sharpening to only the feathers.
 Here is the Tonality layer without a mask. You can see where it sharpened the background as well hence the use of the Mask in Photoshop in addition to changing to the Luminosity Mode.
 Here’s the Layers Palette. Background Layer is original capture. Layer 1 is with noise removal. Top Layer is Tonality with a mask.


