I have a preference for ocean sounds after having lived in the Caribbean for 20 years but any water sounds are helpful with calming my mind. I spent about an hour on Oak Creek at Cathedral Rock capturing small moments of the creek experience. I took some time this morning editing the footage so that you can enjoy the experience as well.
The video is two minutes long and shows some of the different water patterns along this section of the creek.
I didn’t have myfull video kit with tripod and fluid head for proper zooming and panning. Did the best I could with a tiny little five-inch tripod that I keep with me in my shooting bag for just such an occasion. The occasion being I didn’t want to hike with the full tripod kit. With the light weight of Lumix gear, a small tripod can come in quite handy! The camera was Lumix G9 with the Leica DG Vario-ELMARIT Professional Lens, 12-60MM, F2.8-4.0 Lens. Sound was also recorded from the mic that is built in to the camera. Shot in 4K 24p mode.
I edited the footage with a screen capture program that is for MAC computers called ScreenFlow from TeleStream.
The video was captured in the middle of September when there is some monsoon water flow.
The Making of
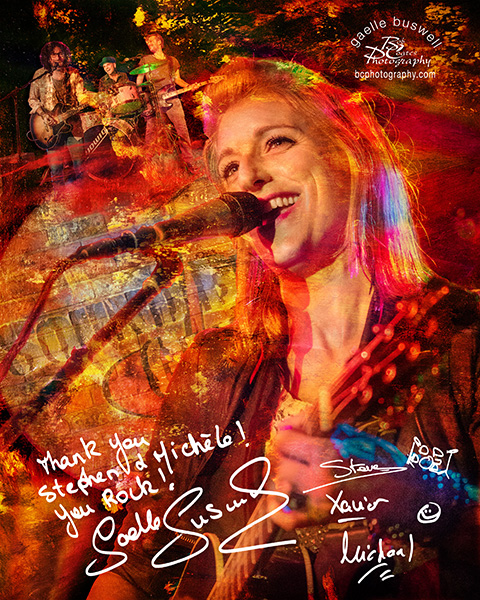
Sound Bites Grill Hall of Fame Image
I’ve often been asked how I create the art images for the Sound Bites Grill Hall of Fame. Thought I might share the process here from start to finish.
Finished Hall of Fame image with Gaelle Buswell and her band members
First, I make photos from the show during the live performance. This is a bit easier said than done as performers are moving in and out of the light, have strange expressions when they reach for THAT note, etc. I need to watch and learn as each performer works and then make sure I’ve gotten enough source material on all the band members.
Then it’s time to download all the images and begin the culling process. Lots of images get thrown away on the first pass. Then I’ll go back through to look for the selects. Those are the photos that have the body position, expression and look I am going for in the final art piece.
The individuals are extracted from their photo and placed upon their own layer so effects such as drop shadows and lighting can be applied individually. Then it’s time to start working on combining all the elements of people, texture, drop shadows, color adjustments and more.
Animated Gif of the various Layers
Above is a Gif showing most of the Layers made in Photoshop to give you an idea of how the pieces work together during the build. Below is a screen capture of the Layers Palette in Photoshop.
Layers Palette of the Gaelle Hall of Fame image
I’m thrilled with the dynamic range of the Lumix Micro 4/3rds camera gear. The camera is Lumix G9 Panasonic’s stills flagship model with the LUMIX G X VARIO LENS, 35-100MM, F2.8 ASPH
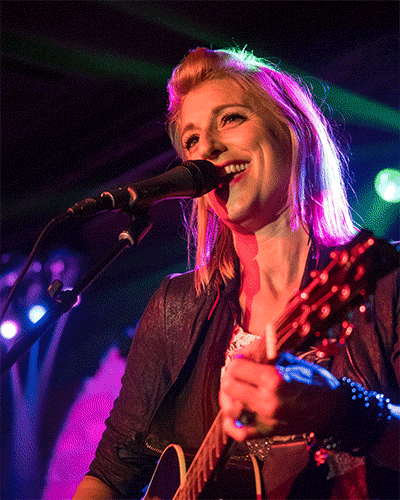
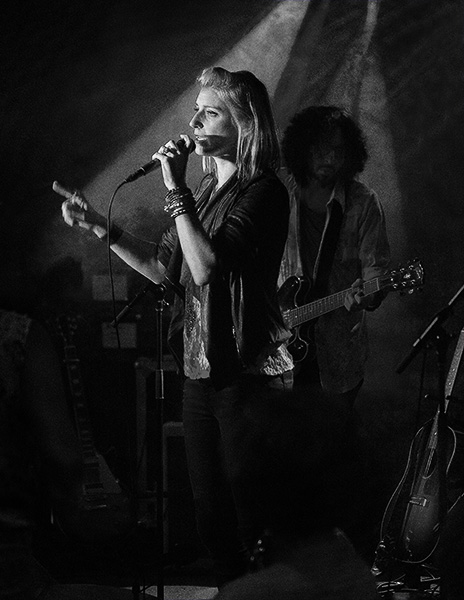
First I want to say what a great show it was at Sound Bites Grillin Sedona, AZ. I photograph musicians at this venue on a regular basis, and it’s a great space. Gaelle is from France, and she brought her A game with her for the performance. I look forward to a return engagement should it happen to come this way.
Gaelle Buswell Live on stage at Sound Bites
Photographing a Live Performance
I want to talk to you about capturing images from a live performance. In the studio, you have control of the lighting, posing, and expression of your subject. Not so much when the performers are live on stage. The lighting is what the lighting is, and while it was set for a specific place on stage, the entertainers often are moving in and out of the preset light pattern. Expressions can be all over the place with closed eyes, weird mouth positions, and strange body positions. To get the best captures that are flattering to the subject you need to study the movements of the performer before beginning to photograph. If you do this, you will start to notice what type of body language will happen with certain kinds of songs. When does the performer close their eyes? And better yet when will they be open? Where is the light best? The study will get you more and better images than if you just start firing away.
Processing the Files
Once you have the capture, it’s time to finesse it in post-processing. There are always improvements to be made. Control of the highlight and shadows. Getting the best color for the situation can be a bit of work because of the LED lighting not having a full spectrum. This can give some bizarre color tones on the skin, and even if everything else is excellent, an unflattering skin tone can kill a shot. Many times I will double process an image and combine. One copy is prepared for the background and the other for the skin tones. Using Layer in Photoshop and adding Masks allow complete control.
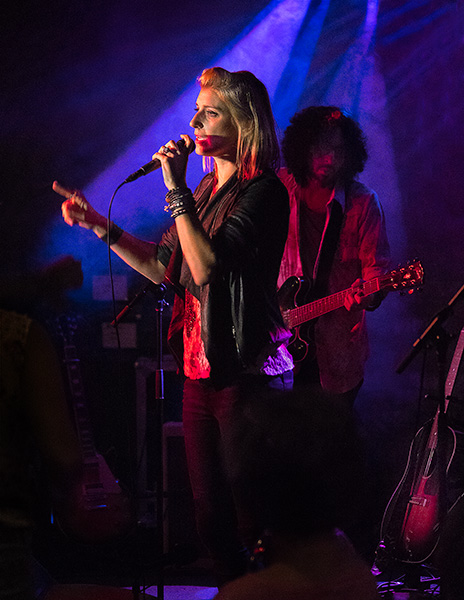
Original image of Gaelle after ACR Process and before tweaks
You can compare the image above with the photo on the top of this post. You will see with a little dodging and burning along with a tiny bit of cloning there are fewer distractions from the performer. Let me know if you can see what the differences are. There are five.
Black and White
I always process out my images to black and white. One is for my clients use in PR situations. Providing BW images will lead to better quality in print, especially newspapers rather than letting the Paper just do a desaturation. The other reason is viewing a black and white image tells you if your tonal values are on because you are not distracted by the color.
Gaelle in black and white
Camera Gear
As always I am using Lumix Micro 4/3rds camera gear. The camera is Lumix G9 with the LUMIX G X VARIO LENS, 35-100MM, F2.8 ASPH Instead of using the Leica f2.8-4.0 12-60mm when I am shooting in scenes with this much contrast and moving performers I want the speed and control f2.8 of the fixed aperture lens.
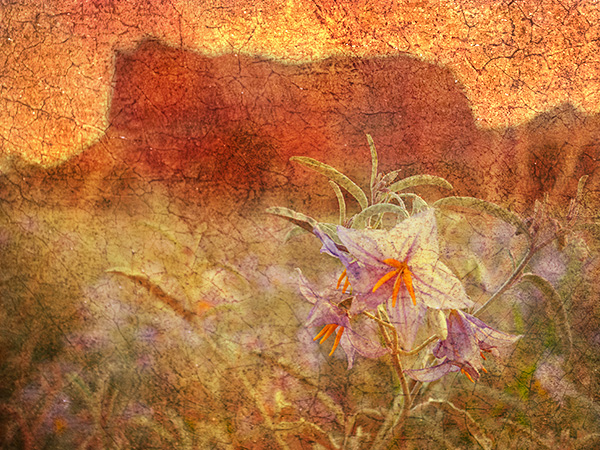
Interpreting the Red Rocks – Juuuust a Little Different
If you have followed this blog and my work for any length of time you know that I often like to take my images further than a ‘straight’ photograph. I have found a weird thing while working on this process. There are times to get a certain look you need to make what I would normally consider a ‘bad’ photograph. One that is either under or overexposed to create the vision in your using certain textures.
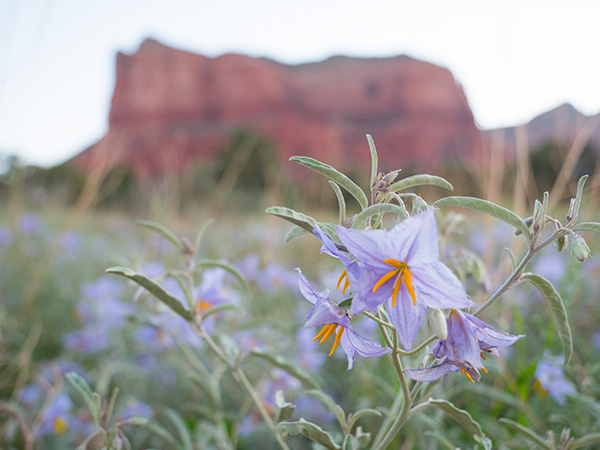
Here’s a case in point. The density range for this image was huge in that I was shooting the flower in the shade and the background was in full sun. I originally bracketed this scene to get a ‘correct’ exposure. I processed that, but when I went to work, I found that I had better results with the image that was a single exposure rather than having all the detail that Aurora HDR 2018 software would provide.
Here is one of the bracketed images slightly over-exposed. Little to no detail in the sky.
The little to no detail in the sky gives the texture a chance to shine. I used texture from a small section of an old painting in various blend modes to achieve the image below.
Here is my artistic rendition of the image.
I think the plain image needed some help other than making a full range of tones visible. I work photos in many different ways before I find the vision for which I was looking.
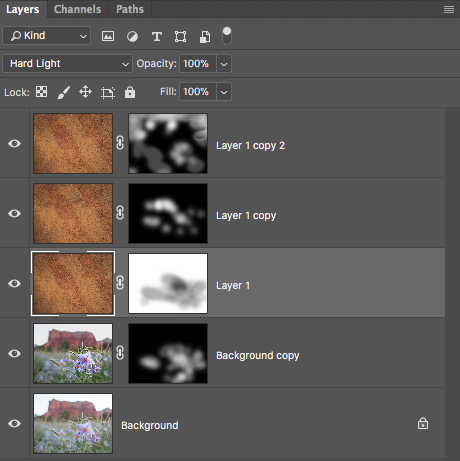
Here is thePhotoshop Layers Palette from the image above. Note: all Layers had a different blend mode applied and Masks were used to extract or cover the information I did or didn’t want.
Lumix G9 with the Leica DG Vario-ELMARIT Professional Lens, 12-60MM, F2.8-4.0 was used for this capture. The fully articulating screen is helpful when framing an image where the camera is low to the ground. Saves getting down to try and look through the viewfinder and also save work in the laundry for clothes that have been doused in dirt!
Porto, Portugal – Guest Post Part Two
by Ken MacAdams
Ken is a traveling man and uses Lumix gear during his travels. Ken will share some of his travel photography and stories here on Successful-Photographer as he has in the past. Ken’s camera of choice is Panasonic’s flagship stills camera the Lumix G9 with the Leica DG Vario-ELMARIT Professional Lens, 12-60MM, F2.8-4.0
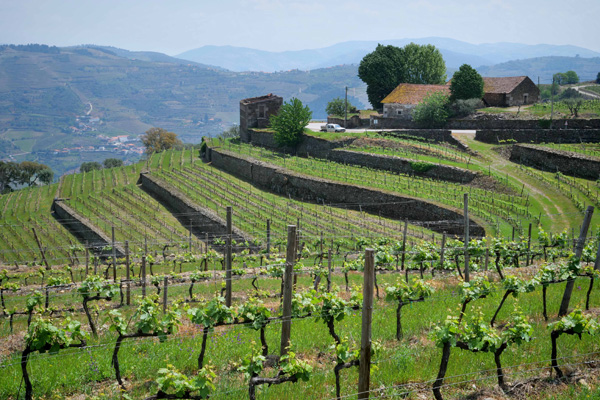
We made a day trip out into the beautiful, hilly, wine region to the east of Porto. Vineyards cling to the sometimes steep hillsides bordering the meandering Douro River. Old World cities cling to these hillsides also, as the narrow road snakes its way inland. We stopped at one of the vineyards along the way for a tour and wine tasting experience. A narrow road switch-backed us from the river side to the establishment set high up on the hillside. Views up and down the river valley revealed terraced vines as far as the eye could see. Inside, the guide explained the different types of port wines – white, red, tawny, and rose. For the different varieties of grapes there is a different aging processes for the wines, with some aged in wooden casks, others in bottles. We were led deep underground, into their wine cellar, and allowed to walk between rows of neatly stacked wooden casks. Another area housed thousands of bottles of port wine, all quietly aging away! Climbing back up from the cellar, we entered a tasting room, where several different varieties were uncorked for our sampling.
Douro Valley vineyards with the town of Sabrosa in the background
Back in the 1700’s, the wines processed inland by the different vintners was transported downriver to Porto in large casks on Rabelo boats, small river-going boats. The casks were stored in warehouses along the river in Porto, called “lodges”. The port wine often aged here for years before being loaded onto ocean going ships which transported them primarily to England, or to final markets in Europe. Modern dams on the river make this shipping process impossible today. Many of the original “lodges” in Porto along the river have been converted into wine tasting establishments. You can still see replicas of the historic boats, complete with wine casks, in many of the old riverside cities that dot the banks of the Douro River, as well as in the Ribeira district in Porto.
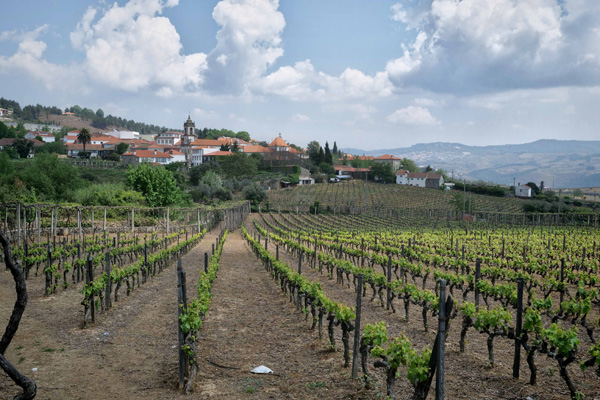
The River Douro with vineyards clinging to the hillsides
It was late in the night when we returned to Porto, but our travel experiences up through the Douro Valley were priceless. We’d seen history, tasted the famous Port wines, and walked among the vineyards. We could have easily stayed in a villa back in the valley, but other destinations in Portugal beckoned.
Ken MacAdams – “I grew up with a darkroom in my basement…so all the old film skills were my friend when digital came on the scene. Funny thing happened…photography just got more interesting as digital posed new challenges! While I loved the characteristic sounds and smells of the old wet-process darkroom days, I wouldn’t go back!”
Ken has always loved to travel, so when he made a common connection with the fact that either a long day pounding the streets of some foreign city, or shooting the last dance at a wedding, a good part of his physical weariness came from lugging around my big heavy DSLR. That’s when he started looking at alternatives – and ended up selecting Panasonic Lumix Micro Four Thirds gear.
Ken is rarely without a camera, and the next great photo travel experience – whether local or abroad – is always in the back of his mind! A longtime resident of the Four Corners, and when he’s not out on the road, he enjoys some of the great outdoor opportunities found there – mountain biking, hiking, and Jeeping.
Ken is a traveling man and uses Lumix gear during his travels. Ken will share some of his travel photography and stories here on Successful-Photographer as he has in the past. Ken’s camera of choice is Panasonic’s flagship stills camera the Lumix G9 with the Leica DG Vario-ELMARIT Professional Lens, 12-60MM, F2.8-4.0
Heeeeere’s Ken!
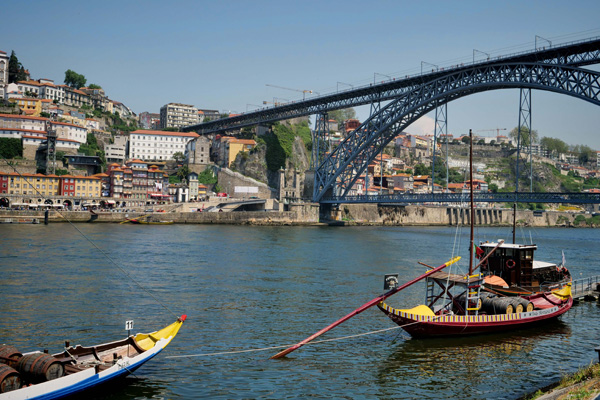
Porto is a coastal city in northwest Portugal known for its port wine and stately bridges. In the medieval riverside Ribeira district, narrow, hilly cobbled streets wind past merchants’ cafes and houses. Close by is the Dom Luis I Bridge, a double deck metal arch bridge that was designed by Gustav Eiffel, the same man who designed Paris’ famous Eiffel Tower. Spanning the River Douro between the cities of Porto and Vila Nova de Gaia, this unique bridge offers great views of the river and city. You can walk across either level of the bridge, but most of the activity takes place on the streets adjoining the lower level, or riverside.
While on the Vila Nova de Gaia city side, or south side of the river, we turned down Avenida Diogo Leite, a street paralleling the River Douro. This street is lined with a multitude of sidewalk cafes, and numerous wine tasting establishments. Settling in at one of the sidewalk cafes, we enjoyed the views of watercraft plying the River Douro, with the hillside city of Porto in the background.
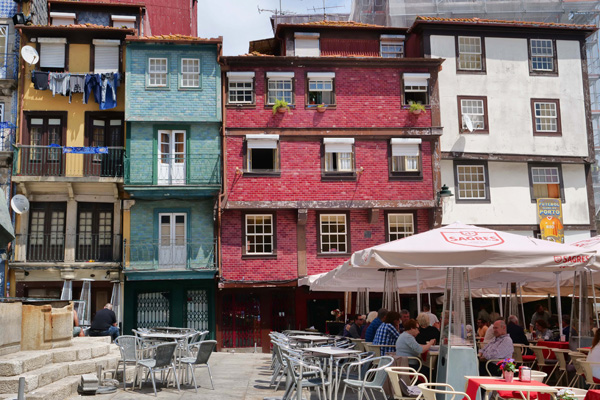
Cafes and housing in the old Riberia district, Porto.
While history tells us it was the Romans – early conquerors of this land – that introduced the first grapevines to this area, it was the Brits who championed port. The significance of the wine producing Douro area dates back hundreds of years. When England was at war with France in the early 1700’s, English merchants began importing wine from this region, for the deprived English wine drinkers of French wines. British importers realized the need for a smooth fortified wine that would not only appeal to English palates but would also survive the trip to London.
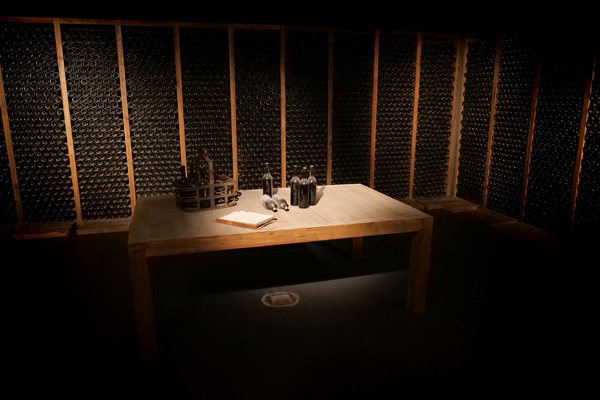
Wine Cellar
Port wine is typically richer, sweeter, and higher in alcohol content than unfortified wines. This is caused by the addition of distilled grape spirits to fortify the wine and halt fermentation before all the sugar is converted to alcohol, and results in a wine that is usually 19% to 20% alcohol. The grapes aren’t grown in Porto itself, but in the region extending inland up the Douro River Valley.
To be continued next Friday. Porto, Portugal – Part Two
Ken MacAdams – “I grew up with a darkroom in my basement…so all the old film skills were my friend when digital came on the scene. Funny thing happened…photography just got more interesting as digital posed new challenges! While I loved the characteristic sounds and smells of the old wet-process darkroom days, I wouldn’t go back!”
Ken has always loved to travel, so when he made a common connection with the fact that either a long day pounding the streets of some foreign city, or shooting the last dance at a wedding, a good part of his physical weariness came from lugging around my big heavy DSLR. That’s when he started looking at alternatives – and ended up selecting Panasonic Lumix Micro Four Thirds gear.
Ken is rarely without a camera, and the next great photo travel experience – whether local or abroad – is always in the back of his mind! A longtime resident of the Four Corners, and when he’s not out on the road, he enjoys some of the great outdoor opportunities found here – mountain biking, hiking, and Jeeping.
For infrared conversion of my cameras I use LifePixel. Infrared allows you to put an older camera to use and opens up a new time time of day for productive image creation.
Learn Photoshop in a fun environment. Aaron Nace applies the right amount of fun with easy to understand and follow tutorials. Actions and brushes are included with lessons!
Best embroidery ever. Give Queensboro a try, get a $20 instant credit to get started by clicking on the logo! They specialize in great quality custom logo apparel and promotional products with the best customer service.
Platypod has become a great resource for being creative in getting your camera gear easily into unusual places. As an Platypod Pro I get to work/play with the gear even before it comes out. Head over to Platypod, subscribe to the newsletter and you will get special discounts reserved only for subscribers.