Find Solid Lighting for Your Photography Portraits
To find a beautiful natural light for your portrait subjects I recommend looking for shadows. Shadows are the hallmark of depth and dimension in two-dimensional renditions of our subject.
First, look for porches or overhangs that will remove the overhead light. Ideally, you’ll have a bright surface like concrete or sand or bright building reflecting the overhead light into the shadowed area. This situation works well because the larger the light source, the softer the shadow edge transitions will be. There is a magical place just under the portico that will yield very flattering light patterns. One way to discover the right spot is to hold up and examine the back of your hand and examine the shadows as you move your hand through the scene. This method allows you to see how the shadow-edge transitions will play out. If you have beautiful smooth hands with no ridges and alternative is to bend the middle finger down and watch the shadow as it falls on your palm.
Fondly referred to as the reverse salute, the middle finger can show you how the shadows will look.
Once you have decided on the proper place for your subject, you then have the opportunity to set the lighting pattern by changing her angle to the light. By rotating your subject you have the ability to create the most flattering light whether that be broad light, split light or short light. Most times I will opt for short lighting as I feel that adds the most depth and interest to a portrait.
Note The light on camera right side is less wide than the shadow camera left
Note the light and shadow are just about even in this image
In this image, most of the mask of the face is lit with just a soft shadow camera left. Note the slight ‘kicker light’ on her face on the camera left side.
This particular space was a bonus in that it was more of a tunnel with an opening on the other side which added a subtle separation light which adds more dimension to the photograph.
I was photographing this session as part of a job for the Sedona Meditation Center, which is now under the guidance of Ichibuko Todd (my fabulous model!) who has relocated here from Hawaii.
Images captured with the Lumix GH4 with 35-100mm f2.8 Vario Lens. Settings ISO 200 1/400th sec. f3.5 47mm (94mm in 35mm)
Yours in Creative Photography, Bob
PS – If you want to have higher contrast with harder shadow edge transitions move your subject further away from the main light source.
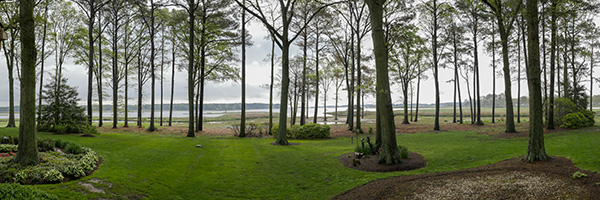
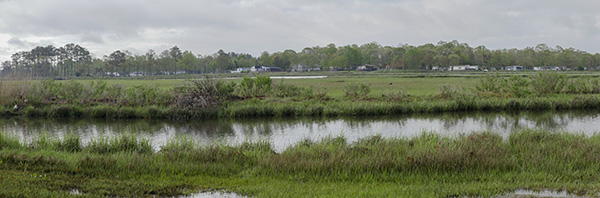
While the weather during the time I was on a family visit was less than stellar I thought I’d give you an overview of the scene from my mother-in-laws backyard. Photos of some of the wildlife from another post.
These two panoramic photos were captured with the Lumix GX8 and the Vario 12-35mm f2.8 lens. Very lucky to have this area as a playground when visiting.
View from the front. Panoramic Mode with the camera oriented vertically. Settings 1/1000 sec f4.0 ISO 800 18mm (36mm in 35mm equivalent)
View from one side. There’s a similar view on the other side with even less evidence of man in the view. Settings 1/2000 sec f4.0 ISO 800 35mm (70mm in 35mm equivalent)
The in-camera stitching on the GX8 is pretty amazing. In straightforward situations it makes a great pano. If you have highly complex subject matter like trees and/or patterns you might want to take two or three passes and check the details before moving on. If it is something very important I will make the in-camera panoramic and the I will also shoot the individual images in RAW for later stitching if I want super high quality. Many times I’ve been pleasantly surprised that I didn’t need to use the RAWs but I always like to back myself up.
My wife says the great blue herons all run for the hills when they see our car pull up as I have been stalking them on this property for years. I love those big birds.
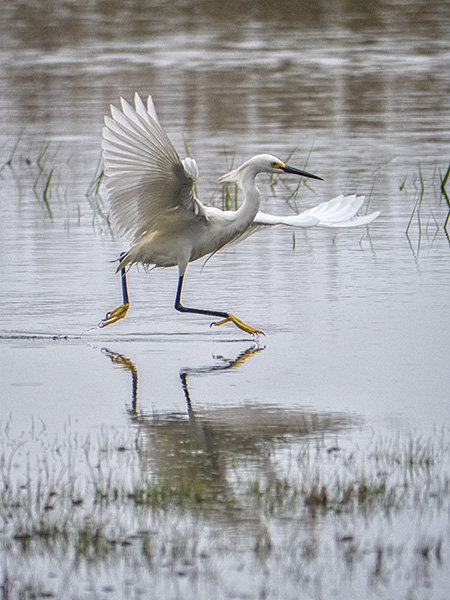
Was visiting my mother-in-law this past week with my wife on our annual visit the family trip. It’s a great time to work on my wildlife skills. I thought I’d try pairing the Lumix GX8 with the 100-300mm Lumix Vario G f4.0-5.6 lens and boy I was happy. The GX8 has a fast capture rate which was great for sequences. I enjoy capturing birds with different behavior rather than just beauty portraits. As my MIL’s home is on the point with surrounding marsh there’s lots of wildlife on display for my camera.
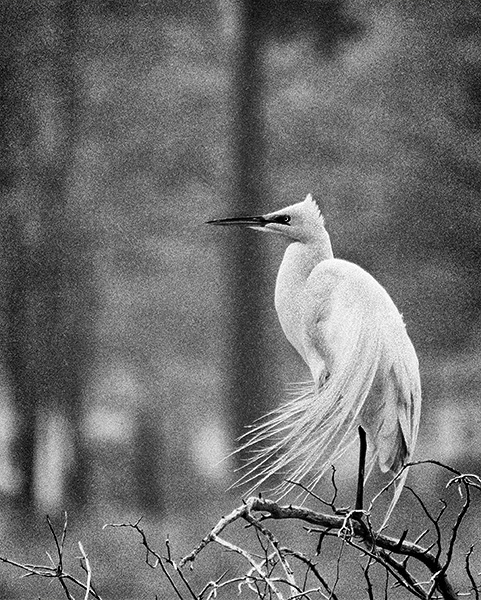
The birds that gave me the most opportunity to study during this trip were snowy egrets. Most of the time it was raining and blustery winds coming from the northeast.
I enjoy how this egret appears to be dancing in this image. ISO 800 1/3200 sec. +1 exposure compensation Aperture Proiity f5.6 300mm (600mm 35mm equivalent)
This combination of lens, ISO and camera lend itself to a slightly grainy (aka noise) look. Because this is a small piece of the overall image I’ve pushed it here to emulate tri-x push process. The processors have given the noise in an image more of a film grain feel. ISO 800 1/1600 sec. Aperture Priority f5.6 300mm (600mm 35mm equivalent) Processed in NIK Silver FX Pro 2 (which you can now download fro free if you hadn’t heard the news!)
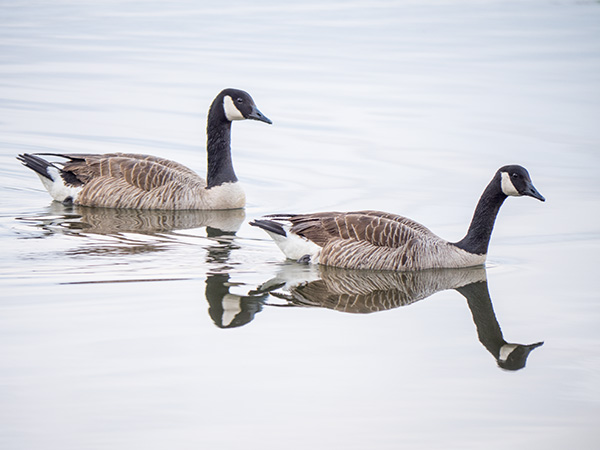
Geese are another ever-present bird on the marsh. ISO 800 1/3200 sec. +1 exposure compensation Aperture Priority f5.6 246mm (492mm 35mm equivalent)
Yours in Creative Photography, Bob
PS – You’ll notice that there are no great blue herons among my captures. That has nothing to do with me but a hawk family moved into the neighborhood and chased all the nesting herons from the area a couple weeks before my arrival.
Landscape Photography Magazine put out a ‘Day in the Life’ type call for images with people from around the world to capture a sunrise image wherever they happen to be. I found myself bummed. I was traveling and had a flight scheduled to head to New Hampshire to speak and judge at their convention during the sunrise time.
Not much chance of catching a sunrise photo from inside the airport.
Bummer!
Instead of giving in to the inevitable, I tried to think outside the proverbial box. I found that the sunrise was during my waiting time for the flight. After checking in through TSA, I found an east facing set of windows and to my surprise was blessed with a beautiful set of clouds and the sun working its way up to the horizon spreading color through the scene. I framed a scene and waited for a bit of action to help tell more of the story.
The density range of the scene called for multiple-exposures to capture the bright sunlight and the shadow areas of the scene. I was using the Lumix FZ1000 and set the camera to capture a bracketed set for five stops of light. I then had the option of blending the images together for the proper rendering of the scene that was before me.
Here is the sequence of images captured before processing
I chose four of the images and processed them in Aurora HDR software for MAC. I am really enjoying the new HDR software from MacPhun. There are a plethora of settings that allow you to dial in the settings necessary to render the scene as you wish. I prefer to have complete control and try to create a more natural rendition of the scene.
Final Image – submitted for the dawn capture
There were some additional adjustments made to take out the reflections in the glass and add a slight vignette to help steer the eye toward the center of the image and keep the viewers eye from leaving the photo.
Yours in Creative Photography, Bob
PS – When you think there no chance of capturing the photo you are after… don’t give up!
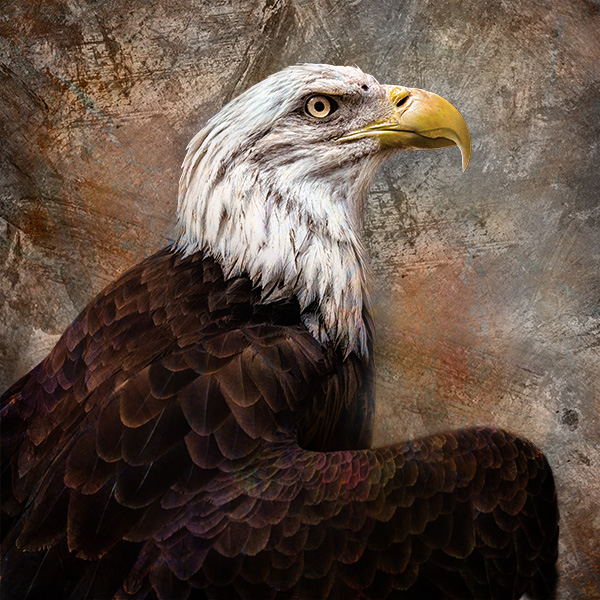
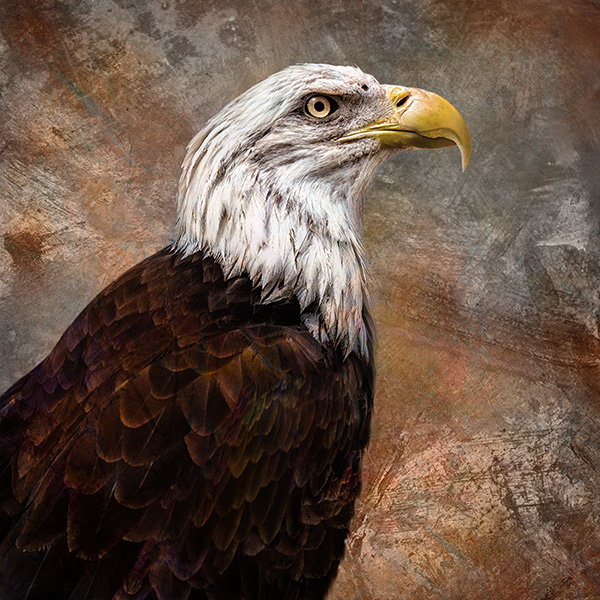
If you look at yesterday’s post you’ll see the capture and processing of an orangutan photographed through a dirty plate glass window which pushed capture and processing skills. Today I want to share an artistic rendition of our countries’ symbol of freedom, the bald eagle.
While we’re looking at this image let’s go back in time with the Steve Miller Band’s Fly Like an Eagle for a little musical accompaniment…
The theme here is to practice skills of photography. What did I get/learn while photographing the eagle that I can carry with me to my regular photography gigs??
Number one – People were moving through on a regular basis, so there were distractions to manage. awareness of surroundings while concentrating of my subject.
Number two – Patience. I wanted the eagle’s beak to be closed and there were only fractions of moments when this was the case. I had to learn this behavior and movement and time it to get the position I wanted.
Number three – The eagle was caged so there was the fencing to account for which meant shooting at a shallow Depth of field and focusing on the eagle and not the fence.
Finally, number four – Processing the image into an art piece that is more than the sum of the parts. Always working on these techniques to improve them. As they say, practice makes perfect…
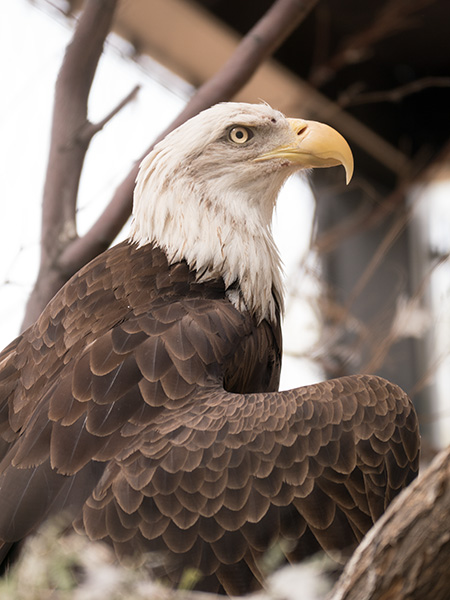
Original photograph. Captured with Lumix FZ1000 1/400th sec f4 ISO 200 at 420mm (35mm equivilent)
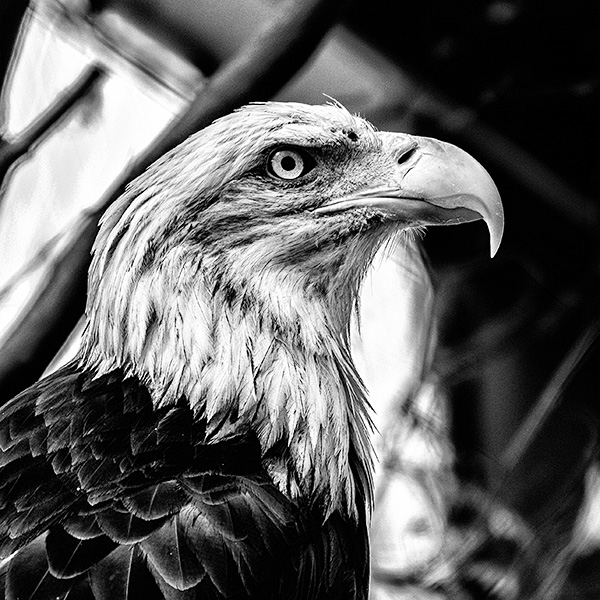
A process through NIK Silver FX Pro 2 gave a very gritty black & white rendition of the eagle. I like the idea of the eagle in a square crop portrait style but not all the cage elements and distracting background.
I wanted a larger portrait rendition so I choose a larger crop and started adding my art embellishments.
The artwork is accomplished using photographs of textures and colors combined together using layers and Blend Modes. Utilizing Layer Masks on the texture layers allows for control of specific effects in certain areas of the image.
I thought the eagle was just holding it’s wing up when I photographed it, but it was bothering me. Then my eagle-eyed wife Holly came in and liked the art treatment but also spotted that the eagle’s wing was probably broken hence the residence at the zoo. I did a little plastic surgery for the final image you see below.
The last bit of work was accomplished with Adobe Photoshop. I copied the broken wing onto its own layer. Then repositioned it as if it was folded in its normal place. Using a layer mask to blend it into place.
I do! I always try to improve my skills by pushing out of my comfort zone and create different images from different places.
I always try to improve my skills by pushing out of my comfort zone and create different images from different places.
So how do you do it? One of the best ways is to continually practice and expand your skillset. Anyone who is at the top of their game in any sport, yes I consider photography a sport as well as an art form, practice daily. Why do I consider it a sport? Depending on your photographic genre you need coordination, timing, and stamina. This goes for shooting sports, weddings, wildlife or other fast moving situations. Why art? Art because you need to create or recognize wonderful lighting in order to have your images rise above the ordinary. Both the ‘art and sport’ parts of your work can be improved by working on your muscle memory. And, you guessed it, that takes practice.
Guess what? Your composition gets better when you practice too.
You also need to practice your post production as well… And the more you do it, well you get the idea.
I always try to improve my skills by putting myself in different situations and today I’ll share some images from the Phoenix zoo. For a little accompaniment push the button to listen to Paul Simon’s song ‘At the Zoo’.
Paul Simon with Garfunkle “At the Zoo’ from around 1967. (am I showing my age here??)
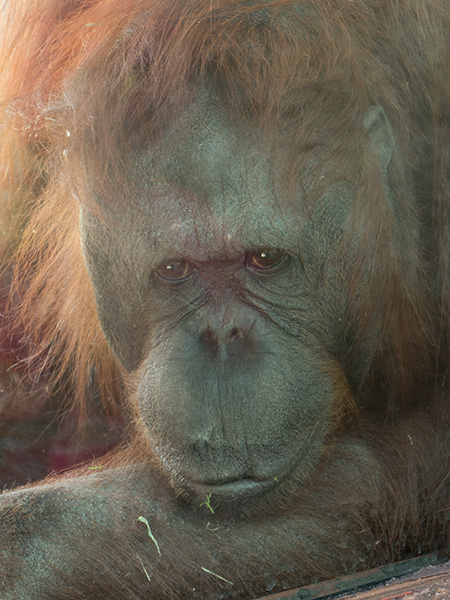
Orangatang at Phoenix Zoo. Captured with Lumix FZ1000 1/40th sec f4 ISO 200 – With a range of 25-400mm the FZ1000 is a very handy lens covering a wide variety of situations.
“OK Bob, so how is this zoo practice good for practicing other types of photography?
I’m fighting crowds to get the angle I want. Looking to capture expression which happens very quickly. In this instance, I am also going to be working hard in my post processing because this image was made in less than ideal lighting conditions through a thick, colored, and dirty pane of glass.
Did I say it wasn’t an ideal situation? That never happens on a regular photo shoot… (cue the laughter bouncing off the walls!)
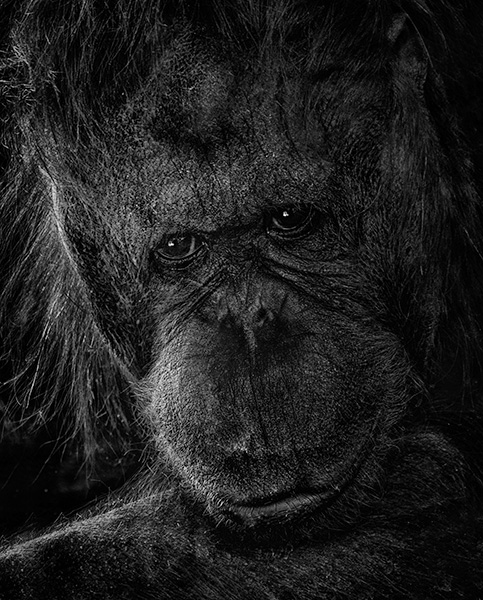
Here is the final image I was able to pull from the original capture.
A couple of post processing tips I picked up from working on this photo of the orangutan. Adobe Camera RAW has a feature called DeHaze. This was quite helpful in getting a lot of the reflections and dirt on the glass to disappear. Did a much better job than I thought it would!It was designed to help with scenics to take some of the blue out of a landscape image but it worked very much like a Polarizing filter in this situation. I will be revisiting this filter more in the future. I love how tools and setting designed for one thing can be leveraged to do more.
After the initial processing in Photoshop I moved over to my favorite black and white conversion tool NIK Silver FX Pro 2. I made my black and white selections in the filter. These process out onto their own layer, and with a Mask, additional adjustments can be made. One more time back into Silver FX Pro 2 (it’s free now!) and I made some adjustments to the Structure, dialing in very strong enhancements to the mid tones and the fine structure. I changed the Mode of that new layer to Luminosity and filled the mask with black. Then I was able to paint with white on the mask to selectively sharpen specific areas of the image.
Last on the list was a Soft Light Mode Layer to dodge and burn.
For infrared conversion of my cameras I use LifePixel. Infrared allows you to put an older camera to use and opens up a new time time of day for productive image creation.
Learn Photoshop in a fun environment. Aaron Nace applies the right amount of fun with easy to understand and follow tutorials. Actions and brushes are included with lessons!
Lightning, waterdroplets, sound, time-lapse, HDR sequences, smiles and much more control for your camera!
Cameras Get Smarter -
A High Speed Smart Camera Remote
Best embroidery ever. Give Queensboro a try, get a $20 instant credit to get started by clicking on the logo! They specialize in great quality custom logo apparel and promotional products with the best customer service.
Platypod has become a great resource for being creative in getting your camera gear easily into unusual places. As an Platypod Pro I get to work/play with the gear even before it comes out. Head over to Platypod, subscribe to the newsletter and you will get special discounts reserved only for subscribers.
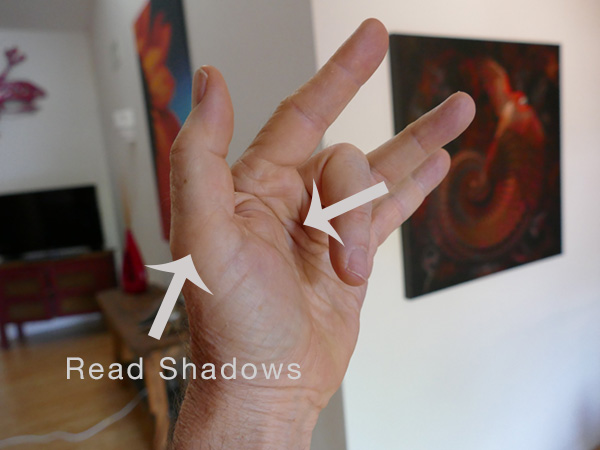 Fondly referred to as the reverse salute, the middle finger can show you how the shadows will look.
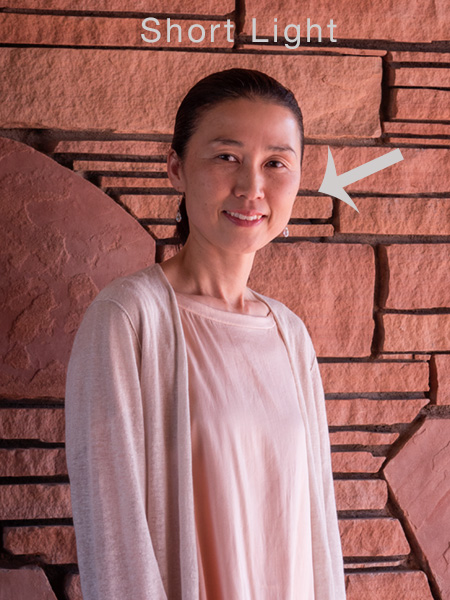 Note The light on camera right side is less wide than the shadow camera left
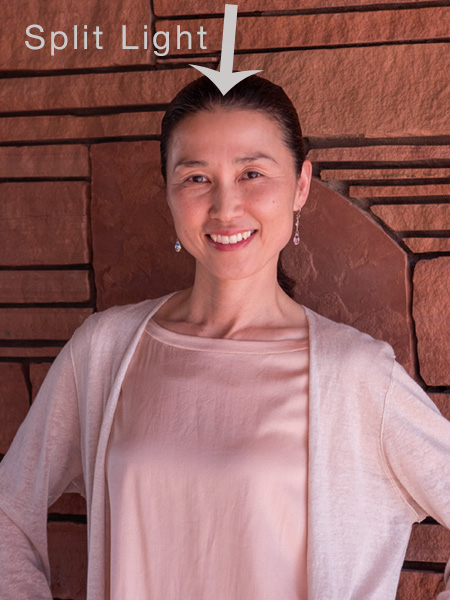 Note the light and shadow are just about even in this image
 In this image, most of the mask of the face is lit with just a soft shadow camera left. Note the slight ‘kicker light’ on her face on the camera left side.