
by successfulbob | bird photography, landscape photography, Lumix GX85, Lumix Lounge, photography, photography creativity, wildlife photography
Bosque del Apache Wildlife Refuge Part Five
This post is the final in this series from a very productive shoot at the wildlife refuge in New Mexico. The refuge is a very target rich environment for making bird images. The scenery wasn’t bad either! Let’s talk about creativity just a bit more. I saw a lot of photographers while I was there. And except for gear difference such as long lenses, I believe most photographers there were getting pretty much the same photo.
Why would I say that? Check out the photo below of the scene at almost every location in the refuge. What do you see?
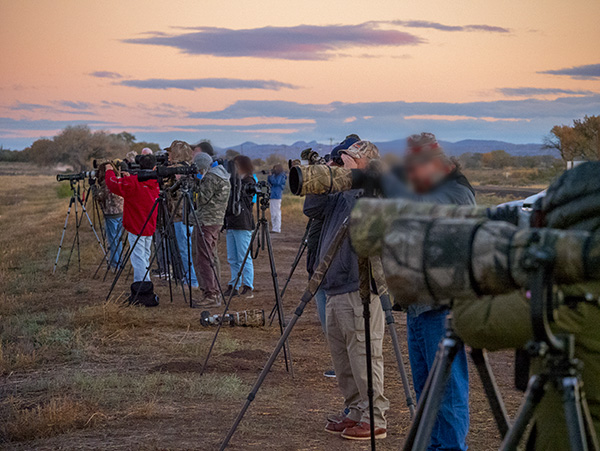 Take a careful look. Every camera is at the photographer’s eye level.
I saw this ALL the time. To obtain a different look to your images, you need to look at things from a different viewpoint. I spent a fair amount of time on my knees, sitting on my butt and getting the camera off of the tripod. Look back through my past posts, and I think you’ll see lots of variety. Bosque Pt 1 Bosque Pt 2Bosque Pt 3 Bosque Pt 4 Changing the height that you shoot from can have a dramatic effect on what is in the background of your subject.
I also heard a lot of motor drives at 8-15 frames per second going off. Motor drives can be helpful when tracking moving subjects or quickly changing background and lighting conditions, but I would see that happening when a photographer was shooting a relatively stable subject in constant light. Save yourself from extra editing time on the computer, Turn off the motor drive when you don’t need it.
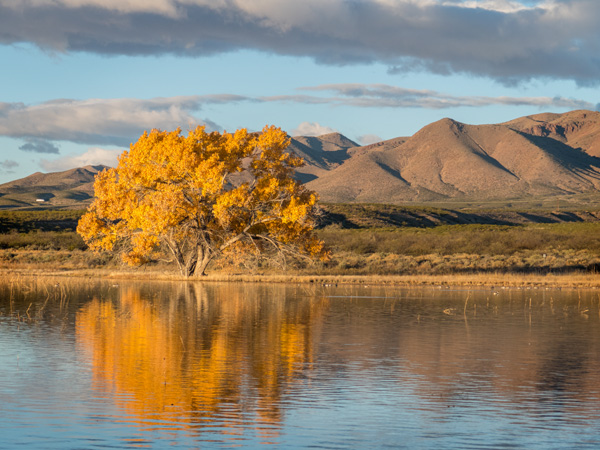
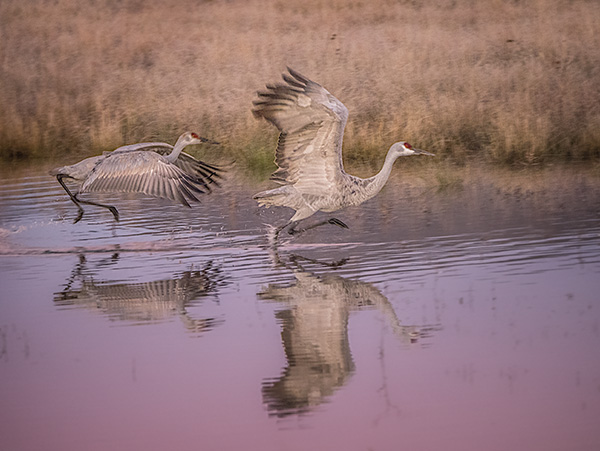 Taking a lower angle allowed for the reflection with the grassland environment in the background.
 Had to be on my knees to get the composition of the reflection where I wanted it placed.
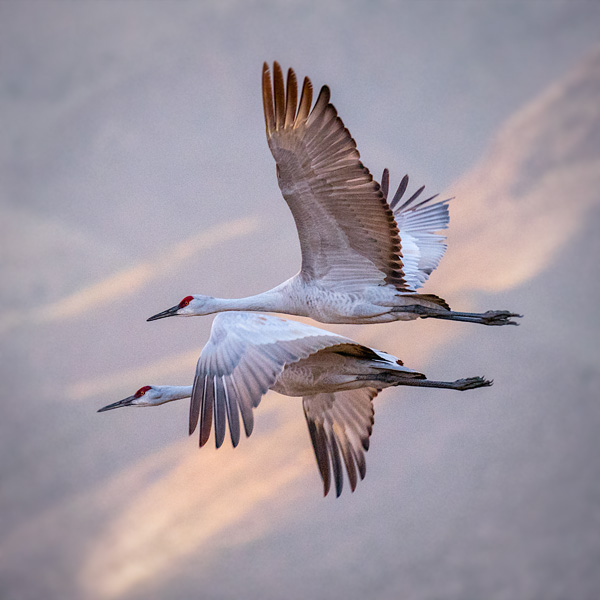 Generally, a gimbaled tripod head would be needed to capture solid images of birds in flight. With new gear and in-camera stabilization improvements, more creativity is possible. The Sandhill Crane images were captured handheld with the Lumix GX85 and the Lumix 100-400mm lens (200-800 35mm equivalent) lens fully extended.
Excited about possibilities as I push this camera and lens combo even further.
See what you can do to differentiate your images from others at every chance you get.
Yours in Creative Photography, Bob
Save
Save

by successfulbob | fine art photography, fine art portrait, photography, photography creativity, photography education, tuesday painterly photo art
Tuesday Painterly Photo Art – Arica Dorff
I met Arika when she was on a road trip creating images for her pet photography business. She was passing through Sedona, and I had the pleasure to make her acquaintance and discovered her pet art painting. I love the expression of her pet portraits and the feel of her art. I think you will too!
Here’s Arika.
“I got into digital pet paintings using Corel Painter after I sold my pet photography studio in Las Vegas, Nevada. I had my studio for nine years and always wanted to offer my clients the option to have their portraits enhanced to a painting, but I never had the time to devote to learning the art. Specializing in painting pets was a natural decision for me since working with domestic animals, and their awesome owners had been my niche for my entire photography and teaching career.
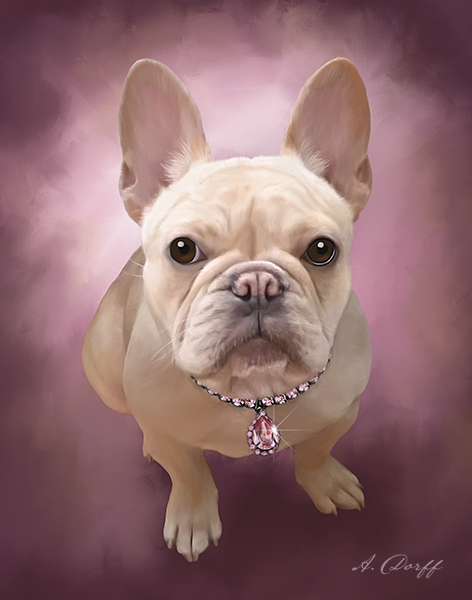 Had to put this photo of Lola right up front! Check out the bling! © Arica Dorff Photography
 Lola before. Arica is often working from cell phone images supplied by her clients
Getting started I reached out to two well-known pet painters whose work I admired and I had the opportunity to train with them one-on-one. Their process of turning a photo into a painting is completely opposite of each other, and I quickly realized that, like any other art form, there is no right or wrong way to do things. Working one-on-one with artists you admire, along with online tutorials, is what I recommend to anyone wanting to learn Corel Painter. Painter is much like Photoshop in the sense that they are both incredibly powerful programs but not something the average person could sit down and use with ease without some training and understanding of how the software functions. If you are a Photoshop user, I’m sure you can recall your beginning stages of learning and how you wanted to throw your computer out the window because you couldn’t accomplish what should have been a very simple task. Or maybe you accidentally hit something on your keyboard, and now nothing is working properly. I’ve been there too. So save yourself a headache and invest in training and tutorials when learning Corel Painter and getting started will be fun!
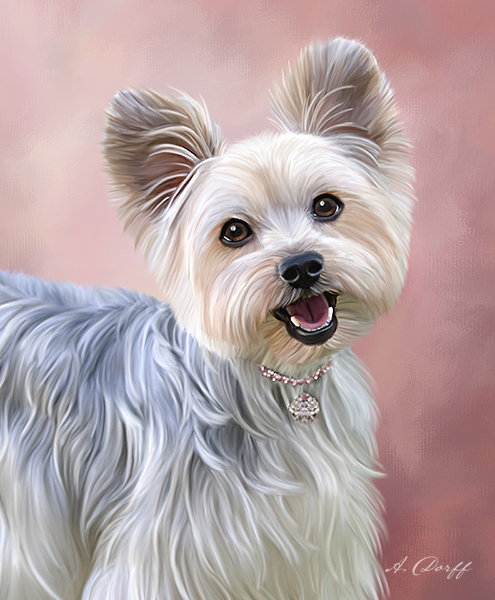
 Tasha – Makes you want to say AWWWW. © Arica Dorff Photography
 Tasha original capture.
As portrait photographers, we make decisions every day regarding lighting and how we want the light to fall on our subjects. But when I started painting I realized that shadows were something to which I never gave much thought. I would just light my subjects the way I wanted, and the shadows were naturally just wherever they were. Well, when you hand paint a background in like I do for most of my paintings (as opposed to enhancing the current background in the portrait) your full-length subjects would be floating on the background if you didn’t anchor them with a shadow. Such a simple concept, but not something I ever gave much thought to until I had to create my shadows.
Painting also forced me to pay more attention to the direction of where light was coming from, which is useful when creating dimension and depth in your backgrounds. Notice how most of my backgrounds have a lighter area near the animals face, this lighter area always coincides from which the direction the light is coming. The opposite side of the painting is always a darker shade which represents the natural fall off of light.
 Emma – Great expression © Arica Dorff Photography
 Emma Before.
Pets eyes are my favorite part of every painting (okay wispy stray hairs might be an equal favorite), but the eyes are what makes the paintings come to life. When doing digital paintings, I often use the existing photo and just enhance it with detailed brush strokes. But not with eyes, I always paint in the eyes freehand. Step 1: Paint in the eye color. Step 2: Paint in the black pupil. Step 3: Paint in the white catchlight – make sure it’s on the same side of the eye where the light is coming from! Step 4: Paint in the counter catch light area with lighter highlights to bring the eyes to life.
Since I’ve done some teaching in the pet photography world, I’ve had a lot of people asking me to train them on digital pet paintings. I currently offer one-on-one screen sharing training sessions, and I’m working on putting together a downloadable video tutorial. For the photographers who don’t have the time or desire to learn to paint, I offer a wholesale option where I send them the digital artwork for them to brand and print for their clients (as opposed to my retail customers who I present with canvas gallery wraps).
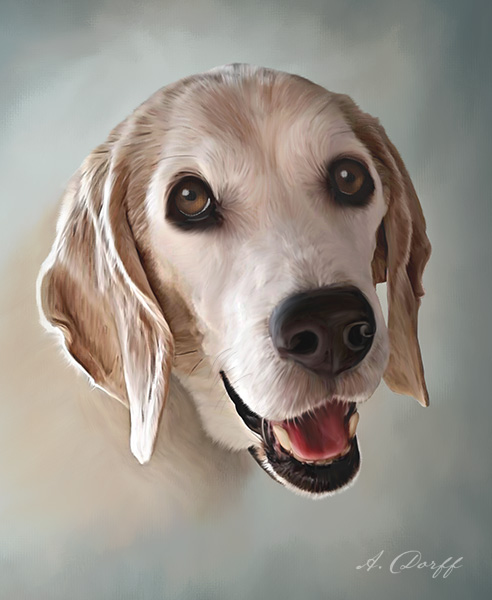 Cooper – © Arica Dorff Photography
 Cooper – Before.
Digital Pet Paintings have been an awesome way for me to stay connected with the pet photography community, pet owners who I love to create cherished art for, and I get to do it all while hanging out with my pup and working from home!”
Check out more of Arica’s work. aricadorff.com
Yours in Creative Photography, Bob
PS – If you are someone who is creating Painterly Art with photography as a base, or know someone who is, and would like to be featured here on Successful-Photographer get in touch.
Save
Save

by successfulbob | landscape photography, Lumix GX85, Lumix Lounge, photography creativity
Bosque del Apache Wildlife Refuge – Part Three
The refuge is quite beautiful in and of itself even without the birds. I made sure to capture images of the landscape as a subject all of its own. Here are a few scenes from the area.
 Even though there are Cranes in the foreground, this is more about the landscape than the birds. Made with the in-camera panorama feature of the Lumix GX85.
 Sunrise just after the Sandhill Cranes made their ascent leaving the pond for the day to forage in the cornfield.
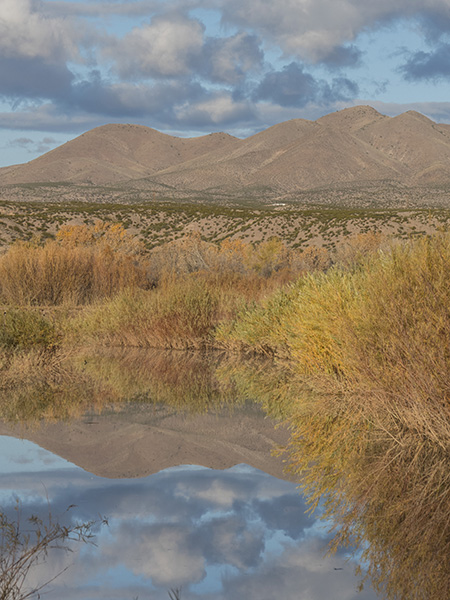
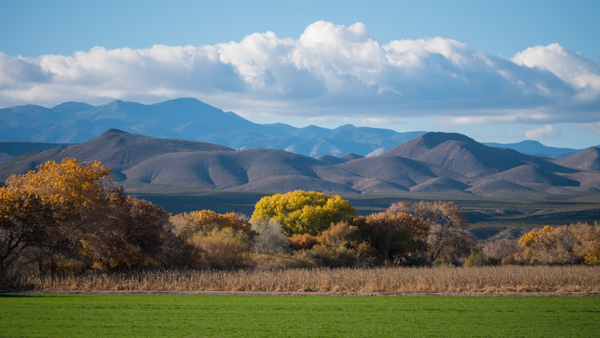 Lots of layers in this landscape.
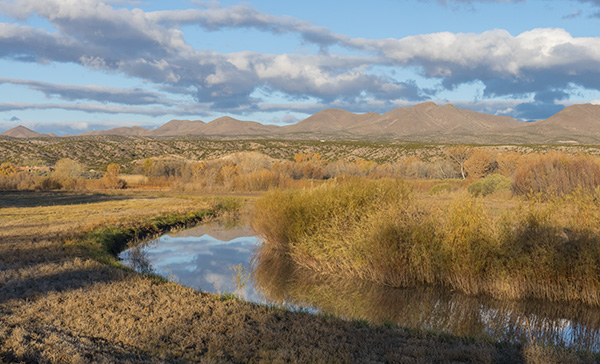 Reflection in the bend.
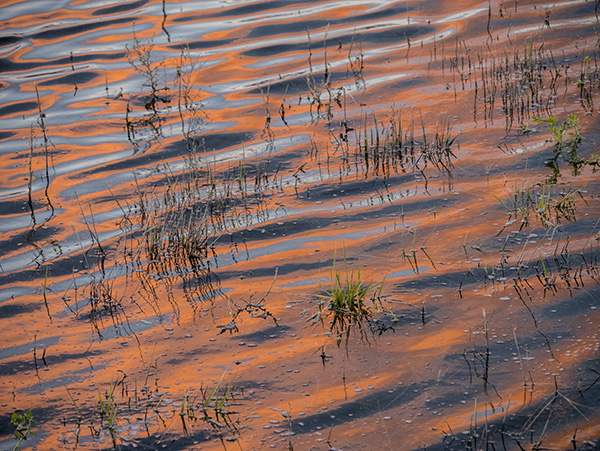 Reflections of sunrise among the grasses help tell the story of the environment.
I always try to tell the complete story of an area even if the main reason for the trip, in this case, was for the Sandhill Cranes and other wildlife of the Bosque del Apache.
Follow the previous posts here. Part One.
Find Part Two here.
Yours in Creative Photography, Bob
Save
Save
by successfulbob | 4K photo mode, 4K video, Lumix GX85, Lumix Lounge, photography creativity, photography gear, video
In-Camera Focus Stacking
Cool beans!
Yep, I said it. Cool beans. This feature is quite handy when you want to photograph with a macro lens and show some incredible depth of field in your image.
The 4K Photo Mode in the Lumix GX85 and the G85 called Post Focus which allows you to choose the frame with the focus where you want it, after the shot, also allows you to focus stack the images together to enhance the depth of field. One downside to using this method is that we are pulling stills from the video which means there is 8MP worth of file size with which to work. A file of this size will get you to a 20-inch print with no problem, but if you want to go bigger, you’ll need to use a different method. I’ll share that with you in the next day or so.
Let’s take a look.
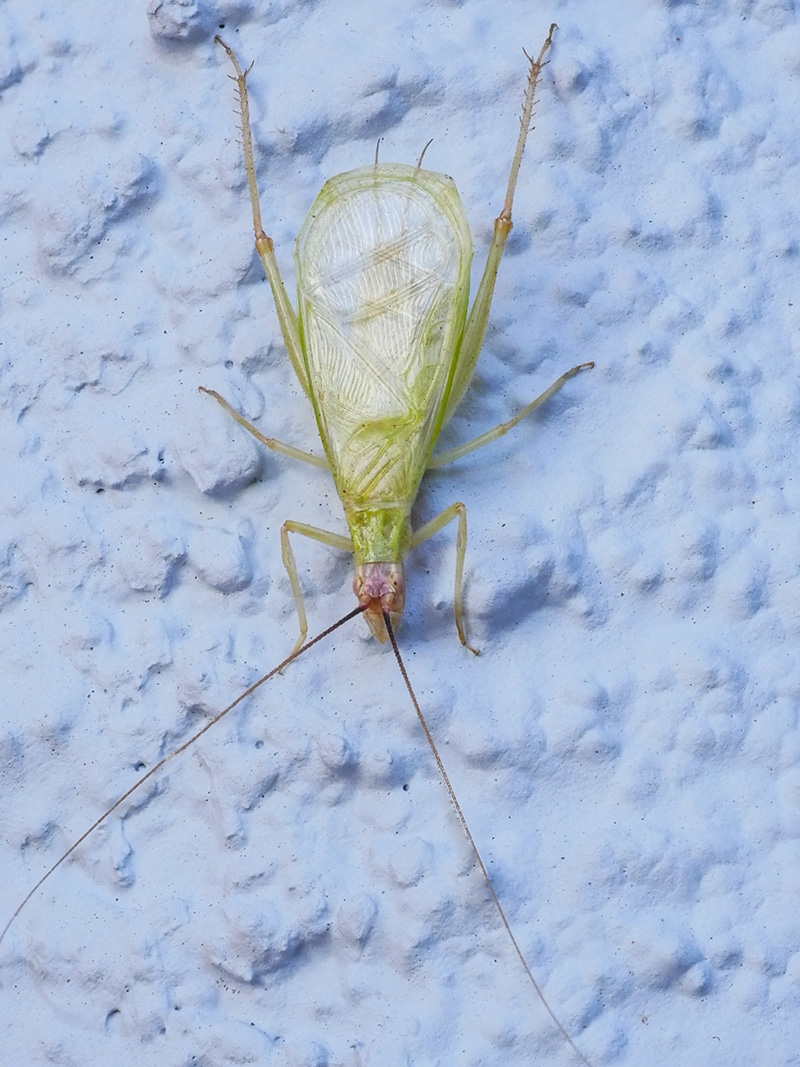
 I call this Green Bug. This image is a single frame grab from the 4K video. Printable and OK. But let’s see something a little better.
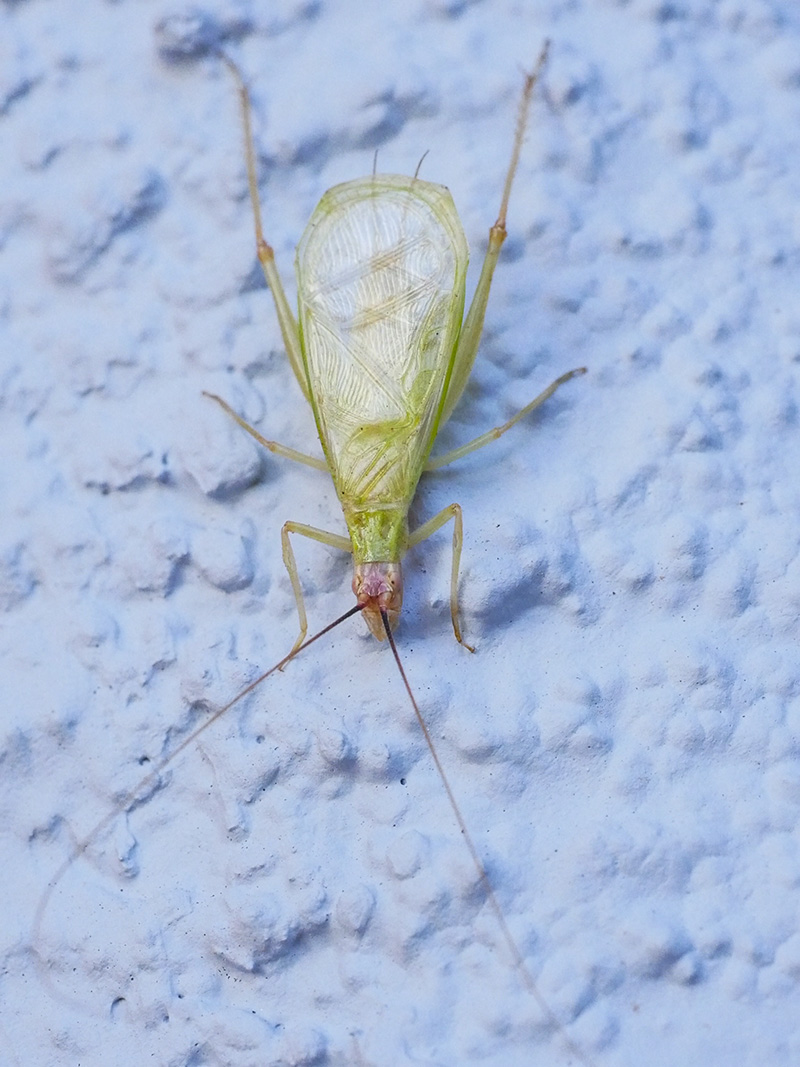
Now let’s take a look at the image after all the images in the stack have been combined to show the sharpest parts of each frame in the video.
 Check out the detail throughout the photo now.
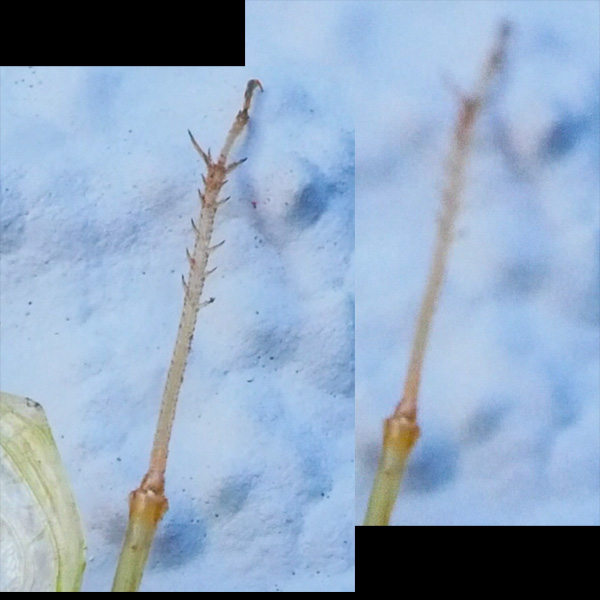 Here’s a little zoom in on the back leg of my friend the Green Bug.
Click Here to see the original video clip
This video image was captured with the Lumix GX85 with a 45mm f2.8 macro lens.
Tomorrow I’ll take a look at the Focus Bracketing feature that allows us to bypass the video and capture full-size images.
Yours in Creative Photography, Bob

by successfulbob | photography, photography - art quote, photography creativity
Sunday Photo/Art Quote – Ernst Haas
I love today’s Photo/Art Quote because it is hitting very close to home as I explore new ideas. The new explorations have received a head-start because I am always trying new ideas and attending classes, seminars, and conventions to expand my photographic knowledge.
I believe the quest is why I am still a photographer today. Photography is a career that I feel I will never be able to master. There is always a new technique, a different way of applying an old idea, and of course, new technology to learn.
Ernst, take it away.
 “I am not interested in shooting new things – I am interested to see things new.” – Ernst Haas
“See things new.” What a great thought. I have started to notice more lighting scenarios as I go about my daily business. Here are a couple of reasons I am noticing new ways of seeing and some thoughts for you.
I just took a Light-Painting class with John Hartman. Watching how he was layering (painting) in the light in tiny sections and then layering those images with thought and finesse to create the final image has me seeing in a new way. It makes you hyper-aware of the play of light on a subject and how you want to portray each little nuance of a scene. This technique also makes you pre-visualize how you want the final image to appear.
Making time-lapse videos has changed the way I watch light as the sun dips toward and below the horizon. It is almost as if I see now in time-lapse form. It’s kind of hard to explain, but if you start creating more time-lapse videos, you’ll start to know what I mean. The benefit to seeing like this is when taking still photographs you’ll have a better idea of the ideal time to snap the shutter.
There are more examples, but I’m done for today… It’s time to head into the studio and make more water droplet splash photos. Starting to see some fascinating things frozen in time. Yet another way to “See things new.”
I like it!
Yours in Creative Photography, Bob

by successfulbob | Lumix G7, Lumix Lounge, macro, photography creativity, photography gear, photography lighting resources
Water Splash Photography Setup
Heads-up here! This is my first foray into photographing water droplets. I’m sharing my current setup, and sure it will change as I learn more and experiment. I am taking you along on my adventure showing you the kind of work I’ve been able to create with this setup. Once again I will share I am no expert with this type of photography. If you’ve got some ideas for me, I’d love to hear them!
This photography is not for the faint of heart. By the way, you CAN do this photography with a couple of Speedlights and in some ways that may be better for more control of the results. I like the variability with the gear which I’ve been working. OK, with the disclaimers out of the way lets look at a water droplet photo and then the layout of all the stuff.
 Photograph achieved with the equipment setup as seen below. Exposures are made at f14 with @ one second ISO 200.
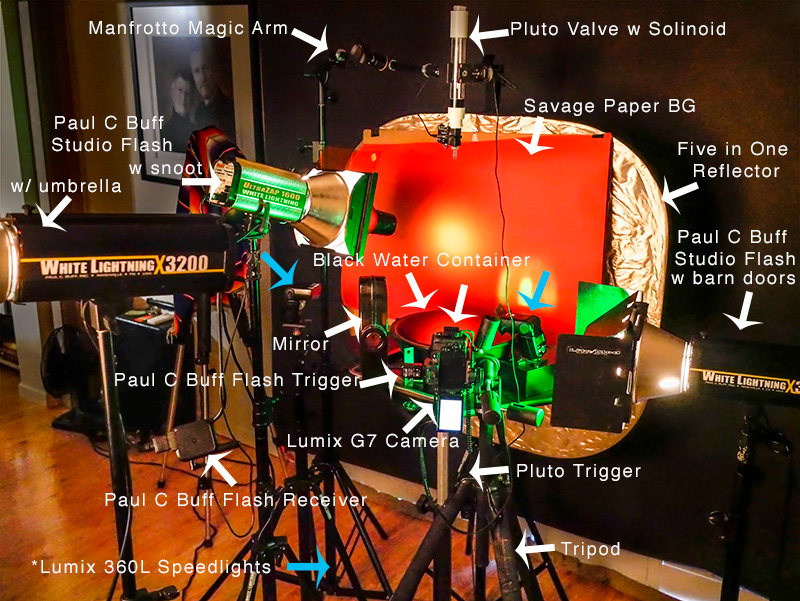 Here’s my gear. I’ll ‘splain below.
I decided to get a little head start on this type of photography by getting some necessary tools. The Pluto Trigger and Pluto Valve can save you a LOT of time. The Trigger is connected to the camera and controls the show. It tells the water drops when to fall. What size they should be and when to trigger the flash. All of these durations are in milliseconds (MS).
Backgrounds are only limited by your imagination. The one showing above is with a colored Savage Paper background. There is a gelled flash with a snoot to vary the light and add interest. With this setup, I have also used a reflective background with a gel over it lit by a flash at various angles and directions. You can use cloth or photos or printed patterns or almost anything you like. As I learn I’m trying to be careful not to overwhelm the waterdrops but we’ll see as I play how that transitions.
I used the Lumix G7 to capture these photos. Lens used was the Vario 35-100mm f2.8 lens with a 10mm or 16mm Vello extension tube. You will need a camera that has a trigger port or can communicate with the Pluto Trigger.
Connected to the camera is a remote flash trigger that fires the flash Paul C Buff flashes from the camera. The Lumix 360L flashes are triggered by the light from the Buff’s because I have them set to Slave Mode. It is the flash that freezes the motion of the water. Adding gels to the flashes adds color and interest to the splashes. In my images, you often see some streaks of color in addition to the frozen droplet. This is because I am using multiple types of flash. The Buff units are not as fast as the Speedlights. And the Speedlights can be of different durations if you change the amount of light you ask them to produce. The lower the power, the shorter the duration of light. Bogen Cine gels Vivid color are juicy. Roscoe gels work well too. You can get gel packs that are just the right size for fitting on your Speedlight. Here’s one from Roscoe holder for the gels.
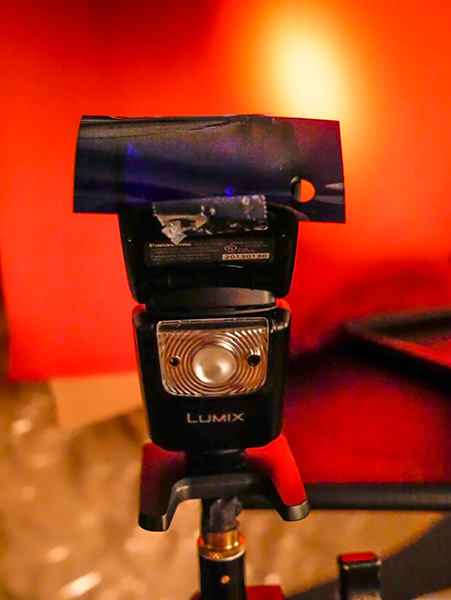 Lumix Speedlight with gel taped in place. Once you see how the gels perform you can also buy larger sheets and cut them to size for larger flashes.
I used a black bowl of water for the reflection. Black allows the color of the background to shine through. Fill the bowl as high as possible, so the edge of it doesn’t show. Science says you can fill a vessel higher than it top because of surface tension. Well, let’s not get into that too far, but as a side note, know that you can put 32 dimes in a shot glass before it overflows after you have filled it with water. Make sure you have a drip tray underneath the bowl or tray to catch any spills as you work.
If you don’t have enough lights, or just want to add another variable, note that you can add a mirror to the set to reflect light back from another direction.
The Manfrotto Magic Arm is extremely helpful in positioning the valve in place over the water. The Manfrotto Super Clamp holds the valve. When you are setting up the position of the water drops, watch where the water drop falls and put something in place to use to set your focus. Remove before shooting.
Working with water droplet photography is like photographing fireworks! You are never quite sure what you are going to get. You get to control the variables but there is never a guarantee and always fun surprises. (well sometimes not so fun but always a learning experience)
If you have any questions, let me know.
Yours in Creative Photography, Bob
Save
