by successfulbob | fine art musician portrait, graphic design, Lumix GH4, musician photography, people photography, photography creativity, photography education
Been a little bit since I’ve photographed a new artist for the ‘Wall of Fame’ at sound Bites Grill in Sedona, Arizona.
Had the great pleasure of capturing fabulous guitarist Ottmar Liebert who sold out the house and ended up performing again tonight (Monday) because he was such a popular artist.
Here’s the art piece I assembled using my Photo-Synthesis technique using Adobe Photoshop and multiple images blended together.
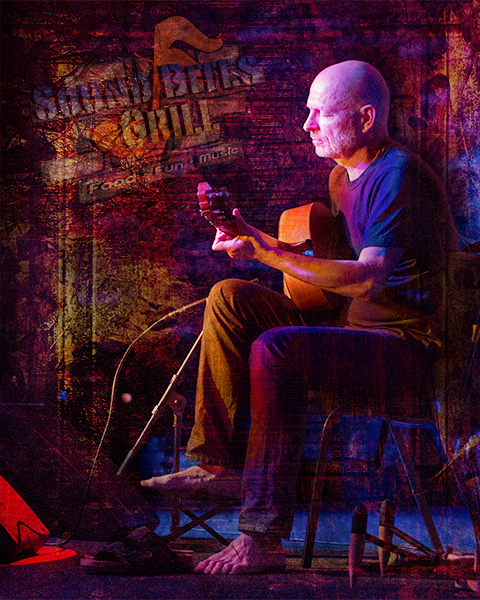
Performing live at Sound Bites Ottmar Wall of Fame Photo Art image
Initial image was captured with the Lumix GH4 and the 42.5mm f1.2 Nocticron lens. 1/60 sec 3200 ISO I love the density range that the GH4 can hold even under the LED stage lights. Three additional images were pulled from my files and using Blend Modes, Layers, Fx and Adjustment Layers came up with the final art.
Yours in Creative Photography, Bob
by successfulbob | architectural photography, fine art photography, landscape photography, Lumix GH4, people photography, photography creativity, photography education
Dusty western streets lined with aged buildings hinting very strongly at a bygone time.
Characters in period dress move through the streets as if they’ve returned home from the present day. That was the Arizona PPA Fall Fest this year organized by AZPPA and headed up by board member Bruce Roscoe of Alayna Photography. Bruce created a calendar with this great bunch of actors and arranged to share their talents during this event. There were five instructors, ten actors and thirty-five photographers in action, learning, sharing and generally having a good time.
I gotta tell you if you live in Arizona, are a photographer and not a member of Arizona PPA you are missing out on education, networking and building lifelong friendships with those of a like mind.
But, I digress just a bit. Here’s an image created after the sun sank (sunk?) below the horizon of the ‘haunted church’ done at the end of the street.
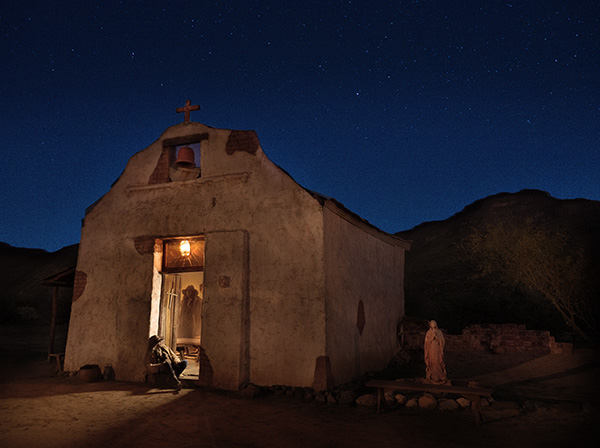
This was ‘Filo’ one of the actors posing during a light painting exercise held at the end of the day. Lumix GH4 with a 12-35mm f2.8 lens was mounted on a tripod and a series of bracketed exposures was made of the church scene followed by Filo being lit in various positions. Images were then striped together to have our actor studying up on his ethereal image inside.
If you are not in Arizona there is probably a Professional Photographers of America Affiliated group not too far away from you. You can check the list. I travel around the country and have spoken to many of these groups and I can tel you that the education acquired from being a member and participating as a volunteer can help you grow your photography business.
Lots of photographers suggest that they can get all the photo education they need from the web and online tutorials. I beg to differ there’s no beating live in person education and if you are not already a member of one of these organizations I encourage you to at least visit for one or two meetings. You be glad you did!
Yours in Creative Photography, Bob
PS – The event was help at Canyon Creek Ranch and should you find yourself in central Arizona it’s a place you might want to check out!
by successfulbob | infrared photography, Lumix G6, Lumix Lounge, people photography, photography creativity, photography education
The marriage theme continues from the Dia de Muertos (Day of the Dead) celebration at Tlaquepaque in Sedona. (see part uno)
This couple was having a blast dancing with Mexican musicians providing music. They stopped and graciously posed for people as they wandered through the event. I asked if they wouldn’t mind posing for me where I could make the Infrared capture shine with deciduous trees as part of the background. Up the stairs we went…
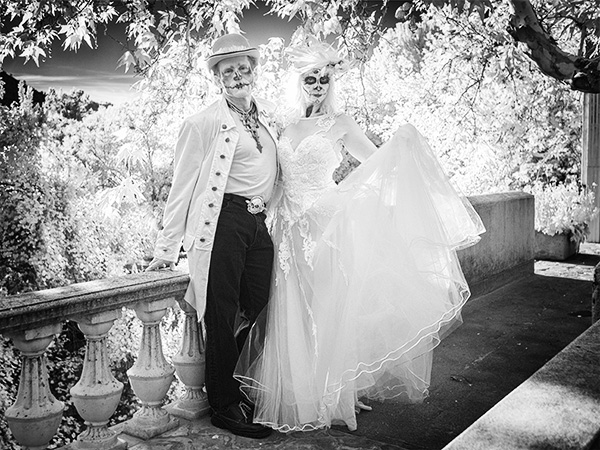
Asking the couple to move to a different background made all the difference compared to just asking them to pose in among the crowd.
I’m still taking multiple exposures to make sure I still have detail in the highlights and the shadows, dark skies and bright leaves then process the files by blending them with Layers and Masks in Adobe Photoshop. This was a simple blend with the darker Layer on top I made a Feathered oval Selection using the Marquee Tool and Refine Edge. This allows you to see and tweak the results before applying the Mask. Even with the Bracketing I did end up loosing detail in the bride’s hair on the sunny side.
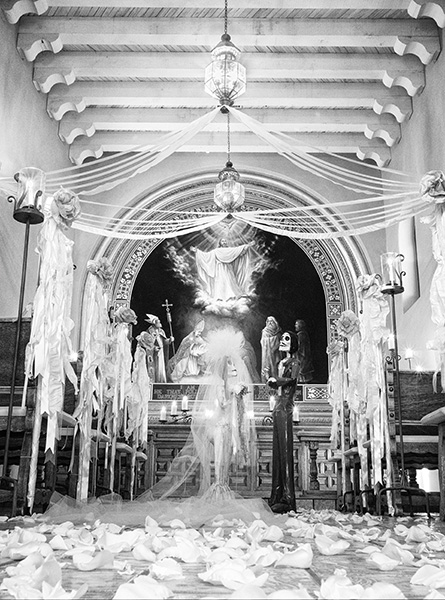
The wedding theme continued at the Chapel that was set for a Day of the Dead wedding.
As you might see I am really enjoying using the Lumix G6 that has been converted to Infrared by Life Pixel. I choose the standard (750nm) filter for my conversion because I wanted to get the traditional IR look exactly as I’d like it.
Yours in Creative Photography, Bob
by successfulbob | infrared photography, Lumix G6, Lumix Lounge, people photography, photography, photography creativity, photography gear
Obviously infrared imaging is not for people photography. Dead eyes. Super high contrast. Blown out highlights. Definitely not for people… Unless you are doing something artsy with the scene being most important and people are a relatively small element in the overall image OR you are at a Dia de Muertos (Day of the Dead) Celebration.
And, I just happened to attend one at Tlaquepaque in Sedona on Saturday and found a few people in costume and face paint to pose for me.
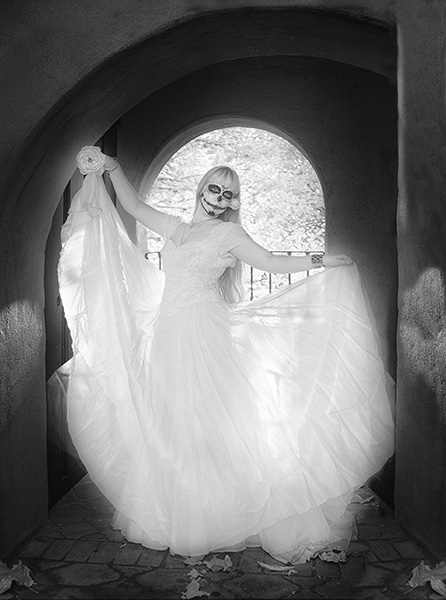
Had a lovely ‘Day of the Dead’ model join me for a quick photo session in a back lit alcove.
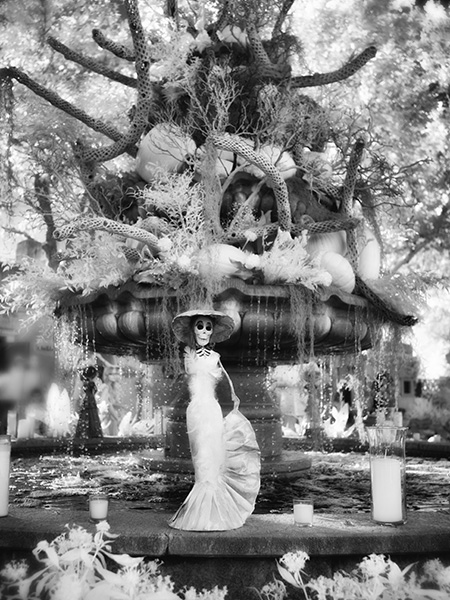
Paper mache Caterina on the fountain. Seems like it was a day for brides as I worked…
If you are unfamiliar with the Day of the Dead celebration it is a Mexican Holiday when families get together and morn and celebrate the passing of loved ones. The celebration is to help those who have passed to move on in their journey beyond.
Images captured with the Lumix G6 and 20mm f1.7 pancake lens. Converted to IR by Life Pixel. I had the
Proper tool for the job. I think infrared works for this situation. How about you??
Yours in Creative Photography, Bob
PS – More tomorrow…
by successfulbob | infrared photography, landscape photography, Lumix G6, Lumix Lounge, photography, photography creativity, photography education, photography gear
While on the mountain trip we rode off through the wilderness. Can you say “Curvy Roads!” boys and girls?
Lots of winding roads through the area but it led to some beautiful places. I had the Lumix G6 that has been converted to Infrared capture by LifePixel. It gives the image a pinkish cast straight out of the camera. I’m starting to find my groove in processing for the final Infrared photo look I am going for…
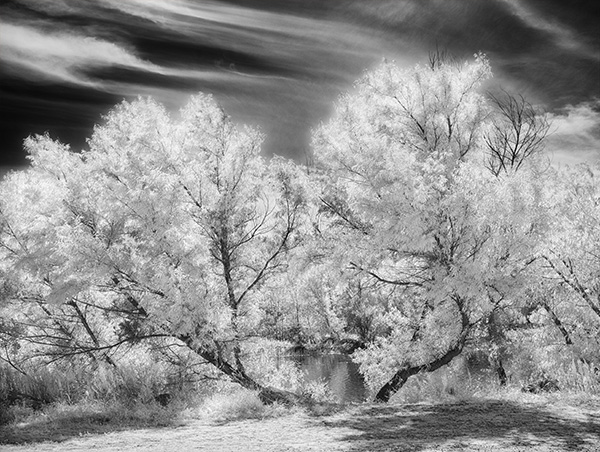
I enjoy how these trees framed a little window into the water beyond.
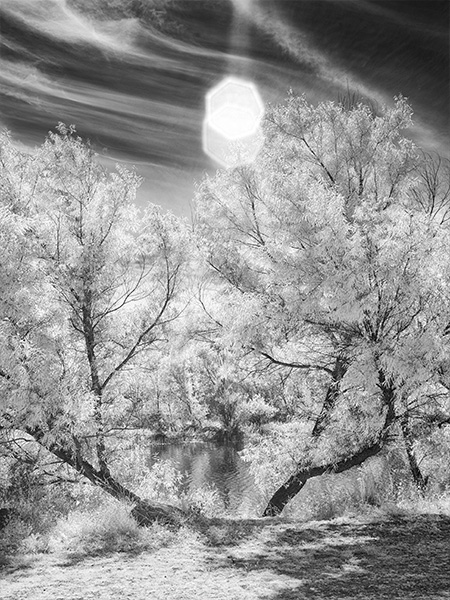
Same trees different composition with a witness to how careful you need to be in shielding your lens from a direct sun hit. Although in this case I think it’s a happy accident and enjoy the flare that found its way into the frame.
Here’s my workflow at the moment as I learn more how the camera ‘sees’ IR light. I capture the scene in RAW plus jpeg with the camera set to capture a black and white image. This give me a pretty good preview of what the IR image will look once it is processed. But since I am capturing the RAW images at the same time I also get all the information that was presented to and captured by the camera for tweaking in post processing. Having all the color information in different channels allows for some very specific processing that would not be available if only the Luminous information was saved.
In addition to the RAW plus jpeg I also bracket exposures. At the moment I am bracketing by seven stops to learn how far to over and/or under expose any particular scene.
Then I choose two of the separate RAW captures with one giving me the tones for the foliage and one for the sky. I process these in Adobe Camera RAW. Then using Masks I blend the two images together feathering the areas using the Brush Tool. I Save the file and merge all into a Layer on top preserving the Masked Layers just in case.
Then I take the file into NIK Silver FX Pro2 to process for Black and White because I still have the color information in the file I have more options for tweaking individual tones. Then I will process the color Layer one more time to vary specific areas even more. Then with the tow BW processed Layers I blend those together using Masks for the final tone blend. Then depending on the look I am going for I may process this Layer in NIK Color FX Pro4 using Glamour Glow and Mask those changes where necessary.
More IR images tomorrow.
Yours in Creative Photography, Bob
by successfulbob | cloud photography, infrared photography, landscape photography, Lumix G6, Lumix Lounge, photography, photography creativity, photography education
Live, learn and practice some more.
This is the continuing story of learning to see and capture infrared images with my newly refurbished Lumix G6 camera from LifePixel where I added a straight IR filter to the camera… (see Part One or Part Two)
Photographing with a camera that has had it’s sensor replaced by with an infrared filter makes IR photography MUCH easier than the olden days of film when fogging a roll was easy and focusing not so much. But as with all things photography making it easier doesn’t necessarily lead to stellar results. You still need to learn to ‘see’ in infrared. A helpful tool is the use of photographing in RAW +jpeg. You can set the camera capture mode to black and white The capture is in color AND black and white. If you have what you need and are happy with the ‘natural’ in-camera capture in black and white you are ready to go…
So far I am not.
RAW file to the rescue. As you saw in part two there are multiple ways of addressing the final IR image and many ways to get to the final image you have in your brain. We still have the words of Ansel Adams to fall back on to create a more artistic rendition of a scene. Paraphrasing for today’s world here, ‘The RAW capture is the score, the processing and final print the performance.’ Just as a conductor can get more out of his orchestra but pulling exhorting his individual musicians to do their best we can manipulate each pixel in each color space to give us the tones we desire.
Some of the things I’ve dabbled with…
Two or three different processing pulls from the RAW files for different areas of the image.
NIK Silver FX Pro 2. to convert to black and white and tweak ‘colors’ into the tones I was looking for.
Channel Mixer Adjustment Layer after the file was open in Photoshop.
Black and White Adjustment Layer.
Hue Saturation Adjustment Layers.
And mixing and matching all of the above techniques to taste…
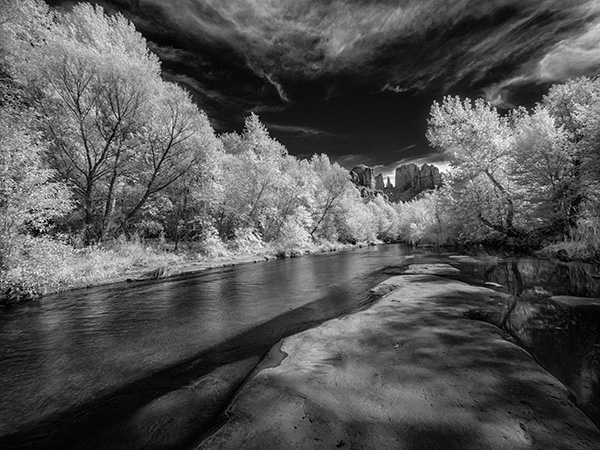
We don’t have a lot of deciduous trees in Sedona, but the banks of Oak Creek lead a parade of trees down from Flagstaff. Having the color information available in the file and Layers and Masks in Photoshop allowed me to create the contrast and tones I was looking for…
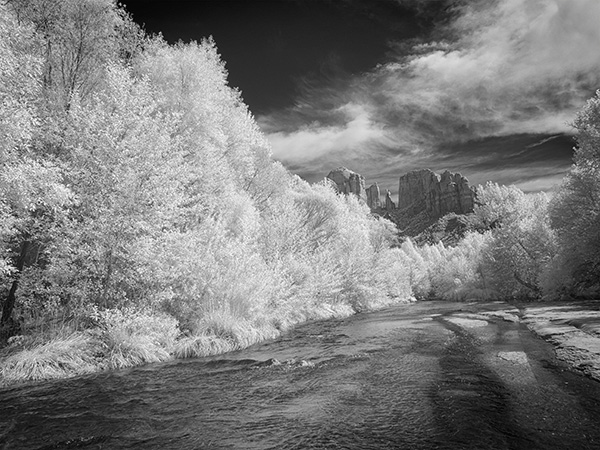
Same scene from a slightly different angle and different processing lead to an image, while still BW IR has a totally different feel than the one above.
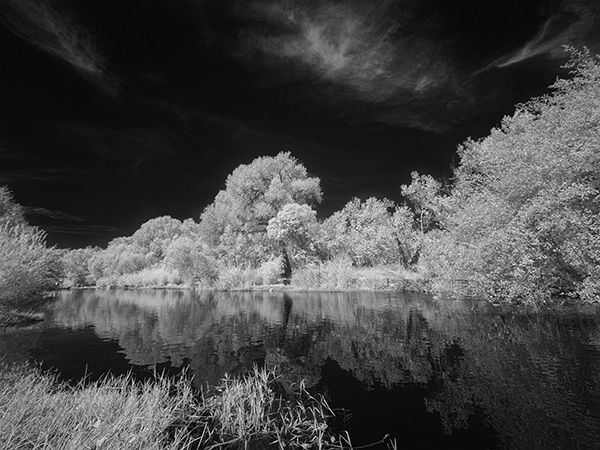
As always don’t forget to turn around… Many times there is an enticing image waiting behind you.
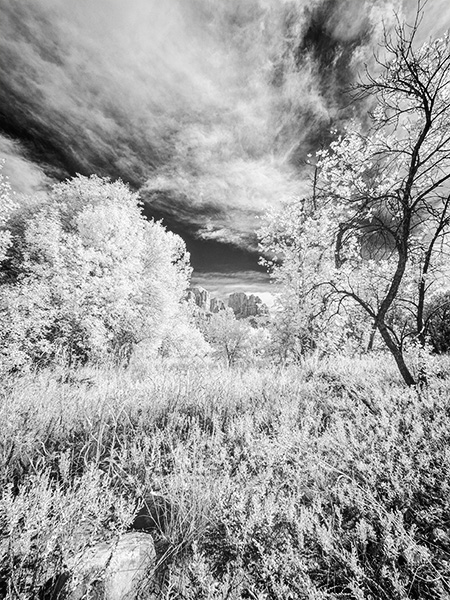
Moving off the creek banks led to this….
I see IR as a great new tool in my quiver. Makes photographing at mid-day very interesting. Can’t wait until I start to learn more about new capture and processing ideas to really push the look.
Yours in Creative Photography, Bob
