
by successfulbob | people photography, photography, photography gear, photography lighting resources
Little Lighting Lesson
I was in Washington speaking to the Professional Photographers of Washington showing a quick lighting demo using a three light setup with Fiilex LED Bricks.
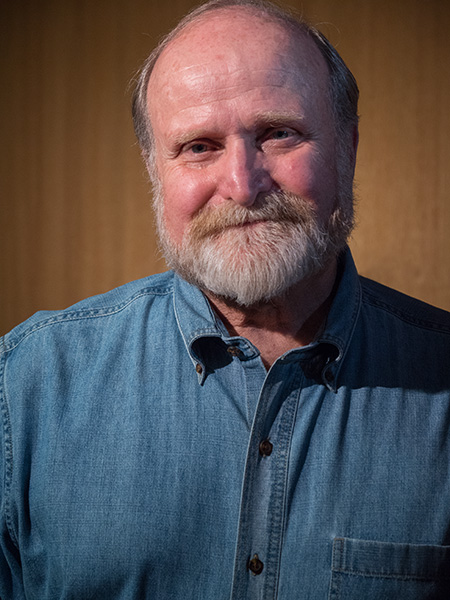 Subject with no light in the eyes gives a less than stellar appearance.
Once you have lights in position, it can be a very small movement of your subject to get a better image. In this case, changing the head to a slightly higher angle allowed the light to show in the eyes. Catchlights in the eyes adds a lot of life to a portrait. A small change. Big difference.
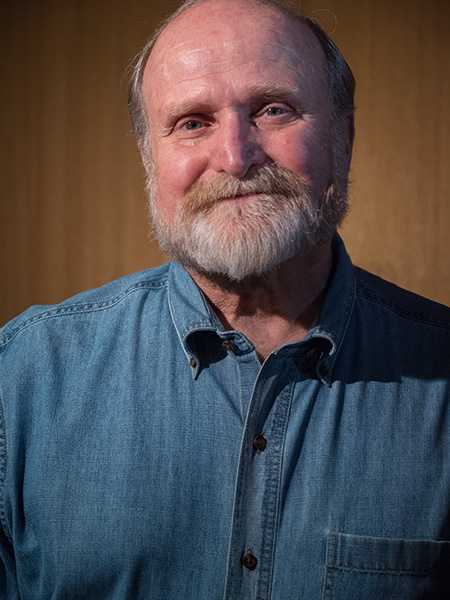 The small change in position allowed the light to leave a catch light behind for a more ‘alive’ look.
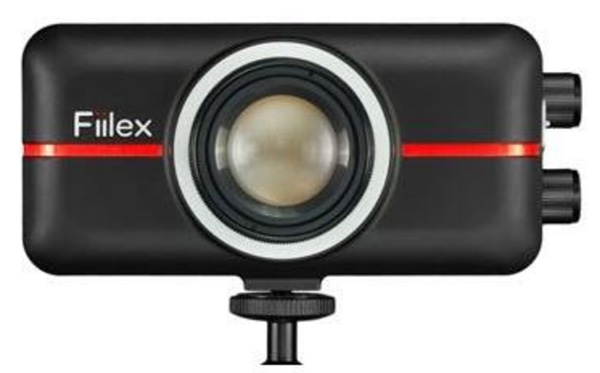 Fiilex P100
I choose the Fiilex LED’s P100 (AKA the Brick) because they fit easily in my suitcase, are battery powered (approx 2 hours battery life per charge), and have adjustable color and power. With a Color Rendering Index (CRI) of just under 90, there is a large spectrum of color available that is important to look for in LED lighting. Very versatile.
Yours in Creative Photography, Bob
Save

by successfulbob | Lumix G7, Lumix Lounge, macro, photography creativity, photography gear, photography lighting resources
Water Splash Photography Setup
Heads-up here! This is my first foray into photographing water droplets. I’m sharing my current setup, and sure it will change as I learn more and experiment. I am taking you along on my adventure showing you the kind of work I’ve been able to create with this setup. Once again I will share I am no expert with this type of photography. If you’ve got some ideas for me, I’d love to hear them!
This photography is not for the faint of heart. By the way, you CAN do this photography with a couple of Speedlights and in some ways that may be better for more control of the results. I like the variability with the gear which I’ve been working. OK, with the disclaimers out of the way lets look at a water droplet photo and then the layout of all the stuff.
 Photograph achieved with the equipment setup as seen below. Exposures are made at f14 with @ one second ISO 200.
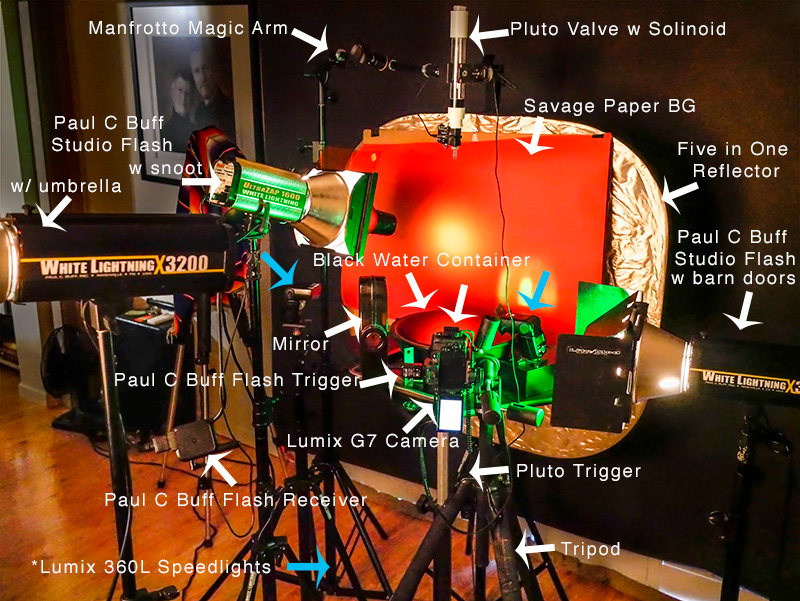 Here’s my gear. I’ll ‘splain below.
I decided to get a little head start on this type of photography by getting some necessary tools. The Pluto Trigger and Pluto Valve can save you a LOT of time. The Trigger is connected to the camera and controls the show. It tells the water drops when to fall. What size they should be and when to trigger the flash. All of these durations are in milliseconds (MS).
Backgrounds are only limited by your imagination. The one showing above is with a colored Savage Paper background. There is a gelled flash with a snoot to vary the light and add interest. With this setup, I have also used a reflective background with a gel over it lit by a flash at various angles and directions. You can use cloth or photos or printed patterns or almost anything you like. As I learn I’m trying to be careful not to overwhelm the waterdrops but we’ll see as I play how that transitions.
I used the Lumix G7 to capture these photos. Lens used was the Vario 35-100mm f2.8 lens with a 10mm or 16mm Vello extension tube. You will need a camera that has a trigger port or can communicate with the Pluto Trigger.
Connected to the camera is a remote flash trigger that fires the flash Paul C Buff flashes from the camera. The Lumix 360L flashes are triggered by the light from the Buff’s because I have them set to Slave Mode. It is the flash that freezes the motion of the water. Adding gels to the flashes adds color and interest to the splashes. In my images, you often see some streaks of color in addition to the frozen droplet. This is because I am using multiple types of flash. The Buff units are not as fast as the Speedlights. And the Speedlights can be of different durations if you change the amount of light you ask them to produce. The lower the power, the shorter the duration of light. Bogen Cine gels Vivid color are juicy. Roscoe gels work well too. You can get gel packs that are just the right size for fitting on your Speedlight. Here’s one from Roscoe holder for the gels.
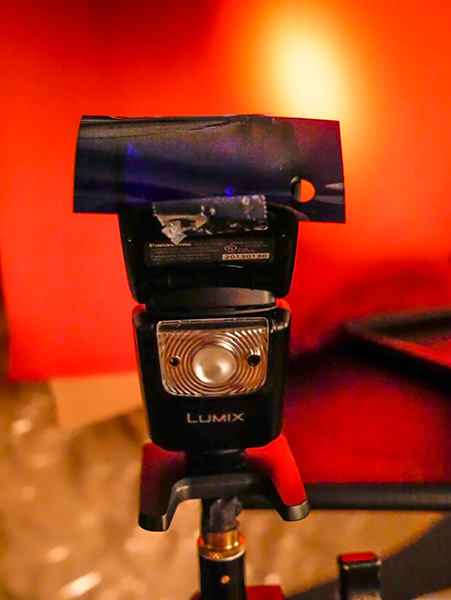 Lumix Speedlight with gel taped in place. Once you see how the gels perform you can also buy larger sheets and cut them to size for larger flashes.
I used a black bowl of water for the reflection. Black allows the color of the background to shine through. Fill the bowl as high as possible, so the edge of it doesn’t show. Science says you can fill a vessel higher than it top because of surface tension. Well, let’s not get into that too far, but as a side note, know that you can put 32 dimes in a shot glass before it overflows after you have filled it with water. Make sure you have a drip tray underneath the bowl or tray to catch any spills as you work.
If you don’t have enough lights, or just want to add another variable, note that you can add a mirror to the set to reflect light back from another direction.
The Manfrotto Magic Arm is extremely helpful in positioning the valve in place over the water. The Manfrotto Super Clamp holds the valve. When you are setting up the position of the water drops, watch where the water drop falls and put something in place to use to set your focus. Remove before shooting.
Working with water droplet photography is like photographing fireworks! You are never quite sure what you are going to get. You get to control the variables but there is never a guarantee and always fun surprises. (well sometimes not so fun but always a learning experience)
If you have any questions, let me know.
Yours in Creative Photography, Bob
Save

by successfulbob | Lumix Lounge, Lumix LX100, photography, photography creativity, photography gear, photography lighting resources
Using a Mini-Scrim for Better Photos
A very simple way to control light is through the use of a scrim. For small subjects and objects, a regular 42-inch round scrim or super size scrims of 60 inches or more can be a bit of overkill for just mucking about. Westcott makes a wonderfully portable sized, five-in-one that is only twenty inches and when folded in it’s carrying case is a tiny eight inches for about twenty bucks.
Here’s a quick example using a neighbor’s cactus that was showing some attractive color blossoms. Look carefully at the difference between photos and I think you’ll see that learning to use a scrim can help get you better lighting in your images.
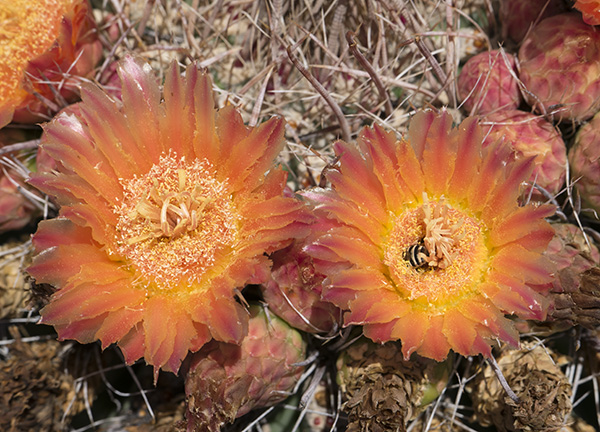 This first image was captured with full sun as the light source. Colors are bright and you might think that this works. Look at the harsh, deep dark patches in the shadow with no detail. This is the same kind of look you will get if you use on-camera flash.
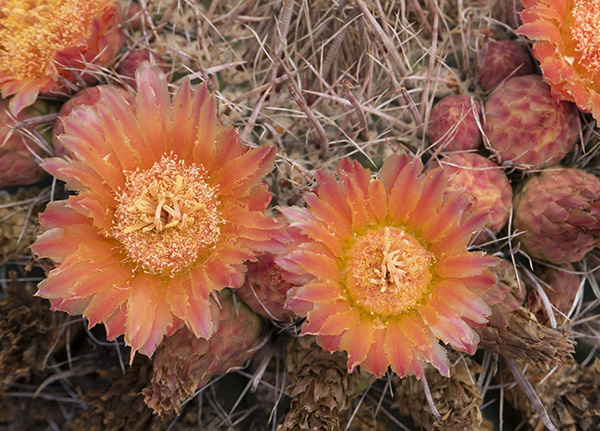
 In order to tame the harsh shadows, I next captured the blooms in full shadow. This results in slightly less contrast and the color has become muted. I suppose the color could be pumped up in post-production but the shadow are still a bit blocked up.
 Here a scrim was placed between the sun and subject. Even though the scrim is only twenty inches because of it’s close proximity to the flowers it is acting like a very large light source. Very nice overall light with soft shadows and color fidelity. All images were processed with the same settings straight out of the camera. (SOOC)
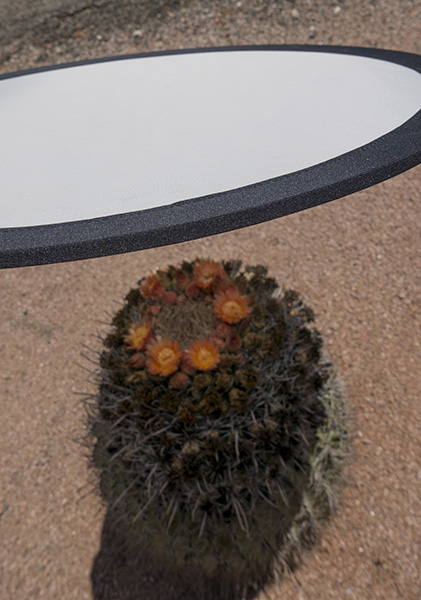 A quick grab of the scrim in action. In addition, the kit comes with four other surfaces to reflect or block light in various intensities and colors. Black, gold, silver and white can all also be used to bend light to your will.
You can take this same lesson and apply it to larger subject such as people by using a larger scrim. Practice with it and you will find the larger the scrim and the distance it is to your subject you will be able to control the shadow edge transitions and depth of the shadow on your subject. Moving it further away while still covering your subject will give you slightly stronger shadows. Conversely, the scrim closer will make the light softer.
 Sometimes you just gotta play! NIK filters, Photoshop extraction’ Layers and the Transform Tool.
These photos were captured with the Lumix LX100 the camera I call the ‘Pro’s Point & Shoot.’ A solid little performer built on a magnesium frame for about $700.
Yours in Creative Photography, Bob
Save
Save
Save

by successfulbob | Lumix GH4, Lumix Lounge, photography, photography education, photography lighting resources
Lessons from a Personal Photo Project – Strawberry Lesson
“You can’t always get what you want, But if you try sometimes, you get what you need!” Rolling Stones
I am always trying new things for art, for practice or just to see if I can do it to add to my photo skill set. Yesterday I found (what I thought was) a beautiful looking strawberry and decided to see if I could create some art with it.
I was not successful in creating art.
I learned several things, so I consider the shoot a success!
 Strawberry image after a little play in Adobe Photoshop to clean up some of the bruises that presented themselves as the shoot progressed.
Image created with Lumix GH4 and the 45mm Macro Elmerit Lens
I placed the light behind and camera left which created the highlight. The camera right side of the strawberry was lit with a reflection of my hand curved into a cup to wrap the light around the top of the fruit. (note the slightly warmer color because of the skin tone)
• When photographing food with a macro lens any, and I mean any imperfections will be revealed. Lesson learned for future – when photographing food, especially perishables examination of the object should be carried out with a magnifying glass. Even if you think you have the hero make sure there is plenty of other possibilities cause as the set heats up with lights the fruit will reveal more and more imperfections from picking, packaging and handling.
• In a low light situation, I learned that my hand could be used as a shaped reflector.
• Playing with the white balance on the camera and the Fiilex P100 (AKA the Brick) color adjustable LED light can lead to some very interesting different rendering of the subject.
I now have more information about photographing food in case that comes my way.
Yours in Creative Photography, Bob
PS – As I was writing this post I think I may have found a way to process this strawberry into some art… Back to Photoshop for some more PLAY!
by successfulbob | Lumix GH4, Lumix Lounge, people photography, photography, photography education, photography lighting resources
Find Solid Lighting for Your Photography Portraits
To find a beautiful natural light for your portrait subjects I recommend looking for shadows. Shadows are the hallmark of depth and dimension in two-dimensional renditions of our subject.
First, look for porches or overhangs that will remove the overhead light. Ideally, you’ll have a bright surface like concrete or sand or bright building reflecting the overhead light into the shadowed area. This situation works well because the larger the light source, the softer the shadow edge transitions will be. There is a magical place just under the portico that will yield very flattering light patterns. One way to discover the right spot is to hold up and examine the back of your hand and examine the shadows as you move your hand through the scene. This method allows you to see how the shadow-edge transitions will play out. If you have beautiful smooth hands with no ridges and alternative is to bend the middle finger down and watch the shadow as it falls on your palm.
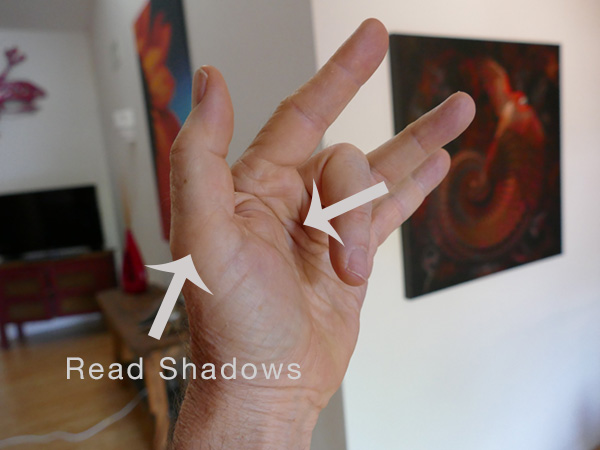 Fondly referred to as the reverse salute, the middle finger can show you how the shadows will look.
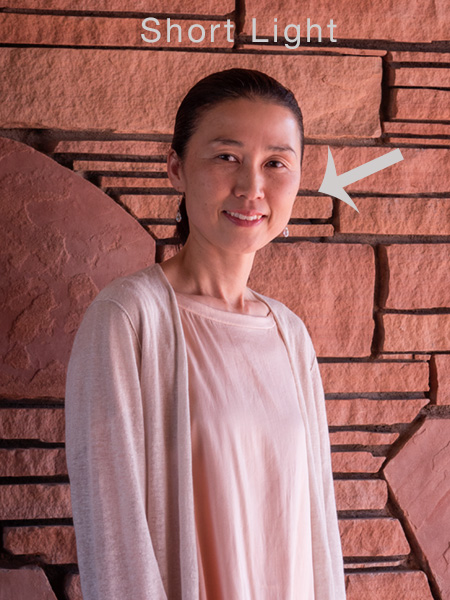
Once you have decided on the proper place for your subject, you then have the opportunity to set the lighting pattern by changing her angle to the light. By rotating your subject you have the ability to create the most flattering light whether that be broad light, split light or short light. Most times I will opt for short lighting as I feel that adds the most depth and interest to a portrait.
 Note The light on camera right side is less wide than the shadow camera left
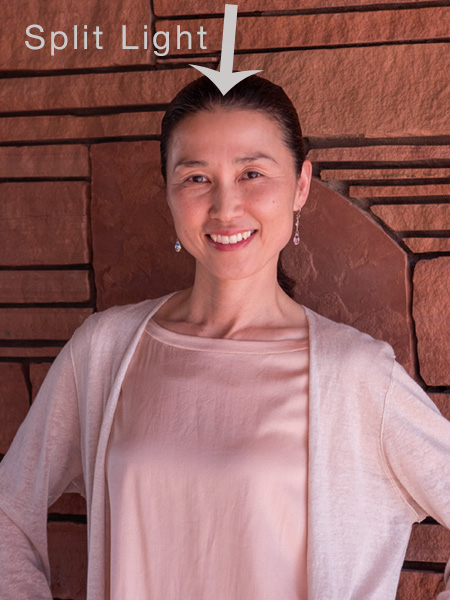 Note the light and shadow are just about even in this image
 In this image, most of the mask of the face is lit with just a soft shadow camera left. Note the slight ‘kicker light’ on her face on the camera left side.
This particular space was a bonus in that it was more of a tunnel with an opening on the other side which added a subtle separation light which adds more dimension to the photograph.
I was photographing this session as part of a job for the Sedona Meditation Center, which is now under the guidance of Ichibuko Todd (my fabulous model!) who has relocated here from Hawaii.
Images captured with the Lumix GH4 with 35-100mm f2.8 Vario Lens. Settings ISO 200 1/400th sec. f3.5 47mm (94mm in 35mm)
Yours in Creative Photography, Bob
PS – If you want to have higher contrast with harder shadow edge transitions move your subject further away from the main light source.
by successfulbob | commercial photography, Lumix GH4, musician photography, people photography, photography, photography education, photography gear, photography lighting resources
I love working with musicians!
They are often solid creative people and have spent some time in front of a camera so getting good posing is not a chore. Good eye contact with the camera and an idea of the story they want told in the image makes for a fun photo shoot. Especially fine session with Valerie Romanoff of Starlight Orchestras who splits her time between New York, NY and Sedona, AZ.
Valerie was looking for images to use in her social media. Some images were set in the red rocks and some were during a live performances over in Cottonwood at the Main Stage venue. She performed with some great musicians as part of the Bottom Line Jam with host band Bottom Line. (Totally enjoyed the performance by the way!) When I was going through the first edit my wife Holly looked over my shoulder and said, “Oh my, she’s going to have a hard time choosing images! There are so many good ones.” I’d like to think it was mostly my skill, but Valerie is a skilled performer and is extremely photogenic!
Here are a few selects from the outdoor session…

The Path leads right to Valerie and Bell Rock is pointing right to her also…
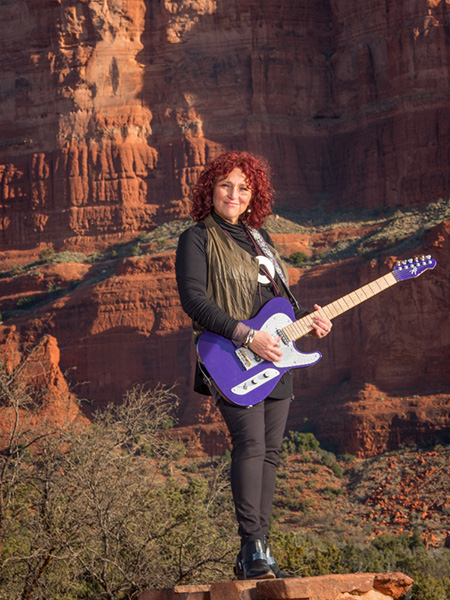
With Courthouse Butte in the Background.

This is a pose idea I picked up from Peter Hurley (The Head Shot: Secrets to Creating Amazing Head Shot Portraits)
For the outdoor photo session I used my workhorse camera the Lumix GH4 with either the Lumix Vario 12-35mm or 35-100mm f2.8 lenses mounted. We had nice light a little after sunrise supplemented with a Paul C Buff mono light powered with a Vagabond Mini Lithium battery. Having power to take studio lights easily on location gits you enough flash power to control the scene. This was fitted with a 35″ foldable Octabox. In order to keep shape and form the flash was placed on the same side as the sun to not flatten out light.
Yours in Creative Photography, Bob
PS – Images from the Main Stage performance will be posted tomorrow