The holidays are fabulous as software companies roll out deals for Christmas and the holiday season. I have been playing the software from MacPhun for a while. It was only MAC-based, and they have now made the software available for Windows PCs as well. This is excellent news for those who were using NIK filters as the people who designed initially that software formed to create some new software that can help creatives get their vision out of their heads and into their imagery.
The first software I want to share with you is Aurora HDR 2018. This is the first HDR software that I found to be able to give me reliable results in density over the image without that ‘HDR!!’ look. Very clean and easy to use with a WYSIWYG system. Here’s an example.
I like how I can add life and dynamic range to the photo without dialing in HDR noise and artifacts that seemed to be prevalent in other HDR software processing programs. And, no hoops to jump through.
Aurora HDR is not just a tool for merging bracketed images; it also provides numerous tools and countless options to create perfect HDR photos for every taste – from one-click presets and advanced tone-mapping, to layers, noise reduction, and robust luminosity masking controls. It was named as the Best Mac App of 2017 by Apple.
Offer Availability: The Aurora HDR Special offer is already live and continues until December 31.
Current users of Aurora HDR may upgrade at a Special price of $39 ($29 using my coupon code COATES)
New users can purchase Aurora HDR 2018 for $79 ($69 with my coupon code COATES)
A collection of bonuses will also be included with every purchase.
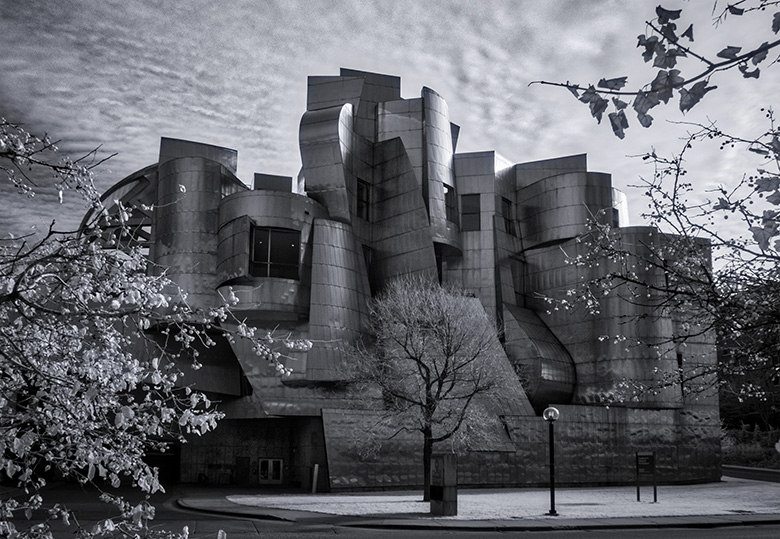
We don’t necessarily think about using IR capture when taking everyday images of architecture. It can give you a different look. And I like it.
Always the difference will be dependent upon what the final image use will be. Since I am my client when doing architecture images for art presentation, I get to choose. I’ll show you a couple of different captures and let you decide. Let me know what you think.
I think the infrared gave this image a bit of an otherworld feeling complementing otherworld style architecture.
Here’s a color capture made with the Lumix GH5. Processed in Adobe Camera RAW and Skylum (AKA MacPhun’s) Luminar
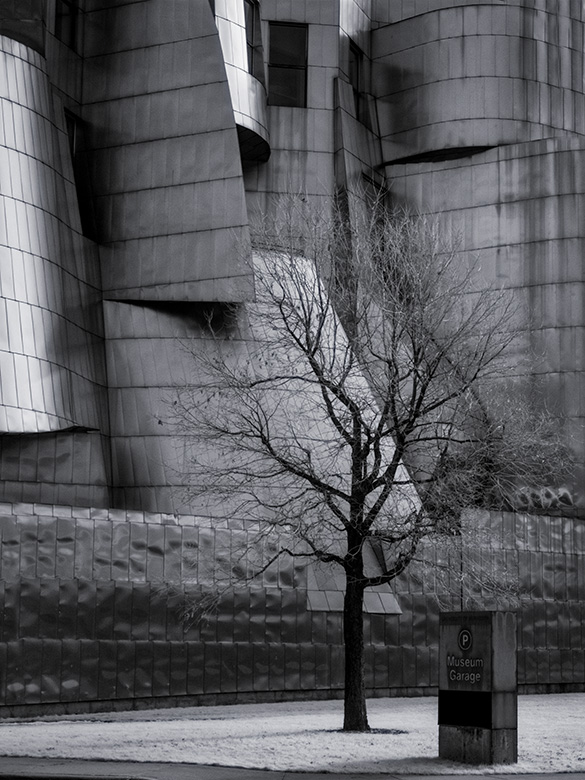
I always try to work a subject over and above a straight-forward rendition. This includes different angles, framing, and processing. See a couple of images below for examples. I would have tried quite a few different ideas, but I stopped on my way to the airport and didn’t want to miss my flight. Art suffers from a tight schedule!
While not showing off the architecture quite as much I feel the framing made for a more interesting photo.
Details can always add to the story. I liked the barren tree against the architecture in this image.
This post was inspired by questions about getting a solid exposure of the moon with detail. Many photographers have issues with this. We’ll start with the ‘Sunny 16 Rule’. Note that I put the exposure rules in quotes in the title of this post. That’s because technically there are no rules because any exposure is the correct exposure if it helps to tell the story you are trying to share.
No matter who tells you something it is always important to test for yourself. ALWAYS! (example below)
The exposure rules I’m going to share here can get you to a place where you can start your journey and attain an exposure that will render highlights and shadows visible within an acceptable range without losing detail in either one. Once you know this happy place, it can be a handy starting place and to check your metering equipment in your camera and light meter.
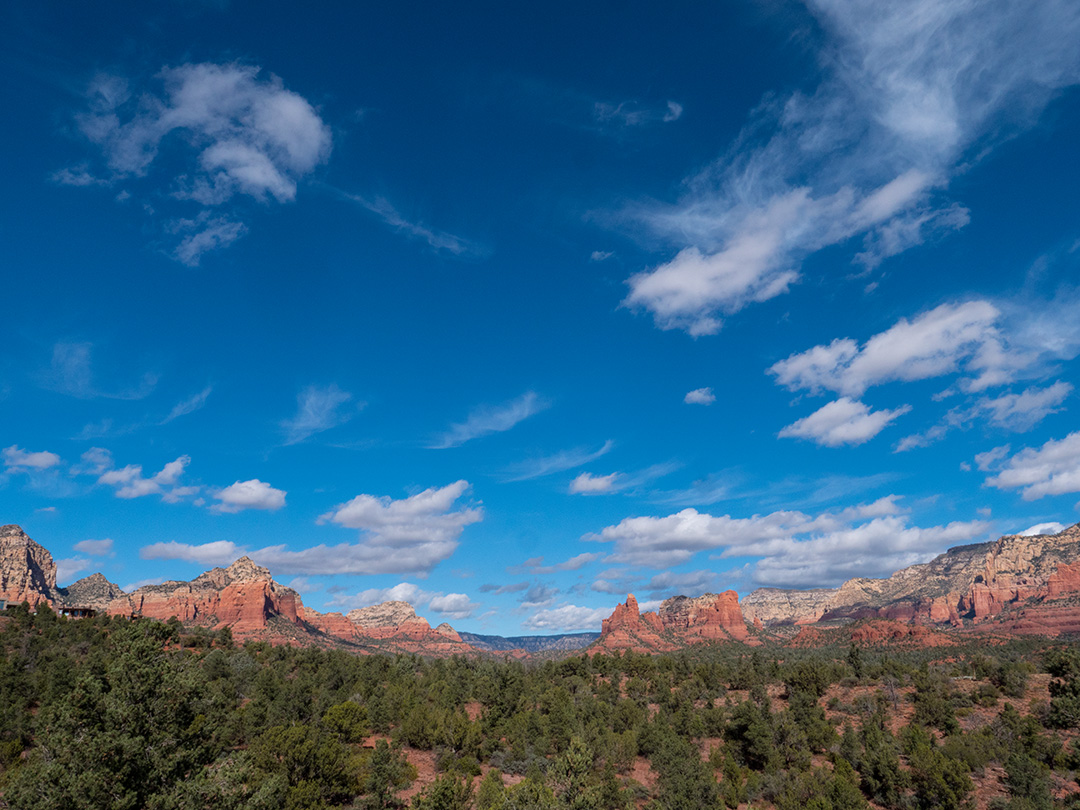
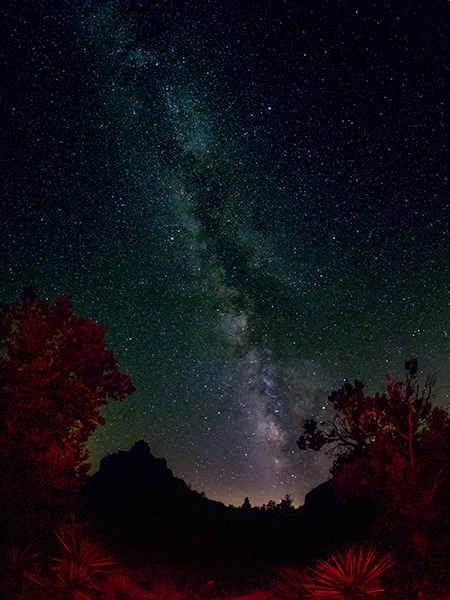
The Sunny 16 Rule in action with Sedona’s red rocks. Lumix GH5with 12-60mm Leica
Exposure settings f16 1/400th second at ISO 400
The first rule is the Sunny 16 Rule. On a sunny, cloudless day scene, this rule states that if you set your camera to f16 and your shutter speed to 1 over your ISO setting you will get a proper exposure. If your ISO is set to 400, your settings would be f16 at 1/400th of a second. It will be correct. For additional creative control within the rule just keep the ratios between shutter speed and f-stop. If you want a shallower depth of field, for each change in aperture change the shutter speed. f8 is two stops different from f16, so the shutter speed would need to be 1/1600th second with our 400 ISO setting. Be aware that small tweaks in 1/3rd of a stop can make quite a difference in how the scene renders. A slight underexposure
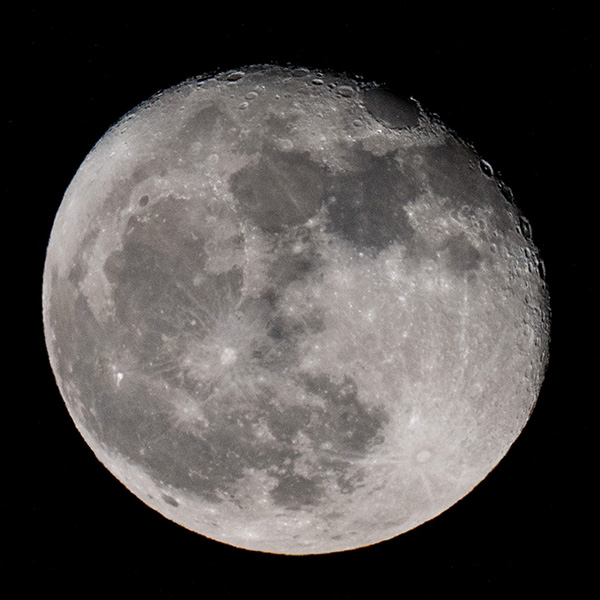
Let’s move to the moon. I shared a piece of info I was told without testing. (sorry about that! working to rectify it ASAP) I was told we could use the ‘Moony 11’ the same way we use the Sunny 16 rule. I apologize for passing that info on without testing first. After testing, I found that the reality for getting a nice exposure of the moon was the ‘Moony 8 Rule’. Set your aperture for f8 and use the reciprocal of your ISO for your settings. Even though the moon is a reflection of the sun, it is traveling through a couple of layers of atmosphere and absorbing some of the light itself. It turns out Moony 8 seems to be the way to go.
Light clouds crossed the moon and changed the exposure to 1/60th of a second still at ISO 400
While the Sunny 16 rule is for the exposure of the scene lit by the sun. The Moony 8 is to achieve texture on the moon itself.
Night sky photography has its own little set of things to think about and prepare. I’ll try to share a few sources I came across in my research in trying to get night sky photos. (some issues covered here)
Lens choice is crucial. Faster glass means better images as they will allow more light to reach the sensor. Wider angle lenses can give you more time to let some of that light through. Look into the rule of 500. It will help you keep your stars as pinpoints as opposed to starting to streak.
According to the rule, the longest shutter speed you can use before your photo gets blurry is equal to 500 divided by your lens’ focal length. This formula has variables, but it is a good starting point. In my searches, I found this calculator on the Lonely Spec web site. There’s excellent info contained in the calendar that has been a great help to me! The calculator takes all variables into account. Sensor size, focal length, ISO, and aperture. If you are looking for more in-depth info, Ian Norman is rocking it over on his site.
Great resource for night sky photography
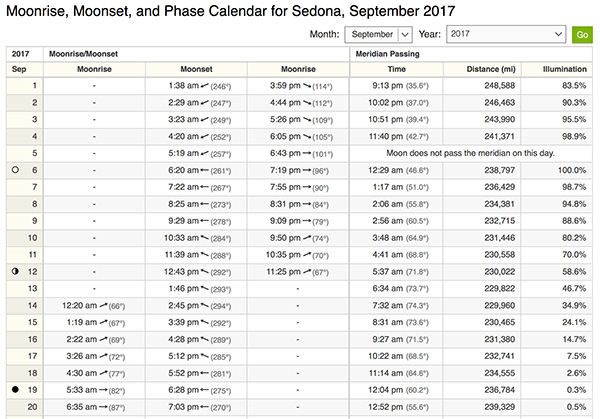
Another important site is timeanddate.com. You can look up the sun or moon cycles, rise and set times along with the direction of appearance on the horizon on the charts. This is handy if you want to find out where the moon will be rising if you are trying to catch rock formations or building with the full moon. (next full moon should be a good one in October AKA Harvest moon)
Above is a moon chart for Sedona, AZ. Go to the site and plug in your town/city name. Use the compass in your phone to see where the moon will come up. Note that if there are mountains and hills between you and the horizon the moon will be moving across the sky a bit and you’ll need to make adjustments.
Stardate is a great site. The more you know about your subject, the better your results will be. For example, if you are trying to photograph stars the darkest skies will be of help and know where, and when, the moon will be in the sky is important. Stardate can also keep you up-to-date with happenings in the heavens.
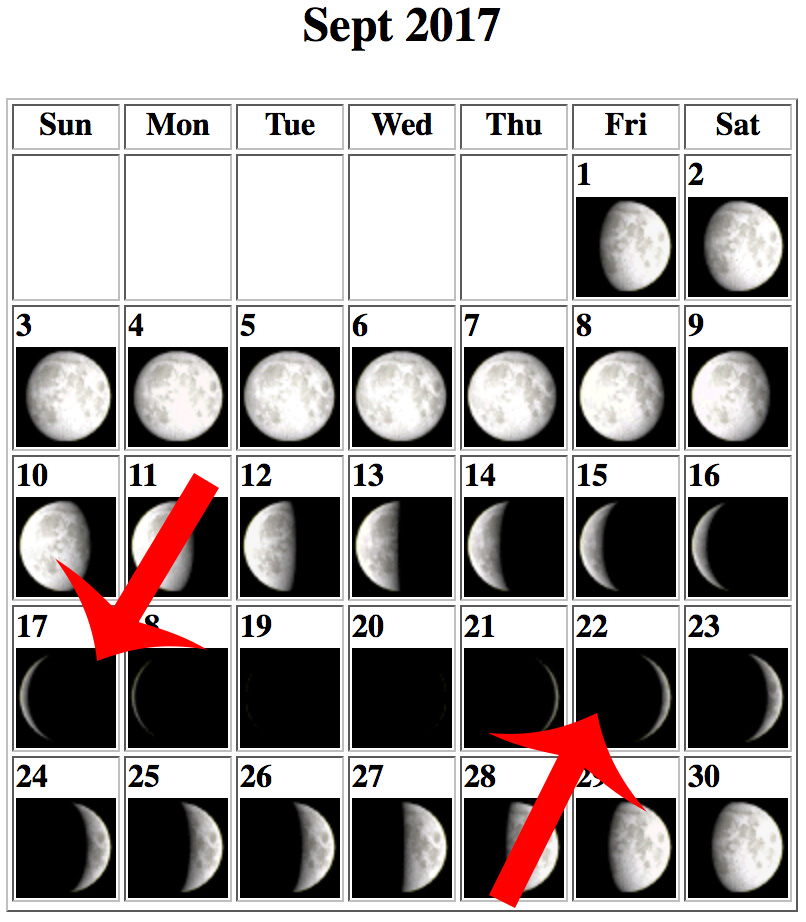
Moon chart with dates. Days around the New Moon are the best for dark skies and better rendition of your stars
The new moon is not the only time for photographing the night skies. A little bit of moon can help render the landscape visible for a different night photography look. Full moon and waxing and waning gibbous moons I tend to shoot for the landscape itself as the extra light tends to make the stars less visible.
Next post, I’ll look at processing the files once you are back at the computer.
I was always a little hesitant about photographing the sky after dark. Never could quite make it work out. Either the focus was off, or exposures were wrong, or both!
Then it came time for me to start working on those captures as I was jealous of those who were killing it in the night sky photography showing incredible renditions of the Milky Way.
If you have had the same problems let me share some of the things that have made a difference for me.
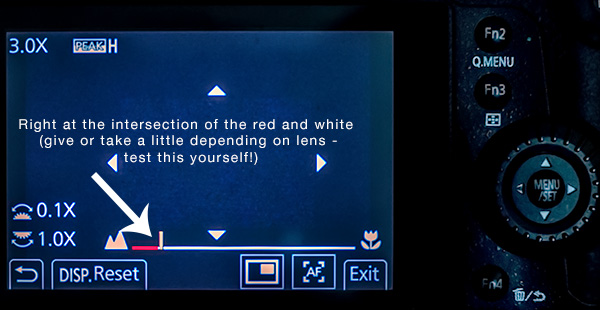
The focus was often a problem for me. Couldn’t quite get the hang of not being able to see my subject in the dark. Either the foreground was out of focus, or the stars were less than stellar until I put in the time and did some serious testing. Using Panasonic’s Lumix cameras has given me a perfect way to set focus and know I am going to get solid detail throughout the image. It’s quite simple and no need to be on scene before dark to get focus. Yay! See the capture of the back of the camera below.
Camera back of the GH5 showing the Manual – Mode focus screen
To get this view set your camera or lens to manual focus mode and touch the focus ring. The assist will give a small 10X magnified view. You won’t need this. Bring your attention to the bar across the bottom. There is a white line that goes from macro to mountain. Just before it gets to the mountain you’ll see a red bar. That’s the sweet spot. Set your focus right in the notch between the red and white portions of the stripe. Done! Test this for yourself.
The other important piece of the puzzle is to use the fastest lens available. Having a very wide aperture allows the sensor to be exposed to the most light allowing for lower ISO settings.
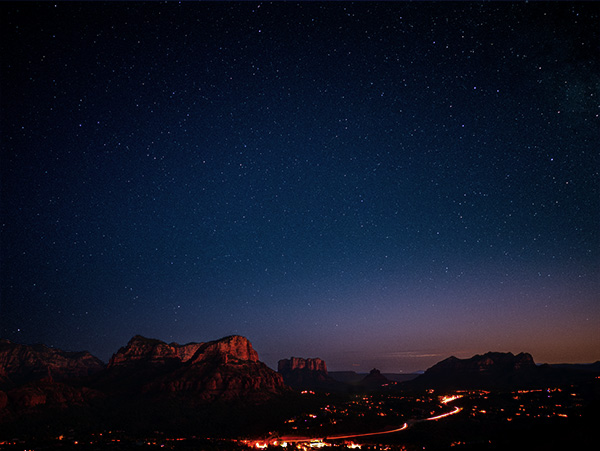
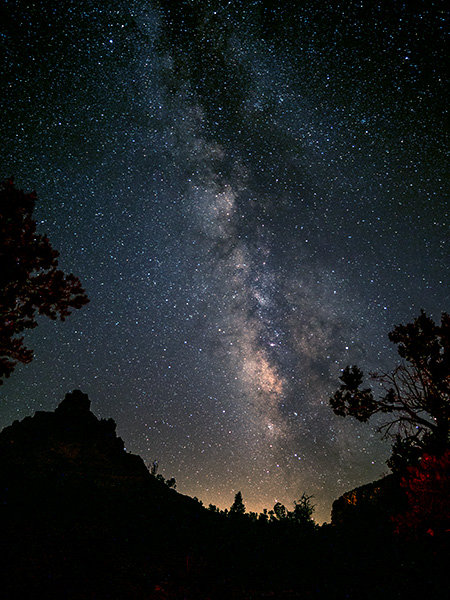
Bell Rock in silhouette to the left with the Milky Way, Sedona, AZ with 12mm Leica DG Summilux f1.4 lens
Images were captured with the Lumix GH5 camera. Lenses listed above.
In another post I’ll share some ideas on post, processing using Adobe’s Photoshop to get the most out of your captures.
Out for the second night of trying to catch the Perseids Meteor Shower. The largest amount of visible streaks across the sky were scheduled for the early hours of Sunday morning.
Set the alarm for 12:05 AM. Wake up 11:58 PM. Check cloud cover. Looks OK. Dress. Hop in the car. Head to the pre-scouted location at Bell Rock Vista one of my favorite rock venues for photos in Sedona. (partly because it’s five minutes from my house.)
About one minute of time lapse from three cameras.
Note clouds and lightning to the south. Thankful there’s an open to the sky ‘window’ to the north.
Set up cameras. Yes, cameras plural. When photographing images for time-lapse video one thing you end up with is time. Once a camera is set, and recording do not touch, bump or adjust unless you would like to restart the sequence.
Camera one – Lumix GH5 with Leica 12mm Summilux f1.4 lens. This camera and lens combination ended up giving me the cleanest, sharpest files. I set the camera for RAW capture. Note that RAW files can chew up some real estate on your card. Make sure you have a large capacity. **
Camera two – Lumix GX85 with the Leica 15mm Summilux f1.7 lens. This set-up is a great go-to set up for night skies.
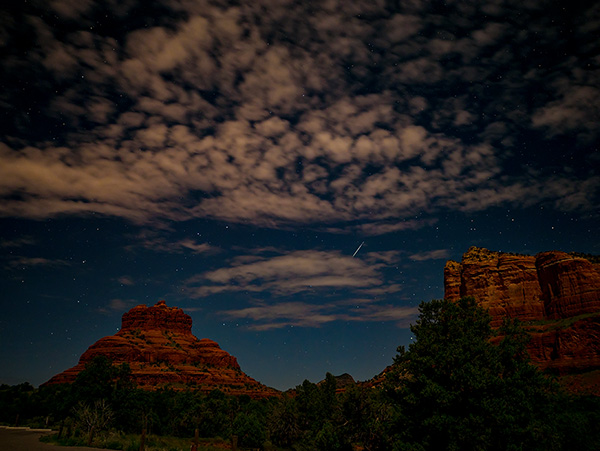
Here’s a single still image from the shoot. Processed in Photoshop
Camera three – The Lumix FZ2500 with a built-in 25-480 Leica DC Vario-Elmarit F2.8-4.5 lens. This is best shot at the 25mm setting to keep the f2.8 aperture. As you’ll note in the video, this is the only camera lens that showed condensation toward the end of the sequence. It was a VERY moist and humid night. This camera must generate a little bit of heat as time goes on. In less humid situations I wouldn’t see this as a problem.
A great resource for deciding what exposure settings to use including various camera and lens combinations may be found here. I highly recommend checking out the rest of Ian Norman’s blog Lonely Speck. Lots of helpful info there to set you on the right path. Remember the guide gives you a starting point. You still must experiment to get the most from your experience.
Yours in Creative Photography, Bob
Working on my settings for better quality imagery. Any lack of quality is purely operator error!
** The GH5 has two cards slots and can be set to behave in a variety of ways including to continue recording on the next card when one fills up. Very handy for lots of captures. When not gathering images for time-lapse the cards can be set to be an automatic back-up by writing to the cards simultaneously, RAW files to one card, jpegs to the other, videos to one card and stills to the other, etc. But I digress.
For infrared conversion of my cameras I use LifePixel. Infrared allows you to put an older camera to use and opens up a new time time of day for productive image creation.
Learn Photoshop in a fun environment. Aaron Nace applies the right amount of fun with easy to understand and follow tutorials. Actions and brushes are included with lessons!
Best embroidery ever. Give Queensboro a try, get a $20 instant credit to get started by clicking on the logo! They specialize in great quality custom logo apparel and promotional products with the best customer service.
Platypod has become a great resource for being creative in getting your camera gear easily into unusual places. As an Platypod Pro I get to work/play with the gear even before it comes out. Head over to Platypod, subscribe to the newsletter and you will get special discounts reserved only for subscribers.

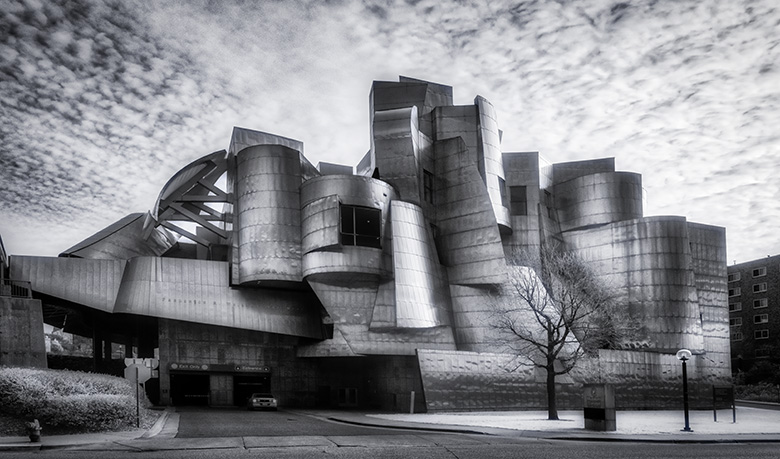
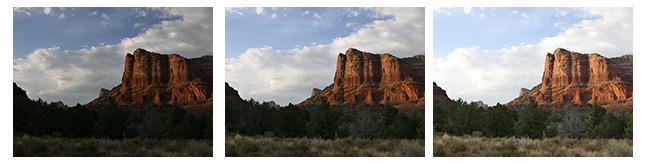 RAW files capture sequence
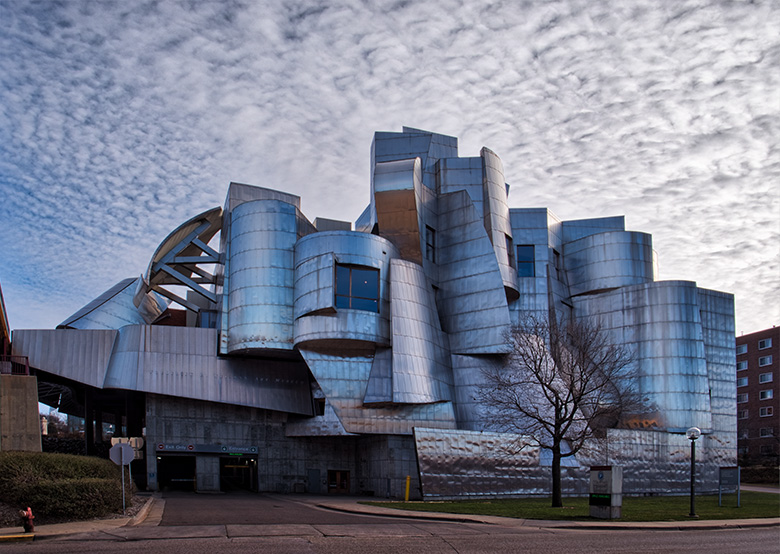
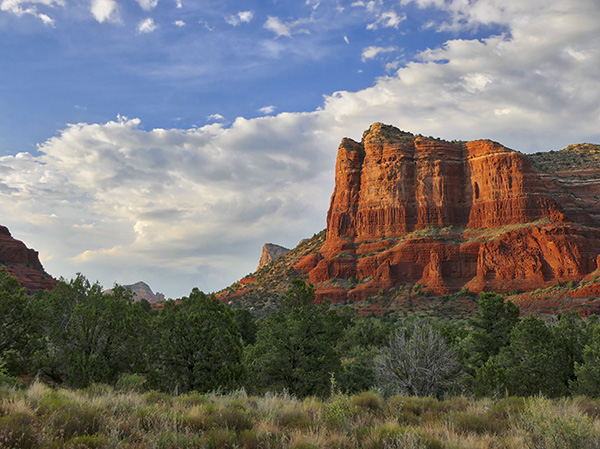 Processed in Aurora HDR 2018 software from images above.