by successfulbob | photography - art quote, photography education
I’ve decided to keep things light and airy this morning.
Found this anonymous quote about photography that I wouldn’t be surprised if it came from Steven Wright (who is freakin’ hilarious by the way)
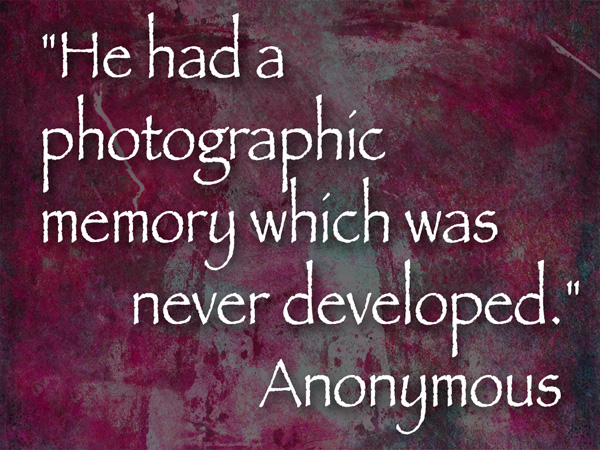 “He had a photographic memory which was never developed.” Anonymous
Have a great Sunday!
Yours in Photography, Bob
by successfulbob | photography, photography education
It’s right around the corner…PPA’s International Photographic Competition (IPC) August 4 – 7, 2014
at Gwinnett Technical College 5150 Sugarloaf Pkwy Lawrenceville, GA 30043. This is just outside Atlanta and if you are in the area you can attend as a PPA member. It’s an incredible education on imaging.
 PPA Photographic Competition.
If you are not in Atlanta PPA will be Live Streaming the event… Here’s what will be happening.
Gotta tell ya I’m excited about the fact that the IPC is going to be web-casting this year’s Imaging Competition. And you should be too. This is a wonderful opportunity to see behind the scenes on how images get to Merit and Loan status.
I would like to share some information to help you understand some of the things you will see during the event.
First, I think that it’s important to know how the jurors came to be in front of your images. The process is very involved and those that have gotten to that level have worked extremely hard and put in lots of time and effort to be able to volunteer their time in service to the system. How do I know? I worked my way through the system and am an International PPA Juror.
First step is to be involved as a participant in the process by putting images in front of others for the feedback of imaging competition and showing some success. After earning at least ten merits potential jurors take time away from their business to attend the three day judging school to learn and practice. In addition, they have paid for airfare and lodging along with the fee to attend judging school.
After successful completion of judging school it’s time to put in more time judging at state competitions. Consider this the farm system where you go to get seasoned and experience. Potential judges work with International Judges during these competitions and are given feedback on how to better learn the skill. This feedback is also passed on to to IPC in the form of evaluations for review. A minimum number of states need to be judged and satisfactory evaluations received before a judge is approved as an International Juror. Again this involves more time away from the business and often added expense in travel.
Why do I share the information above? It’s because I would like you to understand the dedication jurors need to have. They truly care about imaging competition and are dedicated to doing a good job for you.
Let’s get to the process.
Six jurors and and a jury chair are assembled in place to view your image according to a certain lighting standard. The standards are set so you know how to view your image under the same conditions as the jurors before submission.
In the print room a curtain with a turntable is placed 6 feet in front of the jurors. Lighting is from prescribed angles and measures f16 100 ISO at one second in a room with subdued lighting.
In the digital judging room your image is shown on three monitors with two jurors in front of each monitor. Monitors are calibrated to 120 CDM2, D65 and color spaces recognized are SRGB and Adobe 1998.
The jurors have a scoring device in their hands and after seeing the image can make the choice of Merit or Non-Merit image. If there is a majority of four or more jurors who agree it is a Merit the image is considered a Merit for the moment. If four or more Non-Merits are indicated then the image is not considered a Merit for the moment. If there is a tie there is an automatic challenge called by the jury chair. One person will speak for the image and each juror will speak in turn giving their ideas on why they have made the decision they did. The the original person speaking for the image will be given the opportunity for rebuttal of all arguments given and the jurors will again put in their Merit or Non-Meirit to determine if the image will receive a merit.
If you remember I said a Merit was ‘for the moment’. After the result has been announced any juror or even the jury chair may challenge the result. That juror then speaks for or against the result and each juror in turn gives their feedback. The challenger is allowed a rebuttal and the scoring is recalculated. Although not often it is possible this could be challenged by another juror and the process is repeated.
Now here’s the part where you might feel things are moving fast… I remember seeing my first imaging competition and thought, “How can a decision be made so quickly???” Remember all that training? One decision has to be made using the twelve criteria. In the jurors mind is this image merit worthy or not? You have seven sets of eyes looking at the image including the jury chair. All votes are in. A decision is announced. Here’s the important part – any one of those seven trained people may challenge the result and the challenge process outlined above is done. In addition, at any time before each session is closed out a juror may ask to have an image brought back for review to challenge a result. No juror wishes to be haunted by an image that they felt should be a Merit and they didn’t fight for it.
There are over 5000 images to be viewed with the additional view of any image that made it to a Merit that is then judged for the Loan Collection. The process is similar but now their are even more eyes making the decision. As you can see with that many images it would be impossible to talk over every single image presented which is why it’s a great idea to order up the print critiques to get feedback on your individual images.
There is quite a bit more to this but I wanted to give you an overview and show you that there are mechanisms in place for the best review of images to detemine your Merits.
Enjoy the competition with yourself and even if you don’t have images in this year look around the various rooms there’s a lot of imaging education to be found there.
Yours in Photography, Bob Coates M.Photog.,CR.,CPP International Juror
PS – I’ll be watching too! I have a case in the Open category and the Master Artist Category. I will be judging images in Chattanooga, Tennessee on August 2nd but won’t be judging at National this year…
by successfulbob | fine art photography, graphic design, Lumix GH4, Lumix Lounge, photography education
The salesman for neon signs in Austin, Texas could sell ice to Eskimos in their Igloos!
At the very least he or she is very good at what they do. The neon in and around Austin’s downtown area is very creative and plentiful. When I came to town to meet with fellow Panasonic Lumix Luminaries for a brainstorming session after dark I hit the streets to see what I might capture.
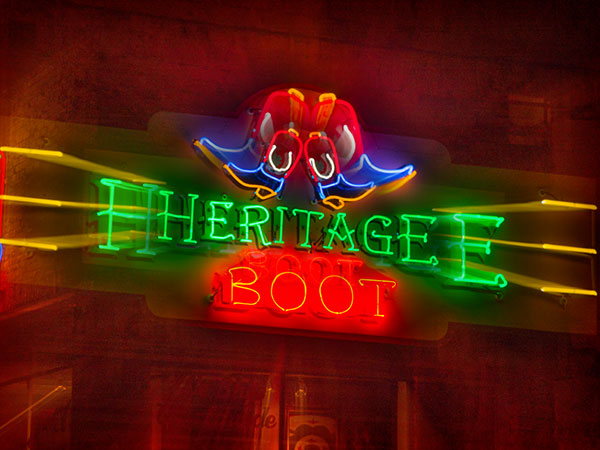 Here’s the Heritage Boot sign just down the street from my motel.
This was created using three separate exposures and layering them together in Photoshop using masks and blend modes. I really like the feel of this… bright and warm yet it has an old time feel at the same time.
If you are ever in need of some beautiful boots this is the place! They are stunning.
Tripod is from the MAC Group MeFoto backpacker model. Easy to pack and surprisingly stiff with a nice ball head. Goes for around $150 bucks. Folded it’s about 12 and a half inches. (OK 12.6 inches) and will expand to 51.2 inches. Camera Lumix GH4 with 35-100 f2.8 with three different exposures and some zooming for extra interest.
Yours in Photography, Bob
PS – If you like what you read on this web site please use the page links to make your purchases.
Successful-Photographer receives a small percentage from sales generated from these links.
by successfulbob | black & white, Lumix GH4, photography education
I was asked the question how do you a black and white image conversion. To steal a quote from Willy Shakespeare, “Let me count the ways…”
That’s kind of like asking ‘What film do you use?’ Or, ‘What are the settings on your camera?’ I use multiple methods depending upon the image and ultimate use of the image. Is it for a fine art landscape? Portrait of a person? Architecture? What are the different colors within the image? Is it being printed on canvas, photo paper, in a magazine or newspaper” All have a different feel and needs… We can now touch every single pixel in an image and control it’s tone Ansel Adams would have been in heaven!
I have an action that incorporates using the LAB mode. Covert to LAB throw away the A and B Channels. (that’s color info) convert to Greyscale. Convert back to RGB. Add a curves bump to taste.
Black and white converter in Photoshop.
Channel mixer.
Hue saturation.
NIK Silver FX Pro 2. Wonderful software!
Combinations of some of the above methods mixed together for different areas of the image.
Now my Lumix mirrorless cameras have presets that give me results that are repeatable and quite interesting. I shoot RAW plus jpeg to have the information that was presented to the camera and sometimes I will take the camera BW jpeg and also process the RAW and mix them together to get the look I want.
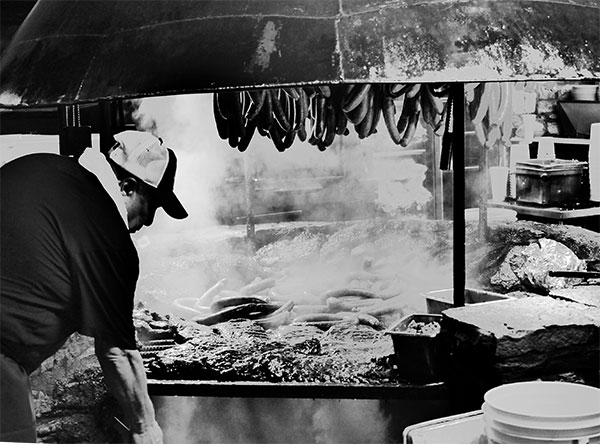 In Austin Texas with the Luminary team. Went to a BBQ place last night. Illustrative Art setting
pushed to black and white on the Lumix GH4
Don’t forget there are more tweaks that can be made to specific areas of an image by dodging and burning. (avoid using the dodge/burn tool in Photoshop! It mashes up pixels. Instead create a soft light layer and paint with black at a low percentage to burn. Another layer paint with white to dodge)
Their could be a whole field of study here just on this subject. I have a two hour program talking about this and could probably do a two day class on this subject called ‘Inspired by Ansel’
Here is a link to some blog posts on black and white shooting. https://chd.lzi.mybluehost.me/category/photography/black-white
by successfulbob | photography, photography - art quote, photography education
Is your photography unique?
Do you fully bring your inner self when you create images? If not, then there’s a distinct possibility you are not creating art. You are just making pictures.
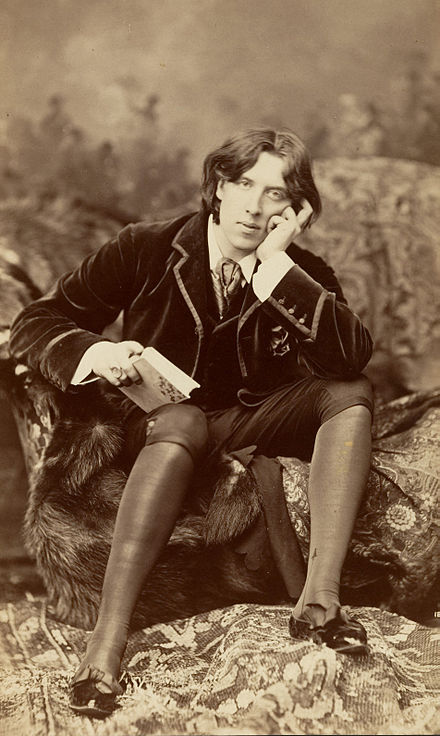 Today I dug up a quote from poet, playwright Oscar Fingal O’Flahertie Wills Wilde Photo by Napoleon Sarony
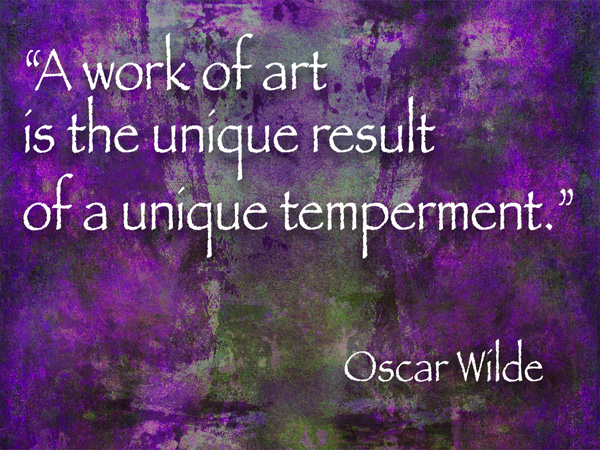 “A work of art is the unique result of a unique temperment.” Oscar Wilde
I’ve found my strongest images come forward when I am totally in the moment working on creating an image I really want to see made. Not necessarily because I am getting paid to make the image. But experience that I’ve acquired over the years allows me to bring creative things forward when on paid shoots even though
That’s why personal projects are so important to your growth as a photographer. You get the opportunity to explore, experiment and experience so much more as you create. You then are able to carry those forward into all your photography. I’ve also experienced the cross-pollinating of different genres of photography helping me create better photography. My wedding work helped in the fashion. My commercial work helped inform my wedding images. Playing while creating art images has worked it’s way back into my advertising photography.
So I ask again, “Are you bringing you to your photo shoots?
Yours in Photography, Bob
by successfulbob | Lumix GH4, musician photography, people photography, photography, photography education
Sound Bites Grill is the new home for Estaban… Turning Sedona into home base is now a reality for guitarist Estaban and his violinist daughter Teresa Joy. They are joined on stage by Percussionist Emilio Santiago. (this guy has the fastest drumming hands I’ve ever seen!)
And they asked me to start documenting and creating images for marketing and promotion. We started out in the Village of Oak Creek about five miles south of Sedona where the red rocks begin. The weather cooperated better than I could have hoped for during our rainy monsoon season. Clouds protected the talent (and me!) from getting overheated, but allowed the sun to keep peaking through to light up the red rocks nicely.
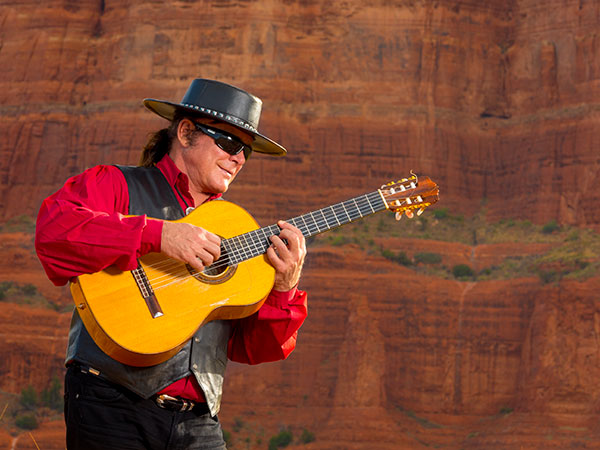
Estaban in front of Courthouse Butte in the Village of Oak Creek Sedona, Arizona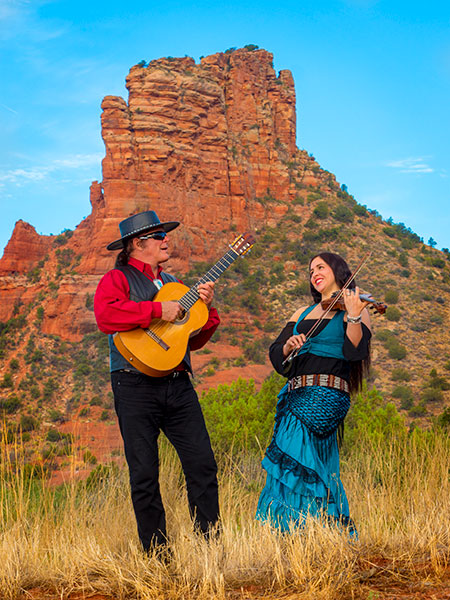
Guitar great Estaban & his daughter, violinist Teresa Joy in front of Castle Rock.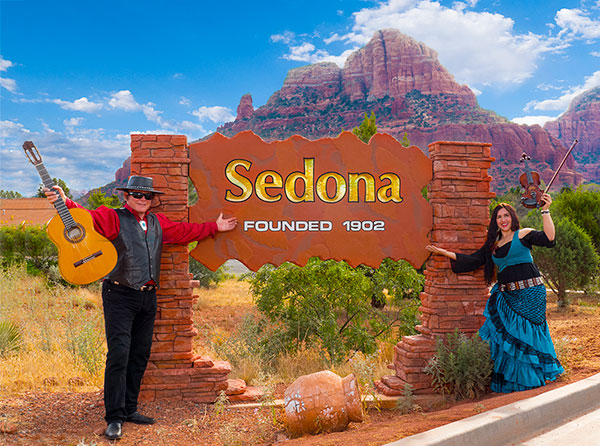 Gateway to Sedona with Estaban and Teresa Joy showing off the sign to their new home base.
 The Estaban show live on stage at Sound Bites Grill with Emilio Santiago on Percussion.
I choose to use the Lumix GH4 for this shoot because I would be working on a tripod. The lens which seemed to work for the entire shoot was the Lumix Vario 35-100mm f2.8 at ISO 200. Aperture for the outdoor images was at f11 because the story we are telling is of Estaban making Sedona his home. If I was trying for more ‘artsy’ images I would have chosen a wider aperture. A lot of noise has been made about the GH4 and the fact that it does 4K video. Well I gotta tell ya it’s a hell of a still camera too. I love the touch screen focus. The screen is bright enough to see in almost any light but it also has a live view eyepiece. It’s picked up and extra stop of density and can shoot RAW files at 12 fps (not that I needed that with this shoot!).
Lighting was supplemented with an Ultra Zap 1600 Paul C Buff flash powered with a Vagabond Mini-Lithium battery. It’s great to have studio powered flash in the field! I added a shoot through umbrella and kept it just out of frame. The shoot-through allows to ht the light source closer to the subject which gives softer shadow edge transitions. Here I was trying to make sure the light on the performers was really clean yet natural.
If you like what read on this web site please use the links to Amazon to make your purchase. As an affiliate I receive a small percentage of the sale and it helps support the web site content.
Yours in Photography, Bob
