by successfulbob | black & white, infrared photography, landscape photography, Lumix G6, photography, photography creativity, photography gear, photography software
Photographer Muse – Part Two (or Deux if you prefer)
I shared how much I enjoy working with Pash. I can’t give her enough credit for coming up with concepts she would like to pursue that lead me to new imagery. She knows how to move, and hold a pose, when necessary. Both are equally powerful skills. See my original post about my muse here.
Learn more about Pash and her work with modeling, mask making, performance and more here.
And now to the images.
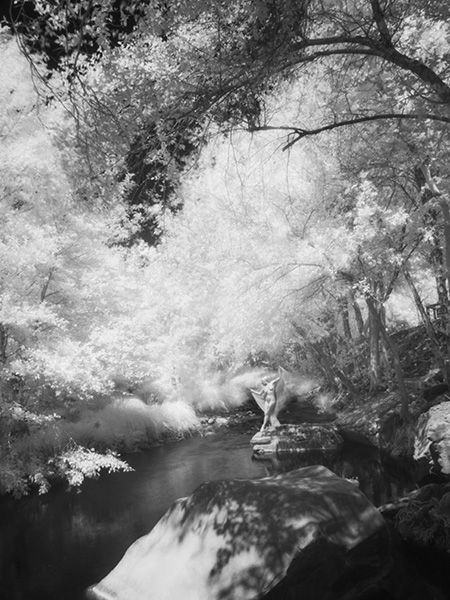
 This image is pushed to high exposure.
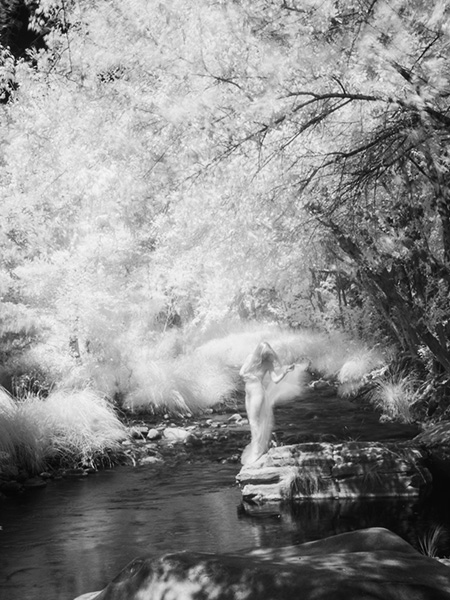
Going very high key with the exposure of the image with the ND filters in place allow the wind to play a part giving an even more ethereal feel to the image as the leaves and cloth wrap blow gently.
ND filters are by Tiffen. It’s the Pro100 package which includes the holder, a 1.2, and a 1.2 graduated filter. For this shoot, I had a 3.0 and the graduated filters. You can buy much less expensive filters but in ND you get that for which you pay. These are very thick optically pure glass filters.
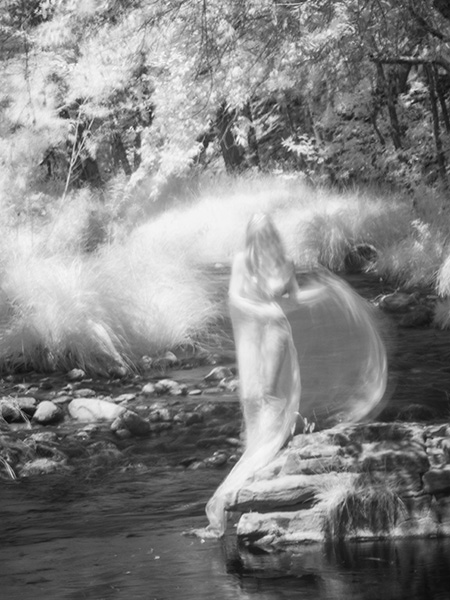 This one turned out a bit spooky!
 All the images were photographed in the same space, but all have a different feel.
A different view of the creek and the amount of space my model Pash takes up within the frame makes for a very different look for all the photos. Let me know which one is your favorite and why. It would be interesting to see the various responses.
All images were created in Infrared made with Lumix G6 converted by LifePixel.
A 14-140mm (28-280mm 35mm equivilent) lens was used. This allowed for the significant changes in framing without spending time swapping out lenses. Files were processed with Adobe Photoshop and Skylum’s Luminar 2018.** Some images were givin a little extra glow. I set up a preset in Luminar to get the image close to where I wanted then tweaked from there.
If you haven’t captured photos in infrared with a digital camera here is what a file looks like when downloaded in RAW to the computer.
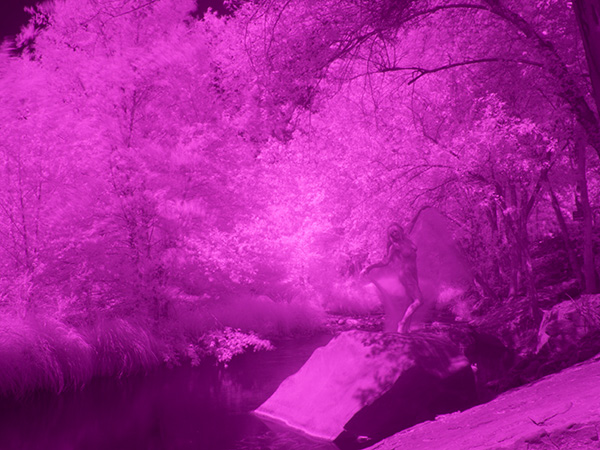 SOOC Infrared RAW file.
The files captured in the IR spectrum need some work as you can see. The nice part of using the Panasonic camera with live view set to monochrome allows you to get a better idea of what the final image will look like. If you shoot RAW plus jpeg, you will end up with a magenta version as above and a black and white version. Can be very handy when you first start shooting IR.
Yours in creative Photography, Bob
PS – Save $10 on Luminar 2018 by using the Promo Code COATES

by successfulbob | landscape photography, Lumix G9, photography, photography gear, photography software
Red Rocks at Sunrise
Living in Sedona is quite a blessing. When I want to experiment there is no lack of obvious subject matter. The red rocks all have different shapes and appear different at differing times of day and night leading to a veritable plethora of images that can be photographed with additional techniques and shared.
On Sunday morning I was up just before the sun made its appearance for the day. I grabbed my tripod. Well, if I must tell the truth, I grabbed my camera (lumixG9) and some lenses, rushed out the door, jumped into the car and headed off to catch the rising sun and quickly coloring clouds. Then I turned the car around and went BACK for the tripod wasting beautiful light in the process. But that’s why we are considered pros. We can come back from a less than perfect situation and still have some nice images. ( or… I guess a real pro would have had the tripod to begin with. But, I digress)
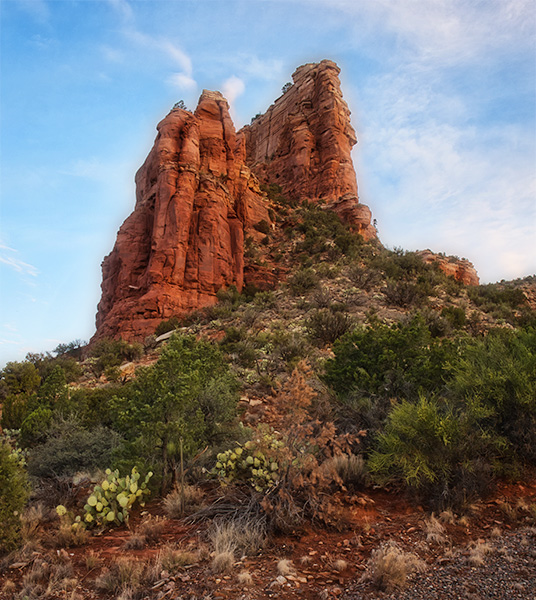 I took a different road than usual. I made a five exposure bracket with the camera on a tripod. I used three of the images processed in *Aurora HDR 2018. This angle made the red rocks feel rather majestic.
Today’s savior was the ability to bracket images and extend the range of light the image can show. Without HDR and the processing software in my tool-bag I would have had a pretty bland results. As it was I found some interesting angles and areas that in which I don’t often shoot.
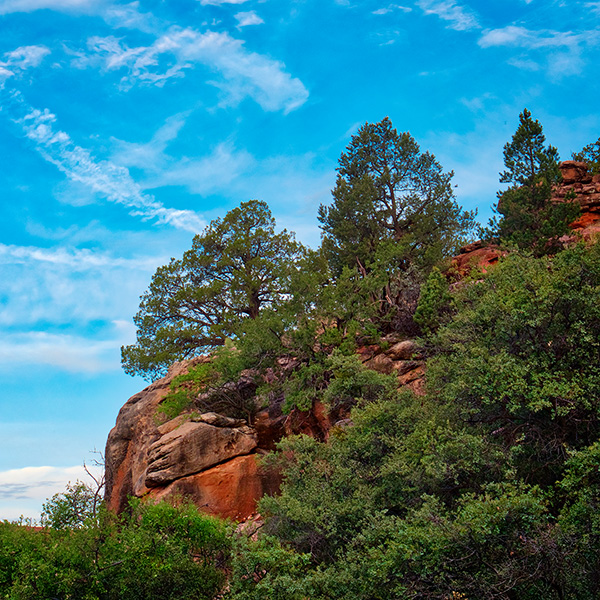 Another not so frequented road let me see this rock formation with trees issuing forth. Again processed with Aurora HDR software from a three exposure bracket.
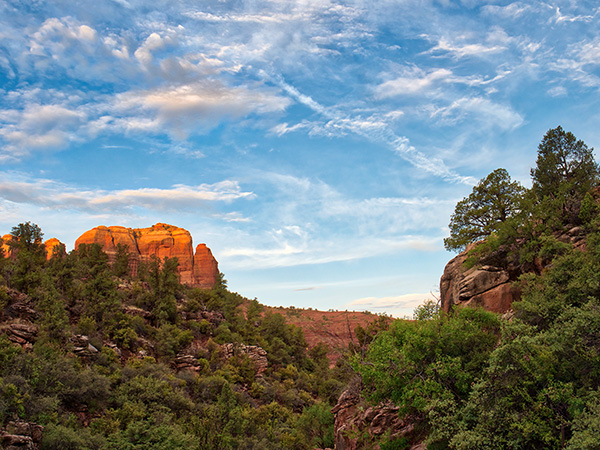 The back side of Cathedrlal Rock with the rock outcrop. Three exposure HDR with one stop oveand one stop under.
Without the hdr system the trees which were in shadow would have been very blocked up and noisy. Making multiple exposure allows the photo to repliatewhat the eye sees. The eye constantly is changing ‘exposure’ with the pupil opening and closing depending upon the brightness of the scene.
In a couple days I’ll show you the hero shots of the backside of Cathedral Rock.
Yours in Creative Photography, Bob
PS – I was using the Lumix 12-60mm LUMIX G LEICA DG VARIO-ELMARIT PROFESSIONAL LENS
This lens has a great range from wide angle to medium zoom and covers a lot of my needs. There is also a kit lens with this range that is not as fast.
* Save $10 with the coupon code ‘COATES’ on AUrora HDR or other Skylum software
by successfulbob | cloud photography, photography, photography creativity, photography gear, photography software
Clouds Illusions – Part Two
A couple of weeks ago I shared some clouds and ideas about photographing them and some thoughts on using them in working on your art images. (see the post here)
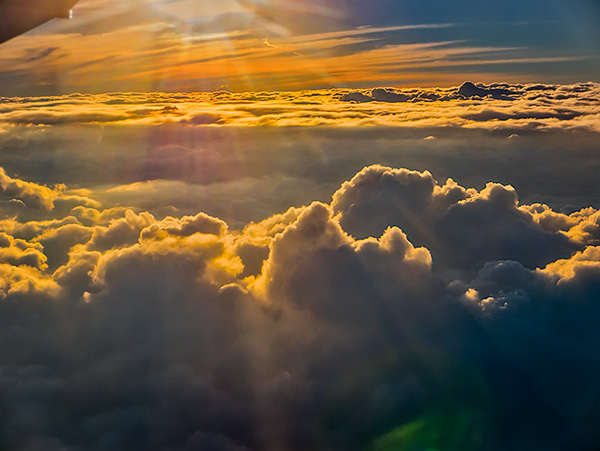
 Sunset was coming together looking over the clouds from the window seat.
I referred to Judy Collins’ song “Both Sides Now” referring to clouds and said I would share some images inspired by Julianne Kost’s book ‘Window Seat.’ After seeing her book, I thought about my pictures out the porthole of the plane as I traveled around the country on my Panasonic teaching forays. I have quite a collection of photos of clouds from above I thought that they deserved a post of their own. So here you go. Images are from the upper side of Both Sides Now.
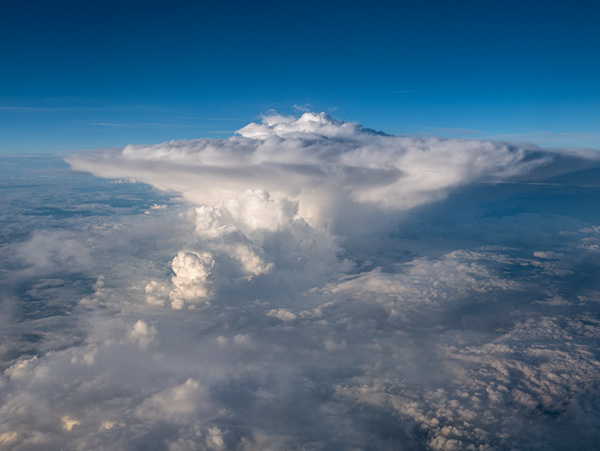 Watching a thunderhead form from this angle is quite different.
 I enjoy the ‘cloudscape’ with its own set of clouds above.
It turns out that all of the cloud photos in this post were made with the Pansonic Lumix LX100 which I refer to as the ‘professional’s point and shoot camera.’ It has a smaller chip, but the lens is sweet and fast. It’s on a magnesium body, and all the critical controls are available on the outside of the camera just as we had back in the day. That said, it has a ton of features we didn’t have then including eleven frames per second burst captures. If you go into 4K Photo Mode, you can pull 3,400-pixel stills at 24 frames per second. And plenty more.
On the downside, it does not have a superzoom so if you get this for travel photos you’ve got to do some zooming with your feet, but that’s what keeps the size down.
It’s on my list to work with the clouds from above and try to put them in art pieces. I’m hoping I can make it work and give almost a sense of ‘Something is wrong here, but I can’t quite figure it out.’ But that will be a post for another day.
Yours in Creative Photography, Bob
by successfulbob | photography, photography gear, photography software
Lumix GH2 Camera Files from Panasonic
My first exposure to the Lumix line of cameras came when I was trying to find a smaller lightweight camera for travel. My wife was always giving me grief for hauling 35 plus pounds of full-frame DSLR gear with me on vacation. I said, “What are you worried about? you aren’t carrying it!” After that she replied, “You aren’t either, the gear often stays in the room ’cause it’s too heavy to lug around.” Don’t let her know this but I’ve found she’s right most of the time and I should listen more often, but I’m a guy. What can I say?

Made with the Lumix GH2 in Florida in 2012
Anyway, back to the story.
I tried three different ‘point and shoot cameras with no success because I finally listened! The reason they didn’t work for me? The files would fall apart when I tried to push them past anything larger than a 12-inch print or use the images in combination with other photos in my PhotoSynthesis process of creating my art.
And then… I found the Lumix GH2 and got a couple lenses. A wide angle and a 14-140mm zoom. (28-280mm FF equivalent) I added a small pouch for extra batteries, a tiny tripod and the other goodies you need for a two week trip to France. I had that camera on my shoulder with the 14-140mm lens and the pouch at my waist, and it never left my side for our entire trip. The best part?? When I returned I started working the files and ‘Viola!”, The files held up. I started running to all my photographer friends and telling them about this discovery. That led to my eventually becoming a Lumix Ambassador. That’s a story for another day.
I’m telling you all this because I decided to take a look at the GH2 files and give them a run through some of the newer software including Photoshop, Luminar 2018 and Aurora 2018. I amazed at how well the files do even today in 2018. These files are six years old, and there have been quite a few improvements in the subsequent iterations of the Lumix line. When the GH3 came out I started using it for my professional work and found that I could do about 85% of my jobs with it. In the beginning, I shot the camera side by side with my full frame DSLR for safety. Then I knew what tasks could be completed with the GH3 and the DSLR sat on the shelf more often. When the Lumix GH4 came out, I did a few more side by side comparisons before realizing I could do all my work with the micro 4/3rds camera. And all my DSLR gear went on the market, and I haven’t looked back since.
Until today. I thought I’d share some of the images from the GH2 circa 2012. Here are a couple more images.
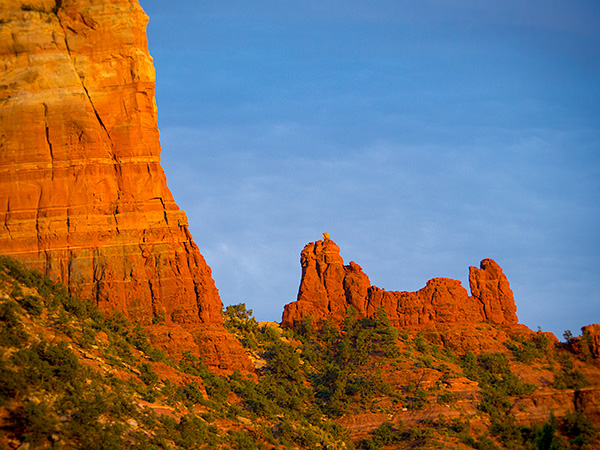
Snoopy Rock in Sedona, AZ Photographed with the Lumix GH2 and processed with Photoshop and ** Skylum Software.
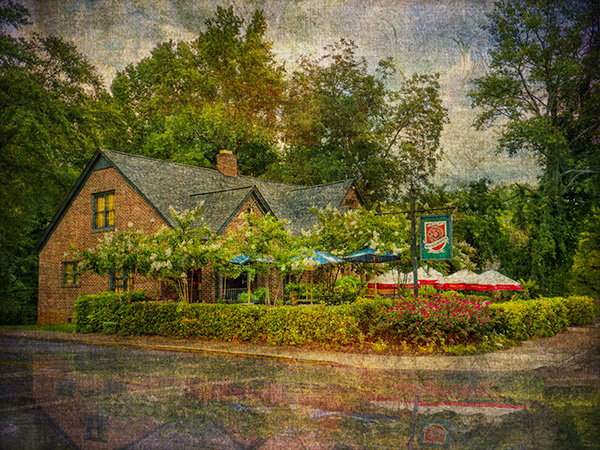
Here’s an image using the PhotoSynthesis process that I use in layering textures and giving more of an art feel to an image. And below that the original capture.
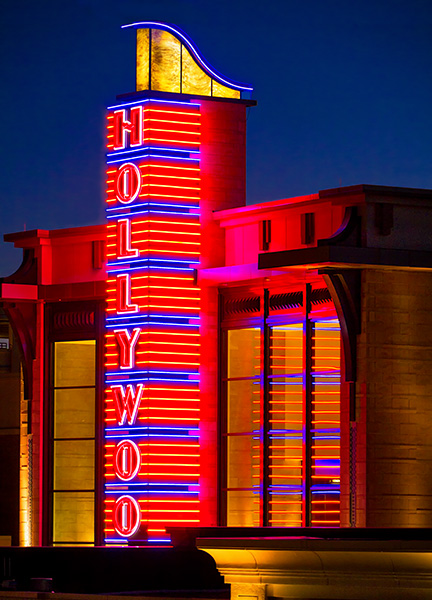
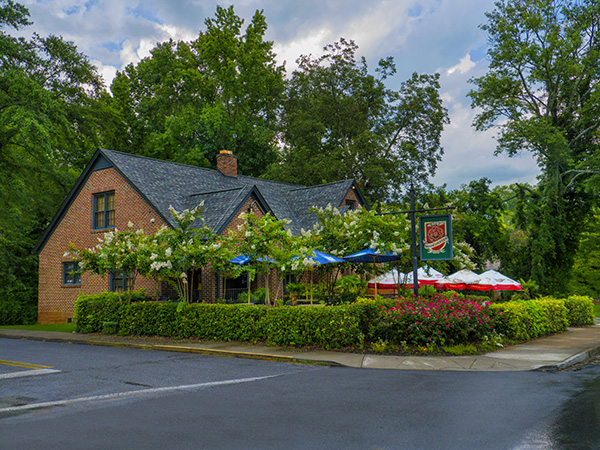
Manchester Arms Restaurant just outside Atlanta. GH2 again.
Original capture
In a couple of days, I’ll show you some images and the artwork created during my trip to France.
Yours in Creative Photography, Bob
** Skylum software includes Aurora HDR – Luminar – and CK Creative KIT. Special deal on Aurora HDR through July 4th. On any of the software add PROMO CODE – COATES to get an additional $10 off
PS – The latest flagship camera for stills (first one!) is the Lumix G9. This thing rocks!
I haven’t forgotten about the clouds from above post I said I get you…

by successfulbob | bird photography, Lumix G9, photography, photography creativity, photography software
Flight of the Blue Jay
I’m still a bit limited in getting out to photograph I’m trying to keep my camera reflexes in good shape. I continue looking for creative photo opportunities close to home. Anytime I can study the behavior of birds, no matter the type I find it adds to the storehouse of knowledge that will make ALL my avian photography better.
A case in point. I’ve been watching birds from my back porch and seeing what I can do to show behavior. I prefer to show movement vs. a still portrait in my work when possible. I have noticed that birds will tend to repeat patterns if they are hanging out in one area. IE a hummingbird will approach a feeder or flower a certain way almost every time returning to the same branch to rest. If a bird goes to the top of a tree, there is a good possibility that the bird will return to the same branch in a short period. I often share that you need to observe wildlife for a while before picking up your camera for the most exciting images.
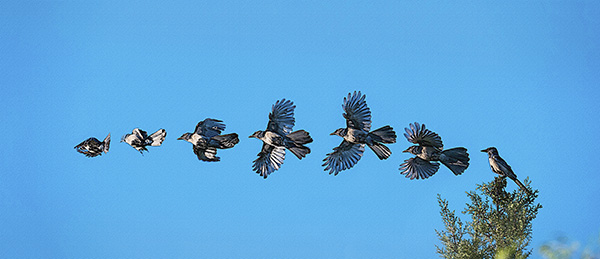
 Screen capture from Adobe Bridge of bluejay flight
Most birds will take off into the wind. The bluejay above was facing the sun and the wind direction. The Great Blue Heron along with many other birds will usually offload some poo just before taking off. If startled or they are feeling threatened they will tend to turn away from the perceived threat.
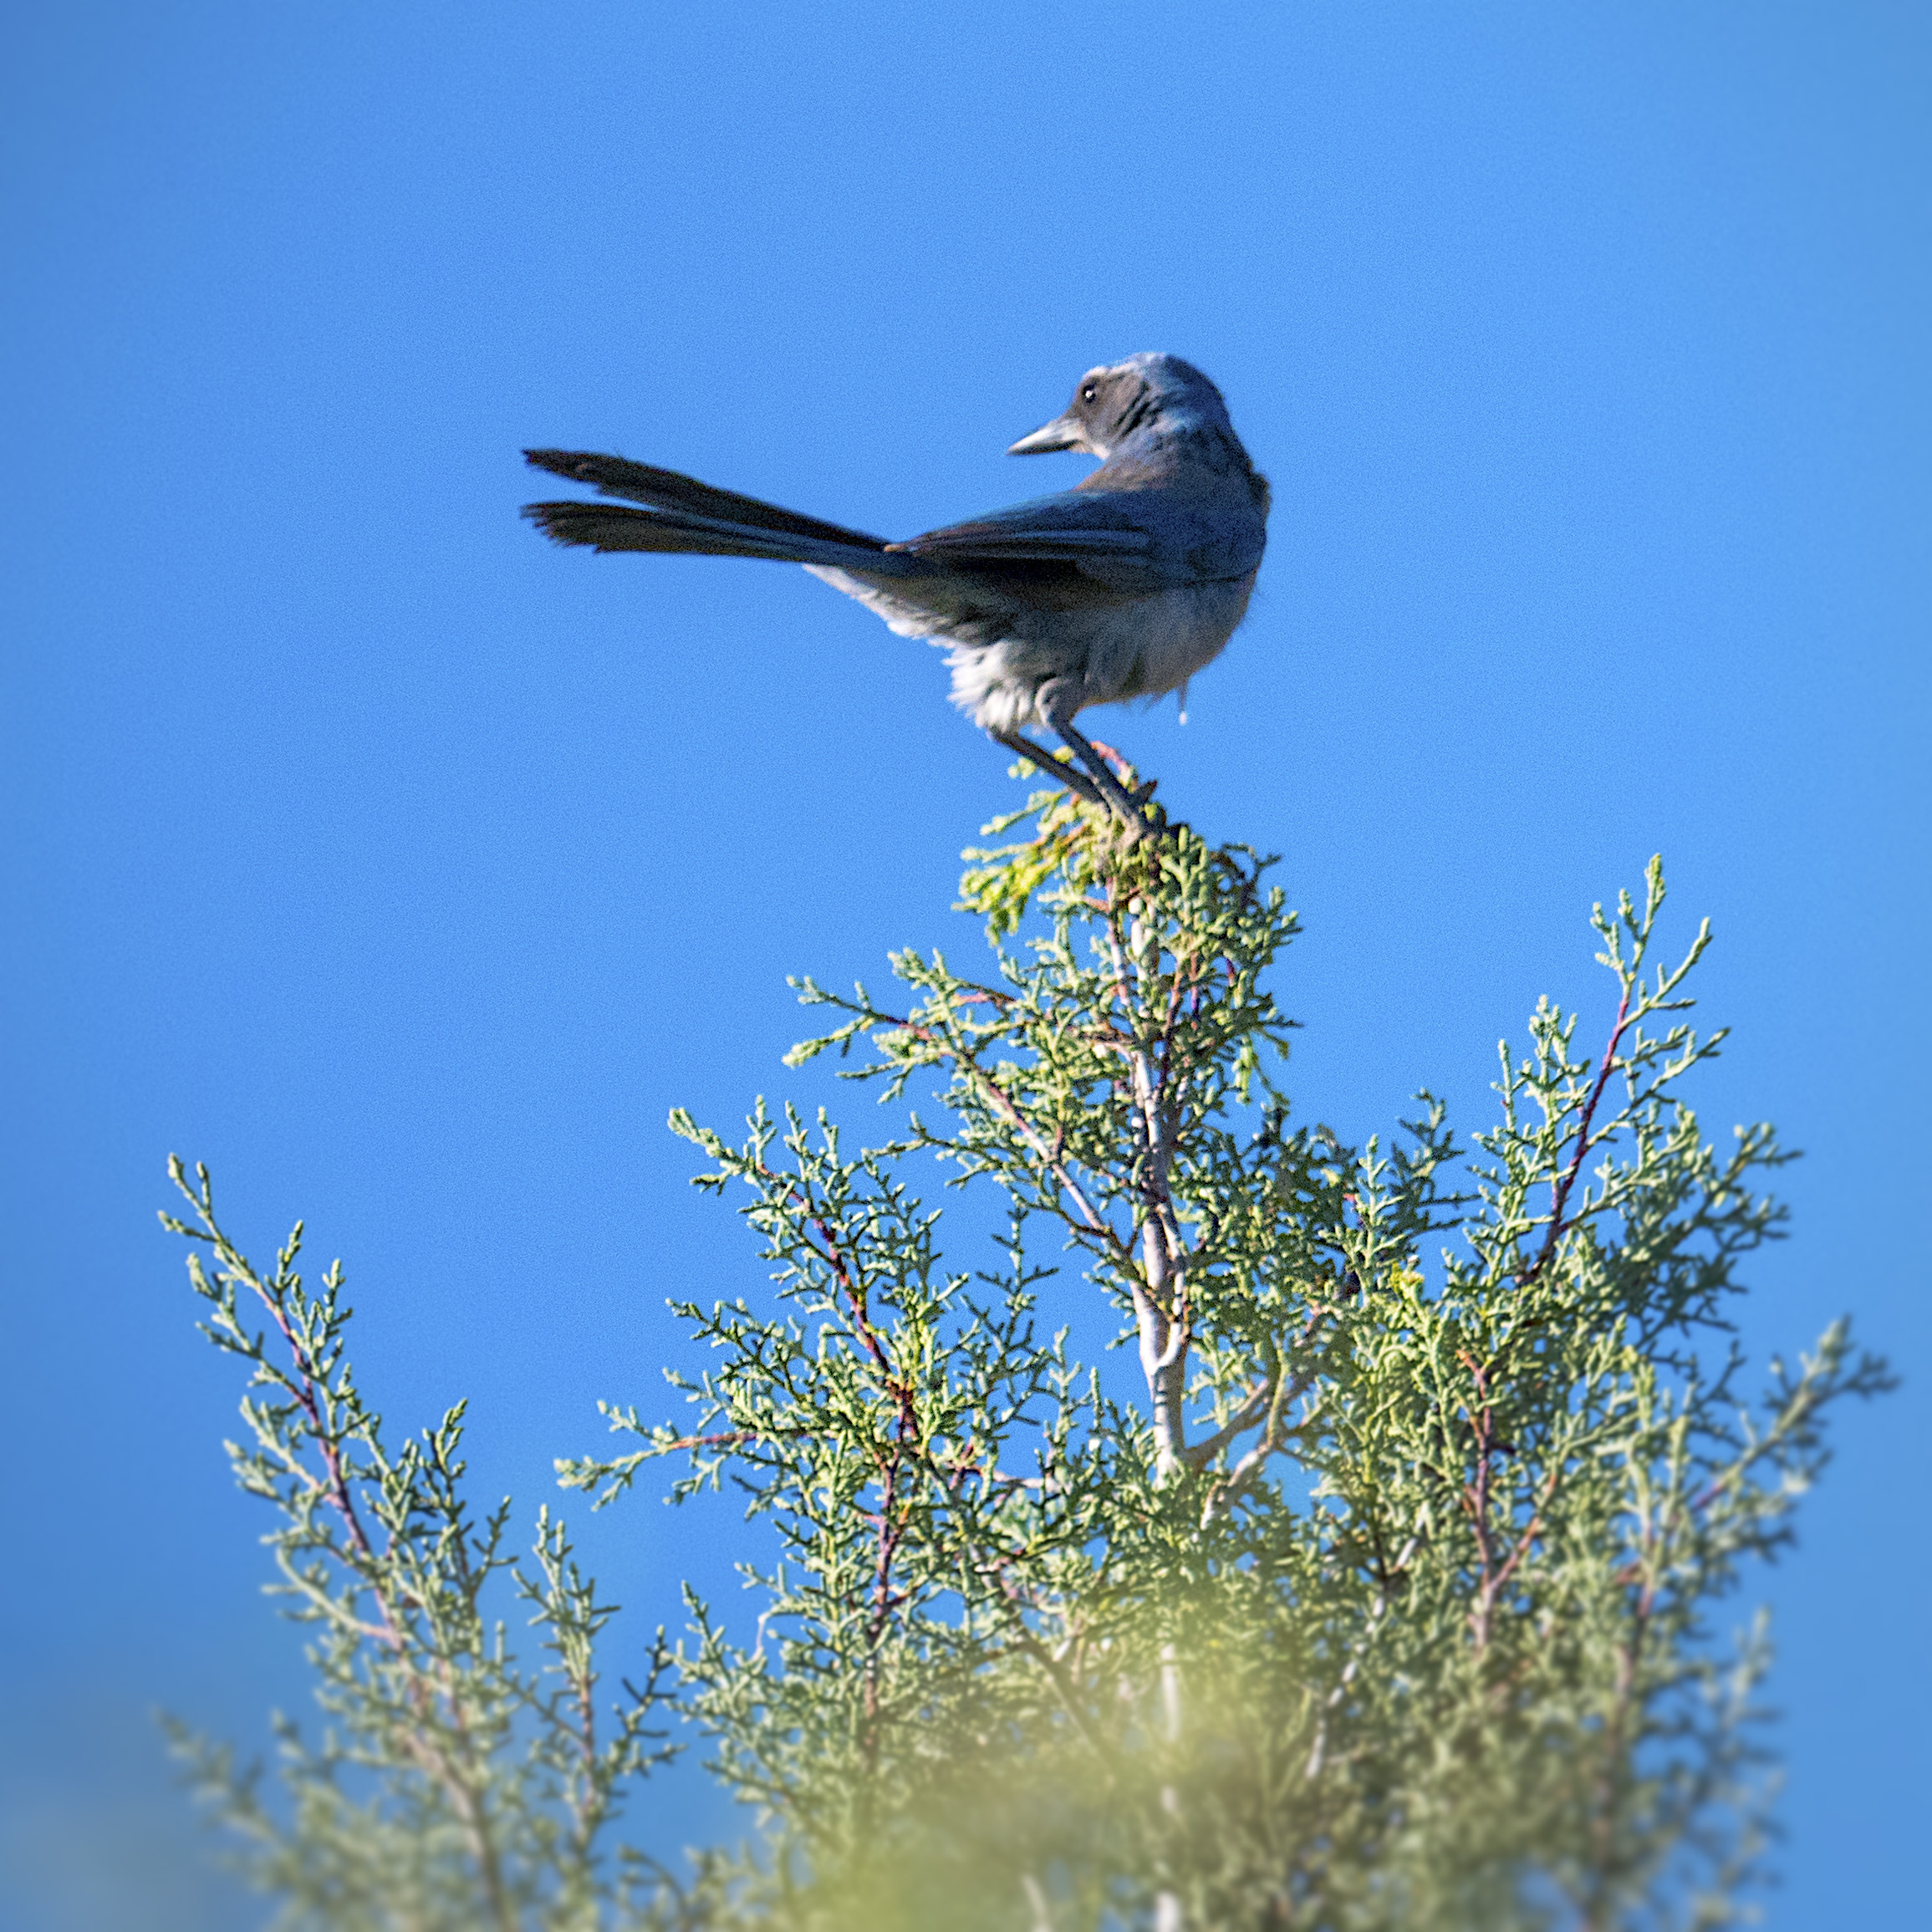 This bluejay landed in the top of the tree waving in the light breeze.
I watched as it left the tree and tried to memorize how it began its flight. Did it fly high and up or start to dive to create lift? How did the wings move? With that image in my mind, I set the Lumix G9 camera to SH which stands for Super High speed. It uses the electronic shutter to allow for twenty FPS. The Leica 100-400mm lens was used fully racked out to its 800MM equivalent
 Flight of the Bluejay with watercolor treatment
The image above was composited using Photoshop Layers and Masks. All relevant photos were selected in Adobe Bridge. Under the Tools Menu, I chose Load Files into Photoshop Layers which placed all files into a single PSD. Additional canvas size was added to the left side. Each image was offset and masked so that each image was not overlapping. Then a series of Photoshop Filters were applied to create a watercolor feel to the image.
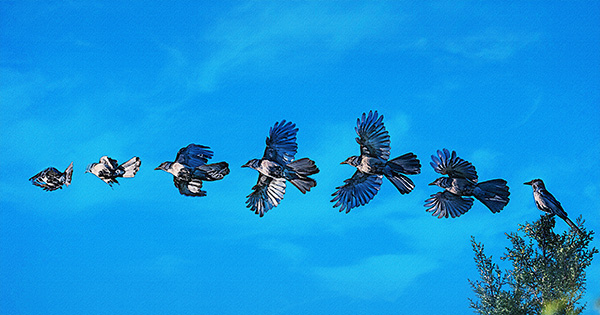 Because the sky was flat, I added a cloud image to the Photoshop File.
A cloud image was opened and dragged into the flight file. Blend Modes were experimented with until I found one that added subtle sky detail.
This one might call for a Photoshop tutorial to show the progression of this image build. Let me know if you would like to see me produce one.
Yours in Creative Photography, Bob

by successfulbob | infrared photography, landscape photography, Lumix G6, photography software
A Little Infrared – View from Mariposa Restaurant
There’s a wonderful restaurant in Sedona; AZ called Mariposa. Award-winning chef/owner Lisa Dahl created a Latin-inspired Grill menu on the hill between Uptown and West Sedona. I highly recommend heading over there for lunch. Good stuff! This was a location that caused me to say, “There should be a restaurant here!’ every time I passed this location. Much of the thought involved had to do with the spectacular view.
While passing by today, I saw some clouds and thought that a little-infrared imaging was in order. As always I recommend working the scene at least a little bit. Play with composition. Play with cropping. Play with different angles. As I didn’t have a lot of time I didn’t work the scene as much as I might have but here are three images.
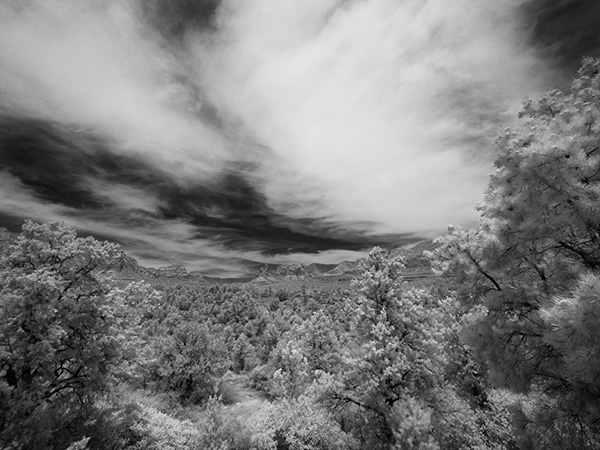 First Capture. I only had a very wide angle zoom. The trees kind of overwhelm the red rocks in the middle ground in this rendition.
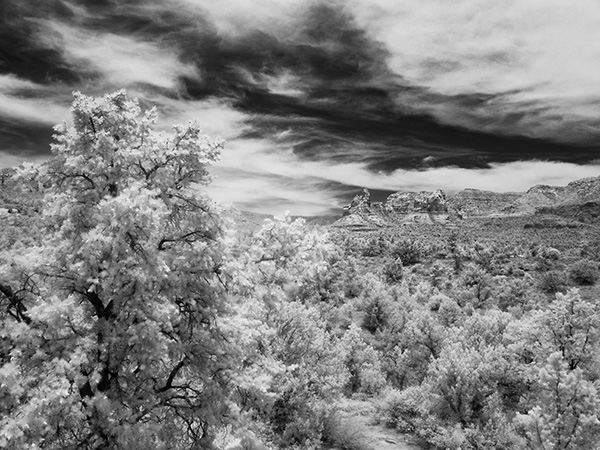 Zooming in a bit and using the play of the foreground tree to balance the red rocks in the background. Using the tighter crop also allowed the sky to read better as there was more movement in the area without clouds.
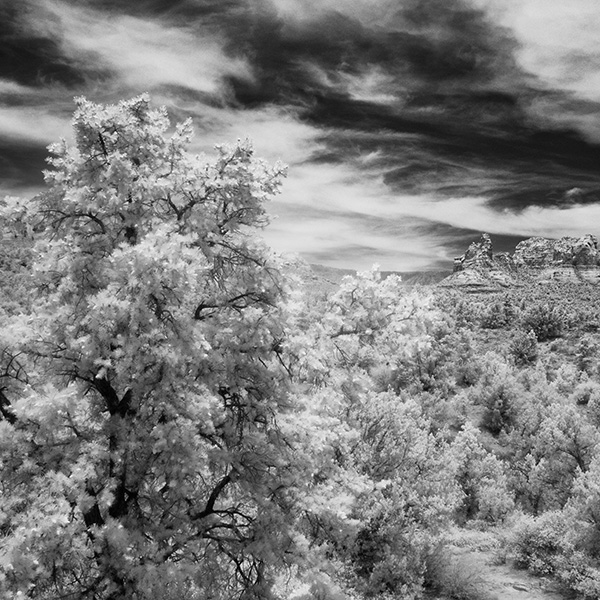 Here is one last version cropped to a square from the image above. It brings even more attention to the red rocks while honoring the glowing tree.
Images were captured with the Lumix G6 which was converted to infrared by LifePixel. Any camera you have retired just sitting on the shelf after upgrading your equipment can be brought to new life by a conversion. It opens the middle of the day to some creative image making. This is the standard 720nm filter that most looks like infrared of old. Infrared converted cameras that are live view capable make it possible to see the image in real time and not have to make focus adjustments as we once did with film cameras.
I processed these in Adobe Camera RAW and Photoshop to control contrast and set the proper tonal range. I then made a copy of the layer and used Skylum’s Luminar 2018** as a plugin to add a glow to the highlights and tweak specific areas for more contrast control, and then another layer to add a little noise to replicate the look of IR.
Yours in Creative Photography, Bob
** Use CODE COATES to get $10 off if you decide to buy Skylum software such as Luminar and Aurora HDR software.