Through the Internet, I have met an avid advanced amateur photographer/videographer named Aloy Anderson. Aloy is always pushing to learn new and creative ways to use his cameras. I have never attempted stop-motion video myself even though it is a capability built into the Lumix Cameras. When Aloy shared his project with me, I asked if he’d mind sharing some of his thinking and his process with me. And now with you.
I invite you to check out his stop-motion video called Jungle Movie “Be Brave” and turn the rest of the post over to Aloy. Enjoy!
“My name is Aloy; I’m a photographer and Youtube content creator from Miami. From an early age watching Sesame Street, I’ve always been curious about how to make stop-motion animation films. In those days it took a 35mm camera with “miles” of film to develop which was out of my reach. When I realized my new Lumix G7 had the feature built in I was pleasantly shocked. I had to give it a try. My video “Jungle Movie” my first attempt at a storyline video.
When you enter the stop motion menu on the Lumix camera choose whether you will snap each shot independently with the shutter button or the camera can be set to shoot at your preset interval. I do a little of both to give me time to reposition the set pieces and camera placement. For simplicity, I chose 5 seconds between each shot to give me time to move the characters quickly and get out the way.
Stop-motion can be very tedious and time-consuming, and it’s tempting to take the easy way out by leaving the camera on a tripod in one spot. That would be a mistake akin to watching a whole movie from one angle. I suggest different scenes and locations for variety, using a wider lens to show establishing shots and standard lenses for shallow depth of field moments. Before you begin, have a definite storyboard in mind. I like to use manual focus and exposure for each shot.
Here are some tips.
1) Don’t to move each piece too far between each shot as I did in some of my Jungle Movie. The resulting video will have choppy movement. A few centimeters is a good start.
2) Keep the camera on a tripod or table-top to maintain a solidly grounded scene.
3) Every few shots check to make sure your exposure or focus point hasn’t changed.
4) As you improve, you will know what not to do next time and come up with more complex ways to tell your story.
5) Imperative before you begin, set your camera’s aspect ratio to 16:9 which will allow it to play back full widescreen rather than a smaller 4:3 photo size.
6) Finally, have fun!
I guarantee your first 10-second video attempt may look like a five-year-old did it but you will have a good laugh watching it play back with all its faults.
The good thing about the Lumix is when you’re finished making captures the camera will ask you how to customize your video rendering such as how many frames per second it will be and at what resolution. It will then stitch all those photos together into an MP4 file. The only downside is it will be a “silent” movie. In my case, I imported the MP4 into my video editor and added music and text titles to polish it off. It is crucial to add some form of audio to keep your video engaging. This information is not an exhaustive tutorial by any means, but the fun is learning as you go.
I invite you to visit my Youtube product review channel and my Flickr Photography album. Most importantly I would like to thank Bob Coates for inviting me to write this piece. Hopefully, you will have a good time learning this type of creative way to use your camera.”
Aloy Anderson.
Thanks to Aloy for sharing his first foray into stop-motion.
Yours in Creative Photography, Bob
PS – Most Lumix cameras have the stop-motion and time-lapse features built into the camera. If you have any questions about which camera might be best for your needs let me know.
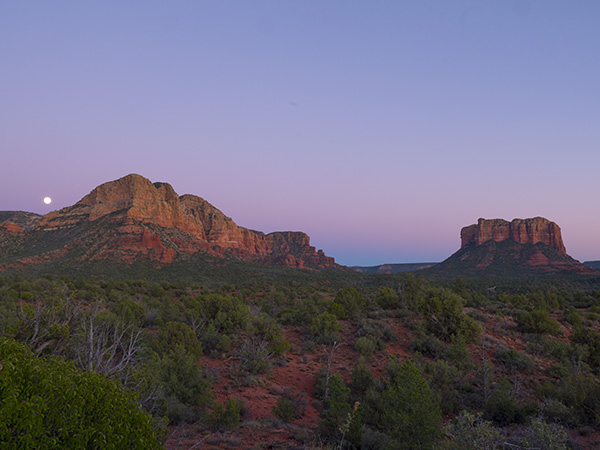
While out waiting for the moon to make its appearance the night before the Supermoon I worked a couple of cameras. I set up the Lumix GX8 to do a time-lapse of the sunset/moonrise. Glad that I also had the Lumix GX85 as a second camera to mess about with while the time-lapse was being recorded.
Here’s a still I pulled for the time lapse sequence.
The time-lapse was pretty simple. The settings are available in the camera. No need for an intervalometer. Under the Time Lapse Shot menu, you have the choice of Start time which can be immediately (now) or a time set in the future. Shooting Interval which is the amount of time between frame captures. Image Count which is the number of frames to be captured. In this case, I fired one frame every four seconds.
I thought I had a better position for the moonrise which was quite a bit to the right of where it actually showed up. I stopped the captures pretty early after the moon made its appearance. Looks like I need to calibrate my compass.
I was able to add some interest because I choose to have the camera process the still images to a 4K video. 4K video enables you to move around in the image without losing quality which I did in Adobe Premiere. Did you catch that part about the camera processing the time-lapse? A very cool feature. I choose the output settings including quality and frames per second. In this case, I used twenty-four.
For the video below I changed the output settings to 12 frames per second. I did a little color correction and added movement in Adobe Premiere.
Tomorrow I’ll show you what I was photographing with the Lumix GX85.
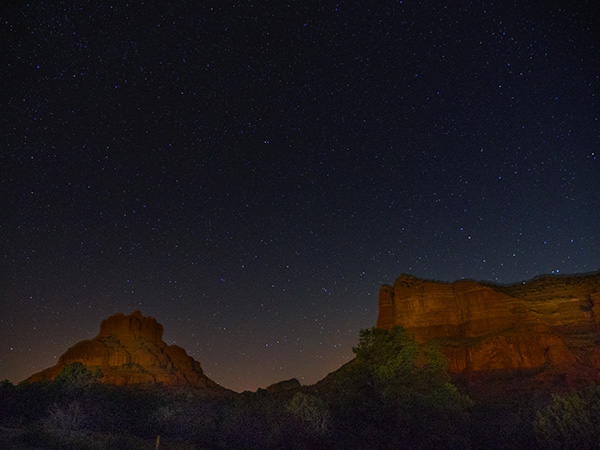
Last week I showed you some night sky photography with some stills blended together. When shooting night skies getting some detail into the foreground takes a bit of work when you are shooting in a dark skies compliant area like Sedona, Arizona. While I was capturing those images with my Lumix GX85 I set up the Lumix GX8 on a tripod for a time lapse sequence.
The lens was the Vario 12-35mm f2.8 set at f2.8. ISO 200 and 30-second exposures. I set the interval to 32-seconds to give the camera a little time to reset. Noise reduction setting was disabled as the camera would have been taking an extra 30 seconds to create the noise reduction for each image. Way too long for what I was trying to do. Using the camera’s processing I was able to make videos at various settings without any problems at all. Here is a minute and a half video showing all of the results including an edit with Photoshop.
Stars are making a circle around the north star. Funny how they twinkle just as they do when you are looking at them live.
Time Lapse Video of 140 images processed in-camera at twenty-four, twelve , eight and four frames per second. I also processed the images in Adobe Photoshop using the timeline to create a ten frames per second video.
One note. I was able to take the RAW files into Photoshop and process the red rock area different than the sky area which allows more detail and color to be in the final video. All the files were imported into Adobe Premiere and resized, captioned and rendered to HD. The videos I made in-camera were processed out as 4K files which gives more possibilities in the final movie. I could have left them large and then had the possibility of movement like panning or zooming through the video to create even more interest.
Here is a still image processed from the same scene. A one second and a thirty-second exposure blended with extra process in MacPhun’s Intensify CK
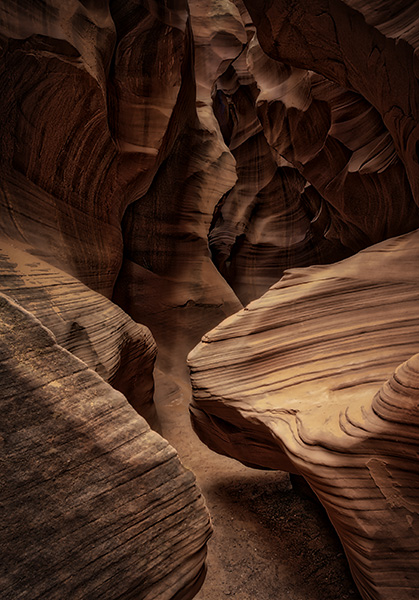
Arizona Professional Photographers Association has scheduled their Fall Fest event for November 4, 5 and 6 of this year. We’ll be traveling to Page, Arizona for lots of landscape photography opportunities. The highlight will be a tour of Secret Canyon. Secret Canyon is a beautiful slot canyon that we will access via Hummer Tour Adventures.
Also on the docket is a visit to sunrise and sunset locations that are quite beautiful. They say a picture is worth a thousand words. How about a video to describe the adventure?
Fall Festival video for Arizona PPA
There are limited spaces available for this trip. Initially, it will only be open to AZPPA members. Then if any spots are left it will be opened to non-members as well. If you would like to get on the waiting list to get in touch with me and I’ll get you hooked up.
The video and stills from this production were captured with a Lumix GX8 and Lumix GH4 cameras and assorted Lumix lenses. You may have noticed the time-lapse. It was created with the camera on a small tripod held on the dashboard with images taken every one second. Those images were processed in-camera to a 4K video at 24 frames per second. Adobe Premiere Pro the editor of choice for assembling all the pieces.
Lumix GH4 Lumix G Vario lens 7-14mm @14mm (28mm full frame equivalent) ISO 200 – Processed a three frame bracket spaced one stop apart in Aurora HDR software
Images were captured with the camera mounted on a tripod. When photographing in slot canyons you need to expand the dynamic range by capturing multiple exposures because light floods in from the open top but there are many dark corners. Being able to blend images together makes it possible to see all the varied detail that has been etched into the walls by wind and water over multiple years.
Yours in Creative Photography, Bob
PS – More information on this trip or the monthly meetings and other benefits of Arizona PPA can be found on the website
Here’s a different time lapse from the same location as a few days ago at Sound Bites Grill. Was able to set the tripod up on the deck that overlooks this wonderful scenery in Sedona.
This time I set the camera behind a red rock stone column in order to stay out of the gusts of wind that caused some extra work on my last time lapse at this location. I also unclasped the camera strap and tied down the camera for even more stability. I was able to do this quickly because I have the Peak Design Camera Strap. I really enjoy the ability to quickly be able to remove the camera strap when shooting video or time lapse images. This cuts down on the wind profile of the gear leading to to steadier capture. It also make it easy to change the type of strap if I’d rather use a wrist strap instead of over the shoulder. This is a pretty cool system with lots of options.
But I digress… How about the video Bob? Here you go…
Sunset time lapse in Sedona
I used similar settings as the last time lapse on the Lumix GX8 capturing a frame every three seconds processing out to a 4K video .MP4 in camera at 24 frames per second. Then taking that video into Adobe premiere Pro to add some Ken Burns movement through the scene.
I was hoping that the clouds your view scudding across the scene were going to be there as the sun snuck beneath the horizon and giving spectacular color, but alas, it did not. Such are the vagaries of predicting the weather.
Of note, as you study this time lapse be aware of the look of the red rocks after the sun has gone down and the sky begins to move toward cobalt blue and the density range begins to tighten up. This is an ideal time to capture the red rocks as the light is being reflected off of clouds and there’s lots of depth and dimension and beautiful color. I can’t tell you the number of times I will be at a scene with other photographers and they pack it up and leave moments after the sun sets. I wait that extra fifteen to twenty minutes AFTER the sun goes down to get much more intense images. Does it always work? Nope. but way more often than you might think and the rewards are worth it. I’ll address this in more detail in a future post.
Lately I’ve been capturing time lapse sequences of sunsets here in Sedona, Arizona. And by photographing them I seem to have reprogrammed my brain for the way it sees light change. Almost as if by capturing and working with images that compress time into a shorter period I am extending my vision of light and time.
Let me explain.
Because of this new awareness I am now seeing the shadows slowly crawl across a scene as if I am becoming hyper-aware of the changes. Capturing a time lapse makes you take time to slow down because it takes a fair number of images created over a relatively long time period to have enough material. In a sense it becomes a meditation.
Now in this particular case it was a bonus to set the camera up then retire to the bar to observe the changes taking place which was a fun way to work/play on a personal project. My wife and I got to enjoy a glass of happy hour wine and one of their stellar appetizers. (it was the calamari, cooked perfectly and served with a sweet/spicy sauce over a bed of carrots and light greens)
Images captured with the Lumix GX8 & 12-35mm f2.8 Vario lens. Time lapse was processed in camera then imported to Adobe Premeire CC 2015 for processing slight movement. I was hoping that the clouds you saw in the beginning of the video would have hung around and colored up to spectacular… and they did as they moved out of the frame. Color was bright salmon to the south… Oh well, still nice movement of light on the red rocks.
For infrared conversion of my cameras I use LifePixel. Infrared allows you to put an older camera to use and opens up a new time time of day for productive image creation.
Learn Photoshop in a fun environment. Aaron Nace applies the right amount of fun with easy to understand and follow tutorials. Actions and brushes are included with lessons!
Best embroidery ever. Give Queensboro a try, get a $20 instant credit to get started by clicking on the logo! They specialize in great quality custom logo apparel and promotional products with the best customer service.
Platypod has become a great resource for being creative in getting your camera gear easily into unusual places. As an Platypod Pro I get to work/play with the gear even before it comes out. Head over to Platypod, subscribe to the newsletter and you will get special discounts reserved only for subscribers.