Time lapse Photography – Sound Bites Grill & Snoopy Rock
aka – Snoopy Goes to Sleep
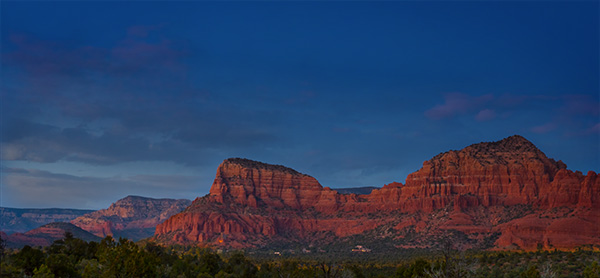
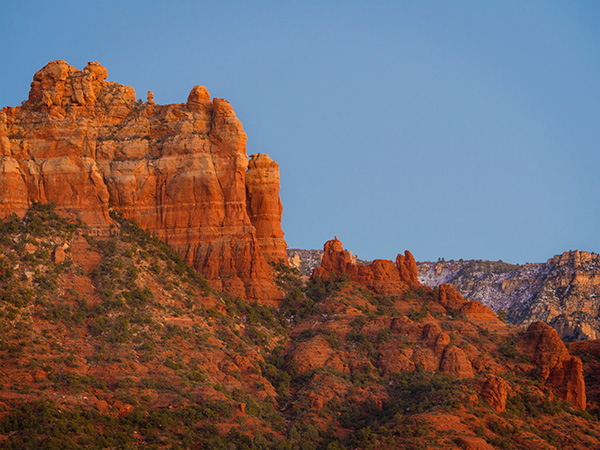
I get to spend quite a bit of time at Sound Bites Grill, being the house photographer. So I am very familiar with the view. And as many times as I see the sun set on the red rocks I am always amazed at how each sunset differs from the one before. On this day with no clouds to help I decided to concentrate on the comic feature built into the red rocks a Charles Schultz character called Snoopy.
Snoopy Rock Time Lapse Video
The initial images were captured with the Lumix GX8 with a 35-100mm f2.8 Vario lens. The settings were for an image captured every 3 seconds. The video was processed in-camera in the GX8 to 4K video with playback speed at 12 frames per second. I had previously processed the 916 images into a 4K 24 fps video and felt it was too fast.
One problem that I wasn’t aware of during capture (cause I was having dinner at the bar) was there were some very severe wind gusts shaking the camera. That’s not a good way to view video. Adobe Premiere Pro CC 2015 to the rescue. Opened the file in Premiere Pro then added the graphics and music. Even more important used the Warp feature to examine and fix the shaky wind buffeted footage to rock steady. Also added a slight Ken Burns effect zooming slowly into the image featuring Snoopy that is possible because of the 4K size files that still leaves you plenty of quality on an HD timeline.
As an added benefit to shooting time lapses there are individual images to choose from to create stills from the same scene. Here’s one with just a bit more color correction in Adobe Camera Raw and Photoshop.
Snoopy Rock still photo at sunset.
I’m really enjoying the ease with which time lapse videos can be made with the Lumix cameras. You don’t need to take the subsequent video into and additional processing program but that enables the addition of information and flourishes depending on your final output.
It’s pretty amazing how far the new HDR software from Macphun called AuroraHDR has come. Layers are now available within. An interface that’s pretty straightforward but with lots of control available in many different areas of manipulation.
One of the things I find I really like is the ability to get the most out of the dynamic range in the scene… and still have a very realistic image rather than one that screams HDR!!!!! And, even better presets that will get you close to the final look you want.
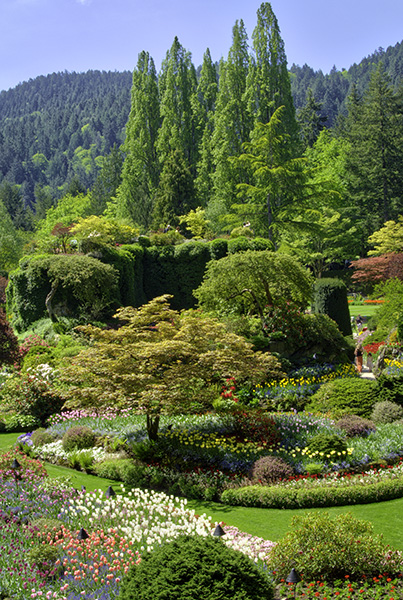
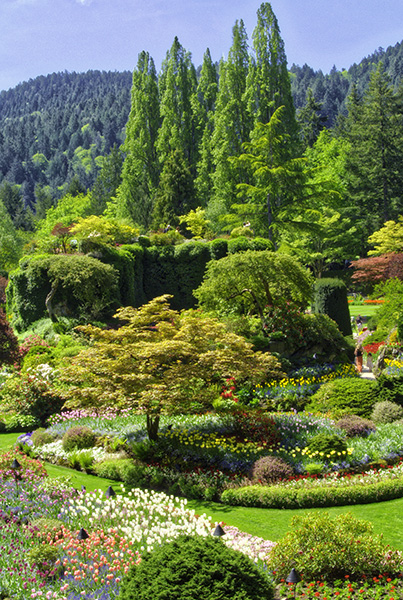
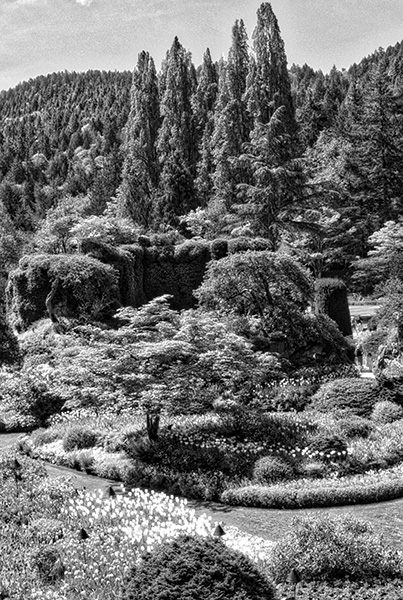
I pulled a set of three images from Butchart Gardens in Victoria British Columbia near Vancouver, Canada and thought I’d see how the software worked with these older files from the Leica D-Lux 4 point and shoot camera.
Natural preset.
A bit more ‘tooth’ in this preset. I like what it did to the greenery but not so much the sky. Could be combined with the image above or processed with layers in Aurora to clean up sky area.
Black and white preset… Not bad. No extra processing.
You can be as subtle or as outrageous in your processing as you would like. Shooting multiple images to expand your density range? Try out the program. I think you’ll like it.
Yours in creative Photography, Bob
PS – Get some extra goodies if you buy before February is over 99 bucks for the program and 90 bucks in bonuses. And always a 30 day money back guarantee… Click on the banner for more info.
HDR. High Dynamic Range. AKA how to jam a whole lot of light into an image the way our eye would see the scene. I’ve always been a fan. As a matter of fact I was one of the first authors to teach this when I was making videos for Software Cinema. I showed how to use this process to make landscapes and real estate scenes look their best.
Unfortunately, I didn’t have a catchy name for it. Nor did I design a software program or cause others to do so on my behalf that did most of the heavy lifting for the HDR process either… Oh well.
Five image sequence, handheld, processed in Aurora HDR software.
Even though there have been many iterations of HDR software it’s been a while since there was a new player with a different interface that included many new possible settings in and easy to understand interface and, wait for it, layers too! The new software is called Aurora and was designed by HDR travel image specialist Trey working in conjunction with Mcphun Software.
I was given the software to play with… And, I like it!
Another 5 image handheld bracket using Aurora HDR software
Same image as above processed differently from same exposures.
It gives you the ability to totally go HDR berserkers! Or, create a very natural scene with full dynamic range. Or somewhere in between so you can have the best of all worlds. An artistic, realistic representation of a scene that DOESN’T SCREAM HDR!!
All images were captured with the Panasonic Lumix GH4
Yours in Creative Photography, Bob
PS – At this time Aurora is only available for the MAC platform at the moment
Photographing at night can be a challenge. The dynamic range of any camera can be challenged by bright lights in a darkened scene. Trying to make that read properly usually takes some work with and HDR program but sometimes you don’t want to work quite that hard and want to just get a decent grab of a scene.
Before switching to the micro 4/3rds system by Panasonic I was never a fan of any presets on a camera. But after playing with some the results have been impressive. Several Lumix Cameras have presets that can help you with extreme situations. For example, the GH4 has an artistic setting called High Dynamic which can be helpful. The new G7 and the FZ1000 have a setting in the scenic menu called Handheld Night Shot where the camera is basically making multiple exposures and blending them together quickly for you.
Strangely enough I hadn’t tried the Handheld Night Shot preset until a fellow photographer I had recommend the FZ1000 to asked me if I had tried it. When I did I was quite happy with the results. Always fun when others share features that work really well with you. Considering I was shooting this through the window glass and doing a quick test this works. I’ll be trying it under better conditions soon.
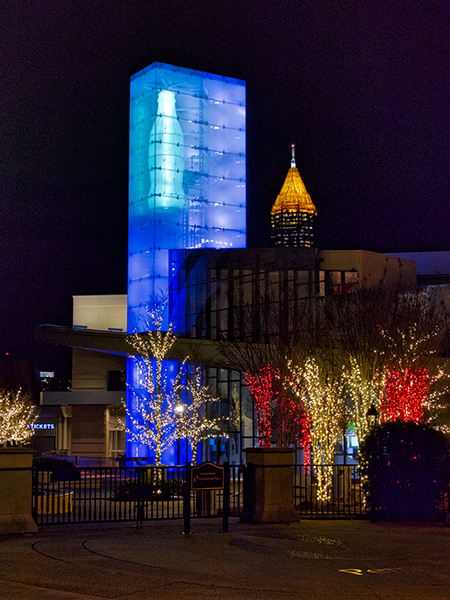
This was captured from my hotel room at the Omni in Atlanta during the PPA Imaging USA convention using Handheld NIght Shot setting on camera. Lumix FZ1000
In future posts I’ll be looking at leveraging other presets from the Lumix cameras as well as exploring some new HDR software from Macphun called Aurora…
When making a time lapse (view time lapse video here) image you can leverage a thing I often do to create a solid look of a scene by using images captured over a time period to get the best of all worlds. As our eye can change the size of the pupil in any scene when looking into the shadow or highlight area we sometimes need to arrest time and blend it into a single image to represent what the eye would actually see. I call this an advanced form of HDR imagery as the images are not captured in one go but with the camera on a tripod blend images that were made while the sun was up, as it was going down, and long after it had crept below the horizon.
Here’s the final image.
Here are the images combined and used to create the final. The photo on the left was used for the treeline across the bottom. Next image was used for the cloud formations. The third image was used for the red rocks. and the final image was blended for the deep colbalt-blue sky.
Why use Multiple Images?
I went back and selected images based on the subject matter that was exposed exactly for the area of the scene and using masks blended them together for the final look.
The use of images captured over time verses capturing all the images in a single HDR capture is the quality of the information in the highlight areas and shadow areas as they are captured exactly as they should. This will give you less noise in shadows and cleaner highlights, allow the glow of light in a scene and more.
Gear
A Lumix GH4 was mounted on a tripod with the 7-14mm f4 Vario lens. Images were captured every three seconds over a long time period for the time lapse video. If I was using this for the ultimate capture of a scene verses also for a time lapse I would set the interval for more like an image every five minutes or so.
Yours in Creative Photography, Bob
PS – this technique can also lead to multiple iterations and mood of a scene… Try it you’ll like it!
For infrared conversion of my cameras I use LifePixel. Infrared allows you to put an older camera to use and opens up a new time time of day for productive image creation.
Learn Photoshop in a fun environment. Aaron Nace applies the right amount of fun with easy to understand and follow tutorials. Actions and brushes are included with lessons!
Lightning, waterdroplets, sound, time-lapse, HDR sequences, smiles and much more control for your camera!
Cameras Get Smarter -
A High Speed Smart Camera Remote
Best embroidery ever. Give Queensboro a try, get a $20 instant credit to get started by clicking on the logo! They specialize in great quality custom logo apparel and promotional products with the best customer service.
Platypod has become a great resource for being creative in getting your camera gear easily into unusual places. As an Platypod Pro I get to work/play with the gear even before it comes out. Head over to Platypod, subscribe to the newsletter and you will get special discounts reserved only for subscribers.
 Snoopy Rock still photo at sunset.