by successfulbob | 4K photo mode, Lumix GX8, macro, photography, photography education, photography software, photoshop tutorial, wildlife photography
Choose your focus later.
The photography world is changing around you as I write this post! At least it feels that way as new cameras and features are introduced in short order. I’ve never been on the front edge of technology before and it’s fun trying to figure uses for features as they come out. A lot of the new capabilities is driven by possibilities not available before 4K mirrorless cameras came on the scene.
This is a very interesting new feature called Post Focus.
This is for stable non-moving subjects where you might not be sure of the focus point you want and would like to have options to choose later for a totally different look and feel to a subject of a scene.
Here’s how it works. The camera makes a quick video of a scene while moving the focus point throughout the frame. Because the camera is automatically set for Photo Mode each still frame can be extracted from the video as an eight MP file. At the end of processing after a few seconds you can see the individual frames on the back of the camera and choose any that you would like to save out as individual jpeg photos.
Want to be able to choose later? Not a problem. Download the video file and take it in an editing program like Adobe Premiere, Final Cut Pro, or Lightroom. There you can step through each frame and choose at your leisure on a large screen and save out your file.
I decided to see if I could use the system to help with the capture of Macro images and the process of focus stacking to get deep detail in an image.
And guess what ?? It works!
I Imported the MP4 file into Adobe Premiere and used the right arrow to move through each individual frame. Selected the ones I wanted to work with and pushed the save as an image (camera icon) and saved the images out as a TIFF. Then it’s off to Adobe Bridge.

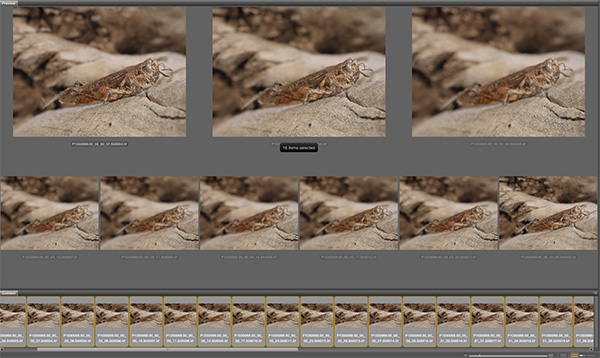
Screen capture of Bridge selections with all 28 files selected with the still captures pulled from the video.
With files selected the next move is Tools > Photoshop > Load Images into Layers

Layers Palette with all layers selected in preparation for Photoshop magic.
Once all layers are selected they need to be put in registration because a change in focus changes the size of the image. Menu Edit > Auto-Align Layers.

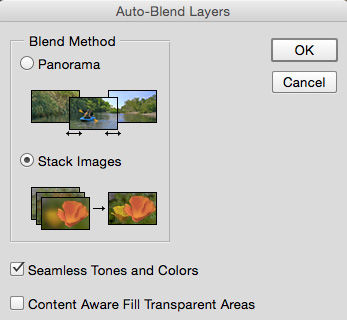
Once layers are aligned Menu Edit > Auto-Blend Layers with the Stack Images and Seemless Tones and Colors checked. Depending on the number and size of your files the the RAM horsepower of your computer this could take a little while but it’s doing all the work you see below masking in all the sharp portions of the images.

Palette window with proper selections for picking and masking in all the sharp bits it can find in the images. Making all of these masks would be super time intensive. Sometimes the individual masks may need a little tweaking if you didn’t get enough detail or colors and tones are very close.

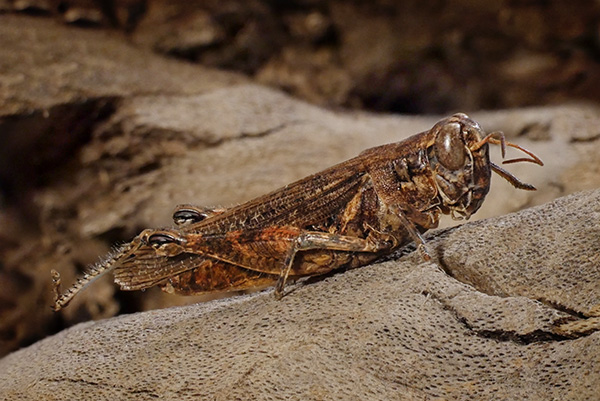
Grasshopper with detail and depth of field exactly where I want it.
The image was captured with the Lumix GX8 and the 45mm f2.8 Macro lens set at f9 in Post Focus Mode. “Why f9 and not f22 and be done with it Bob?” When photographing close-up Macro subjects the DOF is very shallow even at f22. In addition as the aperture gets smaller diffraction is introduced starting to blur details. (learn more about diffraction and check out your camera lens combo to find the sweet spot here)
Yours in Creative Photography, Bob
PS – No grasshoppers were harmed in the making of this tutorial. The grasshopper was already mummified when I found it on my porch.
by successfulbob | Lumix Lounge, Lumix LX100, photography creativity, photography education, photography marketing
Dinner!
MMM good! Filet skewer with mashed potatoes… Sound Bites Grill. Sedona, AZ.
Back to our regularly scheduled programming for this space.
Had my Lumix LX100 an energetic little point and shoot with me when I went out for a meal with my wife. I try not to get too carried away with my camera gear when we are out for a pleasurable meal so I just bring the little guy for the occasional frame grab when something grabs my attention. So when the entertainer went on break I noticed the lighting on the mic and stage and thought “There’s a pretty cool scene…”

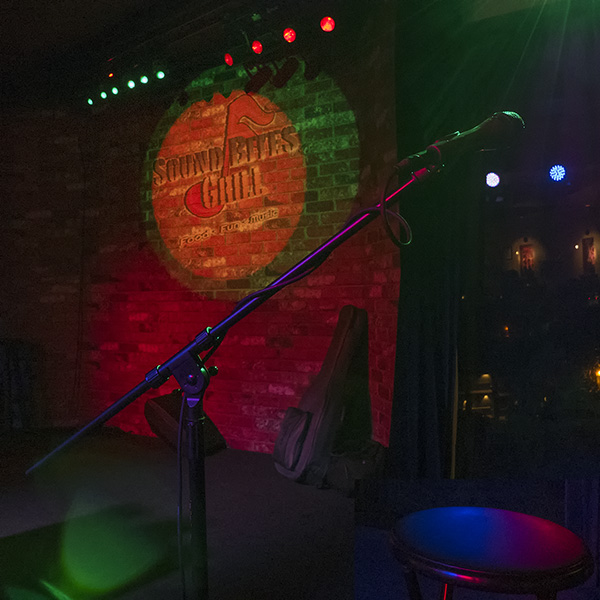
Sound Bites Grill stage waiting for the return of the guitarist.
This is a pretty powerful little camera which I have dubbed, “the professionals point & shoot”, with all the pro settings available outside the electronic menus on easy to use dials. I set this for Aperture Priority and knocked the the Exposure compensation down about one stop to preserve the highlights. Brought the shadows back up a bit when processing in Adobe Camera RAW. Shooting at 3200 ISO gave a bit of noise in the shadows so I used NIK Define 2 to knock out the noise. Make a square crop and Viola…
Yours in Creative Photography, Bob
PS – I was at a client restaurant for dinner and entertainment and will gift them this image and a couple others to use for some marketing. Solid long time client!
by successfulbob | photography charity, photography education
It’s the Sunday Photo/Art Quote with a bit of a twist… In support of PPA Charities I turn this space over to Giving Tuesday. But I can’t do that without a chat about a quote so let combine the two!
As photographers we have the unique opportunity to use our photo skills to help out the community. Giving back is a chance, as Winnie says, to help ‘make a life’ rather than just a living. Being able to combine our photography and service to the community is a win-win. And you know how much I like win-win scenarios!

“We make a living by what we get. We make a life by what we give.” Winston Churchill
All the details are below. I’ll be doing my Periscope at 11AM Eastern time. Hope to see you there!
Yours in Creative Photography, Bob
PPA CHARITIES ANNOUNCES #GIVING TUESDAY – #PPAGIVES
On Tuesday, December 1st, log in to Periscope, Twitter’s live broadcast partner, to join Professional Photographers of America Charities in the first ever #GivingTuesday fundraiser. From 8:00am until midnight, eastern time, we will be broadcasting every half hour. Join in as each of our guests does a five minute presentation on a variety of subjects. Everything from photography to marketing, or even some human interest or general information will be shared. Find us at @PPACharities
Scheduled to appear are (in order): Bert Behnke, Gary Hughes, Mary Fisk-Taylor, Melanie Anderson, Jamie Hayes, Trish Gilmore, Susan Michal, Kay Eskridge, Trish Logan, Bob Coates (hey that’s me!) Jeff & Lori Poole, Carl Caylor, Lori Nordstrom, Trey Homan, Beth Marshall, Bry Cox, Roch Eshleman, Beth Forester, Don Dickson, Tina Timmons, Elizabeth Homan, Michael Timmons, Travis Gugelman, Deanna Duncan, Al Behnke, Cindy Behnke, Cris Duncan and more.
At the end of each segment, feel free to hit the Donate Now button on www.ppacharities.com Home Page if you feel inspired. Then change your profile pic on Facebook or Twitter to one of our icons and challenge others to participate in #GivingTuesday for PPA Charities. If you miss the Periscope broadcast, go to our Facebook Facebook/PPACharities and see the recorded versions.
Find us at @PPACharities
Please donate what you can and mention why you are donating if it is to honor one of the presenters or to help PPA Charities meet our end of year goals. Then remember to ask your friends and tag them when asking on Facebook or Twitter. For every dollar you pledge we have matching grants, two for $2500 and one for $1000! So that is $3-$4 earned for every dollar you donate. Thank you Mike Hanline of WHCC and Roch Eshleman of Romaguera Photography for your matching funds, and also to our Anonymous friend!
Let’s have some fun and help PPA Charities support our charitable partners like Operation Smile, Dando Amor, the PPA Affiliate Schools and others in need.
Join in on Periscope for live feeds and Facebook and Twitter for updates on Tuesday, December 1st, #GivingTuesday, #PPAGives. Find at @PPACharities
by successfulbob | fine art musician portrait, musician photography, photography, photography creativity, photography education, photoshop tutorial
Photoshop Tutorial Creating Photo Art
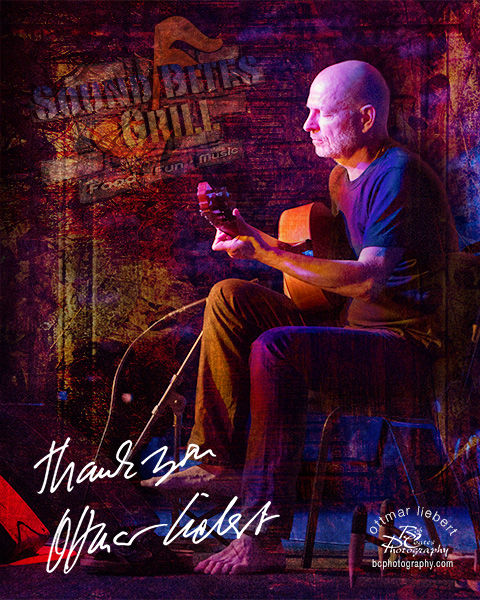
Let’s go into a little more detail on the creation of the photo art for the Sound Bites Grill ‘Wall of Fame’ with guitarist Ottmar Liebert as the subject.
The process is one I’ve dubbed Photo-Synthesis taking multiple images and using Blend Modes, Layers, Masks, Fx, Adjustment Layers and more to create the final piece. First here is the final piece as it now hangs at Sound Bites…

Finished ‘Wall of Fame’ image featuring Ottmar Liebert

Raw materials for the final photo art.

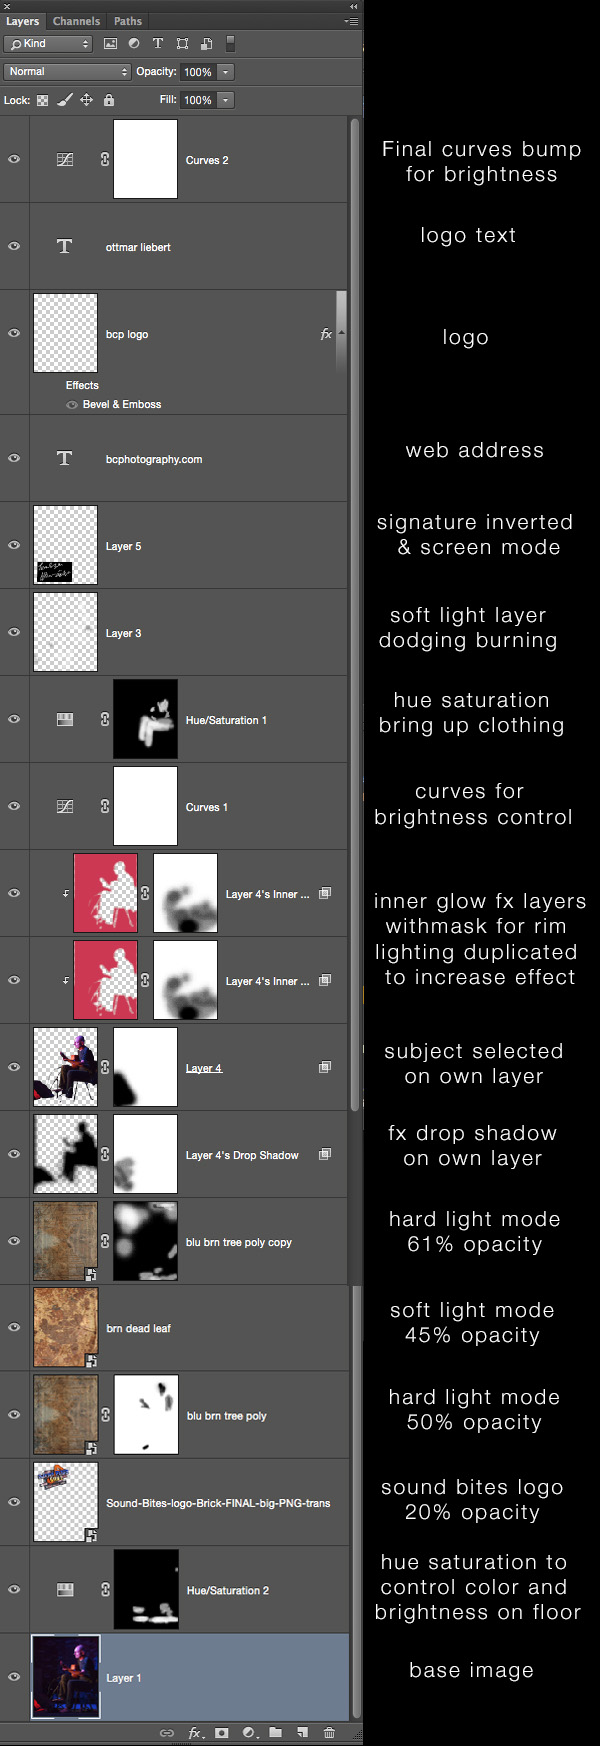
Here’s the Layers Palette with Layer Modes and Opacity Levels indicated. I recommend reading from the bottom to the top to get a better feel of my process.
I usually start with the base Layer and add a texture I feel will blend well. Then I experiment with different Blend Modes and Opacities to get the effect for which I am looking. On the MAC if the Move Tool is highlighted then holding the Shift key and hitting the + & – keys you can scroll through the various Blend Modes seeing their effects in real time.
This should give you an idea how I work with Adobe Photoshop in creating photo art projects.
Have any questions?? Let me know.
Yours in Creative Photography, Bob
PS – Textures are available everywhere. Even from fellow photographers. I have a large library of different kinds of texture but for some reason I found myself attracted to two textures from one of the people who inspire me, Thom Rouse. That’s a link to some amazingly fantastic images. Thanks Thom!! BTW if you ever get the oppourtunity to see Thom speak don’t miss it. It’s a fabulous walk through the art world
by successfulbob | architectural photography, fine art photography, landscape photography, Lumix GH4, people photography, photography creativity, photography education
Dusty western streets lined with aged buildings hinting very strongly at a bygone time.
Characters in period dress move through the streets as if they’ve returned home from the present day. That was the Arizona PPA Fall Fest this year organized by AZPPA and headed up by board member Bruce Roscoe of Alayna Photography. Bruce created a calendar with this great bunch of actors and arranged to share their talents during this event. There were five instructors, ten actors and thirty-five photographers in action, learning, sharing and generally having a good time.
I gotta tell you if you live in Arizona, are a photographer and not a member of Arizona PPA you are missing out on education, networking and building lifelong friendships with those of a like mind.
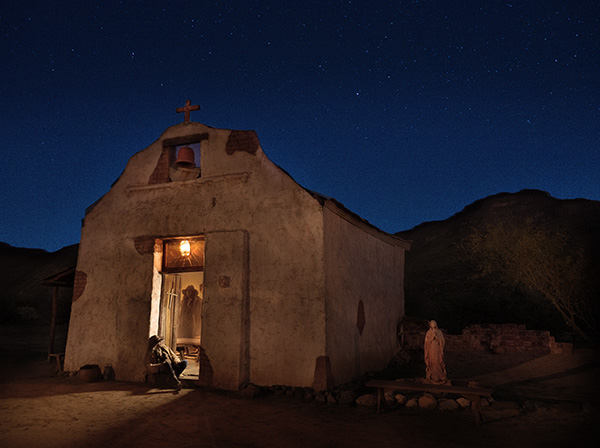
But, I digress just a bit. Here’s an image created after the sun sank (sunk?) below the horizon of the ‘haunted church’ done at the end of the street.

This was ‘Filo’ one of the actors posing during a light painting exercise held at the end of the day. Lumix GH4 with a 12-35mm f2.8 lens was mounted on a tripod and a series of bracketed exposures was made of the church scene followed by Filo being lit in various positions. Images were then striped together to have our actor studying up on his ethereal image inside.
If you are not in Arizona there is probably a Professional Photographers of America Affiliated group not too far away from you. You can check the list. I travel around the country and have spoken to many of these groups and I can tel you that the education acquired from being a member and participating as a volunteer can help you grow your photography business.
Lots of photographers suggest that they can get all the photo education they need from the web and online tutorials. I beg to differ there’s no beating live in person education and if you are not already a member of one of these organizations I encourage you to at least visit for one or two meetings. You be glad you did!
Yours in Creative Photography, Bob
PS – The event was help at Canyon Creek Ranch and should you find yourself in central Arizona it’s a place you might want to check out!

