by successfulbob | Lumix GH4, Lumix Lounge, photography, photography books
Cameras.
We want them to do everything, but when they can do most everything everyone would like them to do we complain that they are hard to operate. Let’s face it cameras have become mini-computers with powerful processors and a myriad of options. Some can get quite confusing until explained in-depth. How to get the the most out of your camera now involves more than just reading the GH4 manual.
You can also download the advanced GH4 Manual which will get you more information on the capabilities of the GH4 which is still pretty dry stuff.
Or, you can read and refer to ‘The Panasonic Lumix DMC-GH4’ The Unofficial Quintessential Guide’ by Brian Matsumoto and Carol F Roulard from Rocky Nook Books and get some down-to-earth easily understandable information on how to get the most out of this powerful computer also known as a camera.
I’ve been using the GH4 for quite a while and I thought I had a good handle on most of the features and capabilities. After a quick cruise through the book I was surprised to learn of some available features because I never even thought to look for them or glossed over the value of them. Having things spelled out simply, from a photographer’s point of view vs an engineer’s or manual writers point of view, makes figuring out – and using – camera features much easier.
Matsumoto and Roulard write in an easy conversational style yet impart all the goodies we need to know. For example, many photographers are frustrated when menu commands are greyed out because they are not available. The authors tell how to avoid frustration and tell you why… They also share how to use the Quick Menus to the fullest capabilities which speeds use in the field when you don’t have time to scroll through (or remember where) menu items are.
I’m going back in to read the book even more in-depth because I’m sure I’m still missing some of the powerful features in the GH4.

The Unofficial Quintessential Guide
If you own the Lumix GH4 and want to get the most out of it I’d recommend getting this Guide.
Yours in Creative Photography, Bob
PS – As a bonus, you save 35% on Rocky Nook Books by using the Coupon Code BOBCOATES
by successfulbob | Lumix G7, Lumix GH4, Lumix Lounge, musician photography, photography, photography gear
Jazz singer Vivian Sessoms entertained at Sound Bites Grill the other night and here’s her image for the SBG ‘Wall of Fame’.

Vivian Sessoms in art treatment for the ‘Wall of Fame’
I was testing the new Lumix G7 side by side with the Lumix GH4. Both cameras used the same lens and same settings. ISO 3200 f2.8 1/60th sec. It shows me they are comparable and the G7 would make a great back up for the GH4. Price makes this a cool camera for those on a budget. The G7 does miss out on a few pro features on handling, like having to remove a tripod plate to get to the battery and SD card compartment. It also has smaller batteries and is built on a plastic body. But, image quality looks to be on a par. And, at half the price of the GH4 depending on your workload you might be willing to put up with a few non-pro features!
Here’s a sample of a couple stage captures from each camera with the same settings.

This image was captured with the Lumix G7.

Captured with the GH4.
Yours in Creative Photography, Bob
PS – If you are ordering gear from Amazon it helps to support this web site and the info shared if you buy through any link on successful photographer. TIA!
by successfulbob | photography, photography education, photography retouching
OK this was a tough one.
My almost ninety year old client wants to use this image of her sister in a book about her life. Does that give you an idea of how old this photo is??
Oh yeah, can you please remove the ink?
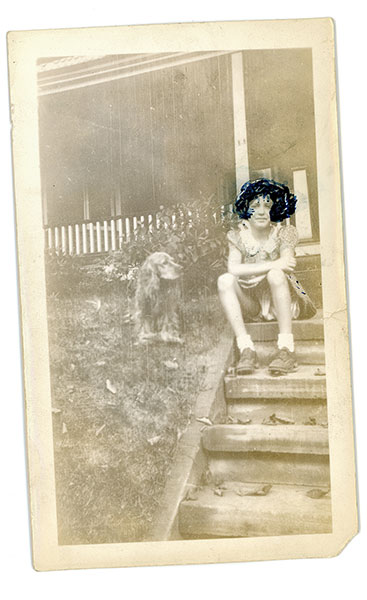
This is the original scanned photo for repair. I make a safety scan to preserve the original before attempting any rehab on a photo
Can Photoshop do the whole job?
So off to the Internet to see how other people have conquered this problem. What did we do before the Internet? I found this suggestion to use hand sanitizer and a Cue-Tip to help remove the ink from the photo without destroying it. I made the scan above as a safety measure in case the idea didn’t pan out we at least would have the original to work with. My first thought was I might be able to see through the ink by working the Channels in Photoshop. But, it turns out the ink was solidly applied. I could rescue a little detail but not enough to see her hair.
To the sanitizer!
So it’s time to try the hand sanitizer. I had some Purell hand sanitizer ‘Refreshing Gel’ that I use when traveling and thought it would be better than straight liquid. And, I was right. Being in gel form allowed gentle application without too much moisture hitting the photo. Please note that this is a resin coated print which allowed this. I believe if this was a fiber print I would not have had near as much success.
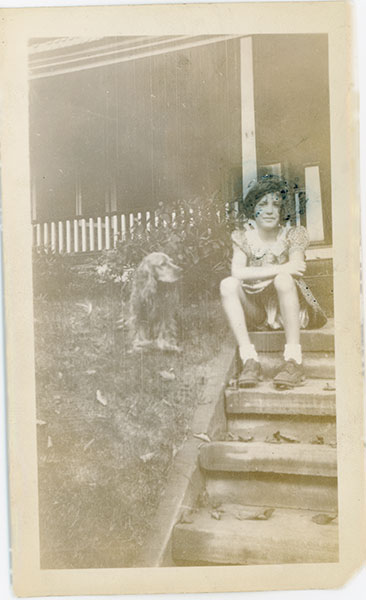
Scan of the print after as much ink as possible had been removed.
(note: I made safety scans throughout the process on a regular basis of ink removal each time I acquired more detail)
Back to Photoshop (to the Rescue!)
With as much ink removed as possible enough detail has bee revealed to begin the process of restoration. Removing scratches, age spots, restoring color, retouching out the rest of the blue ink involved various tools including the Rubber Stamp (clone) Tool, Patch Tool, Spot Healing Brush, Dodge & Burn Layers, **NIK Silver FX Pro 2, **NIK Color FX 4, Add Noise and more.
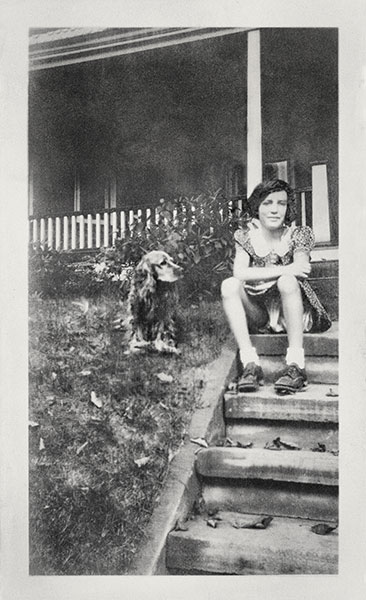
Here’s the final image.
Yours in Creative Photography, Bob
PS – **NIK software is now owned by GOOGLE. The whole NIK Suite of plug-ins is now available for only $149. If you own any of the individual programs and have the serial number GOOGLE will give you the rest of the suite at no charge.
by successfulbob | Lumix G7, Lumix Lounge, photography
You know me.
I gotta play.
Here’s the image from yesterday that started with multiple exposures captured with the Lumix G7 and Layer Stacking in Photoshop. Adding a little artwork using blend modes in Adobe Photoshop.

Apache Plume Bloom
Once the original capture is assembled then it’s time to select the plant image in order to separate it from the background. This allows the addition of a drop shadow which creates more depth. Then adding some textures in various blend modes I built a background to give the image a more painterly feel. I always encourage people to play with images and ideas.
When’s your next test/play session??
Yours in Creative Photography, Bob
by successfulbob | Lumix G7, photography, photography education, photography gear, photoshop tutorial
Just got my hands on the new Panasonic Lumix G7 – Lumix G7 w 14-140mm lens ($1098) or G7 w 14-42 ($798) – and have been putting it through some paces.
There are some beautiful desert plants that my wife has been landscaping the yard with vs having water-sucking plants since we live in the super dry climate of Sedona, Arizona. This is the bloom of the Apache Plume plant.

Apache Plume Bloom
Capture info
I used the 45mm f2.8 Macro to make the details of the ‘plume’ feathering jump. In order to get the most detail I set the aperture to f8 and used studio flash. Shoot through umbrella to the side and just behind the plant with soft reflector fill opposite. Black background paper lit with flash with snoot and 2 layers of blue gel. Used the Wifi from the camera to allow the Ipad to run the camera changing focus using the free Panasonic Image APP. Never having to touch the camera makes for better, easier blending because there’s no camera shake or movement.
Here’s How to Focus Stack
I captured fifteen exposures with focus through the image and used Photoshop to stack them together and achieve sharpness from front to back. Take the images into Adobe Camera RAW and tweak any color or shadow/highlight settings. From the Tools menu ask Bridge to Load Files into Photoshop Layers. Highlight all Layers in the Layers Palette. Under the Edit Menu > Auto-Align Layers. With all Layers still selected, Edit > Auto-Blend Layers with the Radio Button Stack Images Selected with Seamless Tones and Colors checked. Then go through your image and look for areas that might not have been blended perfectly by Shift clicking on the individual Layer Masks to see if there is a sharp image that might be blended better. **Note – Subjects that contain a lot of white will have more issues with Blending the Sharpness in this process than others with more color and contrast.
Initial Thoughts on the G7 (more to come in future posts)
This camera would make a great back-up to the GH4 if you are a pro on a budget. Controls are slightly different but not so much you would have a problem switching in the middle of a job or if you are doing a two camera shoot. Pros – VERY light weight, super-easy 4K Photo Mode, interchangeable lenses, image quality on par with GH4. Cons – Tripod plate needs to be undone to get to battery and SD card compartment, smaller battery, built on plastic body vs magnesium.
If you are really on a budget two or three of these cameras would make great kit to have pro backup capabilities.
Yours in Creative Photography, Bob