by successfulbob | architectural photography, Lumix GX7, Lumix Lounge, photography, photography education
Was in the wonderfully funky town of Austin, Texas this past weekend giving a couple classes at Precision Camera for Panasonic. I broke out my street shooting camera the Lumix GX7 for a little High Dynamic Range work while out and about.
If you have ever photographed neon lights at night you know it’s a subject that screams out for HDR to get the scene to look great. There’s no way to get all that lighting information into an image with a single push of a button. Fortunately, with the GX7’s frame rate I was able to get the exposures hand held as this was grabbed on the fly with no tripod.
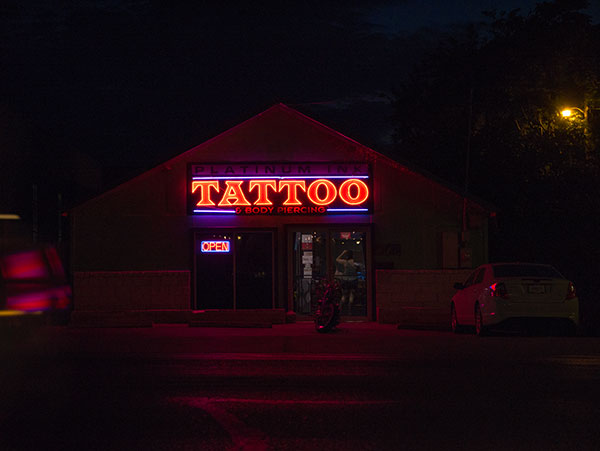 Single capture of the Platinum Ink tattoo parlor gives an idea of the range of light in this scene.
If I was shooting this on assignment I would have spent more time and had a tripod, lost the car, rearranged the motorcycle and would have added some more gelled light to the scene to really make this image rock. As it was a little layer work with some masking of the five stop exposure gave me this…
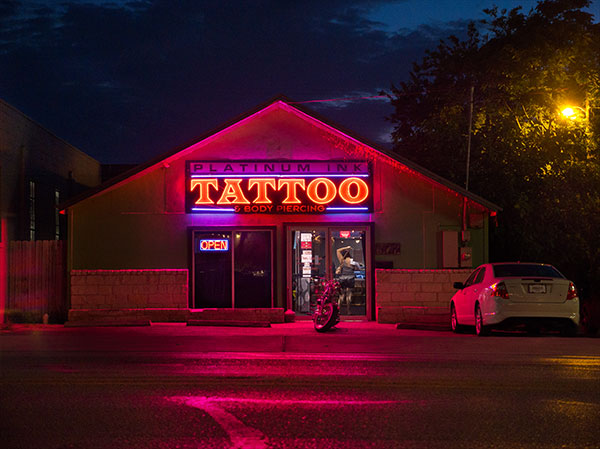 Perhaps if they saw this at the tattoo parlor they might like to have some new images created for their web site next time I am in Austin? If you know pass on this link… We can talk!
Yours in Photography, Bob
by successfulbob | fine art photography, fine art portrait, Lumix GX7, Lumix Lounge, photography, photography education
Using a watercolor photo treatment that looks right was very difficult in the past. Most automated WC actions look like they had are done by a machine. I have a feeling that getting all the subtle nuances inherent in watercolor into a math equation would be amazingly difficult. It’s still not easy even when you do it by individual strokes.
Enter England’s Tom Shelbourne. He has developed a watercolor palette for Photoshop CS6 and CC that can move you way down the road to having more realistic watercolor techniques at your fingertips. You can go to Russell Brown’s website and download it for free. It takes you step by step, inch by inch (OK Layer by Layer) through a technique that helps you with the line drawing, setting up brushes and the opacity for laying down washes and getting more detail oriented as each layer is completed. This is NOT a push button watercolor system, but it will move your imagery much further in a realistic direction. Watch a video explanation of the WC Palette here.
If you like what you see there but feel the limitations you can go to Tim’s web site The Artists Quarter and Tim Has tutorials that take you even deeper into creating fine watercolor art with unlimited variations. I bought his watercolor tutorial ‘Fast and Loose’ and it really opens up the creativity and possibilities!
I wanted to create a tribute as a thank you for the Code Talkers service performed during WW2.
 Bill Toledo – WW2 Navajo Code Talker in Albuquerque, New Mexico
Here is the original photo I started with of a Navajo Code Talker taken with the Panasonic Lumix GX7. I wasn’t able to get Bill to a cleaner background but we did move under an overhang so I could get some better light on his face for depth with a bit more shadow. You can see it’s a busy background. Fortunately, when creating paintings you have the option of only showing what you wish to show.
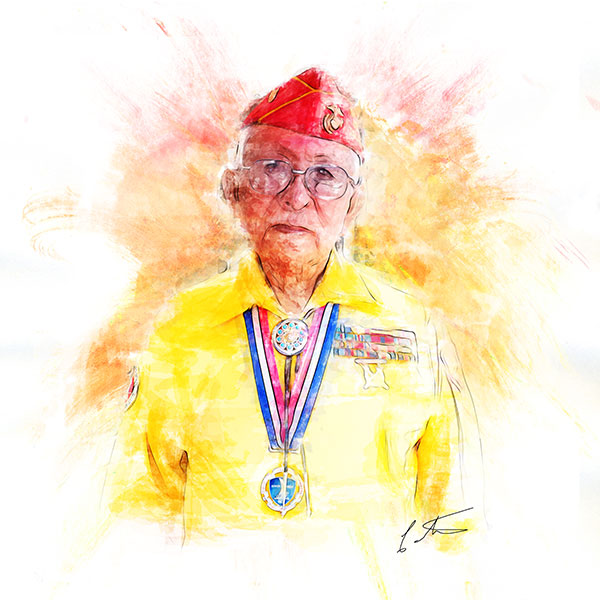 Digital Watercolor of Bill using some of Tim Shebourne’s techniques
Here’s the same photo after spending some time working with a few more of Tim’s techniques. I haven’t finished the tutorial yet so I know there’s even more realism down the road in creating Fine Art Watercolors with my photography as a base. I highly recommend you check out Tim’s tutorials if you want to have realistic digital watercolor as part of your offerings.
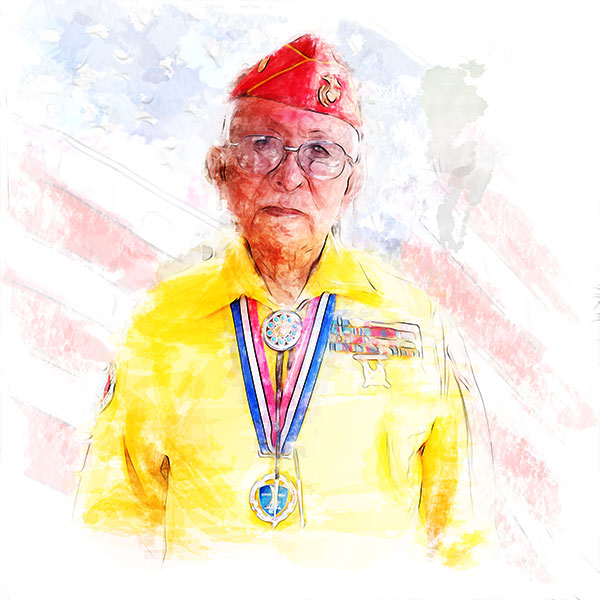 Another watercolor version combining a US flag to help tell the story.
The images are created in honor of the Navajo Code Talkers service to our country, but I would like for you to take time to remember all of our veterans, living and fallen during this Memorial Day. As General George Patton said, “It is foolish and wrong to mourn the men who died. Rather we should thank God that such men lived.”
Yours in Photography, Bob
by successfulbob | Lumix GX7, Lumix Lounge, photography
These bad boys do blend in. This was taken during a hike in Sedona with my Lumix GX7 and 35-100 f2.8 Vario Lens. It reached out pretty far and rendered the animal tack sharp. I like how there are so many different textures in the scene.
We see the ‘Trickster’ as the Native Americans refer to them, on a regular basis. This is from Wikipedia – “The name “coyote” is borrowed from Mexican Spanish coyote, ultimately derived from the Nahuatl word cóyotl, meaning “trickster”.[10] Its scientific name, Canis latrans, means “barking dog” in Latin.[11]”
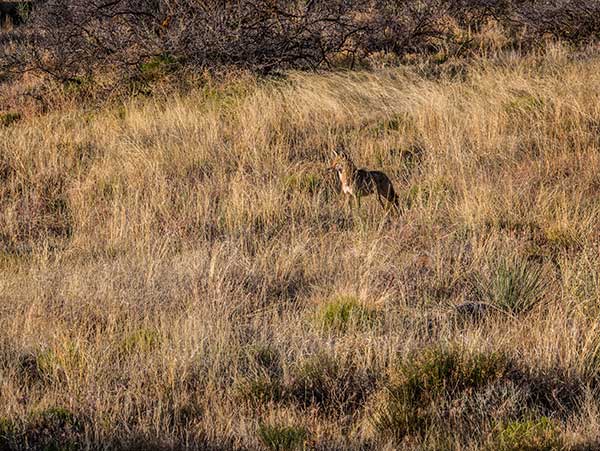 The ‘Trickster’ AKA coyote during dawn hike in Sedona, Arizona
Part of that I believe comes from how coyotes hunt and the fact they have a dual voice-box capable of making many sounds and seeming like there are multiple coyotes when there is only one. The calls a coyote makes are high-pitched and variously described as howls, yips, yelps, and barks. These calls may be a long rising and falling note (a howl) or a series of short notes (yips). These calls are most often heard at dusk or night. You can learn more about the Coyote here.
Your in Photography, Bob
by successfulbob | commercial photography, Lumix GH3, Lumix Lounge, people photography, photography
Fun shoot!
The Arizona Roller derby girls came to the the Arizona Professional Photographers Association meeting to add a little color for the photographers to shoot. A studio area for attendees to shoot during the convention was set up. The Roller Derby ladies got images to use for their promotion and the photographers got great animated models to put in front of their lenses.
Originally it was scheduled that the derby girls were going to have individual head shots for their promos but I wanted to take it a step further an see what kind of action we could put together. I think we got some ‘Bigger than Life’ images for them to use to promote their sport as well as some individual head shots… Wanna become an AZ Derby Skater? get more info.
 Anita Alibi Poses for a head shot.
 Ducky Norris enjoys the spotlight.
 Simulated action is when the fun begins… These girls know how to put on a show!
 More showtime from the derby girls.
 Teammates!
It was a pleasure working with the AZ Roller Derby Team. They were really ready to put on a show and I’m certain that translates into great theater and sport in their matches! I’d love to do a full-on marketing shoot with the team!
What are you doing to stretch your education and practice of photography???
Wanna become an AZPPA Member? Get more Info
Yours in Photography, Bob
by successfulbob | Lumix GX7, Lumix Lounge, photography, photography education, photography gear, photography lighting resources
Traveling light these days!
Thought I’d share what my shooting kit is these days for a couple different scenarios. Panasonic Lumix has made me lean and mean these days. My favorite camera for travel and for hiking is the Lumix GX7. It has all the features I like and has an extremely low profile. The screen tilts up and down for low angles or overhead shooting. The screen is quite viewable even in bright sunshine but just in case there is a 90 degree moveable viewfinder. The camera is capable of in-camera HDR or up to a seven stop auto-bracket, in-camera Panorama, and a host of other specialty settings I’ve been enjoying putting through its paces.
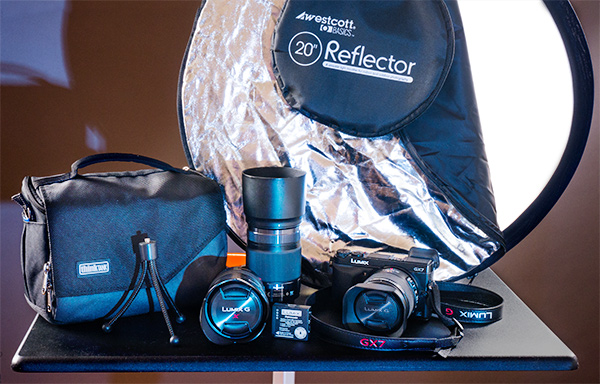 Let’s start with the hiking kit as you see pictured above. 45mm Leica DG Macro-Element f2.8 Aspherical lens for going after those close up details like flowers. Added to that the Lumix Vario 12-35mm f2.8 for the medium to wide angle scenic landscapes and the Lumix Vario 35-100mm f2.8 to help compress longer distance scenes or trying to reach a bit further. Note the mini-tripod. I tend to hike more often traveling light which means no full size tripod but with the mini I can place on or lean against a rock, tree, car or fencepost to help steady the camera. Very handy indeed. Of course, a fully charged spare battery is always in the kit. The Westcott twenty inch Five in one which folds to a very manageable 8 &1/2 inches rounds out the equipment list. So I’m covered from 24mm to 200mm – 35mm DSLR equivalent along with a MACRO and it weighs less than four and a half pounds.
Conversely, my DSLR weighs four and a half pounds with a single lens.
 Wildflowers captured with the 45mm Macro
For travel I swap out the 45mm Macro for the 7-14mm f4 Asperical lens which covers me from 14-200mm 35mm DSLR equivalent and I the kit is still well under five pounds.
Both kits are supported by the Tenba Mirrorless Mover 20 bag which fits comfortably on my belt and holds all the lenses and gear including spare cards, cleaning cloth, etc.
Yours in Photography, Bob
by successfulbob | fine art photography, Lumix Lounge, photography education, success education
TAKE OFF THE FILTERS…
I’m not talking about the filters on your camera.
Talking about the ones in your head.
Ever notice when you go on vacation or to a photo seminar or go shooting with a friend that there are times when you start to see art all over the place? Or, when a fellow photographer comes to your neighborhood he or she makes stunning images in the space you spend a lot of time in? You missed it but it was there all the time?
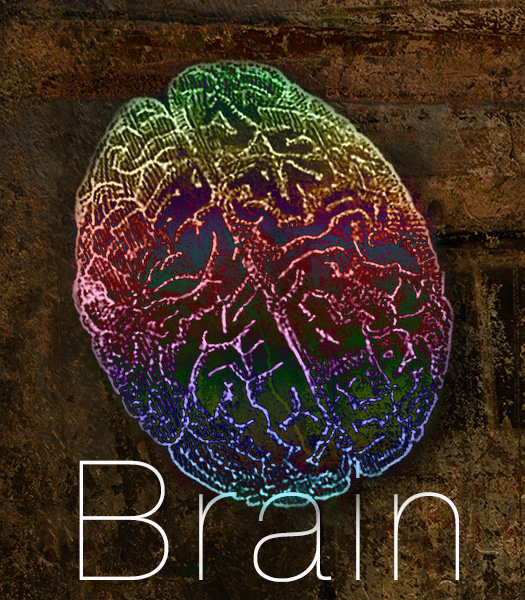 The Amazing Brian. Sometimes it helps you tooooo much…
Your brain is incredible… But sometimes in order to protect itself it puts you on automatic pilot. It has to control the amount of stimuli it gets… and sometimes leaves out the things you really want to be paying attention to. Drive somewhere and wonder how you got there? Always turn right when you leave the driveway? Always brush your teeth with your right hand? Eat the same foods quite often but neglect to taste them? This is a result of your mind conserving itself by putting you on auto-pilot. There are things that the body needs to attend to without you thinking about it. Making sure your heart beats. That you breathe in and out and much more. The problem comes when it starts to make more and more things so automatic that you are almost an automation.
Fight back from the easy path. As the eastern religions and people who champion meditation will tell you, “Be in the Moment!” How to fight back to see more and be connected to what you see hear and feel. Take your brain off auto-pilot and move it into manual transmission.
Drive a different way to work or the store. Walk backwards. (although if you can’t take a little ribbing don’t do that one in front of others). Brush your teeth or shave or apply makeup with the opposite hand you are used to using. Listens to the water falling and splashing on the floor during your morning shower. Try a new restaurant or order different food from the one you normally go to…
 Letting the brain go and be in the moment. Working on new directions for my photography.
If you want to take it straight to photography put a different lens on your camera for a week. Try new settings on your camera. shoot only from the waist. Or, do like I did and totally change the format of camera you use. When I moved to the micro 4/3rds format with the Lumix cameras things changed a lot. I originally found the system because I was looking for a camera that was light enough to have with me on vacations but still had enough of a file to produce larger prints. Then I found I was able to have my camera with me all the time and worked hard at being, “In the Moment” more often. Now I’m getting more and, I think, better images to work with.
So here’s your assignment. Disengage the automatic transmission in your brain. Go stick shift. You’ll be surprised what you start seeing and capturing with your camera!
Yours in Photography, Bob
