
by successfulbob | Lumix G7, Lumix GX7, Lumix Lounge, panorama, photography
Possibilities of Panoramic Photography
Let me put this out there if you don’t already know. I love the panoramic format!
 Red Butte Arboretum – Salt Lake City Utah. In-Camera Panorama Lumix GX7 Shot a few years ago.
Panorama images are not the be all and end all they are there to tell a story that can’t be told in the two by three or three by four ratio. Sixteen by nine is becoming a more ‘standard’ image size to our eyes because we see it more often in movies, television, and our phones.
This post was triggered by a question about the in-camera panoramic photos vs. shooting individual images and stitching photos in post production. Here was the question, “When I use the Lumix G7 it does a Gatling gun shoot as I shift the camera left to right and we all know you shouldn’t be moving a camera when shooting a landscape. I’m curious the quality difference between one shot at a time and stitched in an editor vs. the G7 spray technique.”
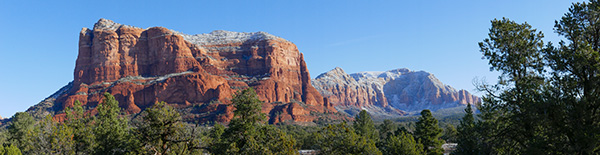 Courthouse Butte in Sedona – In-Camera Panorama. Print to about 27 inches.
Great question. We have different tools for different jobs. The in-camera panorama feature is a tool for the convenience of capturing a scene quickly and being processed for output immediately. For example, you want to share a scene on social media that is panoramic in nature. The camera will produce a completed image that can instantly be uploaded via the camera’s built-in Wifi. It is also a fine way to capture a scene as a memory that will only live in the digital world where higher resolution is not a necessity. That’s not to say you can’t make a beautiful print from the in-camera pano, I’ve made some beauties.
Advantages of in-camera panoramic photos. Immediate gratification. Ideal for web presentation and medium sized prints.
Now to the advantages and drawbacks of a stitched image.
In the capture of individual images to create a panoramic in post-production, you can shoot in the RAW format which will give you a larger file and the ability to finesse the most quality from the file. The larger size files when combined allow for printing very large size images. The only down-side is that post-processing is necessary before you can share the picture as a panoramic.
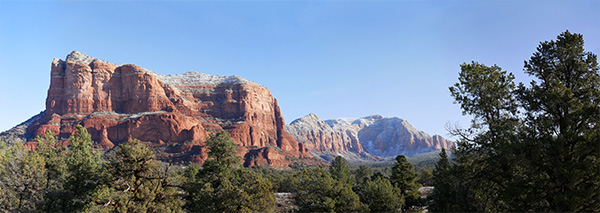 Same scene as above. Ten frames stitched in Adobe Photoshop. Easily print to about Seventy-eight inches. Note the details and color were more available from the RAW file information.
Final thoughts. Use the best of both worlds. Make an in-camera pano to make a quick record of your scene. It can be utilized as a reference for the future building of your panorama or quick sharing of your view in social media. Make your individual images for large format printing.
Yours in creative Photography, Bob
by successfulbob | inspiration, Lumix G7, Lumix Lounge, photography creativity, photography gear, time lapse, video
Stop Motion Video – Aloy Anderson
Through the Internet, I have met an avid advanced amateur photographer/videographer named Aloy Anderson. Aloy is always pushing to learn new and creative ways to use his cameras. I have never attempted stop-motion video myself even though it is a capability built into the Lumix Cameras. When Aloy shared his project with me, I asked if he’d mind sharing some of his thinking and his process with me. And now with you.
I invite you to check out his stop-motion video called Jungle Movie “Be Brave” and turn the rest of the post over to Aloy. Enjoy!
Jungle Movie “Be Brave” from Ray Anderson on Vimeo.
“My name is Aloy; I’m a photographer and Youtube content creator from Miami. From an early age watching Sesame Street, I’ve always been curious about how to make stop-motion animation films. In those days it took a 35mm camera with “miles” of film to develop which was out of my reach. When I realized my new Lumix G7 had the feature built in I was pleasantly shocked. I had to give it a try. My video “Jungle Movie” my first attempt at a storyline video.
When you enter the stop motion menu on the Lumix camera choose whether you will snap each shot independently with the shutter button or the camera can be set to shoot at your preset interval. I do a little of both to give me time to reposition the set pieces and camera placement. For simplicity, I chose 5 seconds between each shot to give me time to move the characters quickly and get out the way.
Stop-motion can be very tedious and time-consuming, and it’s tempting to take the easy way out by leaving the camera on a tripod in one spot. That would be a mistake akin to watching a whole movie from one angle. I suggest different scenes and locations for variety, using a wider lens to show establishing shots and standard lenses for shallow depth of field moments. Before you begin, have a definite storyboard in mind. I like to use manual focus and exposure for each shot.
Here are some tips.
1) Don’t to move each piece too far between each shot as I did in some of my Jungle Movie. The resulting video will have choppy movement. A few centimeters is a good start.
2) Keep the camera on a tripod or table-top to maintain a solidly grounded scene.
3) Every few shots check to make sure your exposure or focus point hasn’t changed.
4) As you improve, you will know what not to do next time and come up with more complex ways to tell your story.
5) Imperative before you begin, set your camera’s aspect ratio to 16:9 which will allow it to play back full widescreen rather than a smaller 4:3 photo size.
6) Finally, have fun!
I guarantee your first 10-second video attempt may look like a five-year-old did it but you will have a good laugh watching it play back with all its faults.
The good thing about the Lumix is when you’re finished making captures the camera will ask you how to customize your video rendering such as how many frames per second it will be and at what resolution. It will then stitch all those photos together into an MP4 file. The only downside is it will be a “silent” movie. In my case, I imported the MP4 into my video editor and added music and text titles to polish it off. It is crucial to add some form of audio to keep your video engaging. This information is not an exhaustive tutorial by any means, but the fun is learning as you go.
I invite you to visit my Youtube product review channel and my Flickr Photography album. Most importantly I would like to thank Bob Coates for inviting me to write this piece. Hopefully, you will have a good time learning this type of creative way to use your camera.”
Aloy Anderson.
Thanks to Aloy for sharing his first foray into stop-motion.
Yours in Creative Photography, Bob
PS – Most Lumix cameras have the stop-motion and time-lapse features built into the camera. If you have any questions about which camera might be best for your needs let me know.
Save
Save

by successfulbob | bird photography, landscape photography, Lumix GX85, Lumix Lounge, photography, photography creativity, wildlife photography
Bosque del Apache Wildlife Refuge Part Five
This post is the final in this series from a very productive shoot at the wildlife refuge in New Mexico. The refuge is a very target rich environment for making bird images. The scenery wasn’t bad either! Let’s talk about creativity just a bit more. I saw a lot of photographers while I was there. And except for gear difference such as long lenses, I believe most photographers there were getting pretty much the same photo.
Why would I say that? Check out the photo below of the scene at almost every location in the refuge. What do you see?
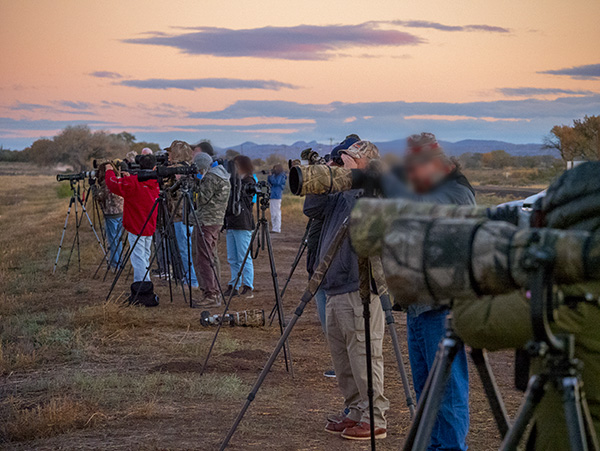 Take a careful look. Every camera is at the photographer’s eye level.
I saw this ALL the time. To obtain a different look to your images, you need to look at things from a different viewpoint. I spent a fair amount of time on my knees, sitting on my butt and getting the camera off of the tripod. Look back through my past posts, and I think you’ll see lots of variety. Bosque Pt 1 Bosque Pt 2Bosque Pt 3 Bosque Pt 4 Changing the height that you shoot from can have a dramatic effect on what is in the background of your subject.
I also heard a lot of motor drives at 8-15 frames per second going off. Motor drives can be helpful when tracking moving subjects or quickly changing background and lighting conditions, but I would see that happening when a photographer was shooting a relatively stable subject in constant light. Save yourself from extra editing time on the computer, Turn off the motor drive when you don’t need it.
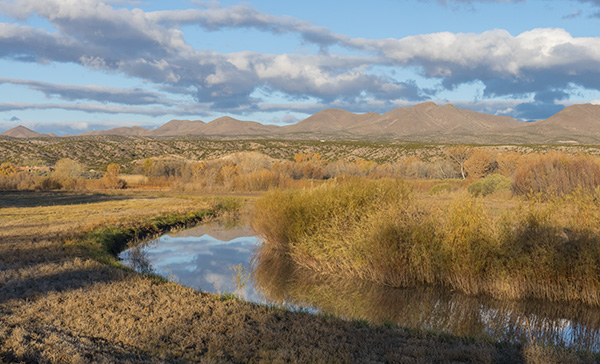
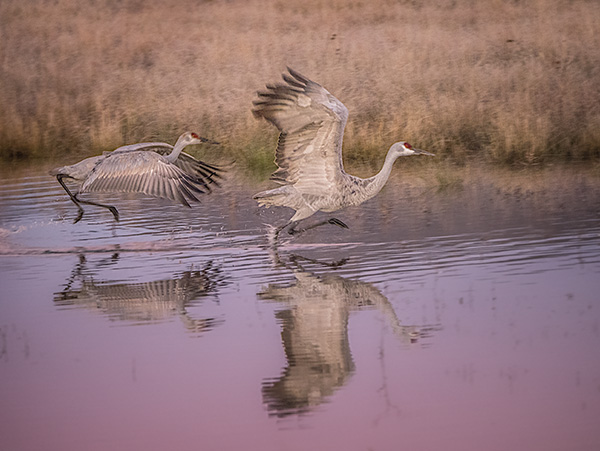 Taking a lower angle allowed for the reflection with the grassland environment in the background.
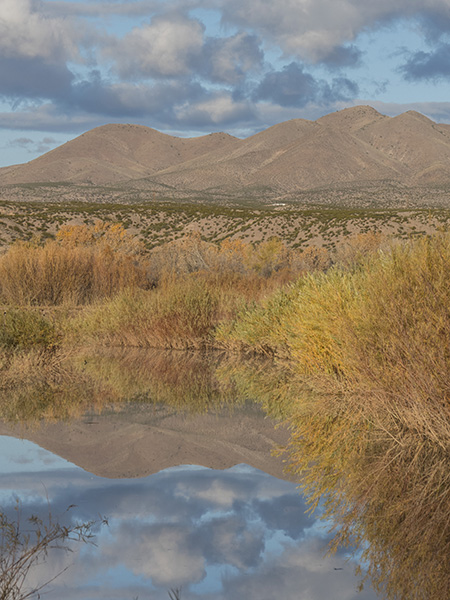 Had to be on my knees to get the composition of the reflection where I wanted it placed.
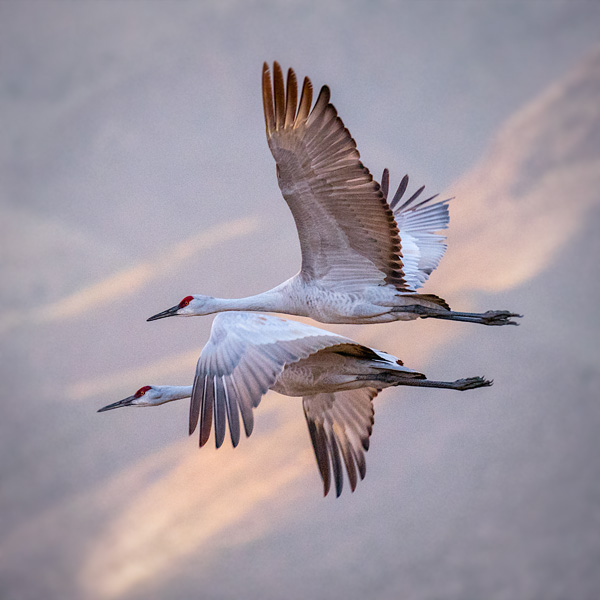 Generally, a gimbaled tripod head would be needed to capture solid images of birds in flight. With new gear and in-camera stabilization improvements, more creativity is possible. The Sandhill Crane images were captured handheld with the Lumix GX85 and the Lumix 100-400mm lens (200-800 35mm equivalent) lens fully extended.
Excited about possibilities as I push this camera and lens combo even further.
See what you can do to differentiate your images from others at every chance you get.
Yours in Creative Photography, Bob
Save
Save

by successfulbob | bird photography, fine art photography, Lumix GX85, Lumix Lounge, wildlife photography
Bosque del Apache Wildlife Refuge – Part Four
Getting Artsy
When photographing a specific subject or area I always shoot for good solid captures at the beginning. After I know I’ve got some good work ‘in the can’, I see what I can do to push the creative ‘Artsy’ side. Here are some of those images.
Let’s look at some tracking flight images with the shutter speed set to a slow speed in this case most were at 1/250th sec. Images were captured handheld with the Lumix GX85 and the Lumix 100-400mm lens (200-800 35mm equivalent) Most were with the lens fully extended.
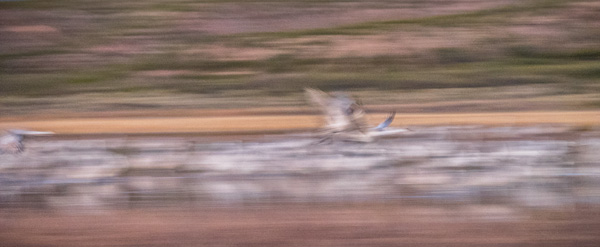 Sandhill cranes photographed at takeoff panning with slow shutter speed.
 This technique adds lots of movement and an abstract feel to the images.
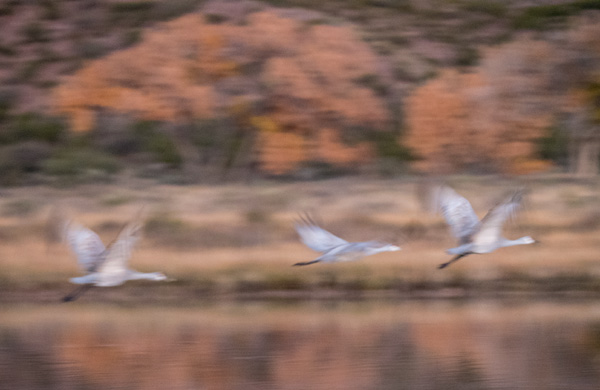
 Further into the art arena using additional post-processing techniques. MacPhun software Focus CK was used to bring more attention to the flight of the cranes.
 Cropped SOOC (straight out of camera) 1/40th SEC shutter speed.
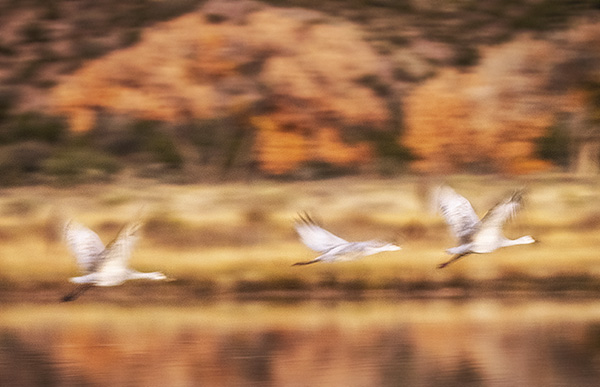 Image from above worked with additional post processing.
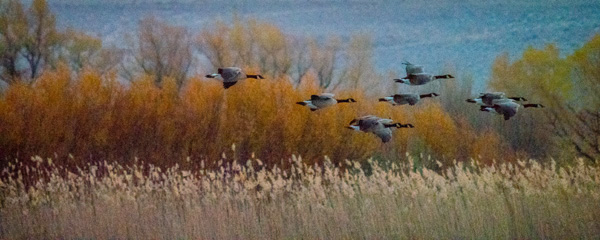 Canada Geese on a flyby 1/1600th SEC shutter speed.
Experiment. Push. Play. Don’t be afraid to get an imperfect result in camera. Playing can lead to more interesting and personal image creations.
Let me know what you like, or don’t care for, in these images. I have an inquiring mind!
Yours in Creative Photography, Bob
Save
Save

by successfulbob | landscape photography, Lumix GX85, Lumix Lounge, photography creativity
Bosque del Apache Wildlife Refuge – Part Three
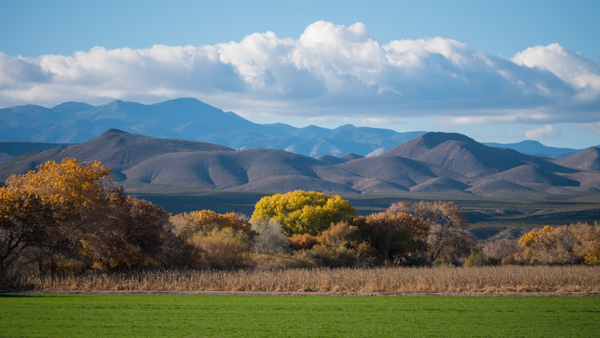
The refuge is quite beautiful in and of itself even without the birds. I made sure to capture images of the landscape as a subject all of its own. Here are a few scenes from the area.
 Even though there are Cranes in the foreground, this is more about the landscape than the birds. Made with the in-camera panorama feature of the Lumix GX85.
 Sunrise just after the Sandhill Cranes made their ascent leaving the pond for the day to forage in the cornfield.
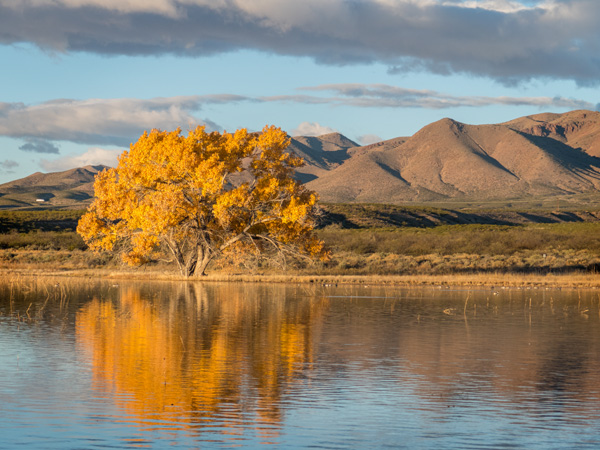
 Lots of layers in this landscape.
 Reflection in the bend.
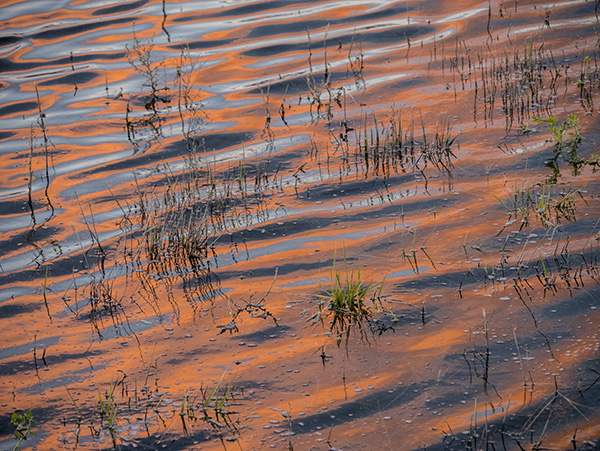 Reflections of sunrise among the grasses help tell the story of the environment.
I always try to tell the complete story of an area even if the main reason for the trip, in this case, was for the Sandhill Cranes and other wildlife of the Bosque del Apache.
Follow the previous posts here. Part One.
Find Part Two here.
Yours in Creative Photography, Bob
Save
Save

by successfulbob | Lumix FZ 1000, Lumix Lounge, photography gear
The Range Cafe – Albuquerque New Mexico
sometimes you just find an environment that is a target rich for making fun photographs. I found one such place while in Albuquerque, New, Mexico while presenting my PhotoSynthesis program for the Professional Photographers of New Mexico.
The decor in this place is a hoot with a painted panorama that is disgorging three-D cows, trucks, and other goodies. Meanwhile other parts of the restaurant display blasts of color and neon goodness. (You know that I like neon right?)
Here are a few images from dinner last night. All were made with the Lumix FZ1000 an east comfortable camera to keep on hand that will cover almost all possibilities. I used the built-in HDR setting to help with some of the challenging lighting situations. The next camera in the FZ line is now out with even more features. FZ2500
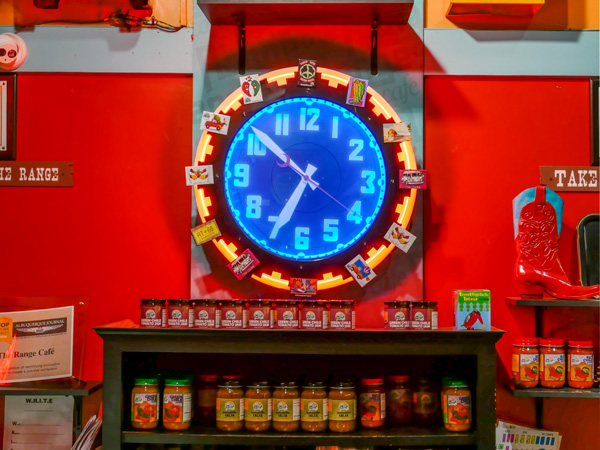 Neon rimmed blue light clock face with a red background. Love it!
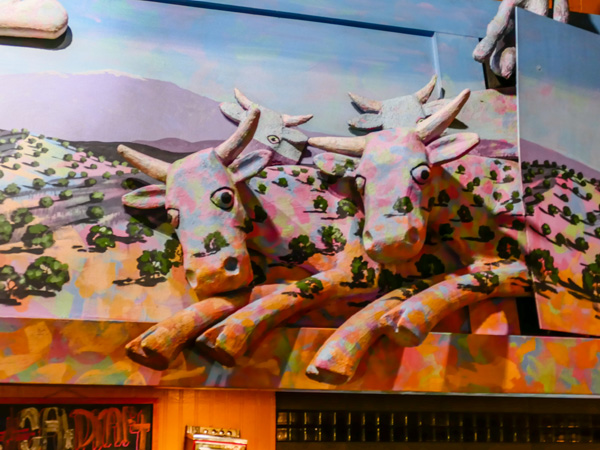 A mural that has pink and blue cows jumping out of the painted panorama is not something you’ll come across every day.
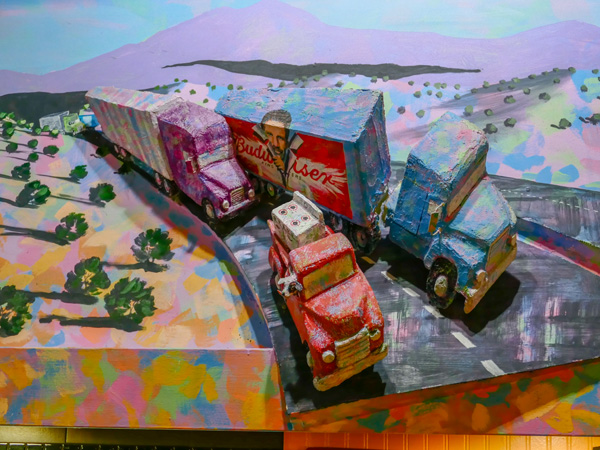 A highway comes out of the mural with multi-colored painted trucks. Way cool!
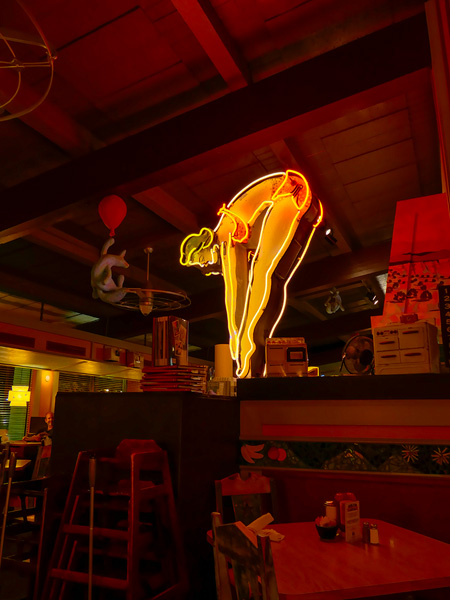 Classic neon sculpture is part of te Cafe decor
A restaurant with unique decor, fun furniture, colors that dance and light fixtures that take you to the moon and the stars can be found in Albuquerque. Oh, and I didn’t mention the namesake part of the decor which is antique toy ranges and stoves from the 50’s and 60’s.
 Find the Range Cafe here
Yours in Creative Photography, Bob