by successfulbob | bird photography, LumixGH5, photography, photography creativity, wildlife photography
Sedona Wetlands
Difficult to believe that there are wetlands in the high desert of Sedona. But, there are! And it’s becoming one of my favorite places to test out new cameras and lens combinations.
The Sedona Wetlands Preserve is approximately 27 acres in Effluent Management Area 2, located south of the Sedona Waste Water Reclamation Plant. The wetlands have six basins, with a total water surface area of approximately 12.2 acres or 9.6 million gallons. They basins are set up to have different depths of water from very shallow up to four feet which make for excellent habitat for a variety of critters. There are some thoughts for making sure all who go enjoy the experience, including the wildlife I pulled from the wetlands website.
Wildlife Viewing Etiquette
• Our viewing behavior can also harm the animals we are looking for unless we take special care.
• Please keep these considerations in mind.
• Observe from a distance, so the wildlife being watched are least disturbed.
• Never chase wildlife or pick up their young even if the parents are not visible.
• Leave feathers, eggshells, nests and even dead animals where you find them.
• Respect other viewers to avoid intruding on another person’s enjoyment.
• Limit the time you spend closely viewing any animal
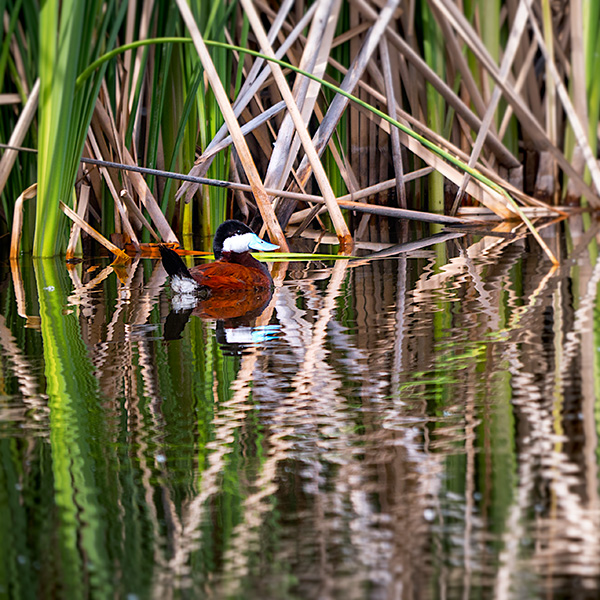
I took the Lumix GH5 for a spin with the Leica DG Vario-Elmarit 100-400mm lens yesterday afternoon when I had a few minutes to work (er’ play) trying out the stabilization and handhold-ability with this combo. Remember, due to the Micro 4/3rds chip, I’m holding an 800mm equivalent lens and very comfortable with the resulting images.
 This image is a severely cropped image of a Ruddy Duck which can be printed to about 18 inches square.
(see full size below)
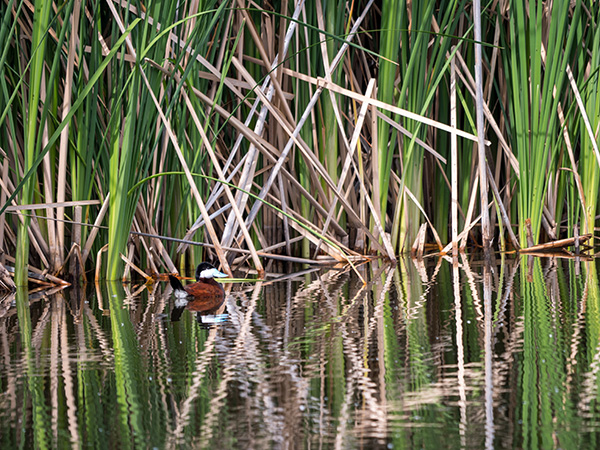 Full-size capture of the Ruddy Duck at the Sedona Wetlands
 These flowers are quite small. Using the 100-400mm lens extended all the way gives an almost macro feel to the photo. The blooms are about the size of my thumbnail.
 A tiny flower puff around the scale of a fingernail. It is kind of a life amongst past life with the fading buds.
In a day or so I’ll share some more images with a bit more of an artistic flair to them. This camera and lens combination is extremely versatile.
Yours in creative Photography, Bob
Save

by successfulbob | black & white, landscape photography, Lumix GX8, Lumix GX85, Lumix Lounge, photography, photography creativity, photography gear
Working with Tiffen ND Landscape Filters
Had a good time making photographs in Tampa with Rob Bird a couple of weeks ago. We were on the beach at Fort Desoto Park, and I was working with my Tiffen ND Pro 100 Landscape filters. I used the 10 Stop plus the three Stop filters stacked together under overcast skies.
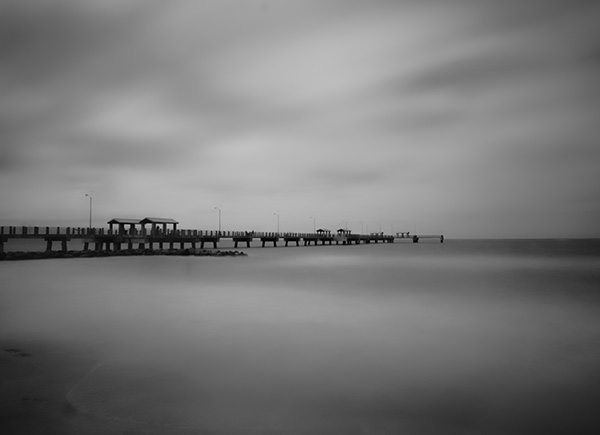 Made with Lumix GX8 camera and 12-35mm f2.8 G Vario Lens with a sixty-second exposure. Added a bit more blur to enhance the scene in post processing in Adobe Photoshop
I like the ability to add a sense of time to my images by using the deep ND filters. Clouds and water merge into an otherworldly look. I’ve only just begun to experiment with this type of photography and look forward to getting better.
When working with the Tiffen Filters, I feel confident that the glass will protect the actual filter material. In the past, I had been using plastic filters and often ended up with scratches making replacement frequently a necessity.
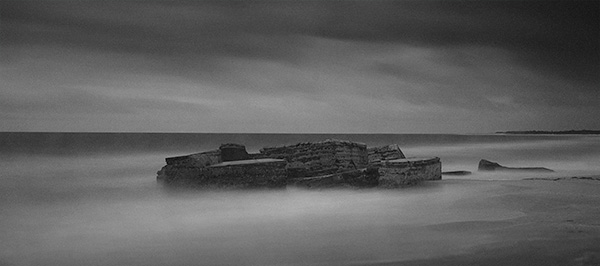 This image had the same settings and gear as above. Added just a bit of grain in post-production. Also removed a tower that was in the background that was a distraction.
Please note that this is not documentary photography. I am working toward giving you the vision I have for the final art piece. I am always adjusting my artwork to suit my vision. With that said, I am onboard with Julianne Kost in using the term ‘Lens Based Artist’ or ‘Lens Based Art’ to differentiate this work from my more realistic work.
 My working set-up for Landscape and Nature photography.
Image © Rob Bird http://www.pockethamsters.com
I work light when on location. Here’s my gear list that is pictured above. MeFoto Road Trip Tripod. Lightweight yet solid. Packs up small for travel. Think Tank Mirrorless Mover belt bag. Hold three lenses, spare batteries, lens cloth, mini-tripod and extra SD Cards. Lumix GX8. 12-35mm f2.8 Lumix Vario Lens, 7-14mm f4 lens, 35-100mm f2.8 Lumix Vario Lens, 20mm f1.7 Lens. Also on my belt the Tiffen Filter kit mentioned above. On my shoulder is a Lumix GX85 and the 100-400mm Lens.
Yours in Creative Photography, Bob
Save
Save

by successfulbob | photography creativity, photography software
Aurora HDR 2017 Software Deal
I’ve been really enjoying the program from MacPhun to create HDR images. I feel I am able to get more realistic images and still be able to tweak photos for the ‘traditional’ HDR look. This month gets you a deal to not only get the software but to get Trey Ratcliff’s instruction on how to get the most out of it. Check it out.
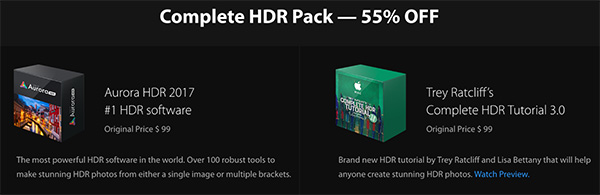 This software is for MAC OS only at this time.
AURORA HDR 2017 + TREY RATCLIFF’S COMPLETE HDR TUTORIAL 3.0:
Aurora HDR 2017 + Trey Ratcliff’s Complete HDR Tutorial 3.0 for only $89. Total value $189 Savings over 50%
Upgrade pricing starts at $49 for users of Aurora HDR, and is $69 for Aurora HDR Pro users
You get:
Aurora HDR 2017, The world’s most advanced HDR photo editor for Mac.
Trey Ratcliff’s Complete HDR Tutorial 3.0: Perfect for everyone who wants to learn to shoot HDR images from beginners to advanced users.
6+ Hours of instruction
Trey’s RAW image files

Yours in Creative Photography, Bob

by successfulbob | graphic design, graphic design, Lumix GH4, Lumix Lounge, photography creativity
BJ’s Brewhouse Art Piece – ColoadoSprings, Colorado
Had a great time sharing Adobe Photoshop techniques from my PhotoSynthesis program for the Professional Photographers Guild of Colorado Springs. During my All Day hands-on class, I was charged with creating artwork from scratch live in front of the attendees including making selections and sharing the thought process as I created the image.
 Here’s the image I made for the class with a few elements cleaned up for clarity
This technique was one I created for art application but I keep finding that it is working its way into my commercial work as well. You can see the original photo below. The textures I used were images that we had gathered on-site that morning. The idea is you can create a significantly different image using many different techniques, textures, masks and blend modes.
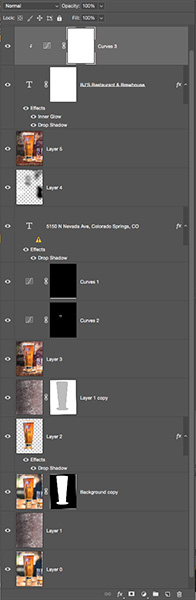 Here’s the Photoshop Layers Palette in a screen grab illustrating some of the techniques used.
The text was created using the fx palette. A large font was used for the name to attract attention. It was ‘dressed’ with bright color, an inner glow with a bright edge and a drop shadow. All of the text effects were chosen to help make the name stand out. The text for the address was more informational and was rendered white to be in high contrast with the rest of the image.
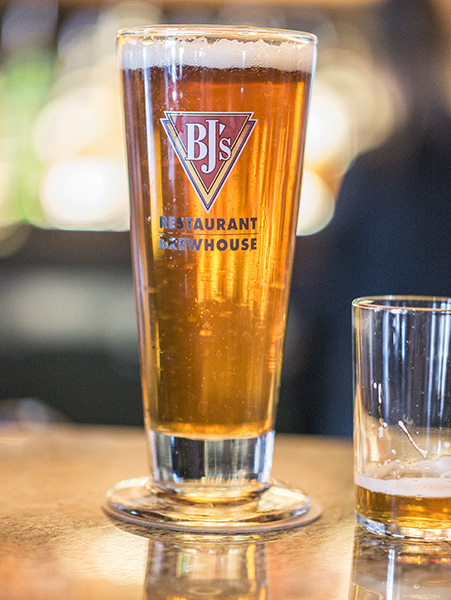 Here is the original capture SOOC ( straight out of camera) when my beer was delivered at the bar. Made with the LumixGH4 and the 35-100mm f2.8 G Vario lens
Got questions? Give me a shout.
Yours in Creative Photography, Bob
Save
Save

by successfulbob | inspiration, photography, photography creativity, tuesday painterly photo art
Tuesday Painterly Photo Art – Dan McClanahan
For this Tuesday edition of Painterly Photo Art I have Dan whose work I have admired for quite a while.
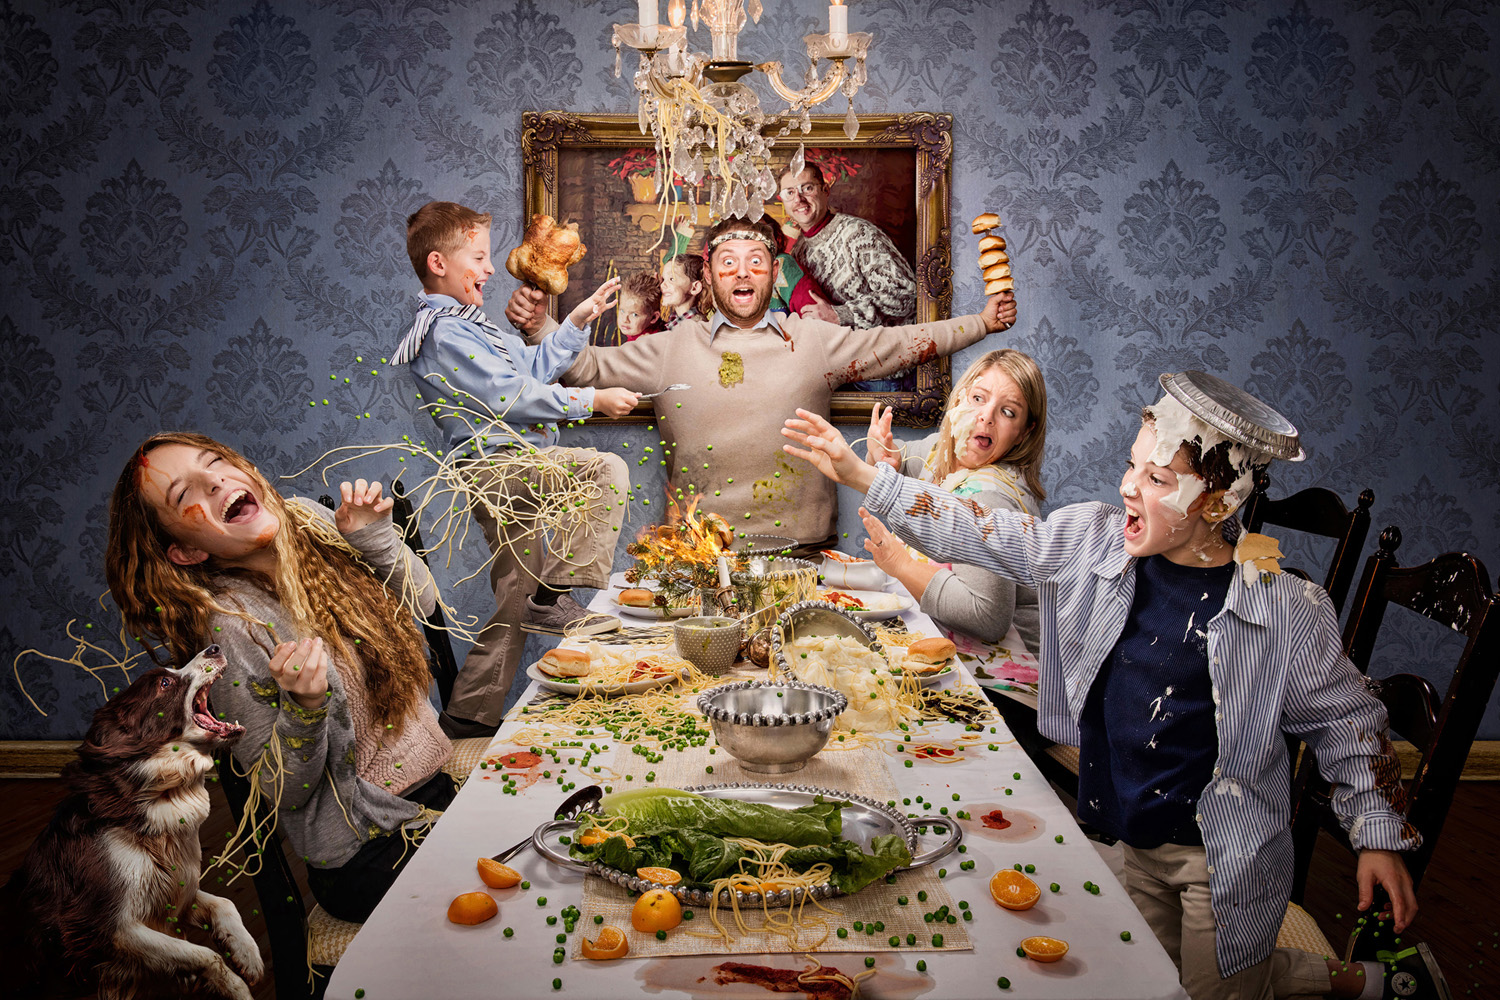 Dad Started It! This piece was photographed in my client’s garage, capturing each subject’s expression from a tripod and stacking them together in photoshop to create an ideal composition. The food was all real, but the background was manipulated to look like a dining room instead of a garage. © Dan McClanahan
 Before images for Dad Started It.
Dan’s work is a mix of in-camera artistry using artificial lighting and photorealistic compositing, often with a fun and vibrant feel. He’s only been a shooter since the digital age, so progressive lighting and digital manipulation have always been a part of his work. Dan’s business is split between his portrait studio and commercial work, and you can see the influence of commercial lighting and sheen in his portrait work.
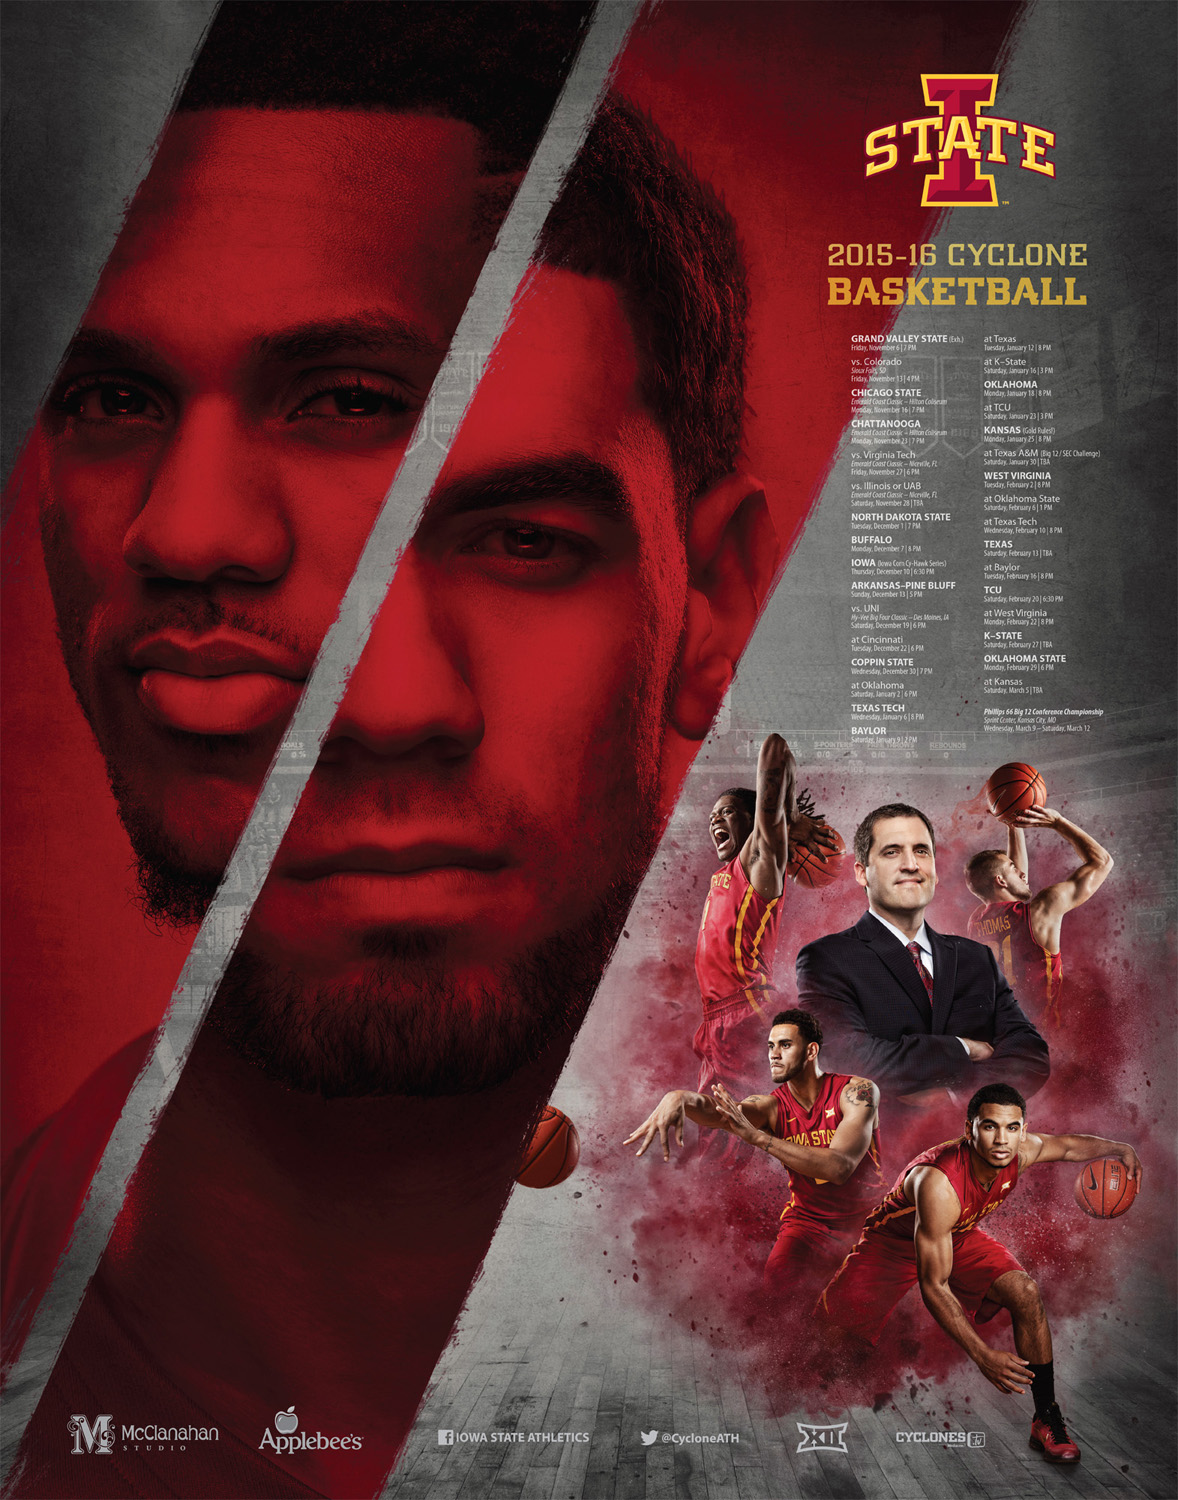 Sports Poster – Basketball © Dan McClanahan
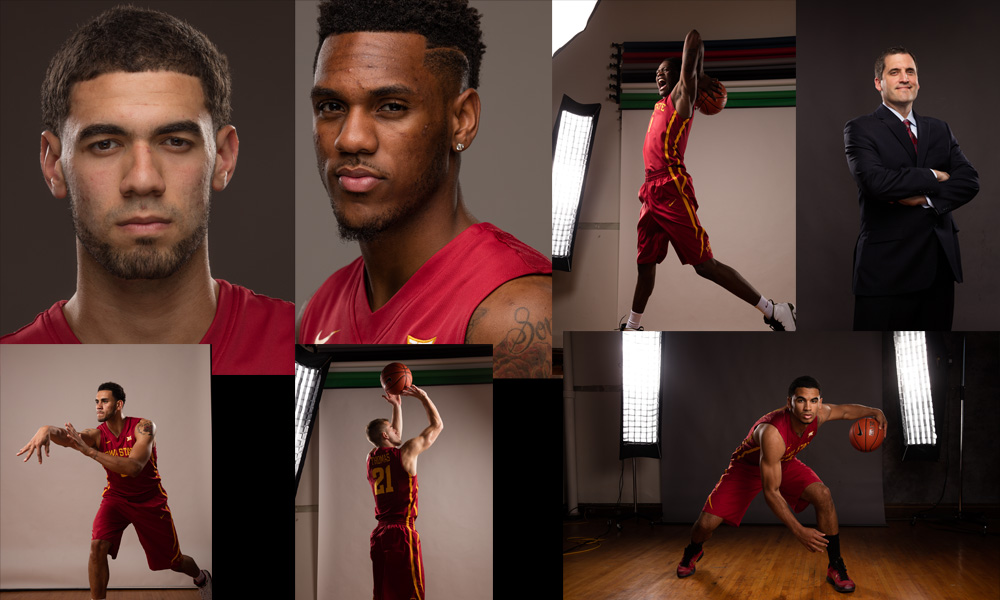 Reference images for sports poster. © Dan McClanahan
“My inspiration is generally gleaned from my clients, so my concepts are a collaboration between me and them within the parameters set by their needs. My challenge is to see how technically interesting and creative I can get within those parameters. Beyond client work, I try to challenge myself a couple times per year to create something I have no idea how to pull off just to make myself learn how to do it. Our Christmas cards and my annual schedule poster for the Iowa State Cyclone basketball team are examples of this. Aside from being great learning experiences, these personal challenges generally reciprocate in the form of successful competition prints and great exposure for my brand. For example, the image above of the family having a food fight was commissioned by a mom that saw our crazy/fun Christmas cards and wanted something like that for her family. I’ll take it!
Commercial photography created by McClanahan Studio in Ames, IA. Des Moines photographers specializing in modern, creative imagery for marketing and advertising campaigns. Dan and Alex McClanahan create promotional photography throughout Iowa and all over the midwest.
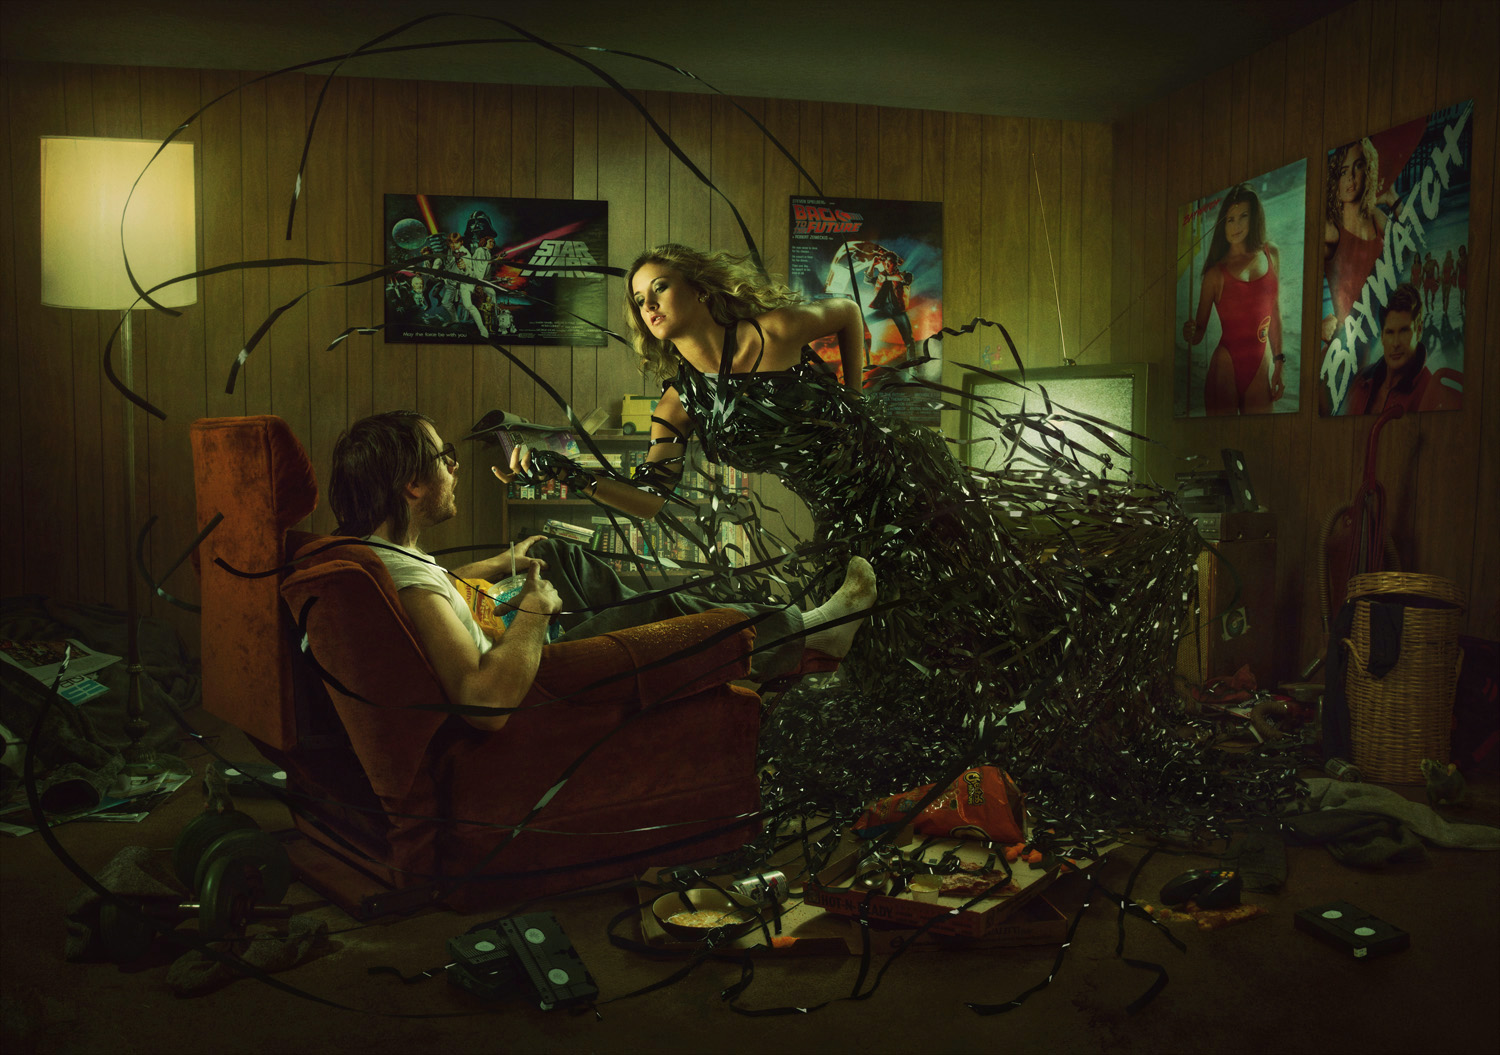
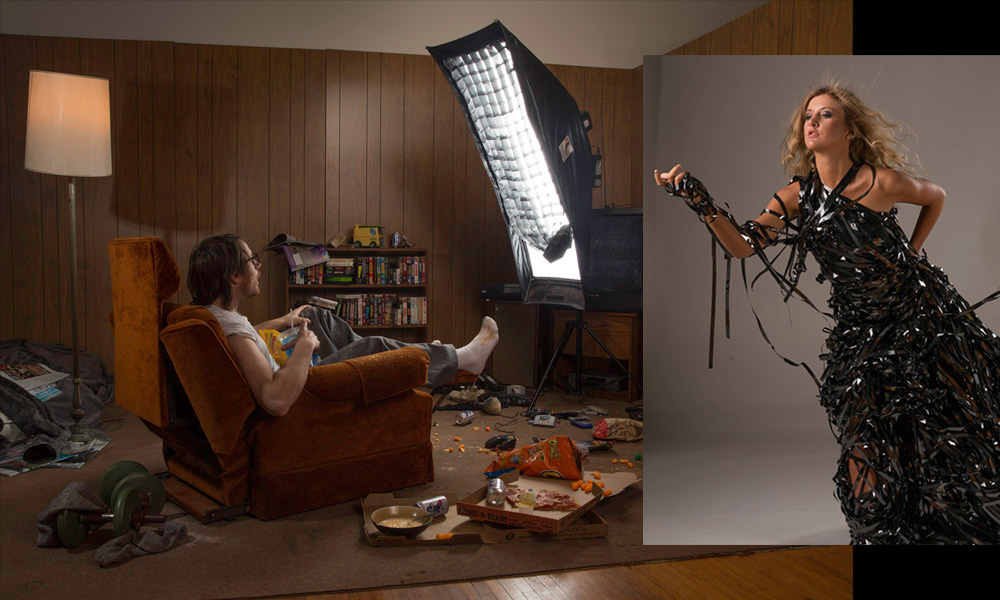 The Dangerous Lure of Entertainment: This was a personal piece. I had a tenant that was a hoarder and left a lot of weird stuff behind when she moved out. I ended up building this set out of her possessions and visually portraying the danger of our culture’s over-addiction to entertainment. It’s something I have struggled with in the past, and I knew people that dropped out of college due to video game addiction. I set the scene in the early 90’s because VHS tape looks way cooler than DVD’s and it was fun to pull some of my childhood interests and possessions in as props. © Dan McClanahan
“I’m not adept at drawing or painting like many of my peers, so when I composite I tend to photograph my components with precise lighting to match the scene so that the layers come together naturally and don’t require much blending in photoshop. I tend to use shapely lighting setups that retain the full dynamic range of the subject while sculpting expressions and textures to look 3-dimensional in a way that is coherent to the scene. Rim lights and fill lights are often used in addition to a key light to create this look. Remember, it’s easy to add contrast in post-production, but it’s tough to fix a photo with blocked up blacks or blown out highlights.”
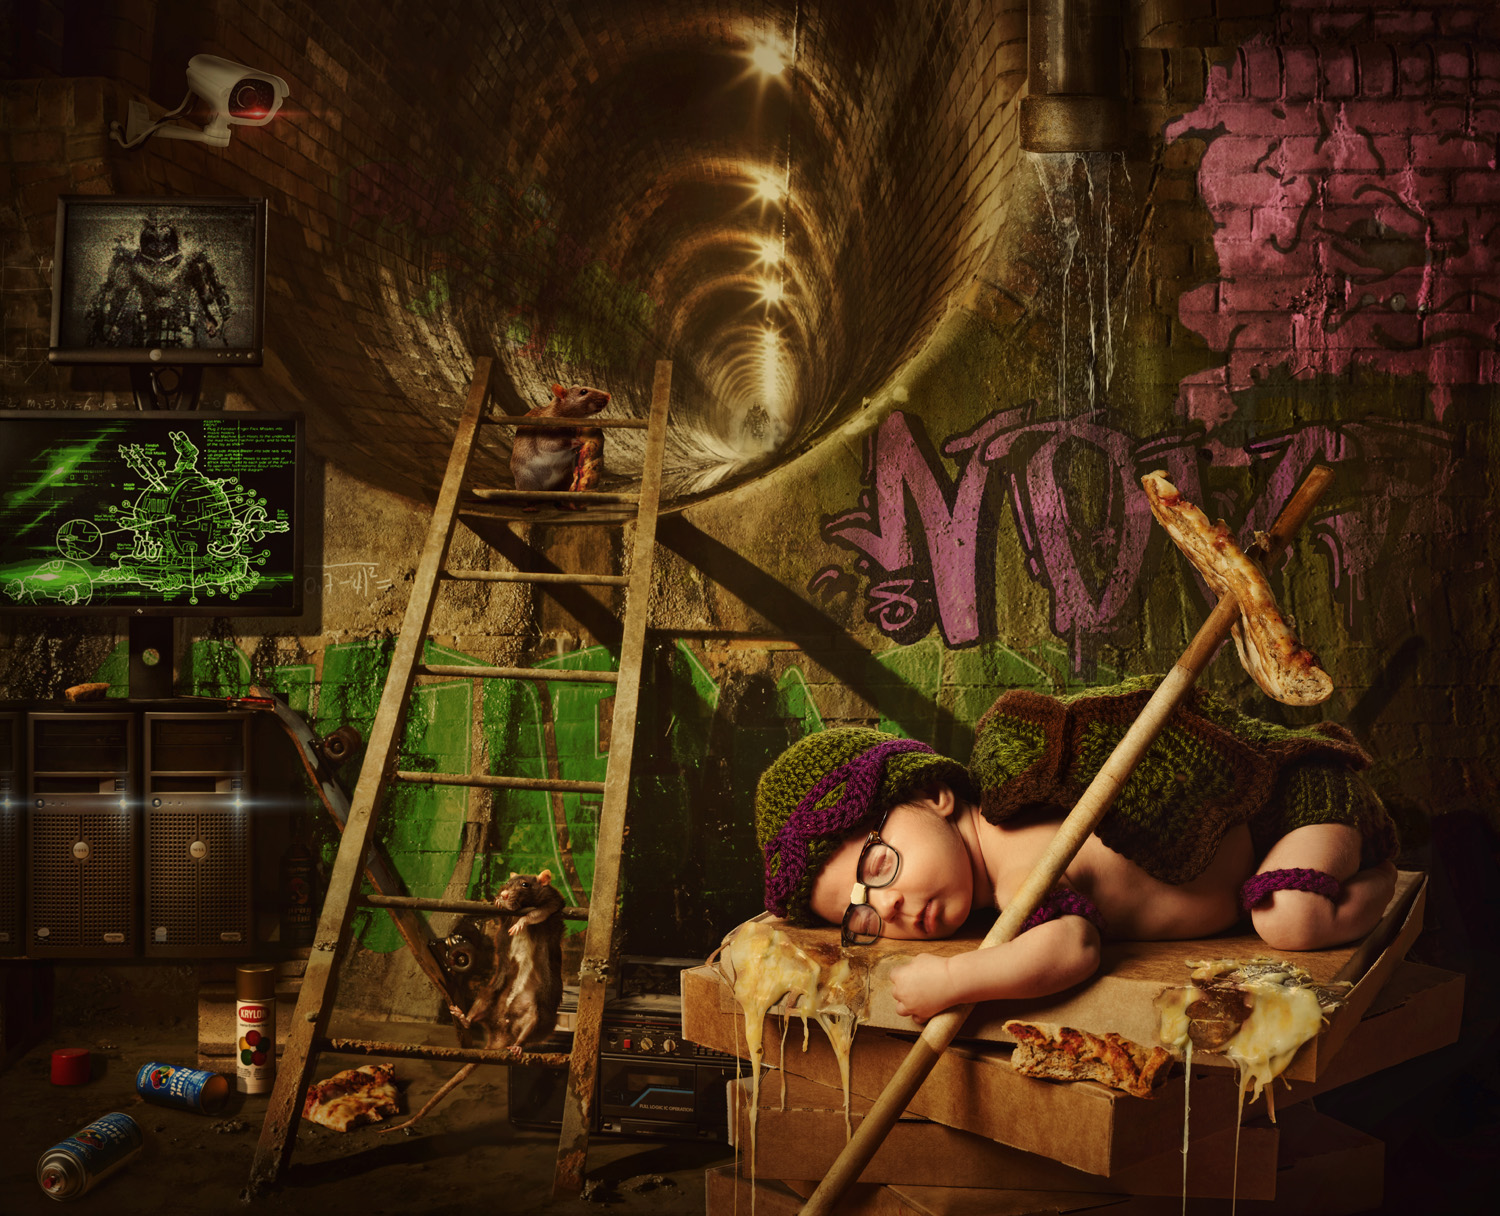 Newborn Mutant Ninja Turtle: I recently became a father and while we hired out our newborn photos to someone with much more expertise than myself, I still wanted to make a newborn portrait “Dan Style.” I mixed several favorites of my wife and me: Teenage Mutant Ninja Turtles, crochet, my father’s glasses, my old boom box, and our favorite local pizza. I figure I better subject my daughter to all of my favorite childhood things in photos before she’s too old to object. © Dan Mcclanahan
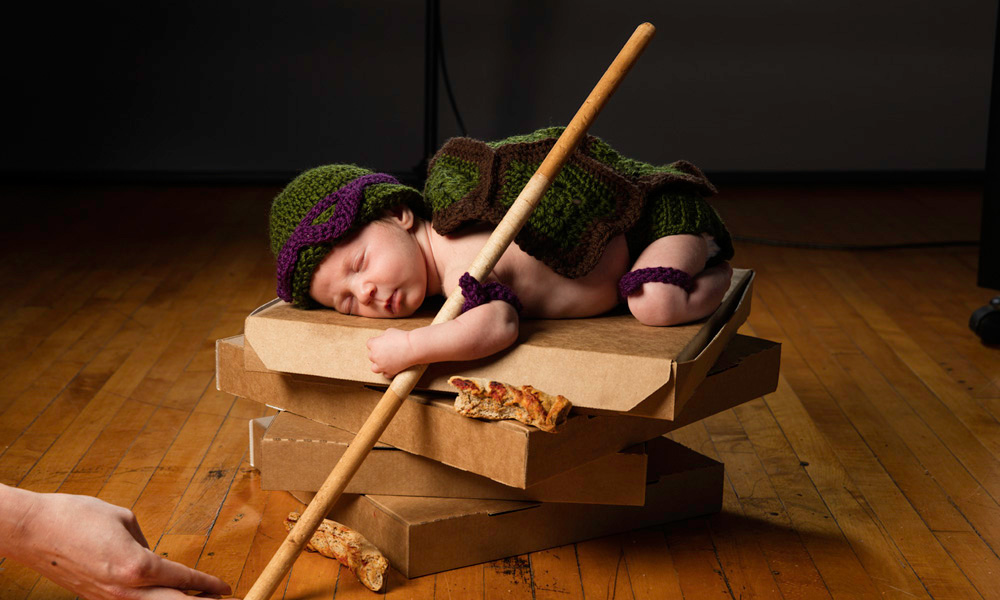
Before image. © Dan McClanahan
Dan McClanahan became a photographer in 2009 with the goal of creating a fresh alternative to traditional photography in his market. His quest was so successful that his work quickly made waves in the photo industry with multiple Grand Imaging Awards from Professional Photographers of America (PPA), Wedding and Portrait Photographers International (WPPI) awards, magazine features and becoming one of the youngest photographers on record to receive all three photography degrees bestowed by PPA. Dan has given back to the photography community as an educator, teaching numerous times at Imaging USA, SYNC, After Dark Education, PhotoVision and other events.
He owns and operates McClanahan Studio with his best friend and beautiful wife, Alex. He splits his time between advertising photography and high school senior photography. The couple live and work with their daughter in a twelve thousand square foot historic building they renovated and share with nine tenants.
Outside work Dan is a small town Iowa introvert that loves Jesus, his family, punk rock drumming and strong coffee.
See more of Dan’s work –
http://www.mcclanahanstudio.net
https://www.instagram.com/danmcclan
https://www.facebook.com/mcclanahanstudio
https://twitter.com/McStudio
Dand and Alex will be hosting a photo retreat in June in Hawaii – for more details
http://createdbykaui.com/photo-retreats-hawaii/retreat-details/june-6-9-2017-mcclanahans-hawaii-retreat
Save
Save
Save
Save
Save

by successfulbob | landscape photography, Lumix GX85, Lumix Lounge, panorama, photography, photography creativity, photography gear, photoshop tutorial
Working a Scenic Landscape
The light was fantastic. Scenery amazing. Time? Very short!
I was on my way to a photo shoot in the evening and saw the moon just starting to peek above the horizon as the light from the fading sun had already dropped below in the west. I grabbed the Lumix GX85 and the 7-14mm f4 lens to see what I might capture in the few minutes I had available. I don’t usually like to rush when a situation like this appears, but duty and a deadline called.
 This was the first quick image to make sure I had something in the can.
I first quickly grabbed an overall scene-setting image. Then I tried a couple quick grab shots. I ran down the parking lot to get a better overall view. Having the wide angle lens gave me a lot of the scene but I knew I would need more to be happy.
 Nine image panorama capture for further work in post. Note the images have already been adjusted a bit in Adobe Camera RAW
I set up and shot a nine image panorama with the camera in the vertical orientation to gather as much info as possible. Already the light was starting to fade and my job was calling.
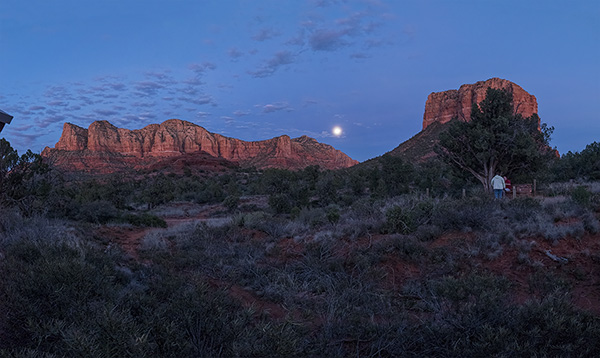 Image output after using Photomerge in Photoshop.
I allowed the Adobe Photomerge tool to do a lot of the heavy lifting for me. I highlighted the images in Adobe Bridge selected Photomerge from the Tools drop-down menu Tools>Photoshop>Photomerge… Layout was set to Auto. The following text boxes were checked. Blend Images Together for obvious reasons. Vignette removal. This was checked because the lens had a bit of vignette and would have made for messy skies. A reason for not checking the vignette box would be if you had files that had no vignette because the files could process faster. Geometric Distortion Correction. You can try working without this but I have found in a scene like this the red rocks would have curved. Content Aware Fill Transparent Areas. When a handheld pano is made like this there is often areas that don’t completely fill the rectangle of the final image. Photoshop will look around and use it’s best guess to fill the areas. You can check on them quickly as it will also leave a selection around the areas it filled in case you need to make some adjustments. In this particular case, it did a great job. All setings are available for you to play with if you don’t get the exact results for which you are looking.
Post-production is a huge help in these instances to obtain quality images.
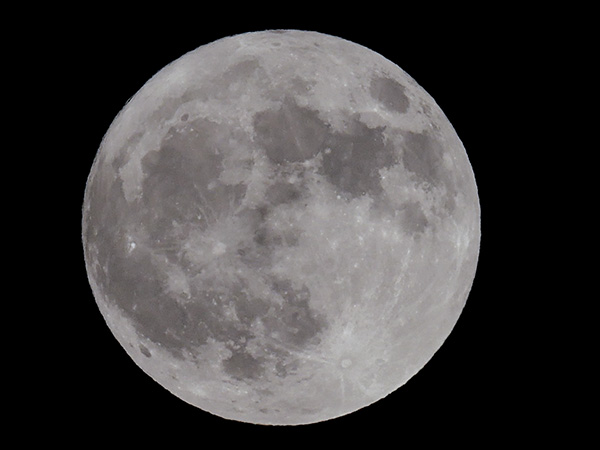 I pulled a full moon from my files as the moon area was blown out. Another case of the eye being better than the camera. If I had more time I would have bracketed exposures to get the detail I needed.
 Here’s the final. The moon has detail. The image was cropped to bring attention where I wanted it and
a little judicious Cloning was used to remove the couple under the tree.
If you have any questions or comments give me a shout!
Yours in Creative Photography, Bob
Save
Save
