by successfulbob | 4K photo mode, 4K video, Lumix GX85, Lumix Lounge, photography creativity, photography gear, video
In-Camera Focus Stacking
Cool beans!
Yep, I said it. Cool beans. This feature is quite handy when you want to photograph with a macro lens and show some incredible depth of field in your image.
The 4K Photo Mode in the Lumix GX85 and the G85 called Post Focus which allows you to choose the frame with the focus where you want it, after the shot, also allows you to focus stack the images together to enhance the depth of field. One downside to using this method is that we are pulling stills from the video which means there is 8MP worth of file size with which to work. A file of this size will get you to a 20-inch print with no problem, but if you want to go bigger, you’ll need to use a different method. I’ll share that with you in the next day or so.
Let’s take a look.
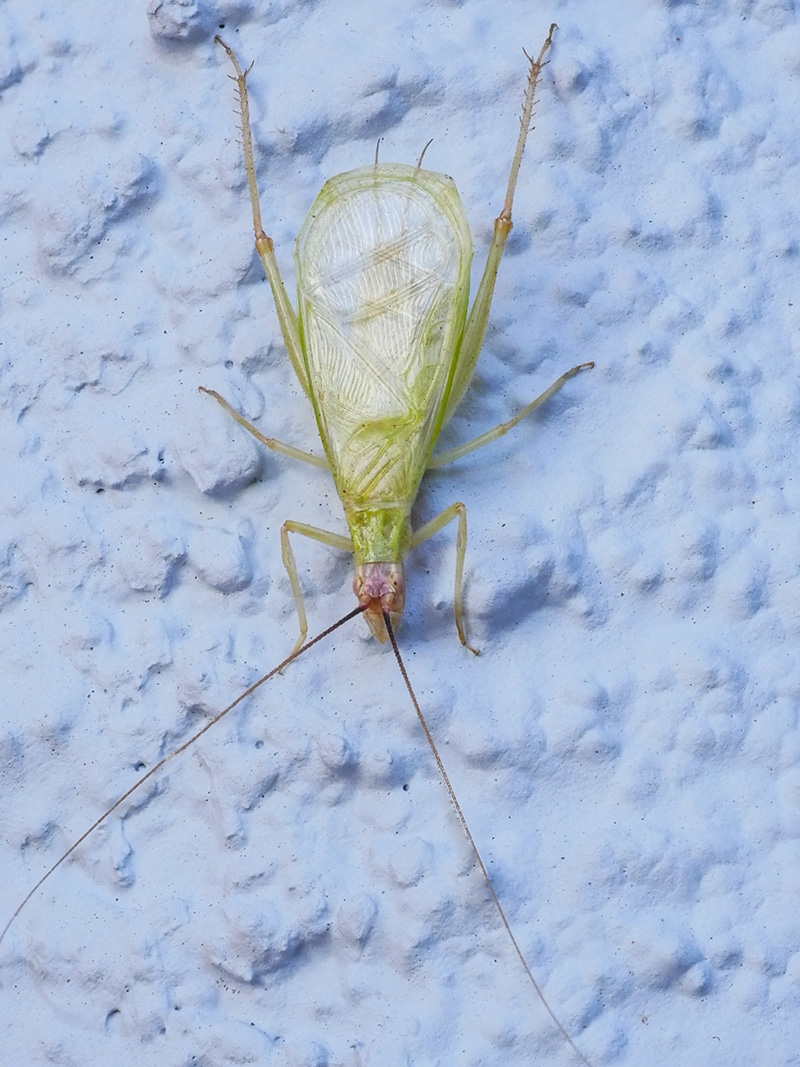
 I call this Green Bug. This image is a single frame grab from the 4K video. Printable and OK. But let’s see something a little better.
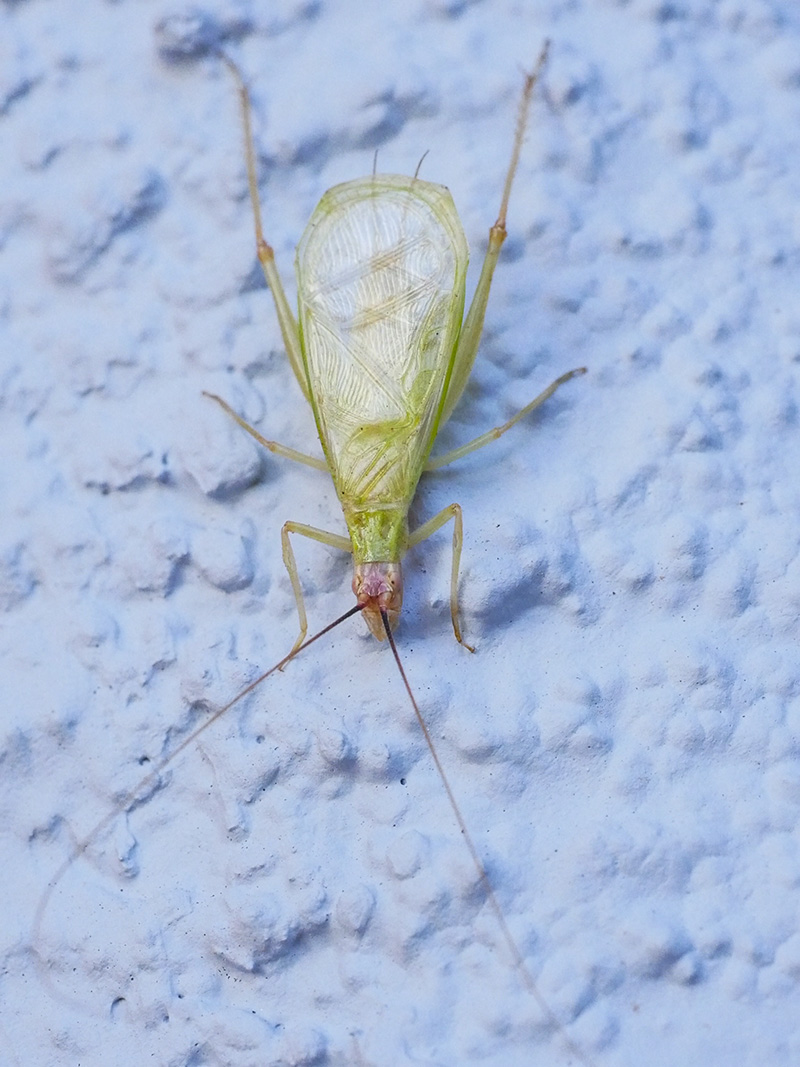
Now let’s take a look at the image after all the images in the stack have been combined to show the sharpest parts of each frame in the video.
 Check out the detail throughout the photo now.
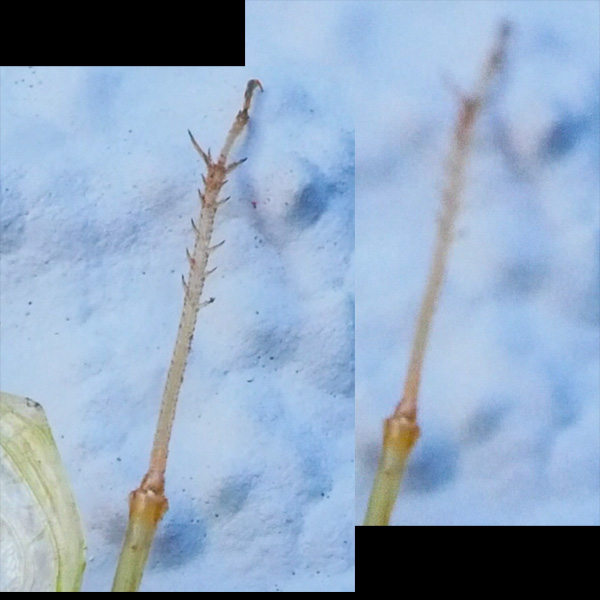 Here’s a little zoom in on the back leg of my friend the Green Bug.
Click Here to see the original video clip
This video image was captured with the Lumix GX85 with a 45mm f2.8 macro lens.
Tomorrow I’ll take a look at the Focus Bracketing feature that allows us to bypass the video and capture full-size images.
Yours in Creative Photography, Bob
by successfulbob | Lumix G7, Lumix Lounge, macro, photography creativity, photography gear, photography lighting resources
Water Splash Photography Setup
Heads-up here! This is my first foray into photographing water droplets. I’m sharing my current setup, and sure it will change as I learn more and experiment. I am taking you along on my adventure showing you the kind of work I’ve been able to create with this setup. Once again I will share I am no expert with this type of photography. If you’ve got some ideas for me, I’d love to hear them!
This photography is not for the faint of heart. By the way, you CAN do this photography with a couple of Speedlights and in some ways that may be better for more control of the results. I like the variability with the gear which I’ve been working. OK, with the disclaimers out of the way lets look at a water droplet photo and then the layout of all the stuff.
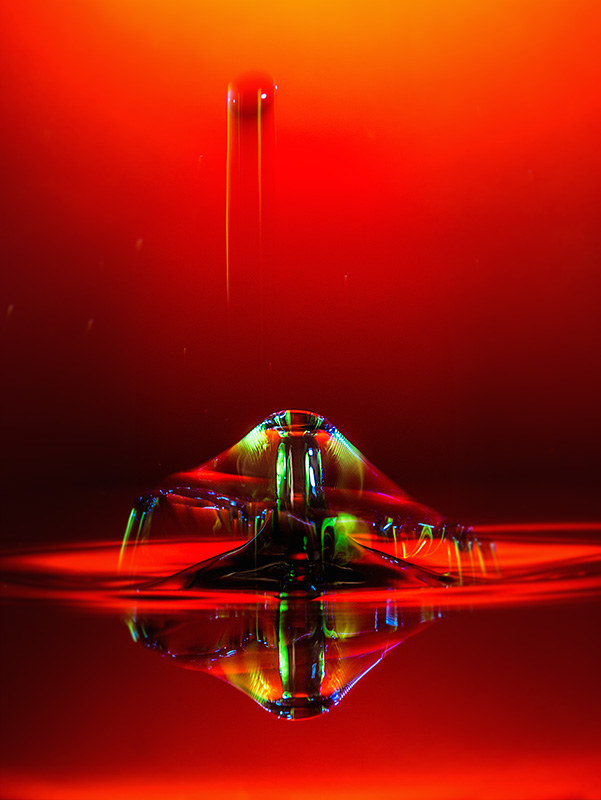
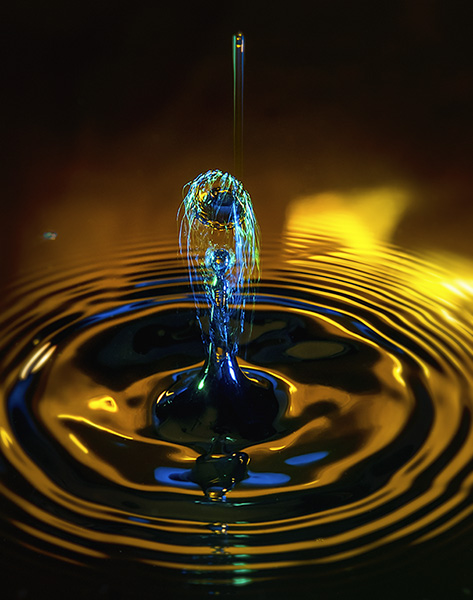
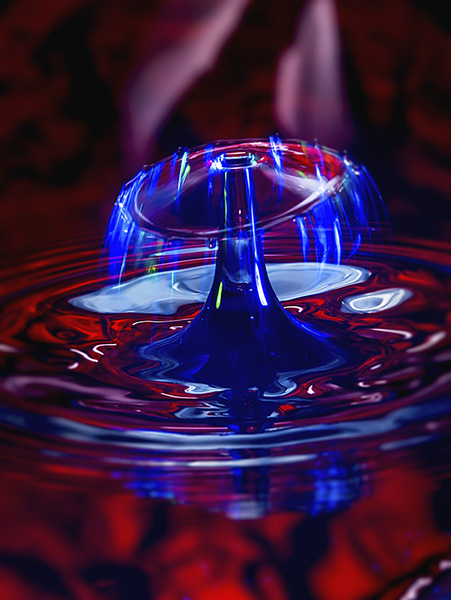
 Photograph achieved with the equipment setup as seen below. Exposures are made at f14 with @ one second ISO 200.
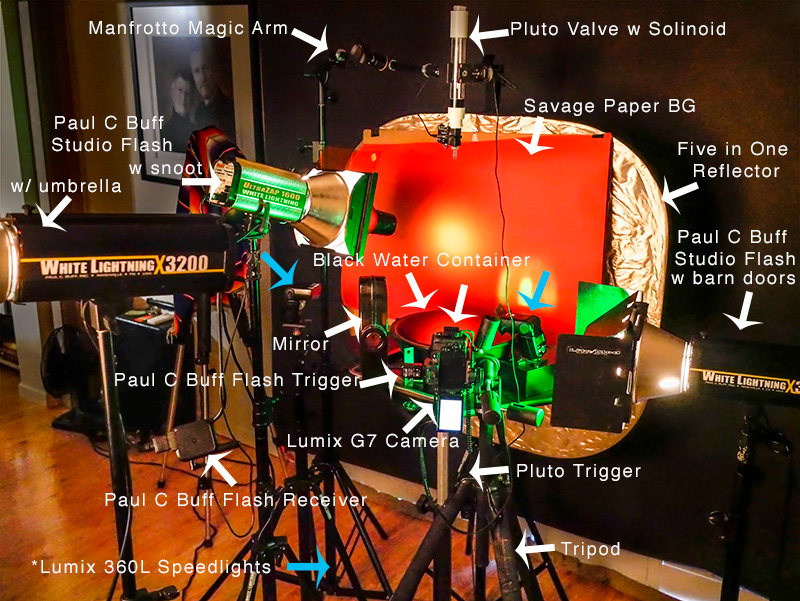 Here’s my gear. I’ll ‘splain below.
I decided to get a little head start on this type of photography by getting some necessary tools. The Pluto Trigger and Pluto Valve can save you a LOT of time. The Trigger is connected to the camera and controls the show. It tells the water drops when to fall. What size they should be and when to trigger the flash. All of these durations are in milliseconds (MS).
Backgrounds are only limited by your imagination. The one showing above is with a colored Savage Paper background. There is a gelled flash with a snoot to vary the light and add interest. With this setup, I have also used a reflective background with a gel over it lit by a flash at various angles and directions. You can use cloth or photos or printed patterns or almost anything you like. As I learn I’m trying to be careful not to overwhelm the waterdrops but we’ll see as I play how that transitions.
I used the Lumix G7 to capture these photos. Lens used was the Vario 35-100mm f2.8 lens with a 10mm or 16mm Vello extension tube. You will need a camera that has a trigger port or can communicate with the Pluto Trigger.
Connected to the camera is a remote flash trigger that fires the flash Paul C Buff flashes from the camera. The Lumix 360L flashes are triggered by the light from the Buff’s because I have them set to Slave Mode. It is the flash that freezes the motion of the water. Adding gels to the flashes adds color and interest to the splashes. In my images, you often see some streaks of color in addition to the frozen droplet. This is because I am using multiple types of flash. The Buff units are not as fast as the Speedlights. And the Speedlights can be of different durations if you change the amount of light you ask them to produce. The lower the power, the shorter the duration of light. Bogen Cine gels Vivid color are juicy. Roscoe gels work well too. You can get gel packs that are just the right size for fitting on your Speedlight. Here’s one from Roscoe holder for the gels.
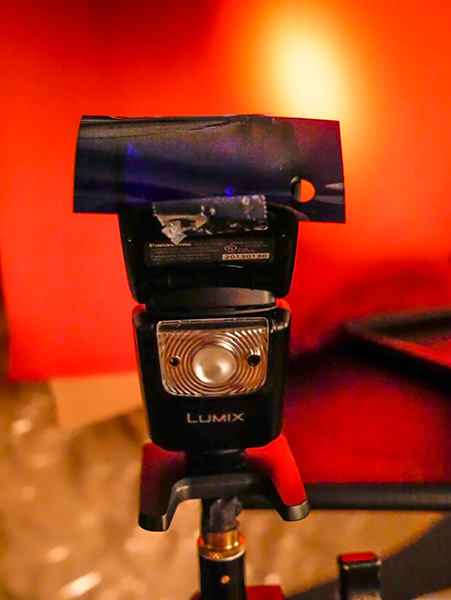 Lumix Speedlight with gel taped in place. Once you see how the gels perform you can also buy larger sheets and cut them to size for larger flashes.
I used a black bowl of water for the reflection. Black allows the color of the background to shine through. Fill the bowl as high as possible, so the edge of it doesn’t show. Science says you can fill a vessel higher than it top because of surface tension. Well, let’s not get into that too far, but as a side note, know that you can put 32 dimes in a shot glass before it overflows after you have filled it with water. Make sure you have a drip tray underneath the bowl or tray to catch any spills as you work.
If you don’t have enough lights, or just want to add another variable, note that you can add a mirror to the set to reflect light back from another direction.
The Manfrotto Magic Arm is extremely helpful in positioning the valve in place over the water. The Manfrotto Super Clamp holds the valve. When you are setting up the position of the water drops, watch where the water drop falls and put something in place to use to set your focus. Remove before shooting.
Working with water droplet photography is like photographing fireworks! You are never quite sure what you are going to get. You get to control the variables but there is never a guarantee and always fun surprises. (well sometimes not so fun but always a learning experience)
If you have any questions, let me know.
Yours in Creative Photography, Bob
Save

by successfulbob | lighting, macro, photography, photography creativity, photography education, photography gear
Water Droplet Splash Photography
I’ve always wanted to attempt water droplet photography.
And now I have!
It’s kinda like photographing fireworks in that you never are quite sure what you are going to capture when the shutter is fired, but you don’t have to wait for the Fourth of July either. This is something that could consume me as there are endless variables to throw into the mix. What can change the look of any image? Type of liquid, the color of the fluid, the temperature of the liquid, the size of the drop(s), flash duration, add another flash, and another, change the background color, add color gels on the flash…
Arrghh! It’s fun if a little frustrating at times when you think you have done everything exactly the same but get an entirely different result. I now understand where someone had said that making these images is part science, part art and lots of luck. As Thomas Jefferson said, “The harder I work the luckier I get.” That might not be an exact quote, but you get the idea.
Here’s are some examples from my first couple of days.
 This is from day one of playing in the water with splash photography
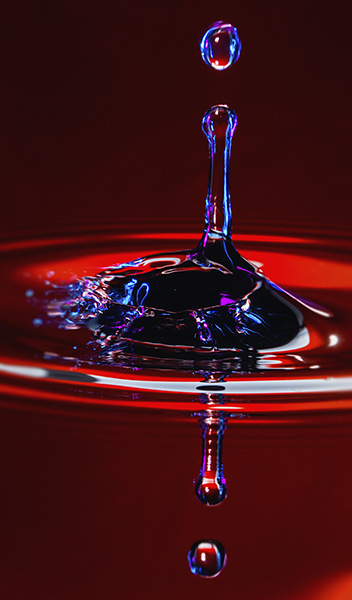 This from day two shooting. Playing with lights and droplet timing.
 Day Three
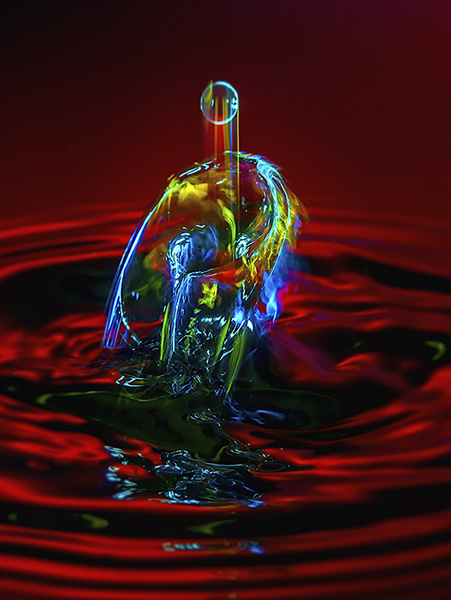 Day Four with thickened water and new timings for dropping the drops.
As I said, the photographing of the drops is part science and part luck. You can increase your luck by adding to the science in your arsenal. I purchased some help in the form of the Pluto Trigger and the Pluto Valve. The Pluto Trigger is a pretty amazing controller for your camera. In this case, the trigger releases the waterdrops and times the firing of the flash. Even with that control, there are still a lot of variables in play.
And I like it.
In the next couple of days, I’ll share my set-up and some things I learned as I have started this new photography genre.
Yours in Creative Photography, Bob
PS – I’ve just bought the Pluto Trigger, and like it so much I’ve signed on as an affiliate
Save
Save

by successfulbob | Lumix GX8, Lumix Lounge, photography gear
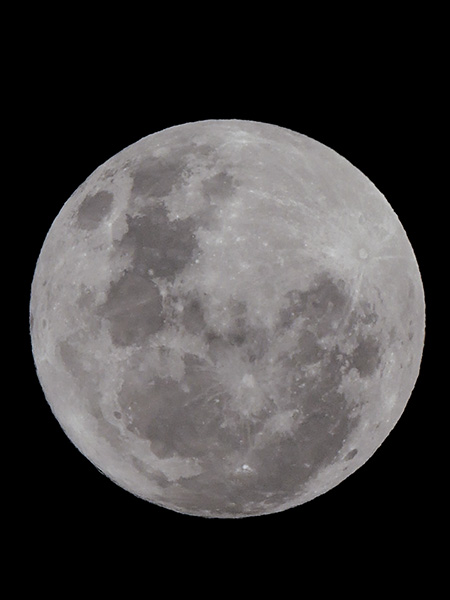
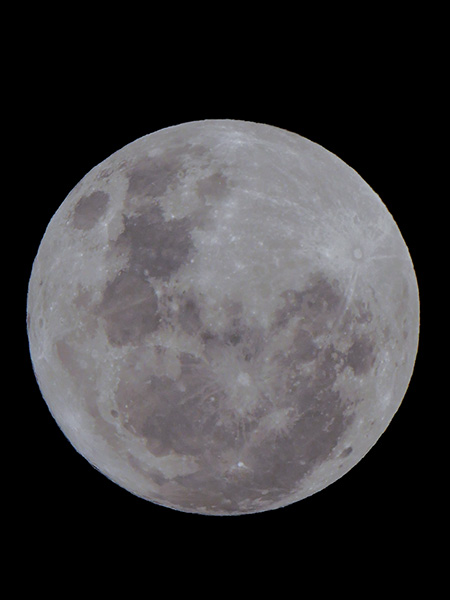
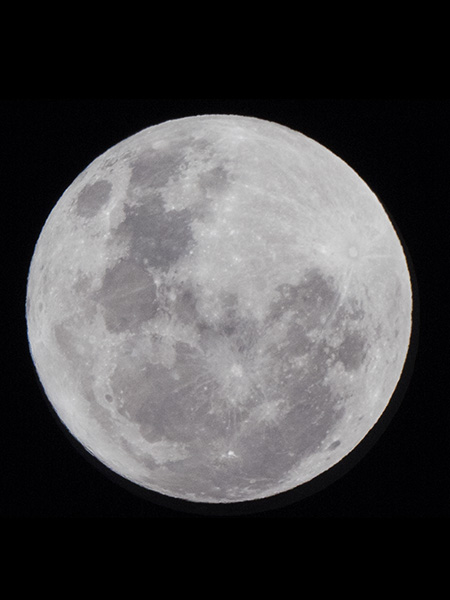
Shooting the October ‘Supermoon’
Testing out some features in the Lumix GX8 while shooting the moon.
What better moon than the full one of October with clear skies? I used the Leica DG Varia Elmar 100-400mm lens racked out to 800mm. This combo allowed me to get crisp solid captures when zoomed all the way out to 400mm which is 800mm equivalent in full frame cameras. I continue to be pleasantly surprised with this lens.
I made multiple images to try out the digital zoom feature in the GX8 to see what you give up in quality buy zooming in camera. It can go 2X and 4X.
 This shows what you see in the viewfinder when you apply the digital zoom.
What are the advantages of the digi-zoom over shooting in RAW and upping the resolution in the file during post production? None if you are only getting the moon. On all my exposure tests I was able to get a better-looking file when resizing the RAW file. When you use the digital zoom you MUST be in jpeg mode, so you are loosing some information right from the beginning. The advantage is that you can see what the image looks like in the viewfinder. If I were just using the moon image all by itself as we see here, I would choose to shoot RAW. Where the difference come in is if we are shooting the moon in relation to some other part of a scene. In that case, we would get the compression of shooting a longer lens which wold render the moon larger in the scene in relation to the objects. We’ve all made that shot when we first started out where the scene is gorgeous, and the moon is an integral part of the beauty, and it turns into this tiny little white dot in the view. Of course, our eyes make us think it is bigger than it actually is but lens optics rule the day!
Here are the images all made to meet up with the full frame of the 4X capture.
 4X capture
 2x capture
 RAW capture cropped to match 4X zoom view and output as a 20MP file. Quality is much better in my opinion.
I didn’t have time last night to get the moon into a scene, but I’ll try to set something up in the future to show you the value of engaging the digital zoom feature.
Yours in Creative Photography, Bob
PS – Please note that the moon has been rotated in post-production for all images to use a vertical orientation.

by successfulbob | architectural photography, black & white, infrared photography, Lumix G6, photo walkabout, photography, photography creativity, photography gear
Wandering – Scottsdale, Arizona
Today is the start of a new feature here on the Successful-Photographer blog. Wandering will have images from a walk around a place with no other objective than to see what images might be gathered. Wandering is a way to keep your eye sharp and experiment with new ideas or test out new gear.
The first stop on the SP wandering tour is Downtown Scottsdale, Arizona. Scottsdale is a high-end community with lots of art galleries and interesting new architecture mixed with buildings built in the ’20’s. I was down in the Valley of the Sun for meetings that started in early morning and stretched into the night with some downtime in the middle of the day. With full sun basting the town I thought it would be fun to put the infrared camera through some paces. For convenience, I mounted the 14-140mm (28-280mm full frame equivalent) on the LifePixel converted IR and set off to see what I could capture.
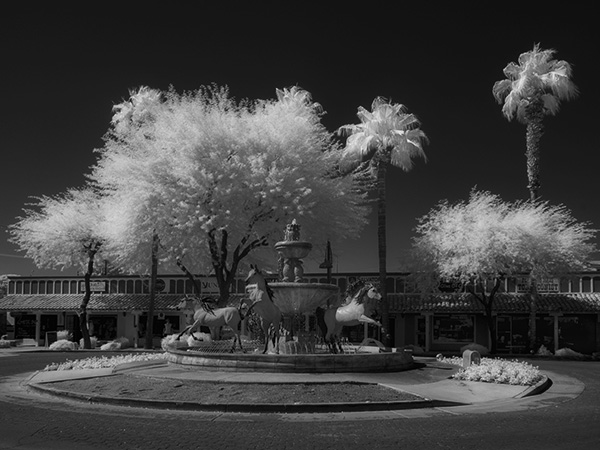 Fountain on the central circle.
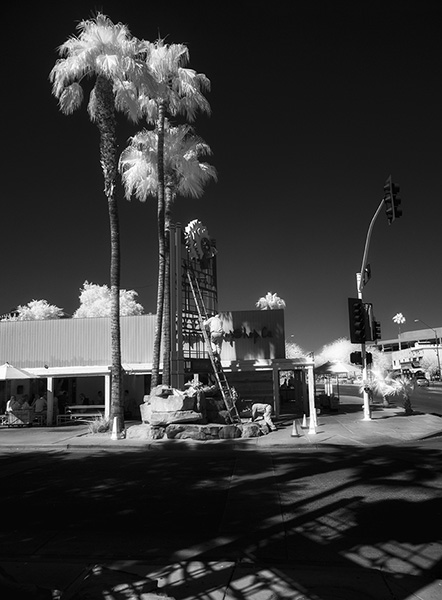 Working on the sign under the palms.
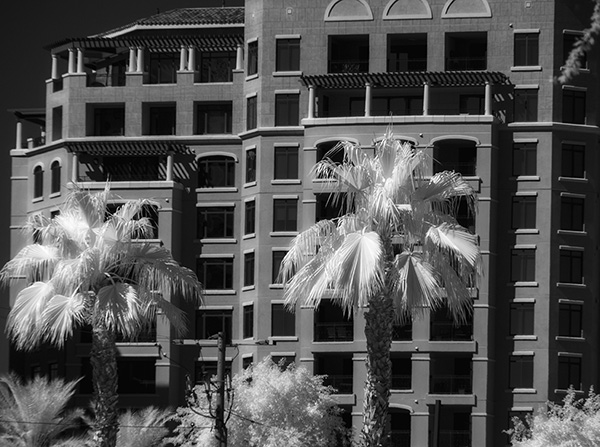 Glowing palms against the modern architecture.
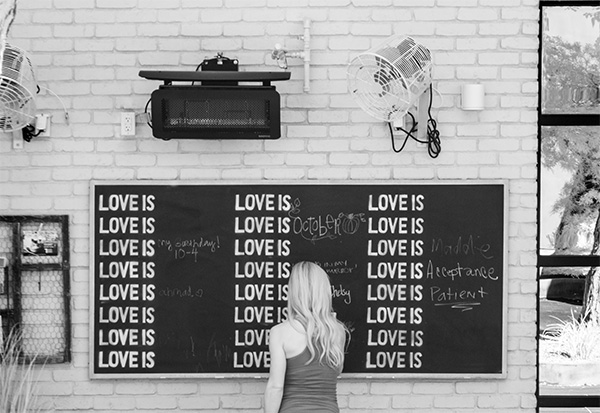 ‘Love is…’ bulletin-blackboard outside a restaurant. Even though there was no full sun the infrared capture renders this scene with lots of contrast.
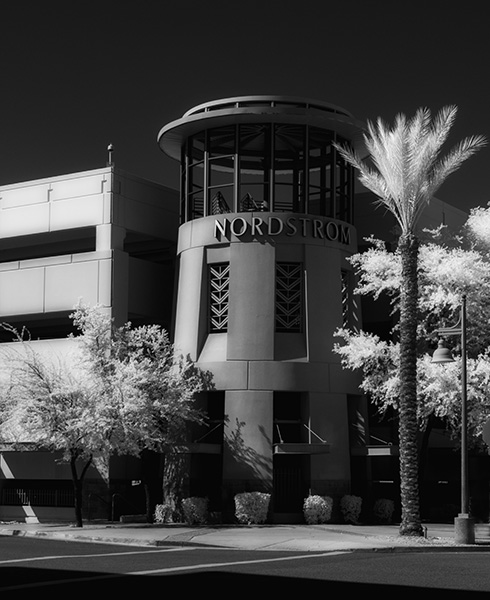 Nordstroms tower architectural detail.
Always having a camera with you allows you to take downtime and turn it into a learning experience. With the light weight and quality of the micro four thirds cameras, it’s easier than ever to always have a reliable capture device with you.
It’s a great time to be a photographic artist.
Yours in creative Photography, Bob
by successfulbob | Lumix GX85, Lumix Lounge, photography, photography gear, wildlife photography
Sedona Wetlands Photo Gear Testing
Well, I gotta tell ya it’s been very busy and I’ve been remiss in posting here for about a week. I photographed a four-day event coverage job with its attendant post-processing along with my regular work. There are only so many hours in a day so the blog had to wait.
I’m back!
And I got a lens I was lusting after to add to my quiver that I’ve started testing. The Lumix 100-400mm G Leica DG Vario-Elmar f 4.0-6.3 lens is as beautiful as I thought. I do not normally get too excited about glass for my cameras. I think of them as tools, and if they do their job as advertised, I’m cool with them. Occasionally, a lens tends to perform over-and-above That’s when I get excited. The 100-400mm is one of those lenses.
I went back out to the Sedona Wetlands for a quick test and here are some results.
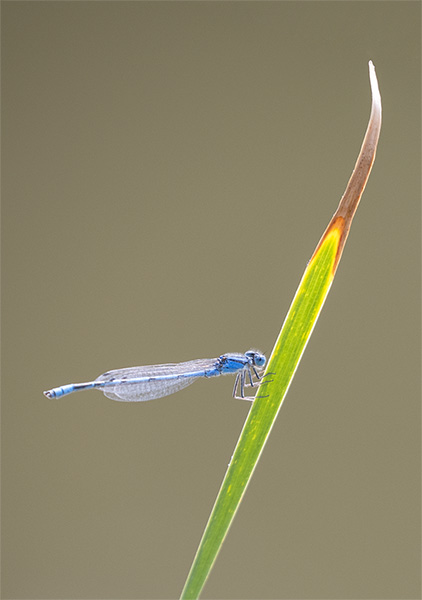 Blue Dragonfly – I was unable to identify this dragonfly. Wonder if it’s because it’s a juvenile and the wings haven’t changed yet. Any ideas??!!
Even though there were quite a few of these critters darting in and out of the stalks of green I could barely see them. They are tiny. Tiny and almost transparent. With some patience, I was able to finally track one of the dragonflies down that took a moment to rest. Excellent detail of something I almost couldn’t see. Oh by-the-way, I was hand-holding the shot with the lens racked all the way out to the 800mm equivalent. As a matter of fact I handheld all the images in this post at the 800mm equivalent. The GX85 was the camera and was a help in this regard as it is using five-axis image stabilization.
 Even at f6.3, there’s some beautiful separation from the background with this lens.
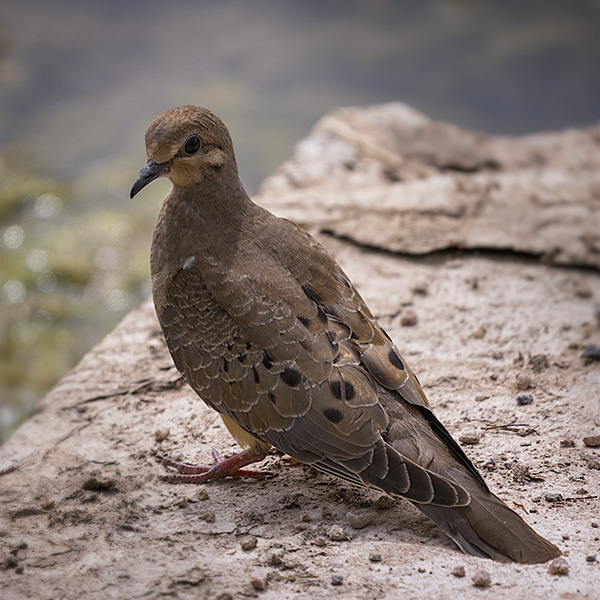
 Mourning Dove – A bird capable of attaining flight speeds of 55 MPH hung around for a portrait. Sweet.
Not so much a beautiful photo, but a test to see the amount of detail that can be represented in the feathers. Sharpness is enhanced in this camera by the removal of the anti-alias filter. I might look to extract the bird from the background and use the pattern of the feathers in an art piece. We’ll see.
Yours in Creative Photography, Bob
Save
Save