
by successfulbob | landscape photography, Lumix Lounge, Lumix LX100, panorama, photography creativity, photography education, photography gear, photography software
Panoramic Photography – One More Time
Here’s one more use of panoramic photography that I haven’t mentioned in previous posts. Change the number of Mega-Pixels in your camera.
“Say what?” You ask? “And once you explain, tell me why I want to try that?”
Ok, here goes.
You can expand the number of pixels in an image in order to be able to make a larger print by making multiple images and overlapping the capture. After you get back to the studio move those images into your favorite photo stitching programs like Adobe’s Photoshop or AutopanoPro and put the images together. Photoshop has gotten very good at merging images together including a new feature called Content-Aware Fill that can automatically clean up the blank space that can sometimes surround your image.
This morning I had my Lumix LX100 with me. I call this the professional’s point and shoot because it has fast glass and is quite versatile with all important controls on dials just like the old days. No need to move into electronic menus to access your settings. All of this is in a quite small package. But the camera is only 12.1MP which yields a 36-megabyte file. In today’s example, I shot five exposures overlapping each by 30-40 percent. After merging the photos I ended up with a 97-megabite file. 97 divided by 3 equals a 32MP capture.
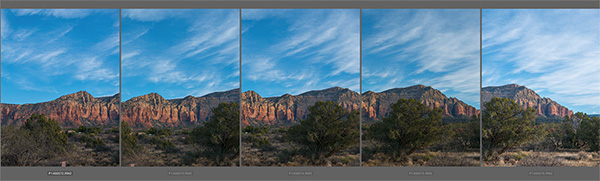 Here is a screen capture of the five images when highlighted in Adobe Bridge.
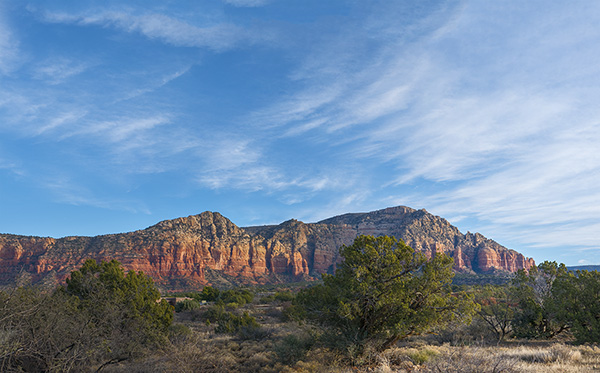 After the images above were assembled in Photoshop and massaged with Luminar from MacPhun.*
With this technique, you can get file sizes you have only dreamed about with a little extra work. Remember if you want to really make a huge file you can use a long lens and do row after row of images and blend them all together. Make sure you capture each row the same way. I always go left to right and top to bottom during my captures.
Yours in creative Photography, Bob
PS – * Luminar software is currently only available for the MAC platform but from what I understand they will be releasing a PC version later this year. Luminar can be used as a stand-alone processing program or as a Plug-in. There’s a sale on ’til the end of the year the link above will take you there.
PPS – The MacPhun software Aurora 2017 HDR is also on special until the end of the year. I’m enjoying the creative processing from MacPhun products.
by successfulbob | inspiration, Lumix G7, Lumix Lounge, photography creativity, photography gear, time lapse, video
Stop Motion Video – Aloy Anderson
Through the Internet, I have met an avid advanced amateur photographer/videographer named Aloy Anderson. Aloy is always pushing to learn new and creative ways to use his cameras. I have never attempted stop-motion video myself even though it is a capability built into the Lumix Cameras. When Aloy shared his project with me, I asked if he’d mind sharing some of his thinking and his process with me. And now with you.
I invite you to check out his stop-motion video called Jungle Movie “Be Brave” and turn the rest of the post over to Aloy. Enjoy!
Jungle Movie “Be Brave” from Ray Anderson on Vimeo.
“My name is Aloy; I’m a photographer and Youtube content creator from Miami. From an early age watching Sesame Street, I’ve always been curious about how to make stop-motion animation films. In those days it took a 35mm camera with “miles” of film to develop which was out of my reach. When I realized my new Lumix G7 had the feature built in I was pleasantly shocked. I had to give it a try. My video “Jungle Movie” my first attempt at a storyline video.
When you enter the stop motion menu on the Lumix camera choose whether you will snap each shot independently with the shutter button or the camera can be set to shoot at your preset interval. I do a little of both to give me time to reposition the set pieces and camera placement. For simplicity, I chose 5 seconds between each shot to give me time to move the characters quickly and get out the way.
Stop-motion can be very tedious and time-consuming, and it’s tempting to take the easy way out by leaving the camera on a tripod in one spot. That would be a mistake akin to watching a whole movie from one angle. I suggest different scenes and locations for variety, using a wider lens to show establishing shots and standard lenses for shallow depth of field moments. Before you begin, have a definite storyboard in mind. I like to use manual focus and exposure for each shot.
Here are some tips.
1) Don’t to move each piece too far between each shot as I did in some of my Jungle Movie. The resulting video will have choppy movement. A few centimeters is a good start.
2) Keep the camera on a tripod or table-top to maintain a solidly grounded scene.
3) Every few shots check to make sure your exposure or focus point hasn’t changed.
4) As you improve, you will know what not to do next time and come up with more complex ways to tell your story.
5) Imperative before you begin, set your camera’s aspect ratio to 16:9 which will allow it to play back full widescreen rather than a smaller 4:3 photo size.
6) Finally, have fun!
I guarantee your first 10-second video attempt may look like a five-year-old did it but you will have a good laugh watching it play back with all its faults.
The good thing about the Lumix is when you’re finished making captures the camera will ask you how to customize your video rendering such as how many frames per second it will be and at what resolution. It will then stitch all those photos together into an MP4 file. The only downside is it will be a “silent” movie. In my case, I imported the MP4 into my video editor and added music and text titles to polish it off. It is crucial to add some form of audio to keep your video engaging. This information is not an exhaustive tutorial by any means, but the fun is learning as you go.
I invite you to visit my Youtube product review channel and my Flickr Photography album. Most importantly I would like to thank Bob Coates for inviting me to write this piece. Hopefully, you will have a good time learning this type of creative way to use your camera.”
Aloy Anderson.
Thanks to Aloy for sharing his first foray into stop-motion.
Yours in Creative Photography, Bob
PS – Most Lumix cameras have the stop-motion and time-lapse features built into the camera. If you have any questions about which camera might be best for your needs let me know.
Save
Save

by successfulbob | black & white, landscape photography, photography, photography gear
Long Exposure Photography
Photographing for extended periods of time can add a whole different dimension to your photography. I consider any exposure over ten seconds to be in the long exposure category. When you have the shutter open for an extended time you begin to record movement which can lead to unique captures of time. Clouds blur through a scene. Light also renders a slightly different dimension on still objects. We all have seen the results of water captured over time.
There are occasions when even with a small aperture and low ISO we can’t get the time we would like to try these creative looks. Enter the neutral density filter. With one or more neutral density filters the creative possibilities are extended. I’m working with Tiffen ND filters (landscape/seascape kit) ** and trying the extremely dark filters. I have a three stop and a ten stop filter. These can be stacked for even more density if necessary.
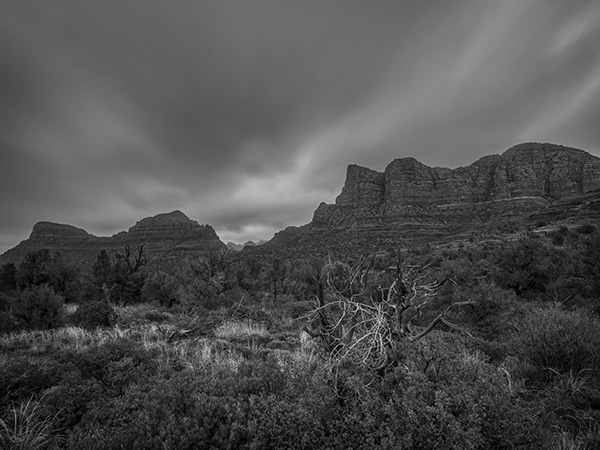
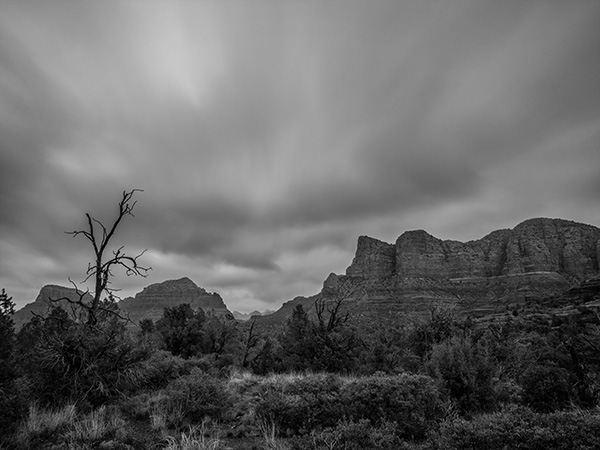
Here are a couple images made with the ten stop filter in place. It is almost impossible to see through a filter this dark so my process is to pull focus and take note of the exposure reading without the filter attached. Then place the filter on the camera. In this case, the exposure was between two and four minutes. My camera will only go to sixty seconds. It also has a bulb setting but that would mean touching the camera to activate and deactivate the shutter. There’s a better way.
 I haven’t achieved the exact look I’d like but I’m looking forward to the experimentation.
 Clouds go soft with movement over the time exposure.
If you haven’t heard of the Pluto Trigger *** and its app you are missing out on many possible controls that can be added to your camera. As long as you have a remote port on your camera it can work for you. For this example, there is a conversion table for the extended time needed for long exposure ND photography. The trigger asks what the shutter speed is for an exposure without the ND filter in place. You input the shutter speed and let the app know what ND filter(s) you add and it calculates the proper exposure. Push the button on the app and the camera shutter is opened for the needed duration and then closed. Very cool!
** The Tiffen Long Exposure Kit
Tiffen Pro100 Series Camera Filter Holder
77mm & 82mm Adapting Rings
Tiffen ND 1.2 (4 Stop)
Tiffen IRND 3.0 (10 Stop)
Tiffen’s Pro 100 Series Filter System
The sleek and innovative design of our camera filter holder enables you to use up to two Tiffen Award Winning 4mm thick glass Motion Picture/Television filters at once, giving you the opportunity to create images like never before.
- Extremely durable Aluminum Frame equipped with rubberized grips, allowing for a secure fit for 4X4 and 4X5.650 filters
- Holds up to two, 4mm thick filters
- Fully rotatable adapting ring
- Edge sealed to prevent light leaks*
- Works with adapting rings from 49mm-82mm
* Felt lining included to prevent light leaks (for long exposure photography
*** There are about 24 extra things you can do with your camera when using the
Pluto Trigger including lightning, sound, infrared, water droplet (with optional valve), extended HDR, time-lapse and much more!
I’m looking forward to exploring this long exposure photography more in the future!!
Yours in Creative Photography, Bob
Save

by successfulbob | bird photography, Lumix GX85, photography gear, wildlife photography
Bosque del Apache Wildlife Refuge – Part Two
You can take a peek at part one on the Bosque Wildlife Refuge shoot here.
Made four total trips into the refuge which included a couple of sunrises and sunsets. Here’s a tip I’ve found to be handy when photographing in the same location multiple times. Download the images you capture as soon as you can for review. When you have a look, you can tell if any settings need adjustment. Nothing worse than making the same mistakes two days in a row and not finding out how you might have improved until you get back home. I’ve been a pro for over twenty years, and I still find slight improvements can be made when making images in the same location on subsequent days.
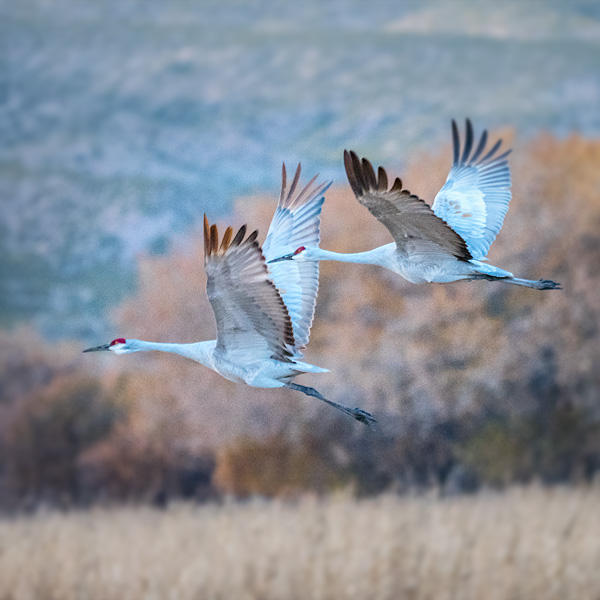
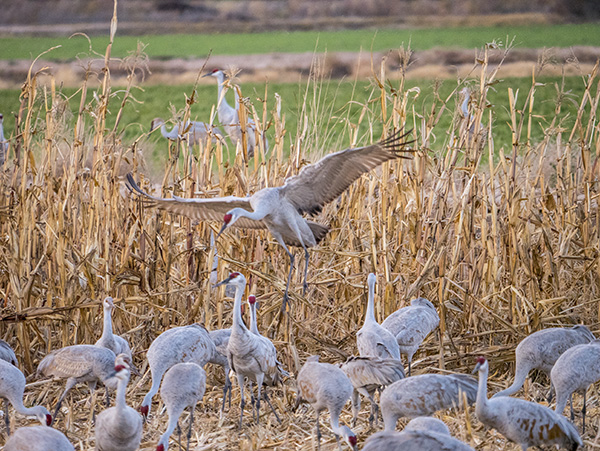
Let’s look at some tracking flight images captured handheld with the Lumix GX85 and the Lumix 100-400mm lens (200-800 35mm equivalent) Most were with the lens fully extended.
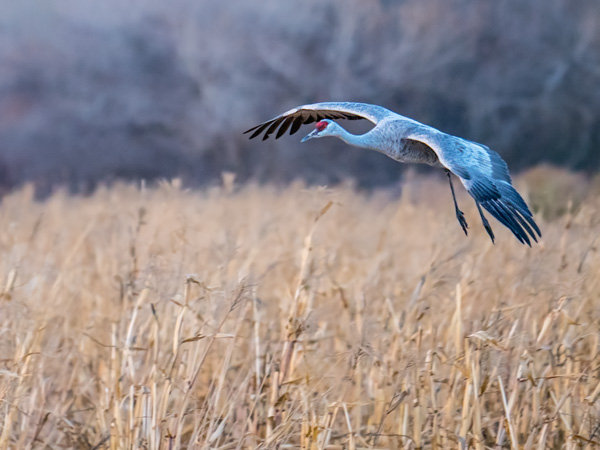 Sandhill Crane in flight over the corn stalks.
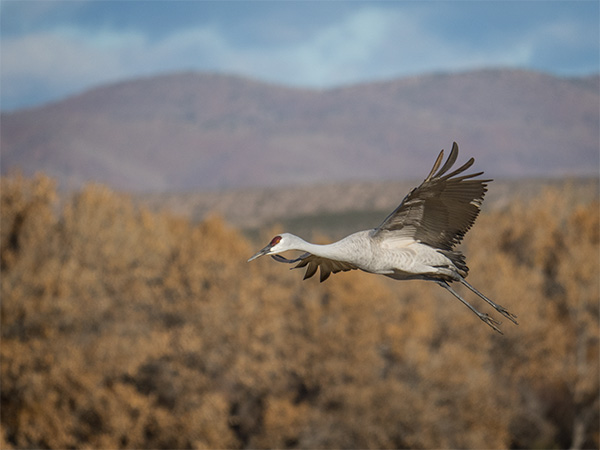
 Flying into the corn field getting ready for landing.
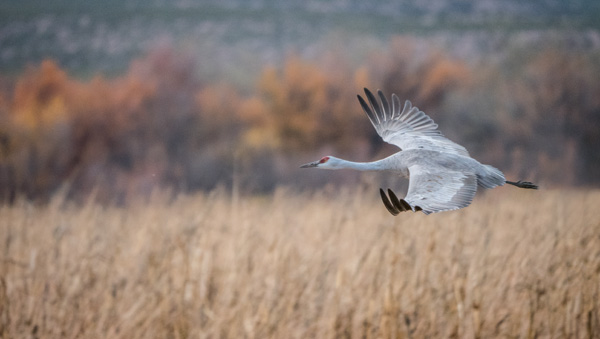 Wings are flared to slow ascent.
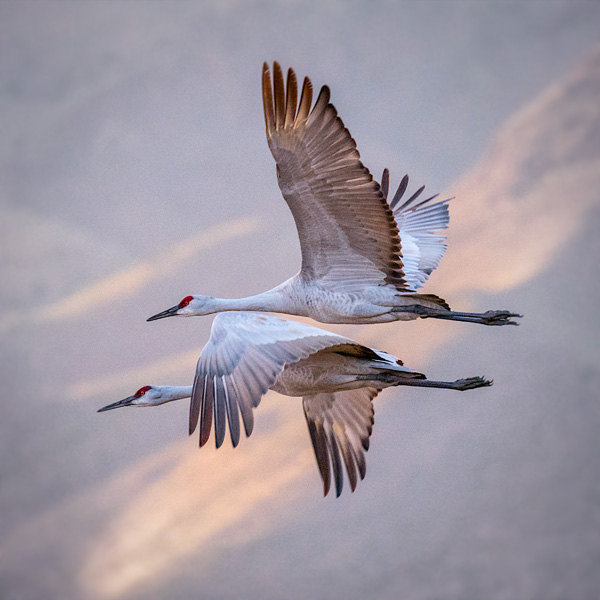 Opposite synchronization of wing position. Mountains in the background with just a streak of sun add interest to the image.
 Taking off from the cornfields heading toward the nighttime gathering area in the pond.
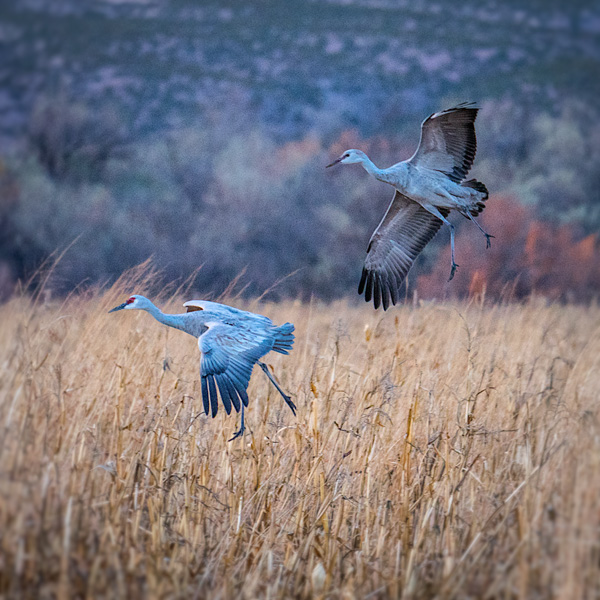
There are many ways to capture a different ‘look’ to a wildlife photograph even though the subject matter is the same. In this case, the subject is Sandhill Cranes, but all the photos have a different feel. The different look is accomplished with a change in position of the subject. Using a different background. Changing the crop can make quite a difference also.
I’ll be sharing more options and possibilities for differences with the same essential subject in subsequent posts. I look forward to hearing your thoughts as I move through this series of with the Sandhill Cranes.
Yours in Creative Photography, Bob
Save
Save
by successfulbob | bird photography, Lumix GX85, photography, photography gear, wildlife photography
Bosque del Apache Wildlife Refuge – Part One
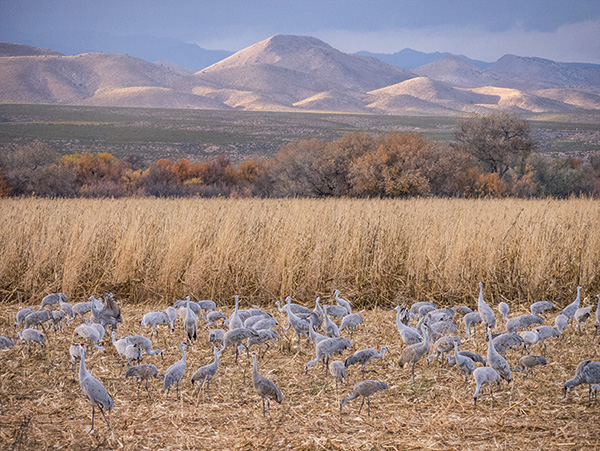
Talk about a target rich environment! Possibilities for incredible wildlife photography abound. The scenery, a variety of birds, and combinations of the two make for a great time photographing in this wildlife preserve about one and a half hours south of Albuquerque, New Mexico near Socorro. Learn more about the Bosque here.
This was my first visit, and I already look forward to returning in the future. Sandhill Cranes are a favorite bird for me to photograph. I have worked with them on the Gulf Coast of Florida. I’ve never seen groups this large. Since they are tanking up from traveling, they are pretty relaxed. They are chomping on rows of corn grown for them. The ponds are just the right depth for them to overnight and makes for interesting photographs as they fly in and out at dawn and sunset.
Let’s take a look at the photos.
This was one of the very first pictures I made when we got to the refuge. I am always trying to show the behavior of the animals when making images to add interest. Because I had previous experience wit the Sandhills, I recognized that this bird was about to leap. The fact that the other two birds are at the end of its wings was serendipity. Not the best time of day for photographing but we were checking out the area.
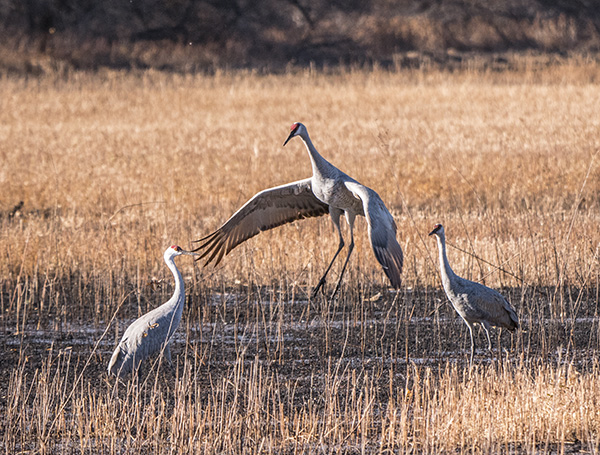 Jumping Sandhill Crane
 Sandhill Crane on a flyby through the field.
 Sandhill Cranes in the corn field planted for the migration as a feed stop.
 Getting ready for landing in the corn field.
 Bob Coates (hey that’s me) Original photo made by my shooting partner on this trip, Dennis Chamberlain. Dennis is an incredible photographic artist. You can see some of his work here. (PS – I arted-up Dennis’s photo so don’t blame him for how it looks!)
Here’s some feedback on the gear that I used. I was testing out the Lumix 100-400mm lens with the Lumix GX85 to see how it would hold up to not being on a tripod. I’ve always tended to photograph birds in flight handheld because I could track their movement better but would often end up with more tossers than keepers due to blur. The dual image stabilization rocks! Total change with this gear. I’m very excited about the number of images I got that were keepers with this rig. You’ll see more of those in the next couple days.
Yours in creative Photography, Bob

by successfulbob | Lumix FZ 1000, Lumix Lounge, photography gear
The Range Cafe – Albuquerque New Mexico
sometimes you just find an environment that is a target rich for making fun photographs. I found one such place while in Albuquerque, New, Mexico while presenting my PhotoSynthesis program for the Professional Photographers of New Mexico.
The decor in this place is a hoot with a painted panorama that is disgorging three-D cows, trucks, and other goodies. Meanwhile other parts of the restaurant display blasts of color and neon goodness. (You know that I like neon right?)
Here are a few images from dinner last night. All were made with the Lumix FZ1000 an east comfortable camera to keep on hand that will cover almost all possibilities. I used the built-in HDR setting to help with some of the challenging lighting situations. The next camera in the FZ line is now out with even more features. FZ2500
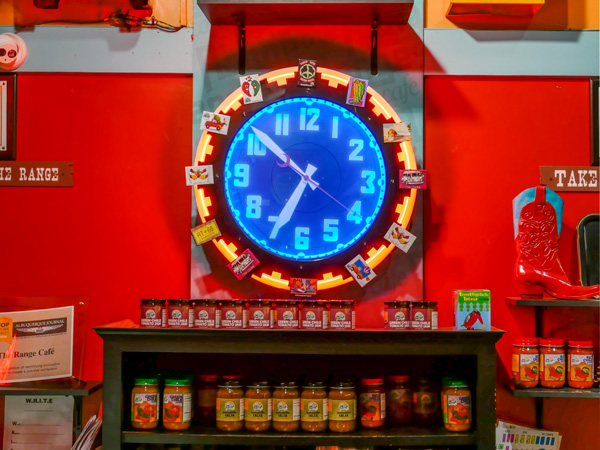 Neon rimmed blue light clock face with a red background. Love it!
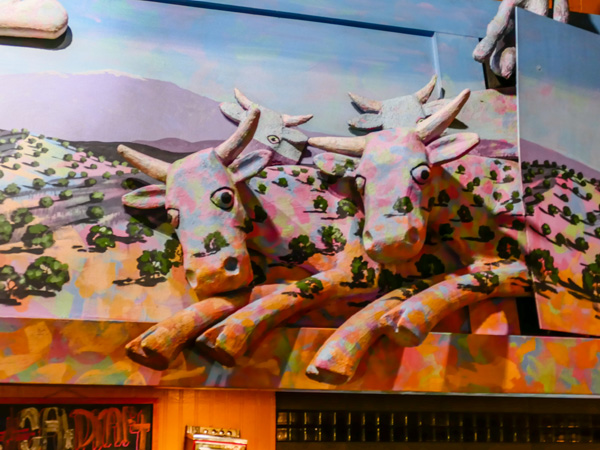 A mural that has pink and blue cows jumping out of the painted panorama is not something you’ll come across every day.
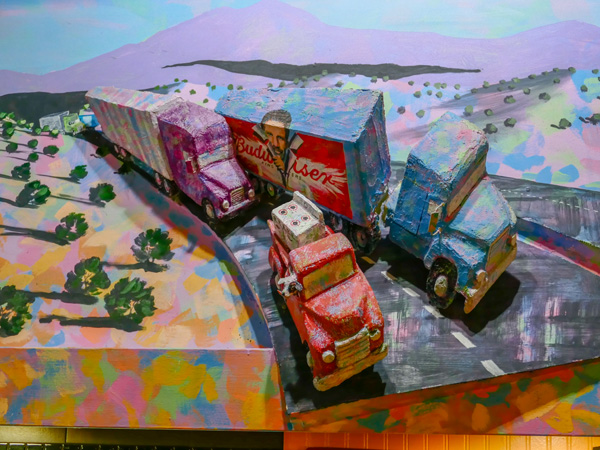 A highway comes out of the mural with multi-colored painted trucks. Way cool!
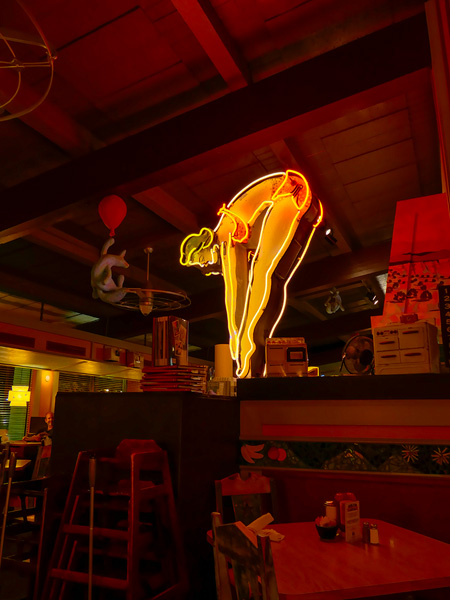 Classic neon sculpture is part of te Cafe decor
A restaurant with unique decor, fun furniture, colors that dance and light fixtures that take you to the moon and the stars can be found in Albuquerque. Oh, and I didn’t mention the namesake part of the decor which is antique toy ranges and stoves from the 50’s and 60’s.
 Find the Range Cafe here
Yours in Creative Photography, Bob