I gotta tell ya it is some kind of wonderful to have a creative person who enjoys being in front of the camera! I’ve never had a muse before. For those who might not know the term here’s the Dictionary definition.
Verb (used without object),mused,mus·ing.
to think or meditate in silence, as on some subject.
(in Greek and Roman mythology) each of nine goddesses, the daughters of Zeus and Mnemosyne, who preside over the arts and sciences.
synonyms:
inspiration, creative influence, stimulus;
formalafflatus
“the poet’s muse”
2.
a person or personified force who is the source of inspiration for a creative artist.
Having a person who is an artist in their own right is a gift. Pash has ideas, shares them with me and then lets the chips fall where they may. We start to make photographs with her thoughts in mind then we go wherever the first situation takes us. She has an intimate relationship with the environment which is usually the starting point. Then I add a couple of thoughts to refine, and we experiment and play, and this invariably leads me to create new imagery that I find exciting.
I usually end up pushing my personal boundaries as we work together. And then, even more, when I get into post-production.
Our latest foray into collaboration led to a photo session on Oak Creek in which she had a thought of ‘creating a mermaid.’ I had the urge to play with infrared and had her do some warm-up posing on the rocks with a dress, flowing cloth and au’ natural.
This Photo has the feeling of a Greek Statue to me. Infrared made with Lumix G6 converted by LifePixel
As the session went on, I added Tiffen neutral density filters to extend the time that the shutter would be open.
The neutral density filters extended the time allowing the wind to register in the trees.
This image reminds of one of the classic painters.
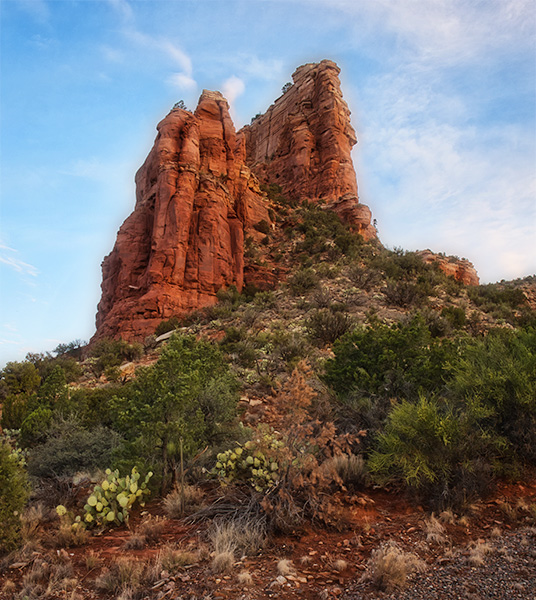
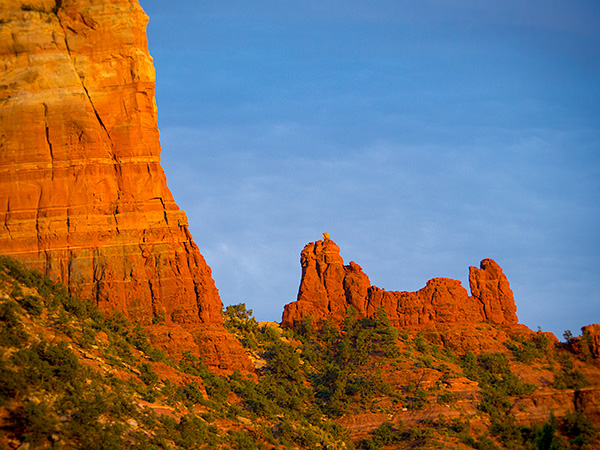
Living in Sedona is quite a blessing. When I want to experiment there is no lack of obvious subject matter. The red rocks all have different shapes and appear different at differing times of day and night leading to a veritable plethora of images that can be photographed with additional techniques and shared.
On Sunday morning I was up just before the sun made its appearance for the day. I grabbed my tripod. Well, if I must tell the truth, I grabbed my camera (lumixG9) and some lenses, rushed out the door, jumped into the car and headed off to catch the rising sun and quickly coloring clouds. Then I turned the car around and went BACK for the tripod wasting beautiful light in the process. But that’s why we are considered pros. We can come back from a less than perfect situation and still have some nice images. ( or… I guess a real pro would have had the tripod to begin with. But, I digress)
I took a different road than usual. I made a five exposure bracket with the camera on a tripod. I used three of the images processed in *Aurora HDR 2018. This angle made the red rocks feel rather majestic.
Today’s savior was the ability to bracket images and extend the range of light the image can show. Without HDR and the processing software in my tool-bag I would have had a pretty bland results. As it was I found some interesting angles and areas that in which I don’t often shoot.
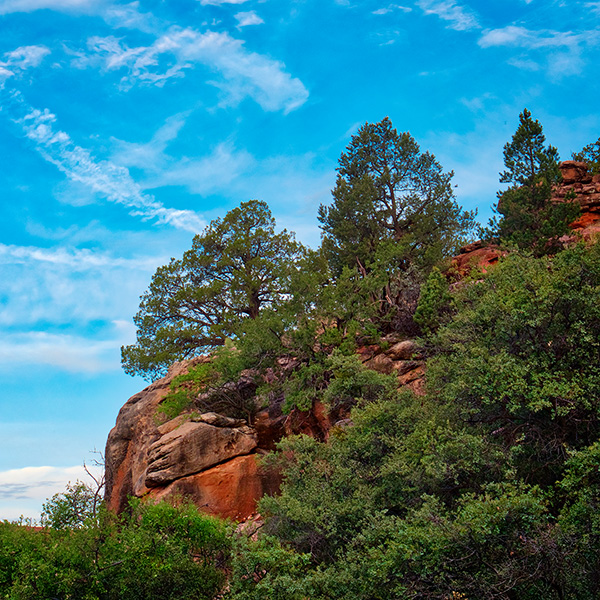
Another not so frequented road let me see this rock formation with trees issuing forth. Again processed with Aurora HDR software from a three exposure bracket.
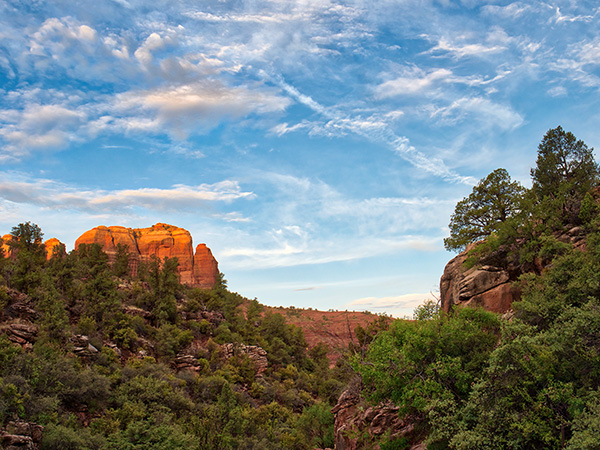
The back side of Cathedrlal Rock with the rock outcrop. Three exposure HDR with one stop oveand one stop under.
Without the hdr system the trees which were in shadow would have been very blocked up and noisy. Making multiple exposure allows the photo to repliatewhat the eye sees. The eye constantly is changing ‘exposure’ with the pupil opening and closing depending upon the brightness of the scene.
In a couple days I’ll show you the hero shots of the backside of Cathedral Rock.
Yours in Creative Photography, Bob
PS – I was using the Lumix 12-60mm LUMIX G LEICA DG VARIO-ELMARIT PROFESSIONAL LENS
This lens has a great range from wide angle to medium zoom and covers a lot of my needs. There is also a kit lens with this range that is not as fast.
* Save $10 with the coupon code ‘COATES’ on AUrora HDR or other Skylum software
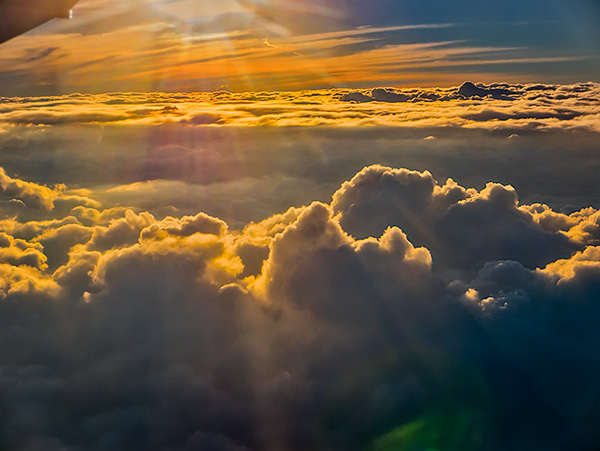
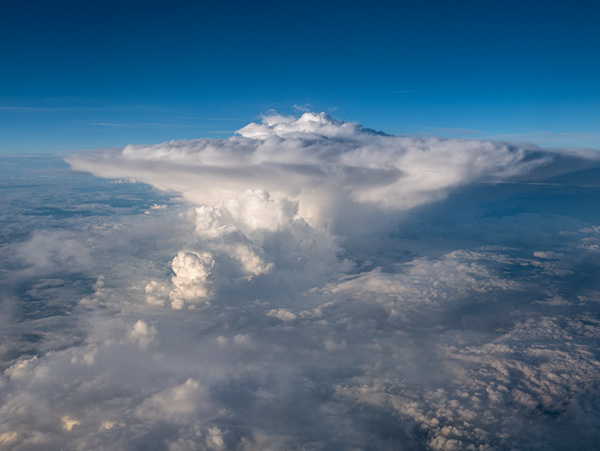
A couple of weeks ago I shared some clouds and ideas about photographing them and some thoughts on using them in working on your art images. (see the post here)
Sunset was coming together looking over the clouds from the window seat.
I referred to Judy Collins’ song “Both Sides Now” referring to clouds and said I would share some images inspired by Julianne Kost’s book ‘Window Seat.’ After seeing her book, I thought about my pictures out the porthole of the plane as I traveled around the country on my Panasonic teaching forays. I have quite a collection of photos of clouds from above I thought that they deserved a post of their own. So here you go. Images are from the upper side of Both Sides Now.
Watching a thunderhead form from this angle is quite different.
I enjoy the ‘cloudscape’ with its own set of clouds above.
It turns out that all of the cloud photos in this post were made with the Pansonic Lumix LX100 which I refer to as the ‘professional’s point and shoot camera.’ It has a smaller chip, but the lens is sweet and fast. It’s on a magnesium body, and all the critical controls are available on the outside of the camera just as we had back in the day. That said, it has a ton of features we didn’t have then including eleven frames per second burst captures. If you go into 4K Photo Mode, you can pull 3,400-pixel stills at 24 frames per second. And plenty more.
On the downside, it does not have a superzoom so if you get this for travel photos you’ve got to do some zooming with your feet, but that’s what keeps the size down.
It’s on my list to work with the clouds from above and try to put them in art pieces. I’m hoping I can make it work and give almost a sense of ‘Something is wrong here, but I can’t quite figure it out.’ But that will be a post for another day.
My first exposure to the Lumix line of cameras came when I was trying to find a smaller lightweight camera for travel. My wife was always giving me grief for hauling 35 plus pounds of full-frame DSLR gear with me on vacation. I said, “What are you worried about? you aren’t carrying it!” After that she replied, “You aren’t either, the gear often stays in the room ’cause it’s too heavy to lug around.” Don’t let her know this but I’ve found she’s right most of the time and I should listen more often, but I’m a guy. What can I say?
Made with the Lumix GH2 in Florida in 2012
Anyway, back to the story.
I tried three different ‘point and shoot cameras with no success because I finally listened! The reason they didn’t work for me? The files would fall apart when I tried to push them past anything larger than a 12-inch print or use the images in combination with other photos in my PhotoSynthesis process of creating my art.
And then… I found the Lumix GH2 and got a couple lenses. A wide angle and a 14-140mm zoom. (28-280mm FF equivalent) I added a small pouch for extra batteries, a tiny tripod and the other goodies you need for a two week trip to France. I had that camera on my shoulder with the 14-140mm lens and the pouch at my waist, and it never left my side for our entire trip. The best part?? When I returned I started working the files and ‘Viola!”, The files held up. I started running to all my photographer friends and telling them about this discovery. That led to my eventually becoming a Lumix Ambassador. That’s a story for another day.
I’m telling you all this because I decided to take a look at the GH2 files and give them a run through some of the newer software including Photoshop, Luminar 2018 and Aurora 2018. I amazed at how well the files do even today in 2018. These files are six years old, and there have been quite a few improvements in the subsequent iterations of the Lumix line. When the GH3 came out I started using it for my professional work and found that I could do about 85% of my jobs with it. In the beginning, I shot the camera side by side with my full frame DSLR for safety. Then I knew what tasks could be completed with the GH3 and the DSLR sat on the shelf more often. When the Lumix GH4 came out, I did a few more side by side comparisons before realizing I could do all my work with the micro 4/3rds camera. And all my DSLR gear went on the market, and I haven’t looked back since.
Until today. I thought I’d share some of the images from the GH2 circa 2012. Here are a couple more images.
Snoopy Rock in Sedona, AZ Photographed with the Lumix GH2 and processed with Photoshop and ** Skylum Software.
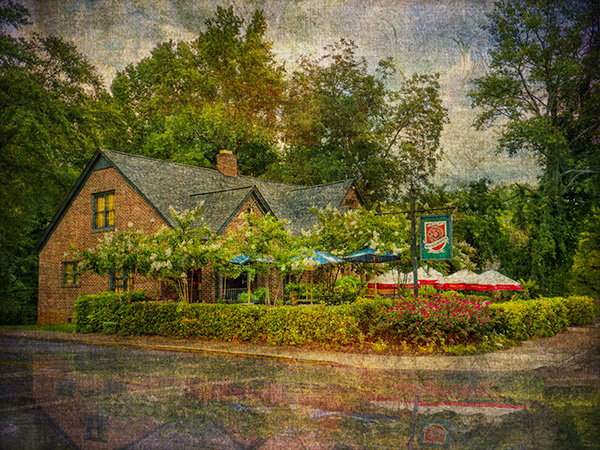
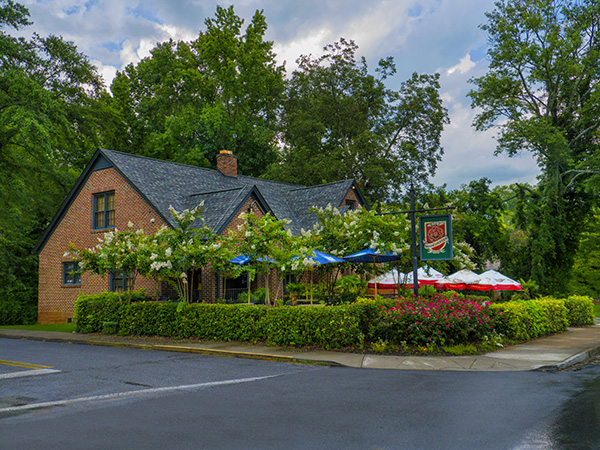
Here’s an image using the PhotoSynthesis process that I use in layering textures and giving more of an art feel to an image. And below that the original capture.
Manchester Arms Restaurant just outside Atlanta. GH2 again.
Original capture
In a couple of days, I’ll show you some images and the artwork created during my trip to France.
Yours in Creative Photography, Bob
** Skylum software includes Aurora HDR – Luminar – and CK Creative KIT. Special deal on Aurora HDR through July 4th. On any of the software add PROMO CODE – COATES to get an additional $10 off
PS – The latest flagship camera for stills (first one!) is the Lumix G9. This thing rocks!
I haven’t forgotten about the clouds from above post I said I get you…
In photography, you will often hear people exhorting you to ‘Look for the Light’! I don’t know how many times I heard and read that during my learning process over the years. I believe that my photography leaped forward when I first heard ‘Look for the Shadows.’ When I started looking for and shooting into, the shadows I saw a marked difference in the depth and dimension of my photographs.
Look for the shadows has become my watchword. Shadows are what make or break an image. If you are walking along and you see harsh shadows being cast by the trees and shrubs and you decide to put your subject in that same light, you will get harsh shadows. Seeing little pockets of soft shadows and using these areas will make for less contrast in your images. To me, soft shadow edge transitions lend beauty and form to a subject being placed on a two-dimensional surface that you want to read as three dimensions.
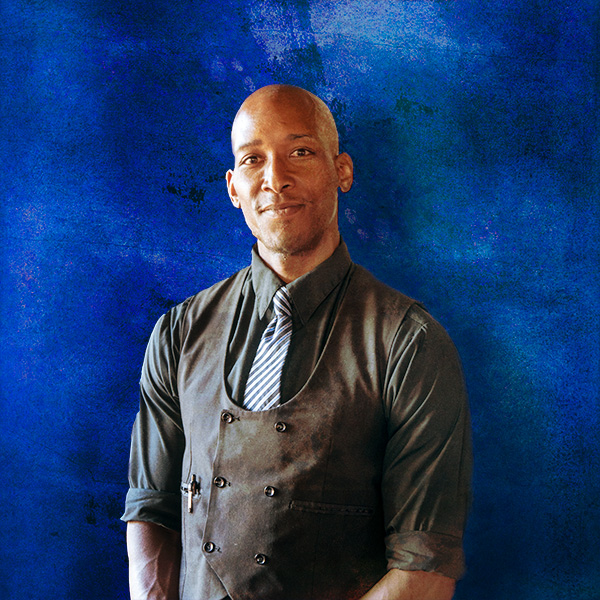
That being said I am always watching how the light and shadows interact which brings me to today’s post. We were out to dinner at my wife’s favorite restaurant J Wine Bistro in the VOC Sedona, AZ. I noticed the waiter Ray and saw the split light on his face from the light beside the front door of the restaurant. I asked Ray when he had a moment if he would strike a quick pose for me.
Ray with split light.
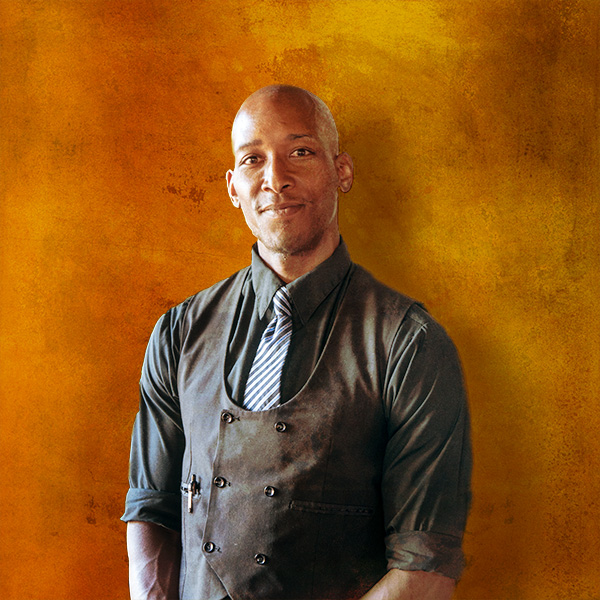
While I enjoyed the light shaping Ray’s face, I wasn’t thrilled with the background as you might imagine. So let’s play! I extracted Ray from the environment and went to work.
After extraction and some added texture and background.
A slight change in layer positioning adds a whole new color palette and feel to the image.
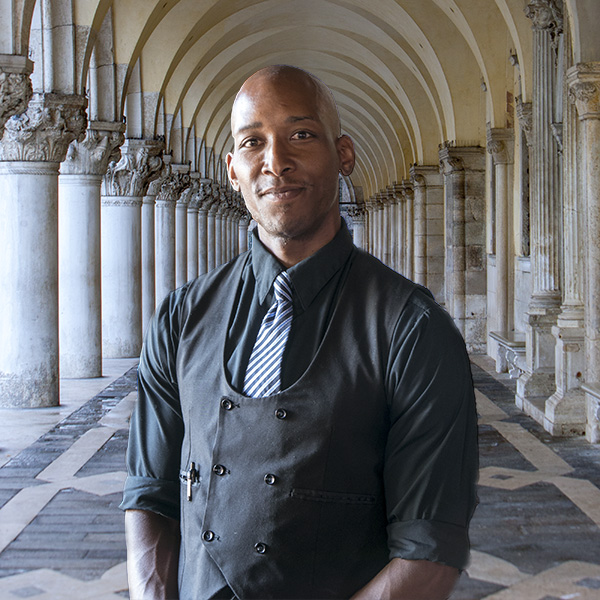
Last I thought I’d see how Ray liked being in Italy.
The original image was captured with what I call the professional photographer’s point and shoot. It’s the Lumix LX100. The LX100 is a nice handy camera that can fit in a large pocket. It has a fixed lens with fast f1.7-2.8 Leica glass and a decent zoom range of 24-72mm.
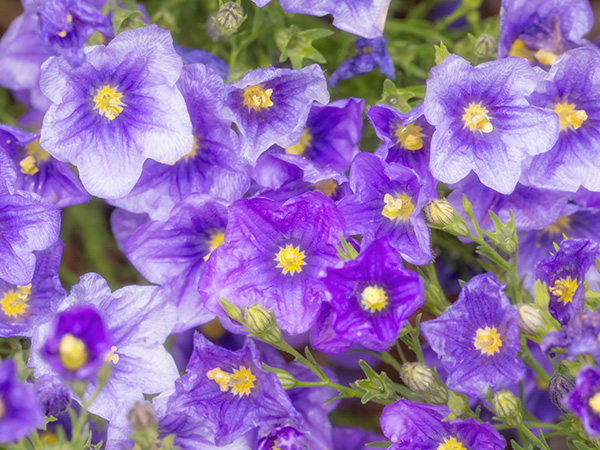
Spring is an excellent time of year to go out and about in our neighborhood in Sedona. Color is starting to splash itself in the form of flowers in many areas. Watching for the cactus to start popping their colorful blooms out of their calloused, thorny, green shells.
In the meantime, some spring blooms have hit the street.
Purple Robe flowers that were crawling out from under a fence. In the post-processing I dipped into Skylum’s Luminar 2018 Jupiter version. I made a copy of the layer then opened Luminar. This allows for adjustments to be made ‘after the fact’ using a mask.
And, of course, I’ve got to play a little. Moving the camera in different directions with a bit of a slow shutter speed can lead to some exciting captures.
Of course, then you can take that to an extreme with time exposure and faster movement. This could be utilized as a background or for an album design element
Using Photoshop, we can get a bit more depth and dimension by replication the layer, rotating it and changing the Blend Mode of the top layer.
Which give lots of options as many Blend Modes give other versions that feel different
And as Russell Brown says, “But, wait there’s more!
Here the Layer is rotated, and a drop shadow is added.
I think you get the idea. We can take a simple shoot with a few flowers and with the help of a little imagination while making the photographs and adding some spice in post-production there are many variations on a theme.
All images were captured with the Lumix G9 flagship stills camera and the 100-400mm Leica Vario-Elmar f4.0-6.3 lens a combo that is becoming very familiar to me. The more I use the G9, the more I like it!
For infrared conversion of my cameras I use LifePixel. Infrared allows you to put an older camera to use and opens up a new time time of day for productive image creation.
Learn Photoshop in a fun environment. Aaron Nace applies the right amount of fun with easy to understand and follow tutorials. Actions and brushes are included with lessons!
Best embroidery ever. Give Queensboro a try, get a $20 instant credit to get started by clicking on the logo! They specialize in great quality custom logo apparel and promotional products with the best customer service.
Platypod has become a great resource for being creative in getting your camera gear easily into unusual places. As an Platypod Pro I get to work/play with the gear even before it comes out. Head over to Platypod, subscribe to the newsletter and you will get special discounts reserved only for subscribers.

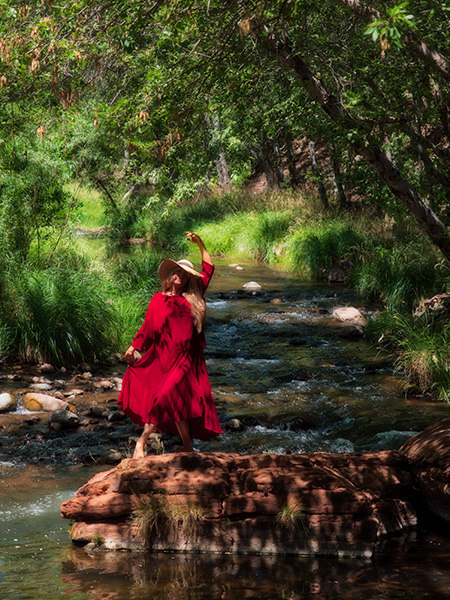 Pash in red. Made with Lumix G9
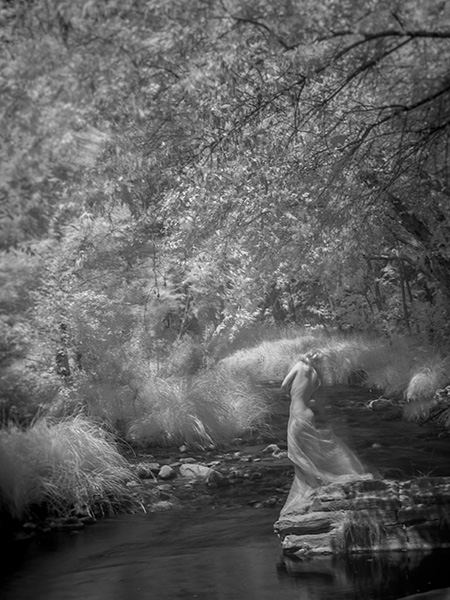 This Photo has the feeling of a Greek Statue to me. Infrared made with Lumix G6 converted by LifePixel
 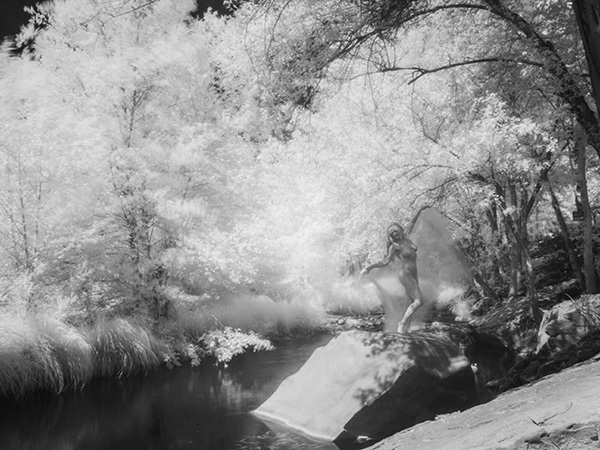 The neutral density filters extended the time allowing the wind to register in the trees.
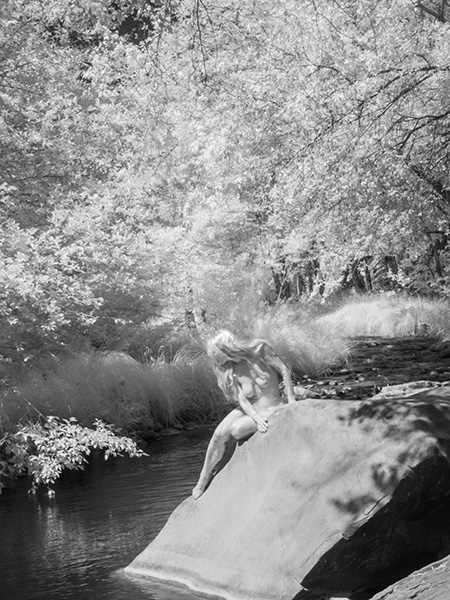 This image reminds of one of the classic painters.