
by successfulbob | black & white, HDR photography, infrared photography, landscape photography, Lumix G6, Lumix Lounge, photography creativity
Infrared Photography Panorama Style
“The sailing clouds went by, like ships upon the sea.” — Henry Wadsworth Longfellow
Clouds scudding across the azure skies. Words can take you to some beautiful places but as the Chinese say, a picture is worth a thousand words. That’s why I keep an eye peeled on the sky. When the clouds start racing, or even lumbering through the red-rock country of Sedona I grab a camera because interest is added to the scene.
Even if it’s mid-day, I grab a camera and head outdoors. My camera of choice for these times is infrared. I enjoy the high contrast black and white rendering of clouds rendered against a deep dark sky. A Lumix G6 was converted by LifePixel and it has expanded my shooting times as infrared shines when it’s time to put the camera up for regular color photography. I used the Kit lens that came with the camera and was pleasantly surprised at the solid quality of the captures. (G Vario 14-42mm f3.5-5.6) It makes for a super light-weight combo.
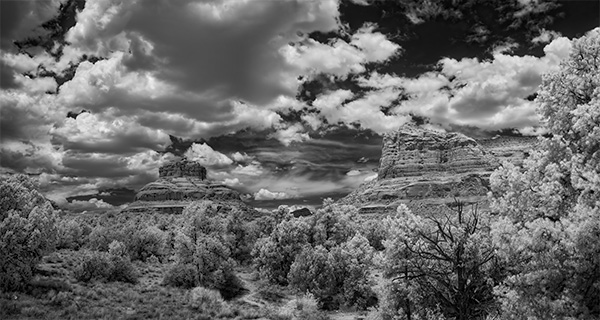 Bell Rock Vista in Sedona – Infrared Panoramic image with Courthouse Butte
I tend to try to push the envelope and experiment when I’m on self-assignment. In yesterday’s adventure, it was to add panorama to infrared. It took quite a bit more work. I’ll let you be the judge to see if it was worth it.
Five images overlapping by about 40% were captured. With the camera set to black & white, three exposures one stop apart were saved in jpeg format to ensure detail in highlight and shadow areas once they were processed. Each set of three images were treated in Aurora HDR software.
 Screenshot of images used before processing
Each of the final five images was loaded into Adobe Photoshop to process the panorama. Whoops! That was an unusual fail. Could be the handheld capture caused some extra deformity in the files. Usually, I can depend on Photoshop to render a solid panorama but with this set of images, there was way too much distortion in the resulting output. (I’ll experiment with these files again when I have some more time and see if different rendering intent might be of help) I couldn’t find my AutoPano Pro software on this computer so I resorted to having Photoshop load all the files into Layers and added my own Masks blending the images together by hand. It’s good to remember the ‘Old School’ methods when the automatic software options aren’t there for you.
Yours in Creative Photography, Bob
PS – Another cloud description I enjoy. “Clouds hastening like messengers through heaven.” —John Hall Wheelock
PPS – Cloud quotes referenced in this post were found in The Free Dictionary by Farlex. I’m book-marking that page for future reference!
Save

by successfulbob | architectural photography, black & white, Lumix GX8, photography, photography creativity, photography gear
Processing Black & White Photography
Ansel said it.
He likened great photography to a concert. The Print is the performance. The capture is merely the score.
OK. Maybe I paraphrased a little bit but the idea is there. And the word ‘merely’ is undercutting the value of the capture. But, by virtue of the camera only having one opening it can only see so much density in a single exposure. How we process the image is a huge part of the success or failure of the photo.
We now have some technological advantages over Adams with software that allows up to combine multiple images t different exposures to expand the amount of information we can have in a single file. We can build up density and exposure in a picture without resorting to chemistry changes as Adams did. In addition to Curves and Levels, we now have the ability to add luminance masks to target very specific tones within the photo. Sharpening can be selectively applied throughout the image to help move a viewer’s attention through the image. And more. We are in a golden age of photography should we choose to follow the possibilities.
I was attending a little courtyard guitar concert at Tlaqapaque in Sedona and just happened to have a camera with me. (imagine that!) Here are a couple grabs where the image definitely has more power in black and white.
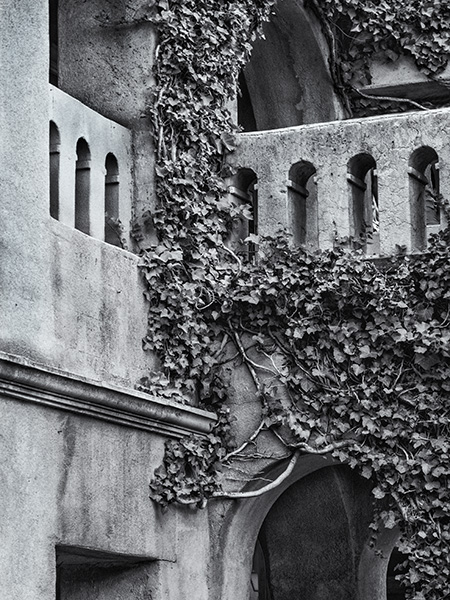 Tlaqapaque detail. Mexican shopping Village in Sedona, AZ
Images processed in Adobe Camera RAW & Nik Silver FX Pro 2 (You can get this software plugin for free)
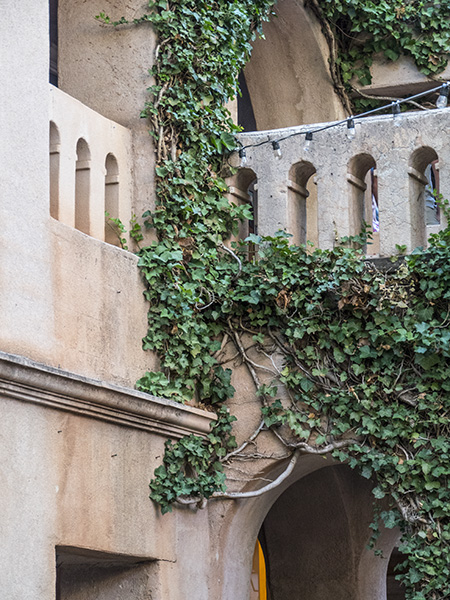 Original capture
Images captured with Lumix GX8 with 14-140mm f3.5-5.8 lens
 Portals within portals within portals add depth and dimension to an image
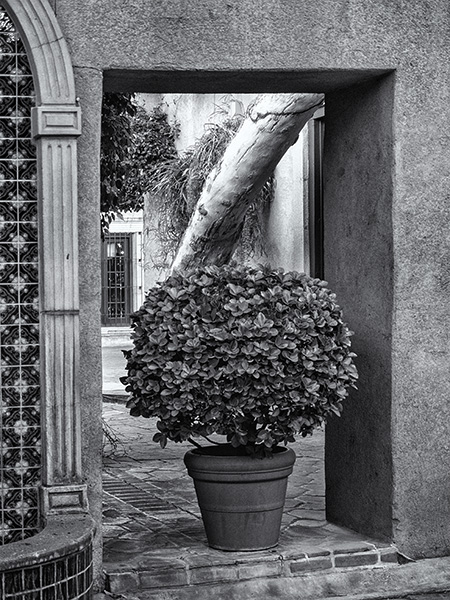
 Original capture
I’ll be doing a more in-depth blog post on black and white processing on LifePixel’s website. You can look for it early next week.
Yours in Creative Photography, Bob
Save
Save

by successfulbob | black & white, people photography, photography - art quote, photography education
Sunday Photo/Art Quote – Helmut Newton
What is your job as a photographer?
If portraiture is your genre then showing people at their best is your work. That means you need to be very good at lighting the form to flatter, right? It means being great at photoshop and retouching is an important part of your work, correct? Having the right equipment and knowing the proper settings, that must be most important, right?
While all of the things listed above have merit and are part of the equation. I think if you have Mr. Newton’s quote in mind as the main part of the job then you are probably doing pretty well.
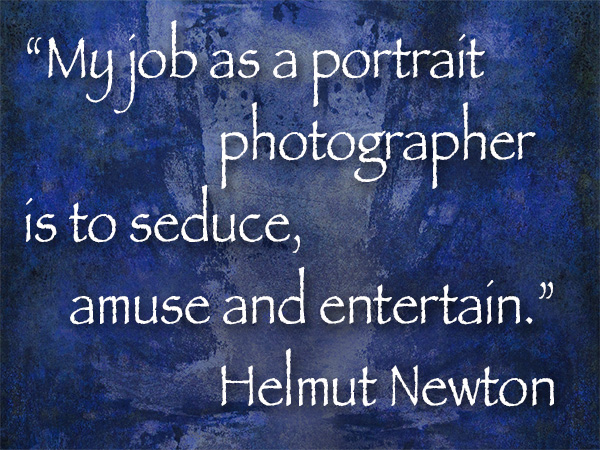 “My job as a portrait photographer is to seduce, amuse and entertain.” – Helmut Newton
I’ve found in the past that if I don’t connect with my subject the final portrait is usually less than stellar. It was when I found this quote from Helmut that I found the words for what my true job is as a portrait photographer. Sometimes just having the words makes all the difference in a career.
I find that it can be interesting to find out about the lives of those photographers that have come before and inspire. Helmut led a VERY interesting life. Born in Berlin, and forced out of Germany to Australia, then spending time in Paris, London, Monte Carlo, and in the United States iPasadenana, California.
 © On Gallery Helmut Newton
Check out some imagery* from Newton. He made some very powerful portraits. While don’t suggest that your images move in the sexually charged direction that much of Newton’s work entailed, you can learn a lot for his lighting patterns and the connection he made with his subjects, You know that people are comfortable in front of his lens.
Yours in Creative Photography, Bob
* Caution: If you are offended by the human form, AKA nudity, you won’t want to follow this link.

by successfulbob | black & white, landscape photography, Lumix GX8, Lumix Lounge, photography
Reticulation
Reticulation.
“H’mmm, Bob what the heck are you talking about?”
If you asked the question above you probably were not a black and white film photographer from past days. We usually learned about the reticulation effects when we treated our film badly by either getting it too hot, processing it at the wrong temperature or some other variable I can’t remember now.
But, after seeing the effects, I remember trying to screw up the film for art purposes. I came across the look when I was messing about (read that playing) in Photoshop.
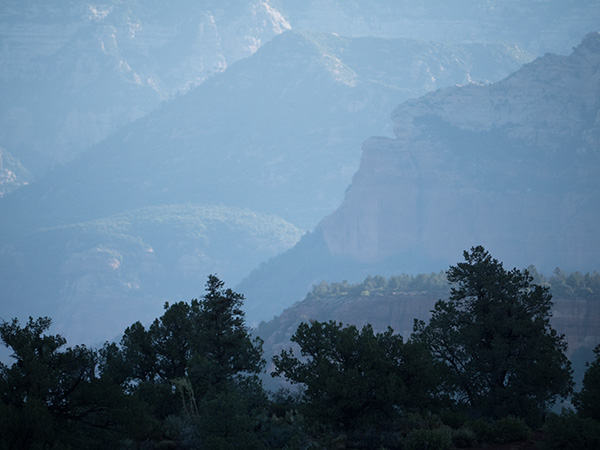 Photographed around sunrise with haze in the distance. Straight out of camera (SOOC) Lumix GX8 with Lumix G Vario 100-300mm f4.0-5.6 lens @ f5.6 1/1250 sec ISO 800 @ 300mm (600mm equivalent)
I choose this lens to compress the scene.
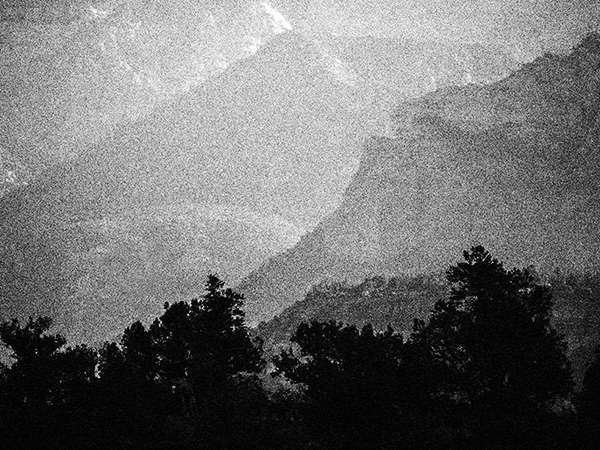 After processing.
I had made a set of images one morning near dawn, and I was feeling a bit of a ‘Japanese aesthetic’ in what I saw through the viewfinder. Things like that can happen when you are out shooting thinking you are getting one thing then, being a bit disappointed upon return to the studio process the files. I still felt I had something worth which to work. I liked the distance imparted by the haze that we don’t usually see in the high desert due to the dry air. This particular haze was thanks to some forest fires sharing some smoke with us.
After trying various filters, I stumbled on a look that reminded me of the reticulation of old. I pushed for it some more, and you see what I got above.
Not sure I’m where I want to be with this set of images. I’m going to put them away for a little while then revisit at a future time. Sometimes you need to try something out and come back later to see how you feel about it. There are a lot of compositions involving this same scene. Who knows? These files may be a treasure trove with this processing or some other treatment.
Or, it could just be a pile of… We’ll find out later.
Something old could be new again. Reticulation anyone??
Yours in creative Photography, Bob
Save
Save
by successfulbob | black & white, landscape photography, Lumix G7, Lumix Lounge, photography
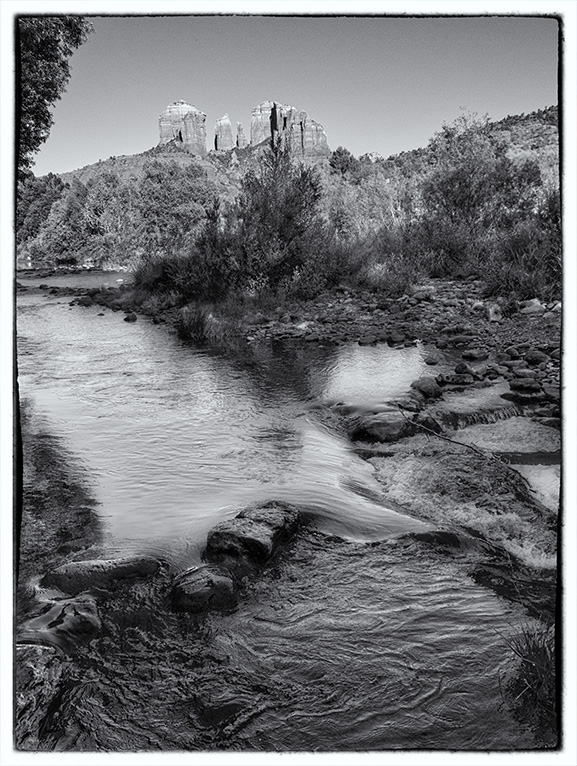
Photographing Cathedral Rock in Sedona, Arizona
Sometimes you just gotta change your thought pattern to get a better photo.
I was with fellow photographer Ralph Romaguera and his wife Cindy who were on a Route 66 road trip. They stopped by in Sedona as we are just down the road a piece for the Route 66 run. We shared a couple of meals and went out to shoot for a little while. Ralph has been using the Lumix GH4 and wanted to see if I had a few insider tips for best practices in using it. It turns out I could share a few ideas.
Today’s cameras from Panasonic are a bit more like computers with a lens than just a camera.
We talked about the ability of the camera to capture multiple exposures of a scene with just a quick twist of the dial. Many times, especially with landscapes, the dynamic range can be so large the only way to capture detail in the highlight and shadow areas is to use multiple exposures and blend them in post-production.
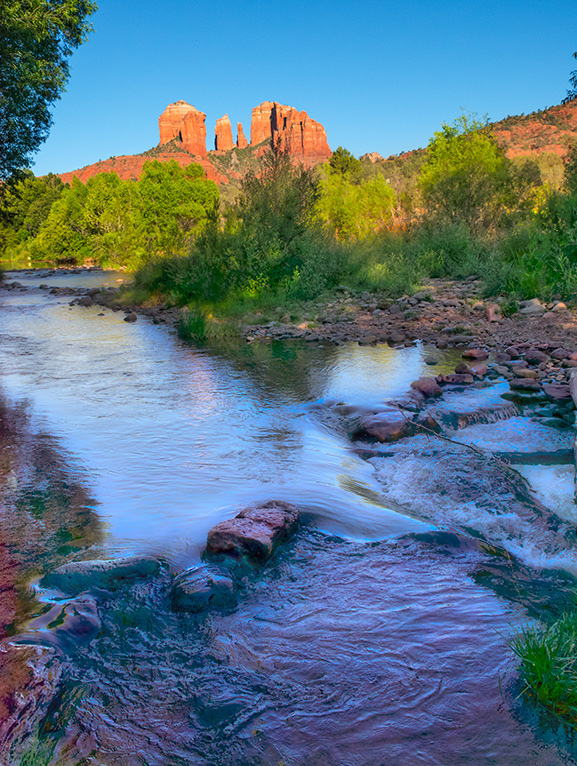 Multiple exposures were obtained to ensure proper detail in shadow areas as well as full sun. Images were processed in Aurora HDR software from MacPhun. Image captured with the GH4’s little brother the Lumix G7.
I usually don’t like how HDR blends skies into leaves or horizons as it tends to leave a bit of a halo. I process another image straight from Photoshop into the HDR software generated image to make the transition clean. Accomplished with an extra layer and layer mask.
Using the touch screen and choosing the exact position of your focus point is extremely handy. You can set the camera to a Mode called Intelligent Auto. With this setting, the camera sets the Aperture, Shutter Speed, and ISO. It provides an amazingly good solid exposure for the scene before it. Am I going to use that all the time? Heck no. But, I leave my cameras set to this mode when I am traveling around. I jokingly call it the ‘Honey, stop the car!’ Mode. It allows you to capture a scene instantly. Then, if the animal or whatever is still available, then I’ll move to one of the other modes to take more control of the final exposure.
 For an entirely different look here’s a black & white version converted in NIK Silver FX Pro 2 toned to selenium with a border added.
Al in all there’s a significant number of features to help you get the photo and/or video you are trying to capture in the GH4 and the G7. It nice to have photographers come from out of town for a visit that gives you a push to get out and shoot.
Yours in Creative Photography, Bob
“ The G7 makes an excellent camera for someone to grow into, offering all the key features a developing photographer would need access to. It offers some of the best tracking AF we’ve seen on any camera in this class. Video is the camera’s trump card, with the ability to capture high-res video giving all sorts of flexibility, whether you downsize back to 1080p, use it for selective cropping as you edit, or extract 4K stills of the decisive moment. ”
Save
by successfulbob | black & white, infrared photography, landscape photography, Lumix G6, Lumix Lounge, photography, photography creativity
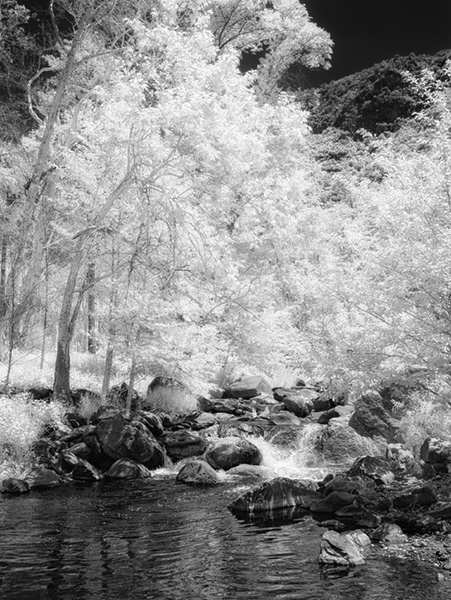
Infrared Photography on the Oak Creek
My job is tough!
Yesterday I took on the task of going hiking in Oak Creek Canyon in Sedona, Arizona to capture infrared photos. OK, maybe tough isn’t the correct word for this assignment. I love almost all aspects of working in photography. Getting out into nature and exploring is high on the list of the good parts.
I’m up in Oak Creek Canyon between Sedona & Flagstaff. The picnic area is called ‘Halfway.’ So named because it’s halfway between the hugely popular (& crowded) swimming hole known as Slide Rock and an excellent trail called West Fork. Halfway is a little less traveled spot as you have to scramble down a fairly steep embankment while climbing over rocks. Once down to the creek there’s a bit of rock hopping to navigate your way around.
 LUMIX G6 20MM LENS F1.7 LENS @F9 ISO 160 1/200TH SEC
But I digress.
On to today’s thoughts on working the with a camera converted to infrared. I had my Lumix G6 converted by LifePixel with a standard IR filter ad it is working out pretty much as I had hoped it would. I find myself using the 20mm Lumix f1.7 lens quite often. It’s sharp, fast, light and has a very low profile. I guess at a 40mm full frame equivalent it pretty closely matches a standard field of view which I feel lends itself to most of my infrared captures.
As I make my IR captures I have been bracketing exposures. When I first started I was bracketing by five stops as I was learning how the camera ‘sees’ with the IR filter installed. I’ve now moved to a three-stop exposure bracket but I also set an exposure compensation adjustment depending on the dynamic range of the scene in front of me. I am capturing the images in RAW plus jpeg with the camera set to black and white. White balance is set to daylight.
The image above is two jpegs blended together to achieve the tonal contrast for which I was looking. After getting the tones blended in Photoshop using a mask, the Layers were merged and a trip to NIK Silver FX Pro 2 for some sharpening. I used the Structure and Fine Structure settings si tweak the sharpness and change the resulting layer blend mode to Luminosity. Only the luminous information is then transferred to the image. Then NIK Color FX Pro 4 was added utilizing the Glamour Glow to add some IR life to the highlights. The shadows were protected from the glow.
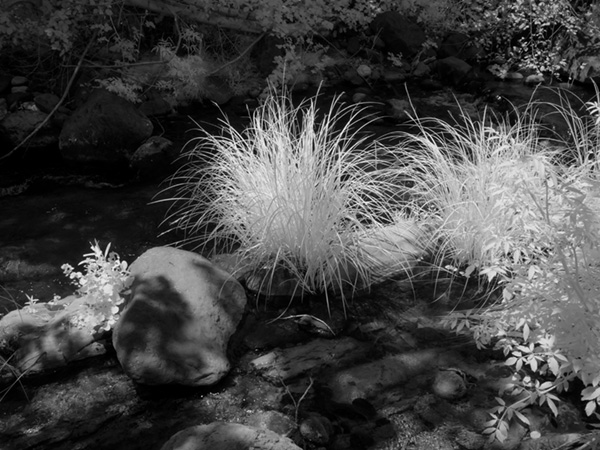 LUMIX G6 20MM LENS F1.7 LENS @F14 ISO 400 1/200TH SEC
This image was processed from a single jpeg which was opened in Adobe Camera RAW. Jpegs can be opened in the RAW editor to use the controls available but it does not have all the information of a RAW file. I was just trying to control contrast with this treatment so I didn’t feel the need to start with the RAW file. Exposure was adjusted as well as the highlight and shadow detail. A soft light layer was added for some dodging and burning. A vignette completes the treatment. I enjoy all the textures and tones of this scene.
Infrared photography can take midday, which is usually a tough time of day for making photographs and turn it into a blast.
That was my play yesterday. I created a few more scenes I’ll share with you tomorrow.
Yours in Creative Photography, Bob