by successfulbob | inspiration, photography - art quote
Sunday Photo/Art Quote – William Eggleston
I share today’s thought from Eggleston who was one of the pioneers of the move to recognizing color photography a true art form. Remember as photography grew throughout the years any change to the medium was met with derision and skepticism. (can you say digital or Photoshop boys and girls??) As technology adds possibilities to processing our vision we get blowback from those who feel there is cheating going on… My personal feeling is can you get the image that is in your head output to another medium such as photo paper, metal or canvas or any material that helps tell the story the way you want it told. How you get there doesn’t matter to me.
Onward to the quote.
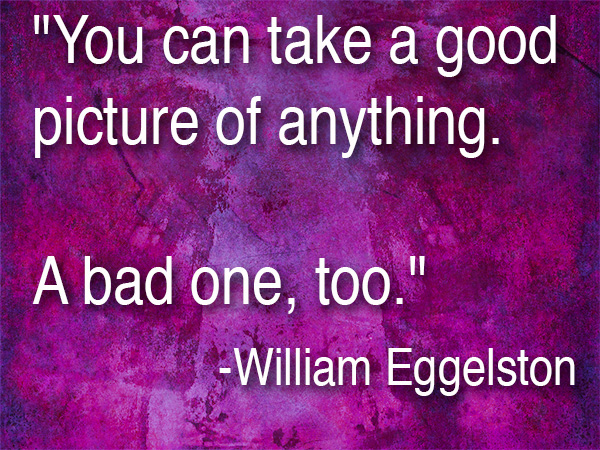
“You can take a good picture of anything. A bad one, too.” Willaim Eggleston
I share this idea with many people when I tell them I am a photographer and live in Sedona, Arizona. I almost always get this comment. “Oh, Sedona that’s a great place to be a photographer!” I always reply that yes Sedona is a beautiful place it’s not what makes for good photography. I’ve seen plenty of crappy photos of Cathedral Rock and I’ve seen some exquisite photographs of peppers and other ‘non-beautiful’ subjects.
We photograph the light. We photograph the shadows. We do it with composition and thought on color and juxtaposition of subjects within the scene.
I leave you with this thought. Are you taking (making) a good picture today?
Yours in Creative Photography, Bob

by successfulbob | photography software
New Photo Processing Software for MAC
Some very interesting software for photo editing has been released by the folks at MacPhun. Basically, you can set up this software very simply or you can build workspaces to create intricate working areas for complex projects. This is new stand-alone software and the price? Only $69. You can try it for free to see if it something that will work for you. Here are the details below.
 LUMINAR NOW AVAILABLE
Offer Available: November 17, 2017
Short Description of Luminar:
Luminar is a new all-in-one photo editor designed to ensure the ultimate in creativity and convenience. The Luminar user interface is built around the idea that every photographer is different, and therefore their photo editing needs are different too. Users can choose from pre-built user interface configurations that match their editing style and needs or create their own.
Pricing:
Retail Price: $69
Launch Price for Macphun Users: $49
Launch Price for New User Price: $59
Luminar Key Features:
• Adaptive User Interface
• Multiple Modes: From basic to advanced
• One-click switch between modes
• Change modes anytime
• All-in-one photo editing tool set
• Includes essential editing tools for different photography styles
• Live editing, live processing, live previews
• Non-destructive editing
• Works as a standalone app or plug-in
• RAW converter & processor
•History Panel
Take a look & try it for free.
Yours in Creative Photography, Bob
by successfulbob | photography - art quote
Sunday Photo/Art Quote – Dorthea Lang
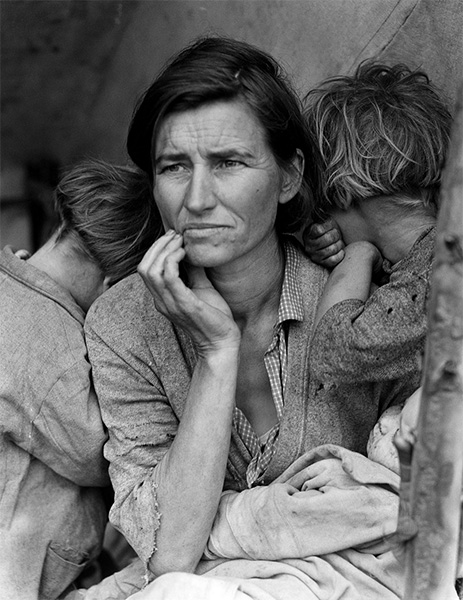
For those who might not know, Dorthea Lang was a photojournalist who documented America during the depression era. Her photographs told the story of the great depression more powerfully than words could have done. I’m confident that even if you don’t know her name, you will recognize one of her most famous photographs taken during that time.
 Known as ‘Migrant Mother.’ Photo by Dorthea Lang
The Library of Congress caption reads: “Destitute pea pickers in California. Mother of seven children. Age thirty-two. Nipomo, California.”
Which brings us to the Photo/Art Quote for today on the Successful-Photographer blog.
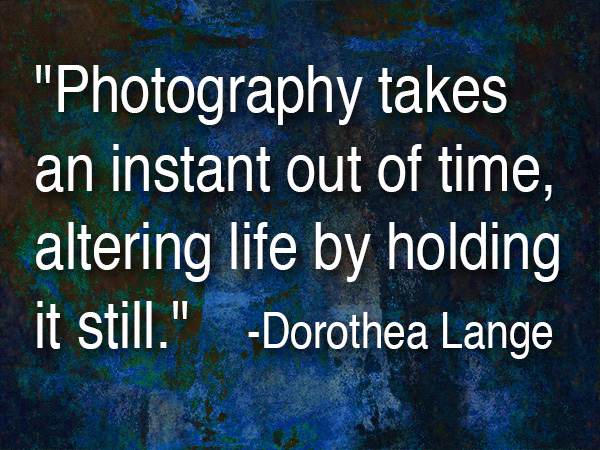 “Photography takes an instant out of time, altering life by holding it still.” Dorthea Lang
“Altering life by holding it still.”
Think about that for a moment.
How do you think about what do we do as photographers? Do you keep a thought such as this in your mind when you are making images for clients? When you change the focus of whatever you do in life to be helpful to others, you end up becoming more successful in the process.
This type of thought also should be shared with your potential clients when speaking about making images for them. Another way to say this is preserving memories but changing the phrasing can contribute to making this powerful message. There’s a line from Zig Ziglar. “You can have everything in life you want, if you will just help other people get what they want.” Sometimes people don’t know what they want in photography until it’s too late. The child has grown up too fast. A family member passes away. Things change amazingly fast in this world of ours and being able to freeze an instant of time is a magical gift.
Do you share those thoughts with your clients? Take the “instants” out of time and alter your client’s world for the better.
Yours in Creative Photography, Bob
Save

by successfulbob | Lumix Lounge, macro, photography, photography software
In-Camera Focus Bracketing
Yesterday I shared info on in-camera focus stacking of images captured with the Post Focus Photo Mode in the Lumix GX85. The PFPM is a great feature for getting images from moving objects, quick captures and times where you won’t need to crop into the image very much because the still frames pulled from the video are eight megapixels. Eight megapixels can get you to a twenty-inch print with no problem but when you want to go big it’s time for a new feature built into the camera.
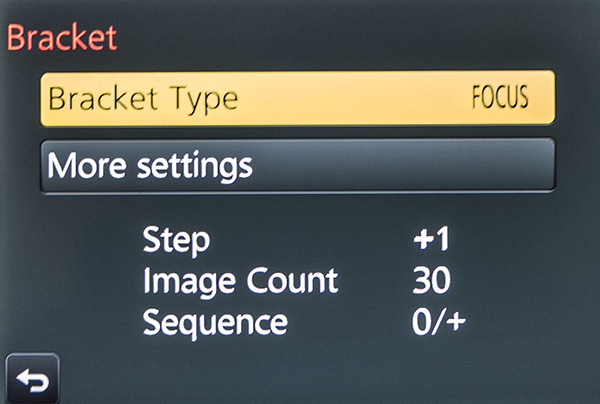
Focus Bracketing is different than the Post Focus Photo Mode in that the camera will be making image captures using the full-size files and changing the focus between each shot automatically. Here’s the screen you will see to set up the capture of multiple images with one push of the button.
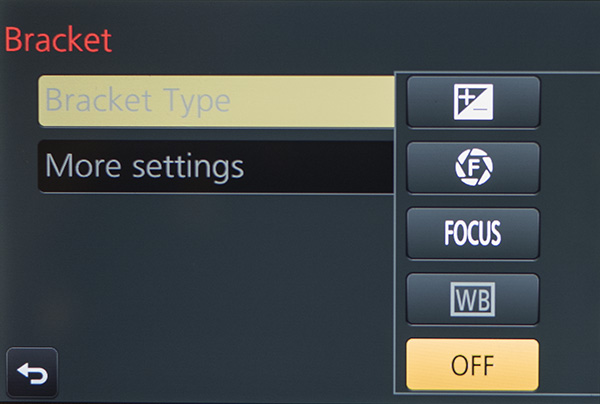 The new Bracket Menu. Options include Exposure Bracketing, Aperture Bracketing, Focus Bracketing and White Balance Bracketing.
 Menu with the Focus Bracket Chosen.
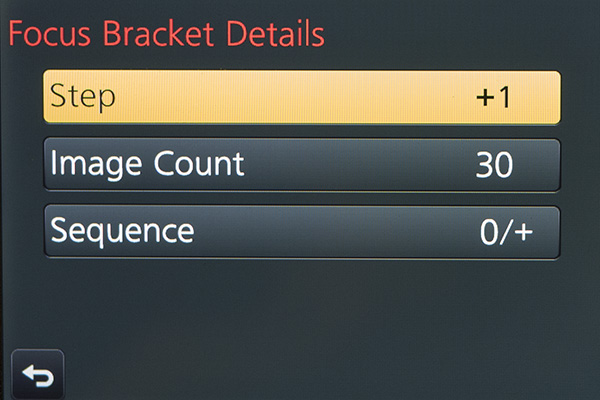 Each one of the menus adds choices. You’ll need to experiment and ‘bracket’ your choices as you learn the results. Step – is the distance that the focus will move on each exposure. Image Count – will be the number of frames made with a single push of the shutter button. You’ll want to ensure there’s enough to cover the scene. Sequence – is the order the images are taken in. Choices are 0/+ to start close and go far (I recommend) or 0/-/+ which will alternate how the bracket is accomplished. I found that Photoshop tends to choke when creating the focus stack using this setting.
Here’s an example of a completed capture and focus stack using Adobe Photoshop taken at Horseshoe Bend just outside Page, Arizona. The Focus Bracketing allowed for a much deeper depth of field in the final image.
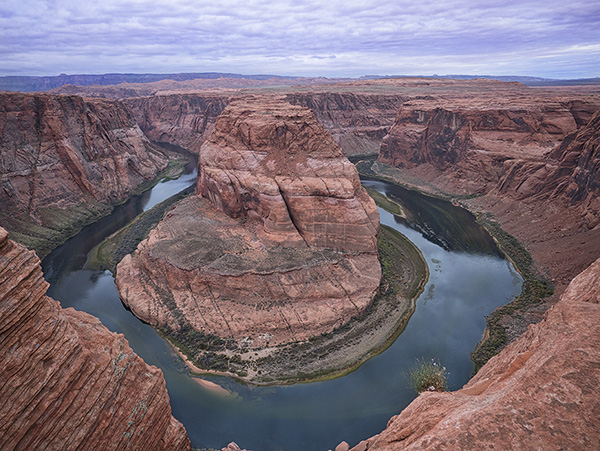 Horseshoe Bend, Page Arizona. The depth of field extends from the near foreground to the far distance.
People ask why do you want to go to all this work? I just set my camera to a smaller aperture like f16 or f22 for deeper depth of field. There is some science that will come into play here. When you use smaller apertures, you will introduce diffraction into your image which will soften the image. There is a sweet spot in lenses between f5.6 and f10, depending upon the lens, that is the absolute best quality the lens can produce. That is the f stop to use when focus stacking. All the sharp areas will be the sharpest and highest quality when combined.
I’ll look at the actual focus stacking technique in a future post using Adobe Photoshop. There are also automatic software solutions like Helicon Focus, Zyrene Stacker, and possibly others for you to check out if you plan to do a lot of stacking.
Til then.
Yours in Creative Photography, Bob
Save
Save
by successfulbob | photography, photography - art quote, photography creativity
Sunday Photo/Art Quote – Ernst Haas
I love today’s Photo/Art Quote because it is hitting very close to home as I explore new ideas. The new explorations have received a head-start because I am always trying new ideas and attending classes, seminars, and conventions to expand my photographic knowledge.
I believe the quest is why I am still a photographer today. Photography is a career that I feel I will never be able to master. There is always a new technique, a different way of applying an old idea, and of course, new technology to learn.
Ernst, take it away.
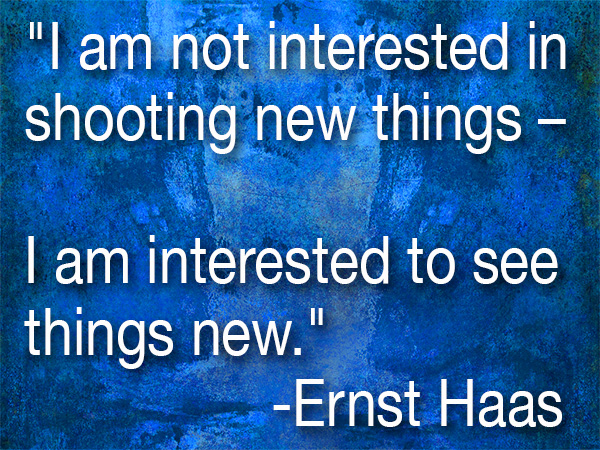
 “I am not interested in shooting new things – I am interested to see things new.” – Ernst Haas
“See things new.” What a great thought. I have started to notice more lighting scenarios as I go about my daily business. Here are a couple of reasons I am noticing new ways of seeing and some thoughts for you.
I just took a Light-Painting class with John Hartman. Watching how he was layering (painting) in the light in tiny sections and then layering those images with thought and finesse to create the final image has me seeing in a new way. It makes you hyper-aware of the play of light on a subject and how you want to portray each little nuance of a scene. This technique also makes you pre-visualize how you want the final image to appear.
Making time-lapse videos has changed the way I watch light as the sun dips toward and below the horizon. It is almost as if I see now in time-lapse form. It’s kind of hard to explain, but if you start creating more time-lapse videos, you’ll start to know what I mean. The benefit to seeing like this is when taking still photographs you’ll have a better idea of the ideal time to snap the shutter.
There are more examples, but I’m done for today… It’s time to head into the studio and make more water droplet splash photos. Starting to see some fascinating things frozen in time. Yet another way to “See things new.”
I like it!
Yours in Creative Photography, Bob
by successfulbob | Lumix G7, Lumix Lounge, macro, photography creativity, photography gear, photography lighting resources
Water Splash Photography Setup
Heads-up here! This is my first foray into photographing water droplets. I’m sharing my current setup, and sure it will change as I learn more and experiment. I am taking you along on my adventure showing you the kind of work I’ve been able to create with this setup. Once again I will share I am no expert with this type of photography. If you’ve got some ideas for me, I’d love to hear them!
This photography is not for the faint of heart. By the way, you CAN do this photography with a couple of Speedlights and in some ways that may be better for more control of the results. I like the variability with the gear which I’ve been working. OK, with the disclaimers out of the way lets look at a water droplet photo and then the layout of all the stuff.
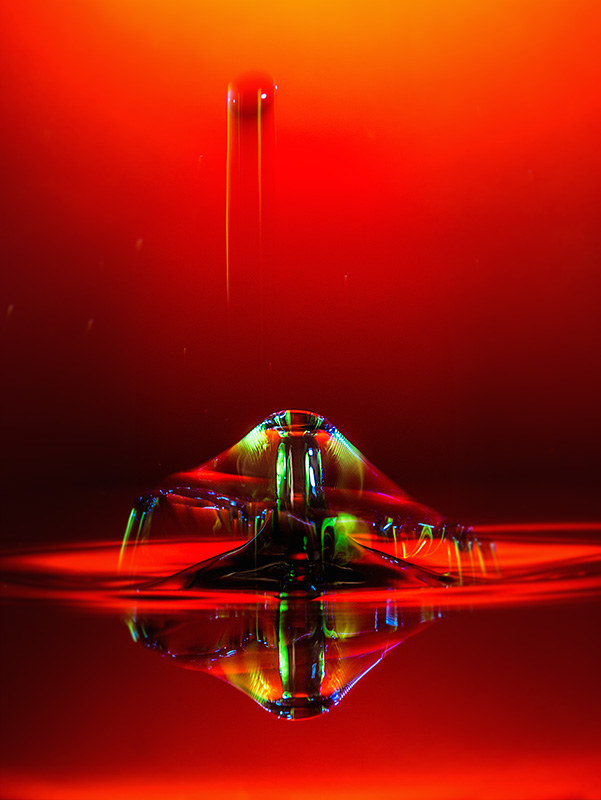
 Photograph achieved with the equipment setup as seen below. Exposures are made at f14 with @ one second ISO 200.
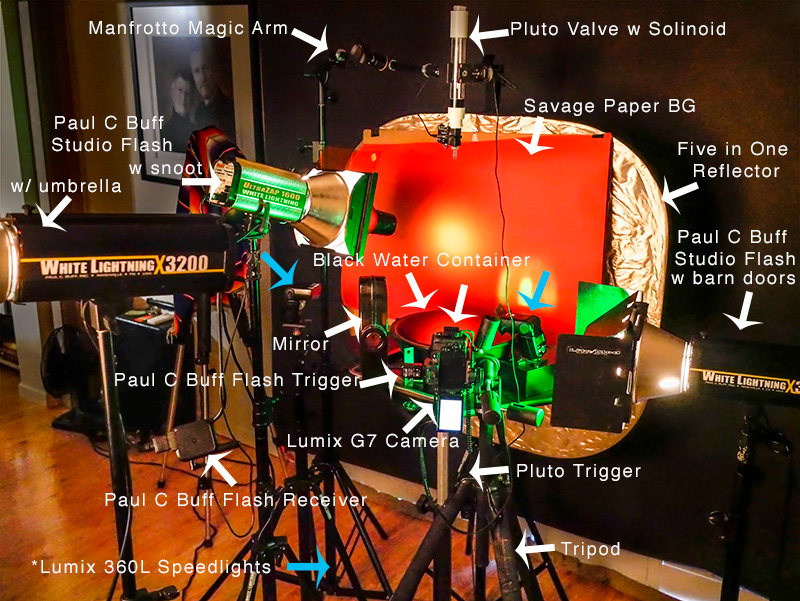 Here’s my gear. I’ll ‘splain below.
I decided to get a little head start on this type of photography by getting some necessary tools. The Pluto Trigger and Pluto Valve can save you a LOT of time. The Trigger is connected to the camera and controls the show. It tells the water drops when to fall. What size they should be and when to trigger the flash. All of these durations are in milliseconds (MS).
Backgrounds are only limited by your imagination. The one showing above is with a colored Savage Paper background. There is a gelled flash with a snoot to vary the light and add interest. With this setup, I have also used a reflective background with a gel over it lit by a flash at various angles and directions. You can use cloth or photos or printed patterns or almost anything you like. As I learn I’m trying to be careful not to overwhelm the waterdrops but we’ll see as I play how that transitions.
I used the Lumix G7 to capture these photos. Lens used was the Vario 35-100mm f2.8 lens with a 10mm or 16mm Vello extension tube. You will need a camera that has a trigger port or can communicate with the Pluto Trigger.
Connected to the camera is a remote flash trigger that fires the flash Paul C Buff flashes from the camera. The Lumix 360L flashes are triggered by the light from the Buff’s because I have them set to Slave Mode. It is the flash that freezes the motion of the water. Adding gels to the flashes adds color and interest to the splashes. In my images, you often see some streaks of color in addition to the frozen droplet. This is because I am using multiple types of flash. The Buff units are not as fast as the Speedlights. And the Speedlights can be of different durations if you change the amount of light you ask them to produce. The lower the power, the shorter the duration of light. Bogen Cine gels Vivid color are juicy. Roscoe gels work well too. You can get gel packs that are just the right size for fitting on your Speedlight. Here’s one from Roscoe holder for the gels.
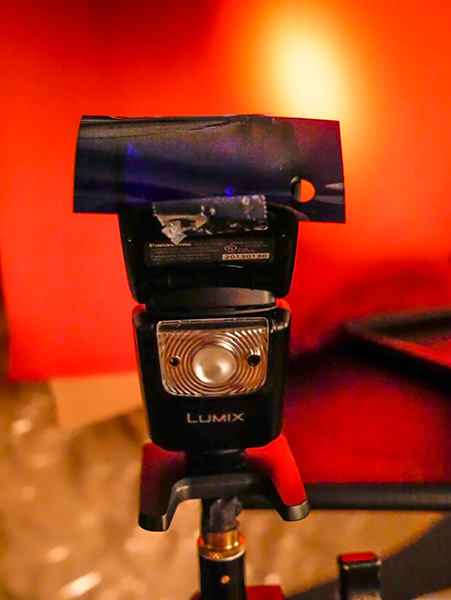 Lumix Speedlight with gel taped in place. Once you see how the gels perform you can also buy larger sheets and cut them to size for larger flashes.
I used a black bowl of water for the reflection. Black allows the color of the background to shine through. Fill the bowl as high as possible, so the edge of it doesn’t show. Science says you can fill a vessel higher than it top because of surface tension. Well, let’s not get into that too far, but as a side note, know that you can put 32 dimes in a shot glass before it overflows after you have filled it with water. Make sure you have a drip tray underneath the bowl or tray to catch any spills as you work.
If you don’t have enough lights, or just want to add another variable, note that you can add a mirror to the set to reflect light back from another direction.
The Manfrotto Magic Arm is extremely helpful in positioning the valve in place over the water. The Manfrotto Super Clamp holds the valve. When you are setting up the position of the water drops, watch where the water drop falls and put something in place to use to set your focus. Remove before shooting.
Working with water droplet photography is like photographing fireworks! You are never quite sure what you are going to get. You get to control the variables but there is never a guarantee and always fun surprises. (well sometimes not so fun but always a learning experience)
If you have any questions, let me know.
Yours in Creative Photography, Bob
Save
