by successfulbob | landscape photography, Lumix FZ 1000, Lumix Lounge, panorama, photography education
During the rainy season here in Arizona it pays to keep a camera nearby and one eye peeled for the ever-changing weather conditions. I was at dinner and noticed a rain shower passing by and thought I’d better go scope it out. I had the Lumix FZ1000 with me when I checked outside to find this rainbow (trying to double-up) from the deck at Sound Bites Grill.
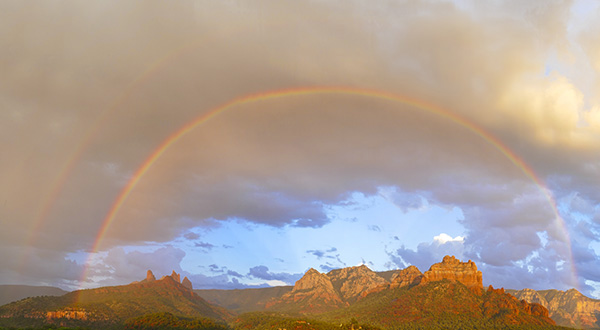
Working on a double rainbow over the red rocks of Sedona
I used the Panorama Mode to capture the entire rainbow. With the FZ1000 I had to make a few passes for this scene because there was nt a lot of detail in the sky for the software to see and stitch. I was wishing for the Lumix GX8 or the G7 as they have new stitching that does a better job in situations like this. The FZ1000 has so many easy options it’s hard not to make it your carry around camera. Next time I’ll grab one of the others and my small Think Tank Mirrorless Mover 20 bag with a couple lenses to add a few more options…
I should also have captured a series of RAW images for later stitching in Photoshop or Autopano Pro. Next time.
Yours in Creative Photography, Bob
by successfulbob | landscape photography, Lumix GX8, panorama, photography
Panorama Photos
I’ll put on my ‘Old Man’ hat here and say, “Back in the day (can you hear the creaky voice??) we had to make notes with a pencil and paper to record what lens was used, and the settings on the camera like Aperture and shutter speed. We knew the ISO ’cause that was on the film.”
OK. you probably already know I’m a fan of the in-camera panoramic format with the Lumix line of cameras. Well I gotta tell ya’ they’ve made it even better. Must be some new math working but you can make your panoramas longer and the stitching is even better than before in the G7 and the GX8.
I’m stoked!
My wife and I went out to dinner tonight and I slipped out for a couple minutes as the scene was unfolding with some nice light. I dialed the GX8 to the pano setting and opened up one stop of exposure compensation to keep the shadows from blocking up since there was so much sky in the image. In Adobe Photoshop I added a Soft Light Layer to gently burn the top ot the sky back in just a bit. Here’s the result.
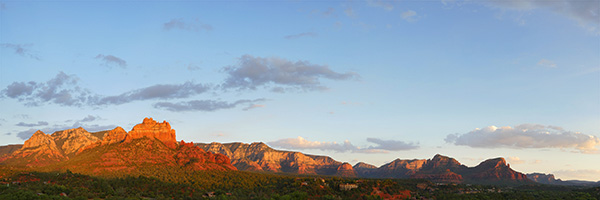
Red rock view from Sound Bites Grill in Sedona, Arizona at sunset. Camera and lens information below.
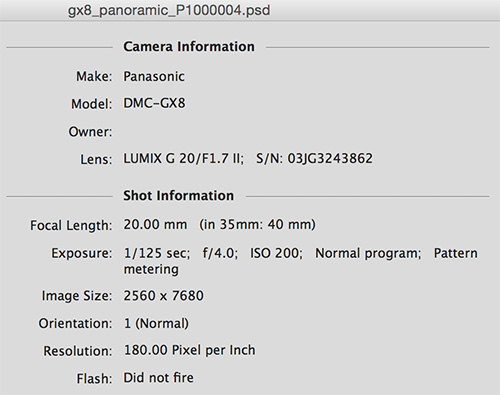
One of the best pieces of information we have as photographers today is the metadata secured in the file for all of our images.
This information is accessed in Photoshop by going to File > File Info >Camera Data. This info makes it possible to understand settings and study how to make our images more consistent and to make situations repeatable as we understand more how our camera’s work.
Yours in Creative Photography, Bob
by successfulbob | cloud photography, Lumix G7, Lumix Lounge, panorama, photography
I dig clouds!
This time of year Arizona can lay out a pretty nice palette for us to enjoy. It’s called monsoon season and thunderheads will pop up in the afternoon and put on a show. I gather all kinds of cloud formations for use in my artwork. I decided to challenge the Lumix G7 (new baby brother to the GH4) to see how well it could do in capturing some panoramic photos of the sky in camera. In the past I’ve found that sometimes the lack of definition in sky scenes made it difficult and I would find stitching errors there occasionally. So I shot some soft cloud formations and some harder edged formations and here’s what happened…

I really thought that the camera might have problems with the lack of definition with this panoramic cloud capture. No problem at all!

Overall did a great job on this one. There was one small area on the left that I had to look hard to find a small stitching error that was easily rectified with the Patch Tool from Adobe Photoshop

Here was another that had an error. It was off to the right and was in the transition area from bright clouds to very dark clouds. After a quick crop this is what’s left.

And, not to forget that the camera can create panoramas in different directions. No stitch errors on this or about 10 other files I let the G7 create.
My overall thoughts on the new panorama stitching in the G7 gets high marks. I always recommend using good camera technique. I point my body to the direction where I want to end up. Then using stomach muscles turn back to the start of the panorama and slowly pivot using the stomach to make the movement to capture the image. If it is a very important pano I will always shoot it several times just in case. Many times an in camera stitching error can be traced to operator error of not capturing the scene smoothly. Even though you can play back the panoramic image at a larger size on the camera you might miss small errors that wouldn’t show up in another pass with the camera.
Yours in Creative Photography, Bob
by successfulbob | landscape photography, Lumix GH4, Lumix Lounge, panorama, photography, photography education, photography gear
Sometimes you just want more pixels in an image.
Do you have to buy a new more expensive camera? Nope. You just have to learn how to sew… I mean stitch.
Basically even with the 16MP micro 4/3rds chip we are working with in the Lumix line of cameras we have multi-megapixel (like 100MP plus) cameras in our hands if we take multiple images and overlap them. Here is an example.

This is 13 images overlapped with the camera held in the vertical orientation. This file comes in at 385MB after processing in Photoshop.
I could easily print this image 26 inches by 158 inches. That’s about 2 feet by 13 feet!

Here’s another version with 2 rows of 10 images overlapped with camera held in vertical orientation. This file is almost 400MB after processing. Could easily be printed to 3 feet by 10 feet…
This technique can be used with large group portraits, architecture and any stationary subjects.
Images were captured with the Lumix GH4 and the Lumix Vario 35-100mm f2.8 lens at ISO 200 f10 1/320th sec. The built in level on the GH4 helps to keep the horizon straight during this hand held capture to make the panorama stitching easier in the software. My overlap of individual images is about 30%. Any less than that and you’ll tend to find stitching errors in the final image.
So you’ve heard the expression “Go big or go home!” Now you can with whatever gear you are working with….
Yours in Creative Photography, Bob
PS – using links on this site to make your gear purchases help to support this web site and the education being shared. Thanks in advance!
by successfulbob | architectural photography, black & white, fine art photography, landscape photography, Lumix GH3, Lumix GX7, Lumix Lounge, panorama, people photography, photography, photography education
I compete to stretch my photography skill set in order to keep growing and to get some feedback from my peers on how my work is stacking up.
This year I received a more than pleasant surprise as my most successful ever in imaging competition at Professional Photographers of America International Photographic Competition. I will be awarded the Diamond Photographer of the Year for my Master Artist entries and The Silver Photographer of the Year for my entries in the Photographic Open case.
I also inadvertently answered another question that comes my way from fellow photographers when referencing the Lumix line of Micro 4/3rds mirrorless cameras… Is the chip big enough? Is there enough quality to use this camera for professional work? The answer is a resounding, “You betcha!”.
I entered eight images overall. Seven were captured with various Lumix cameras. Five images were accepted into the PPA’s prestigious Loan Collection. Variety was the watchword with the entries including a portrait, art images, architecture and a scenic.
Here are the images from the Master Artist case in which judges are looking for the skills involved in post production. Guide images are used to show some of the process going from RAW capture to finished product. These images earned the Platinum Photographer of the Year designation which will be awarded in Nashville at the PPA convention.

‘Horn in F’ original image captured with Lumix GH2. Textures with Lumix GH2 & Lumix GH3.
Used my ‘Step & Repeat” Photoshop action to make multiple copies of the French Horn. Images were copied, rotated and multiple texture layers in various blend modes were used to complete the art.

‘Musical instruments Museum’ original image captured with Lumix GH2. See above description for technique.

‘Nautilus’ original captured with the Lumix GX7. The blossom was isolated and
copied, resized and manipulated multiple times to create the Nautilus shape.

‘Thistle’ image captured with 5D Mark II using Helicon focus and focus stacking then worked with textures and color.
Here are the Four images submitted in the Photographic Open category. Three were accepted into PPA’s General Collection with one image admitted into the Loan Collection leading to the Platinum Photographer of of the Year Award which will be given at the PPA annual convention in February. If you a not already a PPA member it’s a great idea. If you join you can go to the convention for free in Nashville next year.

‘Rooftop View’ captured with Panasonic Lumix GH2. NIK Color FX Pro was used along with textures, blend modes and layer masks.

‘Sedona, Arizona Panorama’ Captured with Lumix GH3. Multiple images stitched together in AutoPano Pro then some NIK Color FX Pro to enhance the depth and dimension.

‘Still the One’ Captured with Lumix GH3. Converted to sepia tone with partial spot color mask for the flag.

‘Santa Fe Street Portrait’ Captured with Lumix GX7 a great street camera with a very low profile and lots of features I really enjoy. It’s my favorite “With Me” Camera. Converted to Black and white using NIK Silver Effects Pro 2.
When I first started working with the Micro 4/3rds format I was a little concerned about sensor size but as the new Panasonic cameras and pro glass were introduced I was able to put those fears aside and now I’m exclusively using the format for all my commercial and fine art work including architecture, product, portraits, fine art imagery and more. Is this the be all and end all format for every photographer and every need?? No, of course not! I’ve found it fits my working style and as long as my customers and I are pleased with the final results that’s what matters.
Questions? Give me a shout.
Yours in Creative Photography, Bob
PS Just in case you haven’t read my disclaimer section I am a Panasonic Lumix Luminary and I travel around the country teaching photography with them as my sponsor. If you would like me to come teach at your photography organization get in touch my contact info is at the top of the page.
by successfulbob | landscape photography, Lumix GX7, Lumix Lounge, panorama, photography, photography education
Been enjoying the hikes more and more. This is on the Templeton Trail along Oak Creek in Sedona, Arizona. With the Lumix GX7 camera so light I’ve got it with me all the time… No excuse for seeing something I want to share and not having a camera at hand…
Used the Panorama setting to get in more of the creek view I was seeing.
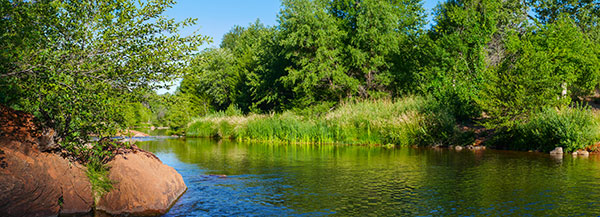 From the Templeton Trail Near Cathedral Rock.
Lens 35-100 f2.8 Vario at 35mm. Camera was held in the vertical position to get a taller file while still maintaining the panoramic photo dimensions. ISO 200 Exposure Settings – 1/640 sec. F 4.5 (pre-set by the camera) More panoramas and information on shooting panoramas here. https://chd.lzi.mybluehost.me/panoramic-photo-red-rocks
Hit the trails or hit the streets it’s a great time to be making images…
Yours in Photography, Bob


