by successfulbob | photographers health
High Intensity Interval Training…
That sounds pretty intense. “No way I want to do something like that!” I know that’s what I was thinking when looking for a workout program that would fit my schedule yet still be helpful in getting me fit.
ALERT ALERT! *Lawyers type notice. I am not a health expert. I didn’t even think about staying in a Holiday Inn Express last night either. I recommend you see a doctor before adding any type of exercise to your daily activities. Also when you first start any new exercise routine you should either get together with an athletic trainer or physical therapist to ensure you are doing any exercises with the proper form. It doesn’t do any good to do the exercises wrong and hurt yourself. Understood?
OK, that’s out of the way I’ll tell you how I’m putting my workouts together.
After poking around the World Wide Web for ideas one kept popping up that seemed like it might be very doable. The Seven Minute Workout. You’ll find lots of variations out there but the APP The Official 7 Minute Workout from Johnson & Johnson is the one I choose.
 Screen grab from the 7 Minute workout page.
This what your workout instructor looks like on the screen of your device.
Cool part of this system is you don’t need any fancy equipment or go to a gym. You need your body. A room. A chair. Smart phone or Ipad. A clear wall. And, maybe an exercise mat if you have a hard floor. As you exercise with the program it tells you the moves you’ll be making. Times you through 30 seconds of the movements then gives you 10 seconds of rest and moving into position for the next exercise and starts you with a new 30 second clock and repeats until you’ve done the full set of 12 exercises.
7 minutes? OK that sounds a little too good to be true… It is. In order to really benefit from the program you should do the cycle three times in a row. And it will walk you through all of that. It will also track your progress with feedback from you and as this set of exercises becomes too easy it will set you up with more advanced exercises and sequences.
Here’s a link to a New York Times article about the program.
I highly recommend trying this out! (after you have seen your doctor!)
It’s easy. It eases you to deeper levels of workout. It’s super portable and there’s no investment except for the time you put in. I recommend you make it part of your daily routine and pretty soon when you miss doing your morning exercise for some reason, you’ll really miss it. Here’s to your health!
Yours in Photography, Bob
by successfulbob | photographers health, photography, photography education, success education
Thanks for checking these posts about our health working as photographers. Let me remind you I am not advocating that you follow blindly anything I share here. These are ideas and programs that are working for me. I have found most of these to also be regular problems for other photographers too. Consult with a physician or do your own research before embarking on any ideas shared here in this or other Photographers Health posts.
I reiterate – I am not a medical professional. I don’t play one on TV. I didn’t even stay at a Holiday Inn Express last night…
Photographers Health – Computers Part 2
Once the work station is properly set up we need to work on our habits while sitting in front of our machines. Regular breaks are a necessary part of good work health. But, you say, “Bob, I take breaks all the time!” I’ll bet you don’t take near as many or effective breaks as you think you are. If you are anything like me you can get lost in a project and hours can pass in what seems like a moment. That’s a good thing. Concentration is great. It’s also a bad thing as we have not moved our bodies properly for a long period of time.
OK. Time for a little experiment with time.
Download a Countdown Timer. Here are five available for Windows OS’s that are free. I use the Apimac timer freeware version on my MAC machine. You need OS 10.6 and an Intel chipped computer for this software. There is also a pro version for under twenty bucks that will also turn your computer on and off schedule down and other stuff too.
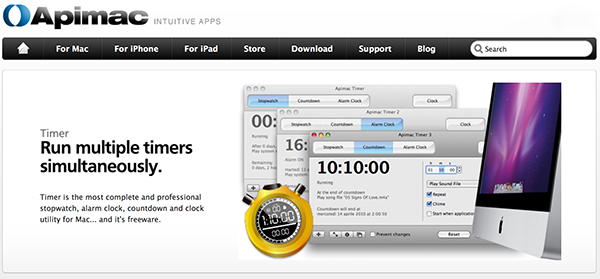 Apimac Software Timer for Mac
Now that you’ve found and installed your timer set it to countdown for thirty minutes repeatedly for all the time you are at your computer. Most timers have a way to pause or restart the timer as necessary. What you will find is constant surprise that, “It’s been 30 minutes already?” Yep it will!
OK now how do we make this work for us? Every time the timer goes off do one to three minutes of stretching and or exercise. I mix mine up throughout the day. I’ll do a minute of jumping jacks with 30-60 seconds of stretching shoulders. On the next thirty minute cycle maybe do 5-10 push-ups and stretch wrists and elbows. On the next cycle get up and walk around while reaching behind and stretching chest muscles. I try to mix a little aerobic movement with some stretching while changing it up throughout the day. This gets the blood flowing and saves you from the dreaded RSI! Physiotherapists have a name for what happens when you don’t get off your butt and do this stuff. Repeatetive Stress Injury. If you are already experiencing pain see a Physician or Physical Therapist for a set of specialized exercises to get your body back on track. Then use the timer. You’ll be amazed how much better you feel at the end of the work day.
Ideally You’ll be looking to work up to thirty minutes a day of the exercise, walking and stretching. Keep some notes and see how you do. You’d be surprised how fast it starts to add up.
What else?
If you spend time on the phone while you work make sure you get a hands free head set to keep you from sticking the phone in the crook of shoulder and neck. That will keep you from crinking (yes that’s my word) up your neck.
As mentioned in a previous Photographers Health post here on Successful-Photographer use a Pen Tool with a Tablet vs a Mouse for making your selections and navigating around the screen. At the very least if you still are using a mouse make sure it’s a good quality mouse that requires minimal pressure to click, and be sure to position it on the same level and as close to the keyboard as possible. Keep your wrist straight and move the mouse with whole arm movements where possible.
What else?
 Get the proper eye wear for your eyes and your body’s health
Don’t be a squinter! If you have any problem viewing the screen break down and get those glasses! See your optometrist for the best results instead of getting cheaters at the drug store. It can make a huge difference. Before you go in for your eye appointment measure the distance to the screen from where your eyes are regularly. Your prescription can be tailored exactly for that distance. Ask for UV protection on the lenses. You might even want to have a pair of glasses fine tuned just for the computer and another pair for the rest of your life. You may especially want to do that if you wear bifocals or trifocals because there’s a tendency to hold your head in a strange position to use the proper section for seeing the screen. Or you bend toward the screen in order to see it clearly. These postures can result in muscle spasms or pain in the neck, shoulder or back. To prevent eyestrain, try to rest your eyes when using the computer for long periods. Rest your eyes for 15 minutes after two hours of continuous computer use. Also, for every 20 minutes of computer viewing, look into the distance for 20 seconds to allow your eyes a chance to refocus. To minimize chances of developing dry eye when using a computer, make an effort to blink frequently. Blinking keeps the front surface of your eye moist.
Back to the equipment – you should have a shield around your monitor to ensure there is no glare on the surface which can adversely affect your eyes causing strain.
I hope the Photographers Health posts this week have been helpful for you. Other ideas? Jump in and comment!
Yours in Photography, Bob
by successfulbob | photographers health, photography, photography education, photography gear, success education
This will be a new series of posts about our health working as photographers. Let me preface this by saying I am not advocating that you follow blindly anything I share here. These are ideas and programs that are working for me. I have found most of these to also be regular problems for other photographers too. Consult with a physician or do your own research before embarking on any ideas shared here in this or other Photographers Health posts.
I reiterate – I am not a medical professional. I don’t play one on TV. I didn’t even stay at a Holiday Inn Express last night…
Computer Work Station Practices for Photographers
We spend an awful lot of time at our computers these days and that can be a severe health issue in and of itself. We hold ourselves in odd positions for long periods of time. We don’t move enough thereby putting ourselves at risk for back and neck issues, carpel tunnel syndrome and more.
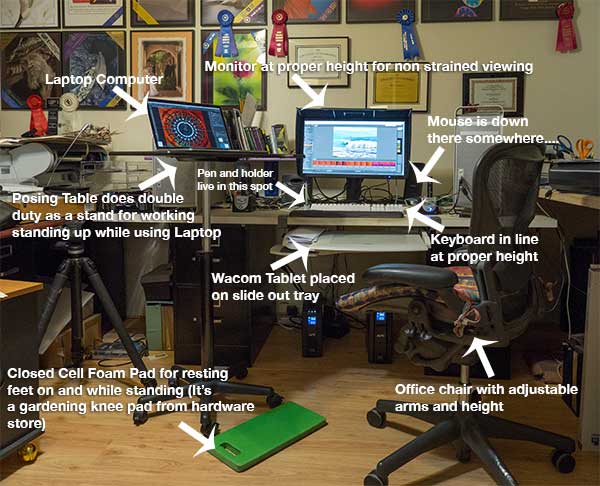 My work station at Bob Coates Photography.
Here’s how I’ve started to take back my health from the computer station.
Here’s a place to find good set up information for your work station. OSHA gets you moving in the right direction.
A quick review of the important stuff.
• Top of the monitor at or just below eye level.
• Head and neck balanced in line with your torso. (You might want to get someone to watch you while you work to make sure you are in a correct position. If no one is around to help you set up a video camera and watch yourself for a while you might be surprised by what you see.
• Elbows close to your body and supported.
• Some support for your lower back.
• Wrists and hands in line with your forearms
• Plenty of room for your keyboard and tablet.
• Feet flat on the floor
Here’s a link to a more in-depth checklist for good practices and to see how your current workspace is helping or hurting you.
As photographers we have an additional piece of equipment to work with that is not addressed in the guidelines above, a tablet. If you are not already using a tablet for your work I’d put it high on your list. “But Bob, I tried a tablet and I can’t get used to it. I hate it!” “No Excuse!” I reply. The way to fall in love with your tablet is to hook it up. Make sure the settings are correct for the click and double-click sensitivity and pen pressure. Yes there are settings and preferences and ways to test all that before you get started. Most who don’t like a tablet didn’t realize that this machinery is also software driven to customize your experience. Once you’ve got the settings correct for you disconnect your mouse for four to five days. By the end of that time you will be an old pro and realize not only the health benefits of not having your hand in an awkward position trying to make selections with your mouse leading to possible Carpel Tunnel Syndrome, but the time savings. Where you put the pen on the tablet is where your Curser will appear. This seems to be one of the most difficult things for newbies on the tablet to grasp. You don’t drag your Curser from place to place. You put your pen where you want it to be. Very cool.
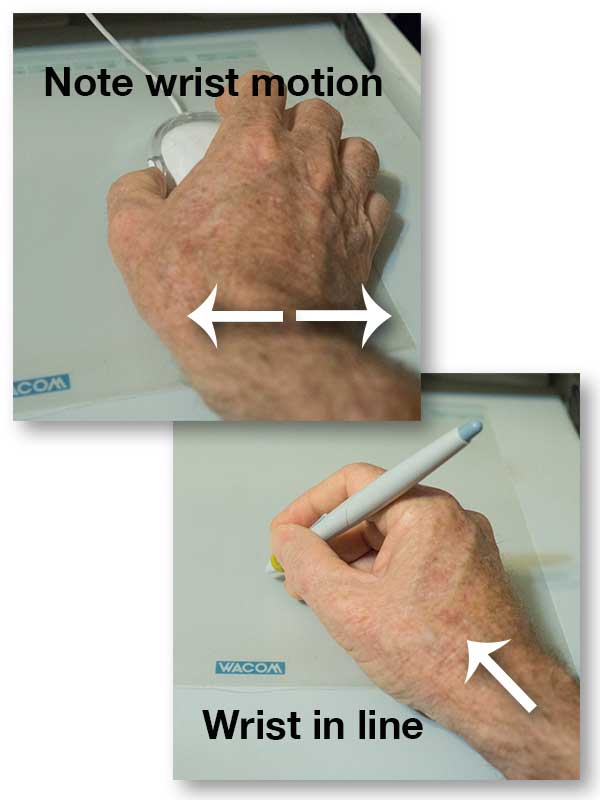 When you use a mouse you do a lot of work moving your wrist back and forth. When using the pen tool your wrist is held in a more neutral position using your arm and fingers to do more of the work making it much easier to make selections. This is a classic tablet I bought well over ten years ago. They design them a bit more sexy these days!
My tablet of choice over the years has been the Wacom brand. They have all different types, sizes and styles of tablet at different price points to meet every need and every budget. That sounds like an ad but it’s not. It’s an industry standard piece of equipment. I have a larger Wacom Tablet for my work station in the office that I bought a bunch of years ago and a smaller one for when I teach on the road with my laptop. If you have a question about which might be best for you drop me an email with info on the type of work you do, how long you do it, in the office? on the road? etc… and I’ll give you some ideas.
I mount my tablet on a roll-out tray so it is right in front of me. My keyboard is on the desktop right in line and above that and the monitor straight above that.
This is probably enough info for today. This has definitely turned into a two part post! In the next installment I share more ideas on staying healthy while working on your computer. Please don’t hesitate to share your ideas here too!
Yours in Photography, Bob